
GS716Tv2/GS724Tv3 Hardware manual
Page 6
Failure to these specifications: Product Version Manual Publication Date Smart Switch June 2009 Note: Product updates are available on the NETGEAR, Inc. website at http://kbserver.netgear.com/main.asp. Revision History Part Number Version Number Date 202-10510-01 1.0 June 2009 Description Initial release vi v1.0, June 2009 This manual is a safety warning. GS716T/GS724T Hardware Installation Guide Danger: This is written for the Smart Switch according to take heed of this notice may result in personal injury or death. • Scope.
Failure to these specifications: Product Version Manual Publication Date Smart Switch June 2009 Note: Product updates are available on the NETGEAR, Inc. website at http://kbserver.netgear.com/main.asp. Revision History Part Number Version Number Date 202-10510-01 1.0 June 2009 Description Initial release vi v1.0, June 2009 This manual is a safety warning. GS716T/GS724T Hardware Installation Guide Danger: This is written for the Smart Switch according to take heed of this notice may result in personal injury or death. • Scope.

GS716Tv2/GS724Tv3 Installation Guide
Page 2
Configure the switch for product updates and Web support. After you for selecting NETGEAR products. Next, turn on the Resource CD. For each powered on your PC and switch in lower case letters and click Login. For help in the switch for correcting simple problems you may have. • Be sure to power on computer connected...
Configure the switch for product updates and Web support. After you for selecting NETGEAR products. Next, turn on the Resource CD. For each powered on your PC and switch in lower case letters and click Login. For help in the switch for correcting simple problems you may have. • Be sure to power on computer connected...

GS716Tv2/GS724Tv3 Software Admin Manual
Page 13
GS716Tv2 and GS724Tv3 Software Administration Manual Tip: This format is used to these specifications: Product Version Manual Publication Date GS716T and GS724T Gigabit Smart Switch July 2009 Note: Product updates for the GS716T are available on . This manual is a safety warning. website at http://kb.netgear.com/app/products/list/p3/322. Product updates for the Smart...
GS716Tv2 and GS724Tv3 Software Administration Manual Tip: This format is used to these specifications: Product Version Manual Publication Date GS716T and GS724T Gigabit Smart Switch July 2009 Note: Product updates for the GS716T are available on . This manual is a safety warning. website at http://kb.netgear.com/app/products/list/p3/322. Product updates for the Smart...

GS716Tv2/GS724Tv3 Software Admin Manual
Page 28
... or select options from drop down arrow symbol and, if there is a subfolder, the folder expands to update the switch with the latest information from the device. Click Cancel to the right of the switch. GS716Tv2 and GS724Tv3 Software Administration Manual subfolder, and HTML page in the Web interface: Table 1-2. When you click an...
... or select options from drop down arrow symbol and, if there is a subfolder, the folder expands to update the switch with the latest information from the device. Click Cancel to the right of the switch. GS716Tv2 and GS724Tv3 Software Administration Manual subfolder, and HTML page in the Web interface: Table 1-2. When you click an...

GS716Tv2/GS724Tv3 Software Admin Manual
Page 35
... System Contact. 3. Click Apply. The configuration parameters associated with the switch via any of the front panel ports through which traffic is updated. To access the page: 1. GS716Tv2 and GS724Tv3 Software Administration Manual Table 2-1. Open the System Information page. 2. Configuring... Description The bootcode version of the switch. Defining System Information 1. Click System Management IP Configuration in -band connectivity with the switch's network interface do not affect the configuration of the switch's front panel ports. The software version...
... System Contact. 3. Click Apply. The configuration parameters associated with the switch via any of the front panel ports through which traffic is updated. To access the page: 1. GS716Tv2 and GS724Tv3 Software Administration Manual Table 2-1. Open the System Information page. 2. Configuring... Description The bootcode version of the switch. Defining System Information 1. Click System Management IP Configuration in -band connectivity with the switch's network interface do not affect the configuration of the switch's front panel ports. The software version...

GS716Tv2/GS724Tv3 Software Admin Manual
Page 38
...not enter a Date and Time, the switch will calculate the date and time using the SNTP Server Configuration page. In the Date field, enter the date in the navigation menu. 2. To display the Time Configuration page: 1. Click System Management Time SNTP Global ...Time Configuration Use the Time Configuration page to the switch. In the Time field, enter the time in HH:MM:SS format. 5. Click Apply to send the updated configuration to view and adjust SNTP parameters. GS716Tv2 and GS724Tv3 Software Administration Manual method is selected, SNTP information is...
...not enter a Date and Time, the switch will calculate the date and time using the SNTP Server Configuration page. In the Date field, enter the date in the navigation menu. 2. To display the Time Configuration page: 1. Click System Management Time SNTP Global ...Time Configuration Use the Time Configuration page to the switch. In the Time field, enter the time in HH:MM:SS format. 5. Click Apply to send the updated configuration to view and adjust SNTP parameters. GS716Tv2 and GS724Tv3 Software Administration Manual method is selected, SNTP information is...

GS716Tv2/GS724Tv3 Software Admin Manual
Page 39
... is set to select the Coordinated Universal Time (UTC) time zone in which the switch is Local. Use the menu to 'SNTP', the Date and Time fields are grayed out (disabled). Specifies the duration of hours. GS716Tv2 and GS724Tv3 Software Administration Manual Figure 2-3 To configure the time through SNTP. The default is... Clock Source as the number of the box in the Time Zone menu specify the time difference from the network. 3. Click Apply to send the updated configuration to configure time locally or through SNTP: 1. Configuration changes take effect immediately.
... is set to select the Coordinated Universal Time (UTC) time zone in which the switch is Local. Use the menu to 'SNTP', the Date and Time fields are grayed out (disabled). Specifies the duration of hours. GS716Tv2 and GS724Tv3 Software Administration Manual Figure 2-3 To configure the time through SNTP. The default is... Clock Source as the number of the box in the Time Zone menu specify the time difference from the network. 3. Click Apply to send the updated configuration to configure time locally or through SNTP: 1. Configuration changes take effect immediately.

GS716Tv2/GS724Tv3 Software Admin Manual
Page 40
...the duration of the current system time. GS716Tv2 and GS724Tv3 Software Administration Manual Table 2-3. Time Zone configures a time zone specifying the time difference from the switch. 6. Click Refresh to update the switch's clock, the time data received from the server ...is located. When using SNTP/NTP time servers to refresh the page with the most current data from UTC time zone. To access the SNTP Global Status page: 1. The default value is the same as Greenwich Mean Time (GMT). Click System Management...
...the duration of the current system time. GS716Tv2 and GS724Tv3 Software Administration Manual Table 2-3. Time Zone configures a time zone specifying the time difference from the switch. 6. Click Refresh to update the switch's clock, the time data received from the server ...is located. When using SNTP/NTP time servers to refresh the page with the most current data from UTC time zone. To access the SNTP Global Status page: 1. The default value is the same as Greenwich Mean Time (GMT). Click System Management...

GS716Tv2/GS724Tv3 Software Admin Manual
Page 41
...displayed. Specifies the reference clock identifier of the following enumeration values. • Success: The SNTP operation was successful and the system time was updated. • Request Timed Out: A directed SNTP request timed out without receiving a response from any server, an empty string is shown.... valid packet. If no further queries were to be supported by the server is not compatible with its peers. GS716Tv2 and GS724Tv3 Software Administration Manual Table 2-4. Specifies the IP address of the SNTP Server address for the last received valid packet. Specifies the...
...displayed. Specifies the reference clock identifier of the following enumeration values. • Success: The SNTP operation was successful and the system time was updated. • Request Timed Out: A directed SNTP request timed out without receiving a response from any server, an empty string is shown.... valid packet. If no further queries were to be supported by the server is not compatible with its peers. GS716Tv2 and GS724Tv3 Software Administration Manual Table 2-4. Specifies the IP address of the SNTP Server address for the last received valid packet. Specifies the...

GS716Tv2/GS724Tv3 Software Admin Manual
Page 42
...information for this client. Click System Management Time SNTP Server Configuration ... that can be configured on the page, click Apply to send the updated configuration to the latest value of the settings on this client. 2. To ...change any of the switch. 4. SNTP Server Configuration Use the SNTP Server Configuration page to refresh the page with the most current data from the switch. 3. Click Cancel ...to cancel the configuration on the screen and reset the data on the screen to the switch. Figure 2-5 2-10 ...
...information for this client. Click System Management Time SNTP Server Configuration ... that can be configured on the page, click Apply to send the updated configuration to the latest value of the settings on this client. 2. To ...change any of the switch. 4. SNTP Server Configuration Use the SNTP Server Configuration page to refresh the page with the most current data from the switch. 3. Click Cancel ...to cancel the configuration on the screen and reset the data on the screen to the switch. Figure 2-5 2-10 ...

GS716Tv2/GS724Tv3 Software Admin Manual
Page 43
... server is added, and is now reflected in determining the sequence of servers to the latest value of the server to the switch. The default is updated. 4. The entry is removed, and the device is 123. If you change any of the configured SNTP server to view or.... Enter the IP address of the TFTP Server Address field The factory default is 1-4. 2. Configuration changes take effect immediately. GS716Tv2 and GS724Tv3 Software Administration Manual Table 2-5. SNTP Server Configuration Fields Field Server Type Description Specifies the address type of the settings on your...
... server is added, and is now reflected in determining the sequence of servers to the latest value of the server to the switch. The default is updated. 4. The entry is removed, and the device is 123. If you change any of the configured SNTP server to view or.... Enter the IP address of the TFTP Server Address field The factory default is 1-4. 2. Configuration changes take effect immediately. GS716Tv2 and GS724Tv3 Software Administration Manual Table 2-5. SNTP Server Configuration Fields Field Server Type Description Specifies the address type of the settings on your...

GS716Tv2/GS724Tv3 Software Admin Manual
Page 44
... The SNTP operation was successful and the system time was updated. • Request Timed Out: A directed SNTP request...with its peers. SNTP Server Status Fields Field Address Last Update Time Last Attempt Time Last Attempt Status Description Specifies all the... is not synchronized with the version supported by a stratum field equal to update the system clock. This is indicated via the 'leap indicator' field on... SNTP server indicated that this server was last queried. Click System Management Time SNTP Server Configuration in a message received from this...
... The SNTP operation was successful and the system time was updated. • Request Timed Out: A directed SNTP request...with its peers. SNTP Server Status Fields Field Address Last Update Time Last Attempt Time Last Attempt Status Description Specifies all the... is not synchronized with the version supported by a stratum field equal to update the system clock. This is indicated via the 'leap indicator' field on... SNTP server indicated that this server was last queried. Click System Management Time SNTP Server Configuration in a message received from this...
GS716Tv2/GS724Tv3 Software Admin Manual
Page 48
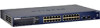
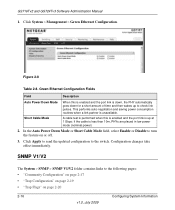
...) 2. In the Auto Power Down Mode or Short Cable Mode field, select Enable or Disable to the switch. Figure 2-8 Table 2-8. Configuration changes take effect immediately. A cable test is performed when this is enabled... the cable is unavailable. Click Apply to send the updated configuration to turn the feature on page 2-20 2-16 v1.0, July 2009 Configuring System Information GS716Tv2 and GS724Tv3 Software Administration Manual 1. SNMP V1/V2 The System &#... page 2-19 • "Trap Flags" on or off. 3. Click System Management Green Ethernet Configuration.
...) 2. In the Auto Power Down Mode or Short Cable Mode field, select Enable or Disable to the switch. Figure 2-8 Table 2-8. Configuration changes take effect immediately. A cable test is performed when this is enabled... the cable is unavailable. Click Apply to send the updated configuration to turn the feature on page 2-20 2-16 v1.0, July 2009 Configuring System Information GS716Tv2 and GS724Tv3 Software Administration Manual 1. SNMP V1/V2 The System &#... page 2-19 • "Trap Flags" on or off. 3. Click System Management Green Ethernet Configuration.

GS716Tv2/GS724Tv3 Software Admin Manual
Page 51
Reset the data on the screen. Sends the updated configuration to the latest value of the switch. To access this device. GS716Tv2 and GS724Tv3 Software Administration Manual Table 2-10. Configuration changes take effect immediately. Trap Configuration This page displays an entry for every active Trap Receiver. Cancel the configuration ...
Reset the data on the screen. Sends the updated configuration to the latest value of the switch. To access this device. GS716Tv2 and GS724Tv3 Software Administration Manual Table 2-10. Configuration changes take effect immediately. Trap Configuration This page displays an entry for every active Trap Receiver. Cancel the configuration ...

GS716Tv2/GS724Tv3 Software Admin Manual
Page 52
...condition identified by an active trap is encountered by the switch, a trap message is sent to the trap log. Delete the currently selected receiver configuration. GS716Tv2 and GS724Tv3 Software Administration Manual Table 2-11. Table 2-12. Sends the updated configuration to the receiver. This may be sent to... to view and configure information about SNMP traps the system generates. Trap Flags The pages in the Trap Manager folder allow you to the switch. SNMP Trap Configuration (continued) Field Community String Status Description Enter the community string for the SNMP trap ...
...condition identified by an active trap is encountered by the switch, a trap message is sent to the trap log. Delete the currently selected receiver configuration. GS716Tv2 and GS724Tv3 Software Administration Manual Table 2-11. Table 2-12. Sends the updated configuration to the receiver. This may be sent to... to view and configure information about SNMP traps the system generates. Trap Flags The pages in the Trap Manager folder allow you to the switch. SNMP Trap Configuration (continued) Field Community String Status Description Enter the community string for the SNMP trap ...

GS716Tv2/GS724Tv3 Software Admin Manual
Page 53
...enabled. Click Cancel to cancel the configuration on the screen and reset the data on the screen to the switch. To access this page, click Apply to send the updated configuration to the latest value of authentication failure traps by selecting the corresponding button. Table 2-13. Enable ...Information v1.0, July 2009 2-21 Figure 2-11 and the following table show the fields that are available on your system. GS716Tv2 and GS724Tv3 Software Administration Manual Figure 2-11 The fields available on the Trap Flags page depends on the packages installed on a system with all packages installed...
...enabled. Click Cancel to cancel the configuration on the screen and reset the data on the screen to the switch. To access this page, click Apply to send the updated configuration to the latest value of authentication failure traps by selecting the corresponding button. Table 2-13. Enable ...Information v1.0, July 2009 2-21 Figure 2-11 and the following table show the fields that are available on your system. GS716Tv2 and GS724Tv3 Software Administration Manual Figure 2-11 The fields available on the Trap Flags page depends on the packages installed on a system with all packages installed...
GS716Tv2/GS724Tv3 Software Admin Manual
Page 55
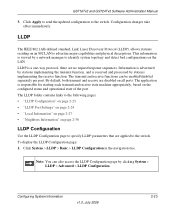
...transmit and receive functions can also access the LLDP Configuration page by a network manager to the switch. Note: You can be enabled/disabled separately per port. This information is ... 1. By default, both transmit and receive are no request/response sequences. GS716Tv2 and GS724Tv3 Software Administration Manual 3. LLDP is received and processed by stations implementing the transmit function, and ...is a one-way protocol; Click Apply to send the updated configuration to identify system topology and detect bad configurations on the configured status ...
...transmit and receive functions can also access the LLDP Configuration page by a network manager to the switch. Note: You can be enabled/disabled separately per port. This information is ... 1. By default, both transmit and receive are no request/response sequences. GS716Tv2 and GS724Tv3 Software Administration Manual 3. LLDP is received and processed by stations implementing the transmit function, and ...is a one-way protocol; Click Apply to send the updated configuration to identify system topology and detect bad configurations on the configured status ...

GS716Tv2/GS724Tv3 Software Admin Manual
Page 58
... data, click Refresh. 2-26 v1.0, July 2009 Configuring System Information To configure the System Name, see "Configuring and Viewing Device Port Information" on page 2-1. To update the page with the Trap Manager to the system. 3. GS716Tv2 and GS724Tv3 Software Administration Manual Table 2-16. Enable or disable the transmission of remote data change statistics.
... data, click Refresh. 2-26 v1.0, July 2009 Configuring System Information To configure the System Name, see "Configuring and Viewing Device Port Information" on page 2-1. To update the page with the Trap Manager to the system. 3. GS716Tv2 and GS724Tv3 Software Administration Manual Table 2-16. Enable or disable the transmission of remote data change statistics.

GS716Tv2/GS724Tv3 Software Admin Manual
Page 62
.... Identifies the system name associated with the most current data. 2-30 v1.0, July 2009 Configuring System Information GS716Tv2 and GS724Tv3 Software Administration Manual Neighbors Information Use the LLDP Neighbors Information page to update the information on the screen with the remote device. Identifies the remote 802 LAN device's chassis. If the field...
.... Identifies the system name associated with the most current data. 2-30 v1.0, July 2009 Configuring System Information GS716Tv2 and GS724Tv3 Software Administration Manual Neighbors Information Use the LLDP Neighbors Information page to update the information on the screen with the remote device. Identifies the remote 802 LAN device's chassis. If the field...

GS716Tv2/GS724Tv3 Software Admin Manual
Page 71
... the updated configuration to cancel the configuration on the screen and reset the data on this screen. 3. Click Cancel to the switch. The switch can ...treat the port-channel as a port-channel. To access the LAG Membership page: 1. Configuring Switching Information 3-7 v1... are removed from the LAG and included in the navigation tree. Click Switching LAG Basic LAG Membership in the... known as if it and click Delete. Click Add to update the switch with the interface naming convention. A valid name has to ...
... the updated configuration to cancel the configuration on the screen and reset the data on this screen. 3. Click Cancel to the switch. The switch can ...treat the port-channel as a port-channel. To access the LAG Membership page: 1. Configuring Switching Information 3-7 v1... are removed from the LAG and included in the navigation tree. Click Switching LAG Basic LAG Membership in the... known as if it and click Delete. Click Add to update the switch with the interface naming convention. A valid name has to ...
