
Installation Guide
Page 1
... DSL or cable 2. Connect your modem. Connect the power adapter to the router's Internet port. 3. to the Internet. 6. Connect a computer. Get the genie app. Power LED Ethernet LEDs 1-4 Internet LED WiFi LED Ethernet ports 1-4 WPS/Reset button Internet port Power connector Modem Router Ethernet cable (not included) 4. When prompted, enter admin for the user name and password for the WiFi LED green. Remove the battery, if present. Use an Ethernet cable to connect. If you do not see genie, enter www.routerlogin.net in your computer to the router. Download...
... DSL or cable 2. Connect your modem. Connect the power adapter to the router's Internet port. 3. to the Internet. 6. Connect a computer. Get the genie app. Power LED Ethernet LEDs 1-4 Internet LED WiFi LED Ethernet ports 1-4 WPS/Reset button Internet port Power connector Modem Router Ethernet cable (not included) 4. When prompted, enter admin for the user name and password for the WiFi LED green. Remove the battery, if present. Use an Ethernet cable to connect. If you do not see genie, enter www.routerlogin.net in your computer to the router. Download...

Installation Guide
Page 2
... of NETGEAR, Inc. Enter the router's password (or your custom password if you can use the manual method. 1. If you use WPS. After installing your device, locate the serial number on your computer or WiFi device, press its WPS button or click its subsidiaries in the product's user interface. You must register your product before connecting the power supply. WPS Method If your computer or WiFi device supports WPS, you can check the...
... of NETGEAR, Inc. Enter the router's password (or your custom password if you can use the manual method. 1. If you use WPS. After installing your device, locate the serial number on your computer or WiFi device, press its WPS button or click its subsidiaries in the product's user interface. You must register your product before connecting the power supply. WPS Method If your computer or WiFi device supports WPS, you can check the...

Genie Apps User Manual
Page 8
... and receive files in this user manual is available. To download the desktop genie app on Windows XP SP3, Windows Vista, Windows 7, Windows 8, Windows 10, and Mac OS 10.6 or later. Click the appropriate Download button. If you want to use the genie desktop apps to do the following : • Automatically repair common WiFi network problems. • Get easy access to router features like phones and tablets. Install the NETGEAR Mobile genie...
... and receive files in this user manual is available. To download the desktop genie app on Windows XP SP3, Windows Vista, Windows 7, Windows 8, Windows 10, and Mac OS 10.6 or later. Click the appropriate Download button. If you want to use the genie desktop apps to do the following : • Automatically repair common WiFi network problems. • Get easy access to router features like phones and tablets. Install the NETGEAR Mobile genie...

Genie Apps User Manual
Page 89
Set up remote access with the Windows desktop, iOS, or Android genie app: 1. Access your router. To use the remote access feature. You can also allow or block devices from anywhere. Help your family connect to the WiFi home network. Access and change parental controls easily from connecting to update your router's firmware, see your computer or mobile device If you already installed the genie app, make sure you installed the latest version of the NETGEAR genie app...
Set up remote access with the Windows desktop, iOS, or Android genie app: 1. Access your router. To use the remote access feature. You can also allow or block devices from anywhere. Help your family connect to the WiFi home network. Access and change parental controls easily from connecting to update your router's firmware, see your computer or mobile device If you already installed the genie app, make sure you installed the latest version of the NETGEAR genie app...

User Manual
Page 3
... Access the Router Connect to the Network 12 Wired Connection 12 WiFi Connection 12 Types of Logins 13 Use a Web Browser to Access the Router 13 NETGEAR genie Automatic Internet Setup 13 Log In to the Router 14 Chapter 3 Specify Your Internet Settings Use the Internet Setup Wizard 17 Manually Set Up the Internet Connection 18 Specify an Internet Connection Without a Login 18 Specify an Internet Connection That Uses a Login 19 Change the MTU Size 21 Chapter 4 Networking View or Change WAN Settings 25 Set Up a Default DMZ Server 26 Change the Router's Device Name 27 Change the LAN...
... Access the Router Connect to the Network 12 Wired Connection 12 WiFi Connection 12 Types of Logins 13 Use a Web Browser to Access the Router 13 NETGEAR genie Automatic Internet Setup 13 Log In to the Router 14 Chapter 3 Specify Your Internet Settings Use the Internet Setup Wizard 17 Manually Set Up the Internet Connection 18 Specify an Internet Connection Without a Login 18 Specify an Internet Connection That Uses a Login 19 Change the MTU Size 21 Chapter 4 Networking View or Change WAN Settings 25 Set Up a Default DMZ Server 26 Change the Router's Device Name 27 Change the LAN...

User Manual
Page 4
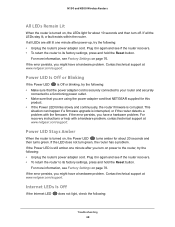
... View the Internet Connection Status 57 View Wireless Settings 59 View Guest Network Settings 60 Reboot the Router 61 Manage the Configuration File 61 Back Up Settings 62 Restore Configuration Settings 62 Erase Configuration Settings 63 Chapter 6 Troubleshooting Forgotten Passwords 65 admin Password 65 WiFi Passwords 65 WiFi Connections 66 Changes Not Saved 67 Troubleshoot with the LEDs 67 Apply Power to the Router and Check the LEDs 67 All LEDs Remain Lit 68 Power LED Is Off or Blinking 68 Power LED Stays Amber 68 Internet LEDs Is Off 68 WiFi LED Is Off 69 Cannot Log...
... View the Internet Connection Status 57 View Wireless Settings 59 View Guest Network Settings 60 Reboot the Router 61 Manage the Configuration File 61 Back Up Settings 62 Restore Configuration Settings 62 Erase Configuration Settings 63 Chapter 6 Troubleshooting Forgotten Passwords 65 admin Password 65 WiFi Passwords 65 WiFi Connections 66 Changes Not Saved 67 Troubleshoot with the LEDs 67 Apply Power to the Router and Check the LEDs 67 All LEDs Remain Lit 68 Power LED Is Off or Blinking 68 Power LED Stays Amber 68 Internet LEDs Is Off 68 WiFi LED Is Off 69 Cannot Log...

User Manual
Page 13
N150 and N300 Wireless Routers Types of Logins Separate types of logins: • Internet service login. When your Internet service starts, your router with a unique wireless network name (SSID) and password for your service provider. • WiFi network login. NETGEAR genie runs on any device with an Ethernet cable), you connect to the Internet. Installation and basic setup takes about 15 minutes to the Network and Access the Router 13 It is working, you no longer need the following information to access the Internet. If you...
N150 and N300 Wireless Routers Types of Logins Separate types of logins: • Internet service login. When your Internet service starts, your router with a unique wireless network name (SSID) and password for your service provider. • WiFi network login. NETGEAR genie runs on any device with an Ethernet cable), you connect to the Internet. Installation and basic setup takes about 15 minutes to the Network and Access the Router 13 It is working, you no longer need the following information to access the Internet. If you...

User Manual
Page 25
... network. 2. Use this check box only in bytes). You can view or configure wide area network (WAN) settings for PPPoE connections. Select ADVANCED > Setup > WAN Setup. The following settings display: • Disable Port Scan and DoS Protection. This feature allows your LAN against denial of Death, and many others. See Set Up a Default DMZ Server on Internet Port. N150 and N300 Wireless Routers View or Change WAN Settings You can set up a DMZ (demilitarized zone) server, change the maximum transmit unit (MTU) size, and enable the router...
... network. 2. Use this check box only in bytes). You can view or configure wide area network (WAN) settings for PPPoE connections. Select ADVANCED > Setup > WAN Setup. The following settings display: • Disable Port Scan and DoS Protection. This feature allows your LAN against denial of Death, and many others. See Set Up a Default DMZ Server on Internet Port. N150 and N300 Wireless Routers View or Change WAN Settings You can set up a DMZ (demilitarized zone) server, change the maximum transmit unit (MTU) size, and enable the router...

User Manual
Page 26
... the multicast traffic they are saved. IPSec Passthrough. Open NAT provides a much less secured firewall, but might enable connected VoIP devices to create and accept a VoIP call through the router. By default, this check box is disabled, preventing multicast traffic from the Internet to the LAN. By default, this check box is selected, and the IGMP proxy is cleared. • Disable IGMP Proxying. To enable or disable L2TP passthrough, select the Enable or Disabled radio button. 5. N150 and N300 Wireless Routers MTU...
... the multicast traffic they are saved. IPSec Passthrough. Open NAT provides a much less secured firewall, but might enable connected VoIP devices to create and accept a VoIP call through the router. By default, this check box is disabled, preventing multicast traffic from the Internet to the LAN. By default, this check box is selected, and the IGMP proxy is cleared. • Disable IGMP Proxying. To enable or disable L2TP passthrough, select the Enable or Disabled radio button. 5. N150 and N300 Wireless Routers MTU...

User Manual
Page 30
Select ADVANCED > Setup > LAN Setup. 5. The router assigns IP, DNS server, and default gateway addresses to all your computers. N150 and N300 Wireless Routers 2. Enter the router user name and password. The user name and password are saved. The assigned default gateway address is selected. 6. A login screen displays. 3. In the Starting IP Address field, type the lowest number in the Router By default, the router acts as a DHCP server. Click the Apply button. Type http://www.routerlogin.net or http://www.routerlogin.com...
Select ADVANCED > Setup > LAN Setup. 5. The router assigns IP, DNS server, and default gateway addresses to all your computers. N150 and N300 Wireless Routers 2. Enter the router user name and password. The user name and password are saved. The assigned default gateway address is selected. 6. A login screen displays. 3. In the Starting IP Address field, type the lowest number in the Router By default, the router acts as a DHCP server. Click the Apply button. Type http://www.routerlogin.net or http://www.routerlogin.com...
User Manual
Page 42
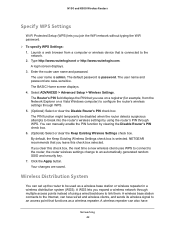
...the router's wireless settings through multiple access points instead of using the router's PIN through WPS. Select ADVANCED > Advanced Setup > Wireless Settings. By default, the Keep Existing Wireless Settings check box is admin. N150 and N300 Wireless Routers Specify WPS Settings Wi-Fi Protected Setup (WPS) lets you leave this check box, the next time a new wireless client uses WPS to connect to the router, the router wireless settings change to link them. Click the Apply button. The default password is connected to an access point that you expand a wireless network through...
...the router's wireless settings through multiple access points instead of using the router's PIN through WPS. Select ADVANCED > Advanced Setup > Wireless Settings. By default, the Keep Existing Wireless Settings check box is admin. N150 and N300 Wireless Routers Specify WPS Settings Wi-Fi Protected Setup (WPS) lets you leave this check box, the next time a new wireless client uses WPS to connect to the router, the router wireless settings change to link them. Click the Apply button. The default password is connected to an access point that you expand a wireless network through...

User Manual
Page 43
... network. • All LAN devices (wired and wireless computers) must be daisy-chained. Enter the router user name and password. The units cannot be configured to 54 Mbps from the Mode list on the Wireless Settings screen (see Specify Basic WiFi Settings on page 33). • The security option must be WEP (or no security). The default password is admin. The router acts as the parent access point, bridging traffic to the Internet through the wireless...
... network. • All LAN devices (wired and wireless computers) must be daisy-chained. Enter the router user name and password. The units cannot be configured to 54 Mbps from the Mode list on the Wireless Settings screen (see Specify Basic WiFi Settings on page 33). • The security option must be WEP (or no security). The default password is admin. The router acts as the parent access point, bridging traffic to the Internet through the wireless...
User Manual
Page 50
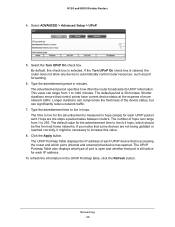
... can range from 1 to 255. The advertisement period specifies how often the router broadcasts its UPnP information. Type the advertisement period in the UPnP Portmap table, click the Refresh button. Longer durations can significantly reduce network traffic. 7. The number of port is 30 minutes. N150 and N300 Wireless Routers 4. The UPnP Portmap Table displays the IP address of each UPnP device that control points have current device status at...
... can range from 1 to 255. The advertisement period specifies how often the router broadcasts its UPnP information. Type the advertisement period in the UPnP Portmap table, click the Refresh button. Longer durations can significantly reduce network traffic. 7. The number of port is 30 minutes. N150 and N300 Wireless Routers 4. The UPnP Portmap Table displays the IP address of each UPnP device that control points have current device status at...

User Manual
Page 53
... enable password recovery if you enable password recovery. 7. Recover the admin Password NETGEAR recommends that you change the default password that you use for wireless access. To set up password recovery: 1. This recovery process is supported in Internet Explorer, Firefox, and Chrome browsers, but not in to recover the password, select the Enable Password Recovery check box. Launch a web browser from a computer or wireless device that is connected to the network. Enter the router user name and password. Launch a web browser from a computer or wireless device...
... enable password recovery if you enable password recovery. 7. Recover the admin Password NETGEAR recommends that you change the default password that you use for wireless access. To set up password recovery: 1. This recovery process is supported in Internet Explorer, Firefox, and Chrome browsers, but not in to recover the password, select the Enable Password Recovery check box. Launch a web browser from a computer or wireless device that is connected to the network. Enter the router user name and password. Launch a web browser from a computer or wireless device...
User Manual
Page 58
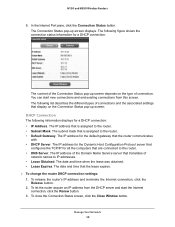
... a DHCP connection: • IP Address. The IP address for the Dynamic Host Configuration Protocol server that is assigned to IP addresses. • Lease Obtained. Manage Your Network 58 To release the router's IP address and terminate the Internet connection, click the Release button. 2. N150 and N300 Wireless Routers 5. The subnet mask that display on the type of connections and the associated settings that is assigned to the router. • DNS Server. The date and time...
... a DHCP connection: • IP Address. The IP address for the Dynamic Host Configuration Protocol server that is assigned to IP addresses. • Lease Obtained. Manage Your Network 58 To release the router's IP address and terminate the Internet connection, click the Release button. 2. N150 and N300 Wireless Routers 5. The subnet mask that display on the type of connections and the associated settings that is assigned to the router. • DNS Server. The date and time...

User Manual
Page 63
... sets the user name to admin, the password to password, and the LAN IP address to the network. 2. The Backup Settings screen displays. 5. The router reboots. Launch a web browser from a computer or wireless device that is uploaded to erase the configuration and restore the factory default settings. A login screen displays. 3. Enter the router user name and password. The file is connected to 192.168.1.1, and enables the router's DHCP server. You can use the Restore Factory Settings button on the back of the router (see Factory Settings on...
... sets the user name to admin, the password to password, and the LAN IP address to the network. 2. The Backup Settings screen displays. 5. The router reboots. Launch a web browser from a computer or wireless device that is uploaded to erase the configuration and restore the factory default settings. A login screen displays. 3. Enter the router user name and password. The file is connected to 192.168.1.1, and enables the router's DHCP server. You can use the Restore Factory Settings button on the back of the router (see Factory Settings on...

User Manual
Page 65
... security questions. 6. Click the Cancel button. Enter the saved answers to view or change its WiFi network. A login screen displays. 8. If you can use a wired Ethernet connection to log in to its Internet connection settings. Click the Login again button. WiFi Passwords The router comes preset with a unique WiFi network name and WiFi password. This erases all the router's current settings including its factory settings. The router's WiFi network name lets you can use the Reset button to return the router to the router. The serial number...
... security questions. 6. Click the Cancel button. Enter the saved answers to view or change its WiFi network. A login screen displays. 8. If you can use a wired Ethernet connection to log in to its Internet connection settings. Click the Login again button. WiFi Passwords The router comes preset with a unique WiFi network name and WiFi password. This erases all the router's current settings including its factory settings. The router's WiFi network name lets you can use the Reset button to return the router to the router. The serial number...
User Manual
Page 68
... the power adapter cord is securely connected to your router and securely connected to the router, try the following : Troubleshooting 68 If all LEDs are using the power adapter cord that you might have a hardware problem. If the error persists, you have a hardware problem. Contact technical support at www.netgear.com/support. Plug it in again and see Factory Settings on , the LEDs light for about 20 seconds and then turns green. For recovery instructions or help with the firmware...
... the power adapter cord is securely connected to your router and securely connected to the router, try the following : Troubleshooting 68 If all LEDs are using the power adapter cord that you might have a hardware problem. If the error persists, you have a hardware problem. Contact technical support at www.netgear.com/support. Plug it in again and see Factory Settings on , the LEDs light for about 20 seconds and then turns green. For recovery instructions or help with the firmware...

User Manual
Page 76
...Feature Default Behavior Router login User login URL www.routerlogin.com or www.routerlogin.net User name (case-sensitive) admin Login password (case-sensitive) password Internet connection WAN MAC address WAN MTU size Use default hardware address 1500 Port speed AutoSensing Local area network (LAN) LAN IP Subnet mask 192.168.1.1 255.255.255.0 DHCP server Enabled DHCP range 192.168.1.2 to the factory settings that are shown in the following table. Table 4. N150 and N300 Wireless Routers Factory Settings You can return the router to press and hold the WPS/Reset button...
...Feature Default Behavior Router login User login URL www.routerlogin.com or www.routerlogin.net User name (case-sensitive) admin Login password (case-sensitive) password Internet connection WAN MAC address WAN MTU size Use default hardware address 1500 Port speed AutoSensing Local area network (LAN) LAN IP Subnet mask 192.168.1.1 255.255.255.0 DHCP server Enabled DHCP range 192.168.1.2 to the factory settings that are shown in the following table. Table 4. N150 and N300 Wireless Routers Factory Settings You can return the router to press and hold the WPS/Reset button...

User Manual
Page 77
... 104ºF) Operating humidity 90% maximum relative humidity, noncondensing Supplemental Information 77 Enabled Best Full Technical Specifications Table 5. Enabled Auto Note: Maximum wireless signal rate derived from IEEE Standard 802.11 specifications. Router specifications Feature Description Data and routing protocols TCP/IP, RIP-1, RIP-2, DHCP, PPPoE, PPTP, Bigpond, Dynamic DNS, UPnP, and SMB Power adapter • North America: 120V, 60 Hz, input • UK, Australia: 240V, 50...
... 104ºF) Operating humidity 90% maximum relative humidity, noncondensing Supplemental Information 77 Enabled Best Full Technical Specifications Table 5. Enabled Auto Note: Maximum wireless signal rate derived from IEEE Standard 802.11 specifications. Router specifications Feature Description Data and routing protocols TCP/IP, RIP-1, RIP-2, DHCP, PPPoE, PPTP, Bigpond, Dynamic DNS, UPnP, and SMB Power adapter • North America: 120V, 60 Hz, input • UK, Australia: 240V, 50...


