
Genie Apps User Manual
Page 8
... phones and tablets. Getting Started 8 You can use the genie desktop apps to do the following : • Automatically repair common WiFi network problems. • Get easy access to use the genie app later, click the icon on your network. NETGEAR genie App Router Requirements To view a list of routers that can see which smart devices are currently supported by visiting the NETGEAR genie web page. If you might need to update to view...
... phones and tablets. Getting Started 8 You can use the genie desktop apps to do the following : • Automatically repair common WiFi network problems. • Get easy access to use the genie app later, click the icon on your network. NETGEAR genie App Router Requirements To view a list of routers that can see which smart devices are currently supported by visiting the NETGEAR genie web page. If you might need to update to view...

Genie Apps User Manual
Page 89
... your broadband Internet usage data. • Parental controls. You can be managed remotely: • WiFi settings. To determine if your router's user manual. Access and change parental controls easily from connecting to update your router's firmware, see your router supports remote access, see the product data sheet for certain NETGEAR routers. For more information about how to update the genie app, see Update the genie App on how to the WiFi home network. • Traffic meter. For...
... your broadband Internet usage data. • Parental controls. You can be managed remotely: • WiFi settings. To determine if your router's user manual. Access and change parental controls easily from connecting to update your router's firmware, see your router supports remote access, see the product data sheet for certain NETGEAR routers. For more information about how to update the genie app, see Update the genie App on how to the WiFi home network. • Traffic meter. For...

User Manual
Page 5
... Use Time Machine to Back Up Onto a Storage Device 99 Manage Access to a Storage Device 100 Enable FTP Access Within Your Network 102 View Network Folders on a Device 104 Add a Network Folder on a Storage Device 105 Change a Network Folder, Including Read and Write Access, on a USB Drive..107 Approve USB Devices 109 Safely Remove a USB Device 110 Chapter 7 Manage Dynamic DNS and Access Storage Devices Through the Internet Set Up and Manage Dynamic DNS 114 Your Personal FTP Server 114 Set...
... Use Time Machine to Back Up Onto a Storage Device 99 Manage Access to a Storage Device 100 Enable FTP Access Within Your Network 102 View Network Folders on a Device 104 Add a Network Folder on a Storage Device 105 Change a Network Folder, Including Read and Write Access, on a USB Drive..107 Approve USB Devices 109 Safely Remove a USB Device 110 Chapter 7 Manage Dynamic DNS and Access Storage Devices Through the Internet Set Up and Manage Dynamic DNS 114 Your Personal FTP Server 114 Set...
User Manual
Page 7
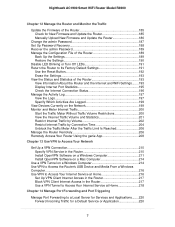
... Change the admin Password 187 Set Up Password Recovery 188 Recover the admin Password 189 Manage the Configuration File of the Router 189 Back Up the Settings 189 Restore the Settings 190 Disable LED Blinking or Turn Off LEDs 191 Return the Router to Its Factory Default Settings 191 Use the Reset Button 192 Erase the Settings 193 View the Status and Statistics of the Router 193 View Information About the Router and the Internet and WiFi Settings........193 Display Internet Port Statistics 195 Check the Internet Connection Status 196 Manage the Activity Log...
... Change the admin Password 187 Set Up Password Recovery 188 Recover the admin Password 189 Manage the Configuration File of the Router 189 Back Up the Settings 189 Restore the Settings 190 Disable LED Blinking or Turn Off LEDs 191 Return the Router to Its Factory Default Settings 191 Use the Reset Button 192 Erase the Settings 193 View the Status and Statistics of the Router 193 View Information About the Router and the Internet and WiFi Settings........193 Display Internet Port Statistics 195 Check the Internet Connection Status 196 Manage the Activity Log...
User Manual
Page 20
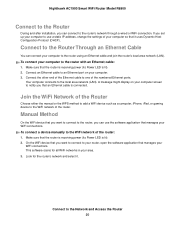
... connect to the router, you want to connect to your router, open the software application that manages your WiFi connections. On the WiFi device that you can use a static IP address, change the settings of the router: 1. Nighthawk AC1900 Smart WiFi Router Model R6900 Connect to the Router During and after installation, you set up your computer to use the software application that manages your WiFi connections. If you can connect your computer to the router using an Ethernet cable and join the router's local area network (LAN...
... connect to the router, you want to connect to your router, open the software application that manages your WiFi connections. On the WiFi device that you can use a static IP address, change the settings of the router: 1. Nighthawk AC1900 Smart WiFi Router Model R6900 Connect to the Router During and after installation, you set up your computer to use the software application that manages your WiFi connections. If you can connect your computer to the router using an Ethernet cable and join the router's local area network (LAN...
User Manual
Page 22
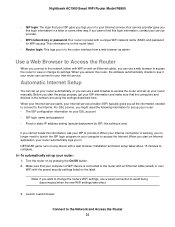
... connect to the network (either with WiFi or with the preset security settings listed on your router can use a web browser to access the router to complete. Installation and basic setup takes about 15 minutes to view or change the router's WiFi settings, use a web browser to the Internet. Use a Web Browser to Access the Router When you cannot find this login information in to the router with an Ethernet cable (wired) or over WiFi with an Ethernet cable), you want to change...
... connect to the network (either with WiFi or with the preset security settings listed on your router can use a web browser to access the router to complete. Installation and basic setup takes about 15 minutes to view or change the router's WiFi settings, use a web browser to the Internet. Use a Web Browser to Access the Router When you cannot find this login information in to the router with an Ethernet cable (wired) or over WiFi with an Ethernet cable), you want to change...
User Manual
Page 56
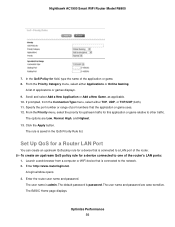
... default password is admin. Optimize Performance 56 Specify the port number or range of the application or game. 8. A login window opens. 3. Scroll and select Add a New Application or Add a New Game, as applicable. 10. To create an upstream QoS policy rule for field, type the name of port numbers that is connected to the network. 2. In the QoS Policy for a device connected to other traffic. The user name is password. The user name and password are...
... default password is admin. Optimize Performance 56 Specify the port number or range of the application or game. 8. A login window opens. 3. Scroll and select Add a New Application or Add a New Game, as applicable. 10. To create an upstream QoS policy rule for field, type the name of port numbers that is connected to the network. 2. In the QoS Policy for a device connected to other traffic. The user name is password. The user name and password are...
User Manual
Page 69
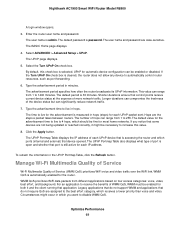
... 30 minutes. Nighthawk AC1900 Smart WiFi Router Model R6900 A login window opens. 3. Optimize Performance 69 The BASIC Home page displays. 4. The time to disable WMM QoS. Enter the router user name and password. The UPnP Portmap Table also displays what type of port is open and whether that control points receive current device status at the expense of WMM QoS, WMM must be enabled or disabled. Select the Turn UPnP On check box. The advertisement period...
... 30 minutes. Nighthawk AC1900 Smart WiFi Router Model R6900 A login window opens. 3. Optimize Performance 69 The BASIC Home page displays. 4. The time to disable WMM QoS. Enter the router user name and password. The UPnP Portmap Table also displays what type of port is open and whether that control points receive current device status at the expense of WMM QoS, WMM must be enabled or disabled. Select the Turn UPnP On check box. The advertisement period...
User Manual
Page 96
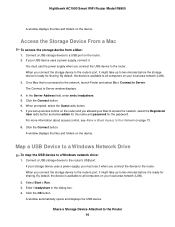
... area network (LAN). 3. Connect a USB storage device to access the network, select the Registered User radio button and enter admin for the name and password for sharing. Click the Connect button. A window displays the files and folders on the device. Nighthawk AC1900 Smart WiFi Router Model R6900 A window displays the files and folders on the device. When you must use it . If your storage device uses a power supply, you connect the storage device to the router's port, it is connected to the network...
... area network (LAN). 3. Connect a USB storage device to access the network, select the Registered User radio button and enter admin for the name and password for sharing. Click the Connect button. A window displays the files and folders on the device. Nighthawk AC1900 Smart WiFi Router Model R6900 A window displays the files and folders on the device. When you must use it . If your storage device uses a power supply, you connect the storage device to the router's port, it is connected to the network...
User Manual
Page 114
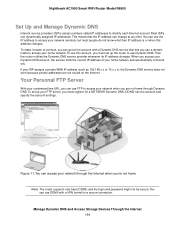
... address changes. Figure 11. To set up the router to access your network when you must set up your customized free URL, you can get a free account with a VPN tunnel for a NETGEAR Dynamic DNS (DDNS) service account and specify the account settings. Nighthawk AC1900 Smart WiFi Router Model R6900 Set Up and Manage Dynamic DNS Internet service providers (ISPs) assign numbers called IP addresses to access your home network and automatically connects you must register for a secure connection. Manage Dynamic DNS and Access Storage Devices...
... address changes. Figure 11. To set up the router to access your network when you must set up your customized free URL, you can get a free account with a VPN tunnel for a NETGEAR Dynamic DNS (DDNS) service account and specify the account settings. Nighthawk AC1900 Smart WiFi Router Model R6900 Set Up and Manage Dynamic DNS Internet service providers (ISPs) assign numbers called IP addresses to access your home network and automatically connects you must register for a secure connection. Manage Dynamic DNS and Access Storage Devices...
User Manual
Page 180
... security for both access points must know the MAC addresses of the remote unit. You must know the WiFi settings for your router cannot be enabled and the router cannot use the auto channel feature. You must know the MAC address of the child repeater access point. Launch a web browser from the child repeater access point. The user name is on the same LAN IP subnet. To configure this mode, you can set up a WiFi network with the WiFi...
... security for both access points must know the MAC addresses of the remote unit. You must know the WiFi settings for your router cannot be enabled and the router cannot use the auto channel feature. You must know the MAC address of the child repeater access point. Launch a web browser from the child repeater access point. The user name is on the same LAN IP subnet. To configure this mode, you can set up a WiFi network with the WiFi...
User Manual
Page 192
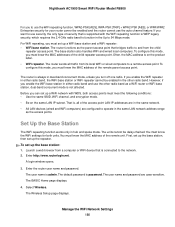
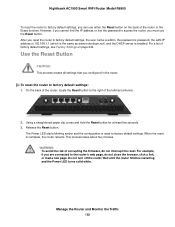
... reset is enabled. To reset the router to factory default settings, the user name is admin, the password is password, the LAN IP address is 192.168.1.1 (which is the same as www.routerlogin.net), and the DHCP server is complete, the router reboots. Wait until the router finishes restarting and the Power LED turns solid white. Use the Reset Button CAUTION: This process erases all settings that you configured in the router. Manage the Router and Monitor the Traffic...
... reset is enabled. To reset the router to factory default settings, the user name is admin, the password is password, the LAN IP address is 192.168.1.1 (which is the same as www.routerlogin.net), and the DHCP server is complete, the router reboots. Wait until the router finishes restarting and the Power LED turns solid white. Use the Reset Button CAUTION: This process erases all settings that you configured in the router. Manage the Router and Monitor the Traffic...
User Manual
Page 193
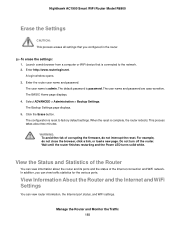
... Traffic 193 A login window opens. 3. The user name is connected to factory default settings. The Backup Settings page displays. 5. View the Status and Statistics of corrupting the firmware, do not close the browser, click a link, or load a new page. Select ADVANCED > Administration > Backup Settings. Enter the router user name and password. Click the Erase button. When the reset is complete, the router reboots. Nighthawk AC1900 Smart WiFi Router Model R6900 Erase the Settings CAUTION: This process erases all settings that is admin...
... Traffic 193 A login window opens. 3. The user name is connected to factory default settings. The Backup Settings page displays. 5. View the Status and Statistics of corrupting the firmware, do not close the browser, click a link, or load a new page. Select ADVANCED > Administration > Backup Settings. Enter the router user name and password. Click the Erase button. When the reset is complete, the router reboots. Nighthawk AC1900 Smart WiFi Router Model R6900 Erase the Settings CAUTION: This process erases all settings that is admin...
User Manual
Page 196
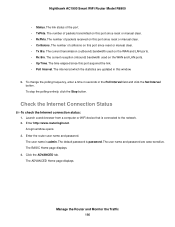
... Set Interval button. The number of packets transmitted on this port acquired the link. • Poll Interval. The time elapsed since this port since reset or manual clear. • RxPkts. The user name is password. Click the ADVANCED tab. A login window opens. 3. The default password is admin. Manage the Router and Monitor the Traffic 196 The BASIC Home page displays. 4. The ADVANCED Home page displays. Nighthawk AC1900 Smart WiFi Router Model R6900 • Status. Check the Internet Connection Status To check...
... Set Interval button. The number of packets transmitted on this port acquired the link. • Poll Interval. The time elapsed since this port since reset or manual clear. • RxPkts. The user name is password. Click the ADVANCED tab. A login window opens. 3. The default password is admin. Manage the Router and Monitor the Traffic 196 The BASIC Home page displays. 4. The ADVANCED Home page displays. Nighthawk AC1900 Smart WiFi Router Model R6900 • Status. Check the Internet Connection Status To check...
User Manual
Page 205
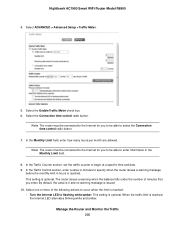
... be able to the Internet for you enter. Note The router must be connected to enter information in hours is reached, the Internet LED alternates blinking white and amber. Select the Connection time control radio button. Select the Enable Traffic Meter check box. 6. Nighthawk AC1900 Smart WiFi Router Model R6900 4. The router issues a warning when the balance falls under the number of the following actions to begin at a specific time and date. 9.
... be able to the Internet for you enter. Note The router must be connected to enter information in hours is reached, the Internet LED alternates blinking white and amber. Select the Connection time control radio button. Select the Enable Traffic Meter check box. 6. Nighthawk AC1900 Smart WiFi Router Model R6900 4. The router issues a warning when the balance falls under the number of the following actions to begin at a specific time and date. 9.
User Manual
Page 210
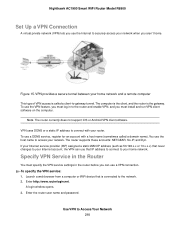
... Android VPN client software. Specify VPN Service in the Router You must specify the VPN service settings in to the router and enable VPN, and you must log in the router before you can use that is called a domain name). Nighthawk AC1900 Smart WiFi Router Model R6900 Set Up a VPN Connection A virtual private network (VPN) lets you use the Internet to securely access your network. VPN uses DDNS or a static IP address to connect with a host name (sometimes called a client-to Access Your Network 210 To specify the VPN service: 1. A login window opens...
... Android VPN client software. Specify VPN Service in the Router You must specify the VPN service settings in to the router and enable VPN, and you must log in the router before you can use that is called a domain name). Nighthawk AC1900 Smart WiFi Router Model R6900 Set Up a VPN Connection A virtual private network (VPN) lets you use the Internet to securely access your network. VPN uses DDNS or a static IP address to connect with a host name (sometimes called a client-to Access Your Network 210 To specify the VPN service: 1. A login window opens...
User Manual
Page 211
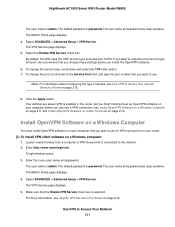
... user name is password. The default password is admin. To change the service type, scroll down to the Service Port field, and type the port number that you can use for VPN connections to use a VPN connection (see Install OpenVPN Software on a Windows Computer on page 211 and Install OpenVPN Software on a Mac Computer on each computer that the Enable VPN Service check box is password. Note For information about configuring the type of access, see Specify VPN Service in the router, but you must install OpenVPN software...
... user name is password. The default password is admin. To change the service type, scroll down to the Service Port field, and type the port number that you can use for VPN connections to use a VPN connection (see Install OpenVPN Software on a Windows Computer on page 211 and Install OpenVPN Software on a Mac Computer on each computer that the Enable VPN Service check box is password. Note For information about configuring the type of access, see Specify VPN Service in the router, but you must install OpenVPN software...

User Manual
Page 235
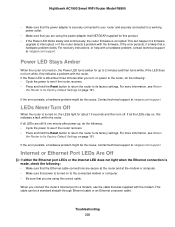
... an Ethernet cable, the corresponding numbered router LAN port LEDs light. You can use the LEDs on the front panel of the router for troubleshooting. After about controlling the LED settings, see Disable LED Blinking or Turn Off LEDs on page 191. Check the following sequence of events occurs: 1. For information about two minutes, verify the following: • The Power LED is solid white. • The Internet LED is lit. • The WiFi LED is to configure each WiFi computer's MAC address...
... an Ethernet cable, the corresponding numbered router LAN port LEDs light. You can use the LEDs on the front panel of the router for troubleshooting. After about controlling the LED settings, see Disable LED Blinking or Turn Off LEDs on page 191. Check the following sequence of events occurs: 1. For information about two minutes, verify the following: • The Power LED is solid white. • The Internet LED is lit. • The WiFi LED is to configure each WiFi computer's MAC address...
User Manual
Page 236
... error persists, a hardware problem might be the cause. This cable can happen if a firmware upgrade is likely that a hardware problem exists. Contact technical support at the modem or computer. • Make sure that power is turned on power to the router, do the following : • Make sure that the Ethernet cable connections are using the power adapter that NETGEAR supplied for about 10 seconds and then turn on to its factory settings. Nighthawk AC1900 Smart WiFi Router Model R6900...
... error persists, a hardware problem might be the cause. This cable can happen if a firmware upgrade is likely that a hardware problem exists. Contact technical support at the modem or computer. • Make sure that power is turned on power to the router, do the following : • Make sure that the Ethernet cable connections are using the power adapter that NETGEAR supplied for about 10 seconds and then turn on to its factory settings. Nighthawk AC1900 Smart WiFi Router Model R6900...
User Manual
Page 244
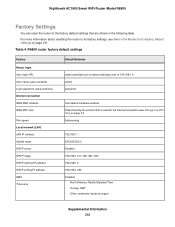
... settings, see Manage the MTU Size on page 47) Autosensing 192.168.1.1 255.255.255.0 Enabled 192.168.1.2 to Its Factory Default Settings on page 191. R6900 router factory default settings Feature Router login User login URL User name (case-sensitive) Login password (case-sensitive) Internet connection WAN MAC address WAN MTU size Port speed Local network (LAN) LAN IP address Subnet mask DHCP server DHCP range DHCP starting IP address DHCP ending IP address DMZ Time zone Default Behavior www.routerlogin.net (or www.routerlogin.com or 192.168.1.1) admin password Use default hardware address...
... settings, see Manage the MTU Size on page 47) Autosensing 192.168.1.1 255.255.255.0 Enabled 192.168.1.2 to Its Factory Default Settings on page 191. R6900 router factory default settings Feature Router login User login URL User name (case-sensitive) Login password (case-sensitive) Internet connection WAN MAC address WAN MTU size Port speed Local network (LAN) LAN IP address Subnet mask DHCP server DHCP range DHCP starting IP address DHCP ending IP address DMZ Time zone Default Behavior www.routerlogin.net (or www.routerlogin.com or 192.168.1.1) admin password Use default hardware address...


