
Product Data Sheet
Page 7
...; R7200 Smart WiFi Router (R7200) • Three (3) detachable antennas • Ethernet cable • Quick start guide • Power adapter Physical Specifications • Dimensions: 11.22 x 7.26 x 1.97 in the U.S. Includes remote access to manage your network away from home • USB 3.0 for up your router and get more wired devices for faster file transfer and uninterrupted connections • Nighthawk App-Easily set up personal FTP server • VPN support-secure remote access • Guest network access-separate & secure • Standards-based WiFi Security...
...; R7200 Smart WiFi Router (R7200) • Three (3) detachable antennas • Ethernet cable • Quick start guide • Power adapter Physical Specifications • Dimensions: 11.22 x 7.26 x 1.97 in the U.S. Includes remote access to manage your network away from home • USB 3.0 for up your router and get more wired devices for faster file transfer and uninterrupted connections • Nighthawk App-Easily set up personal FTP server • VPN support-secure remote access • Guest network access-separate & secure • Standards-based WiFi Security...
User Manual
Page 5
...89 Manually upload firmware to the router 90 Change the admin password 91 Enable admin password recovery 91 Recover the admin password 92 View information about the router and the Internet and WiFi settings 93 Display the statistics of the Internet port 94 Check the Internet connection status 95 View and manage logs of router activity 96 View devices currently on the network 97 Monitor Internet Traffic 97 Manage the router configuration file 99 Back up the settings 99 Erase the settings 99 Restore the settings 100 Remote access 101 Set up remote management 101 Use remote access...
...89 Manually upload firmware to the router 90 Change the admin password 91 Enable admin password recovery 91 Recover the admin password 92 View information about the router and the Internet and WiFi settings 93 Display the statistics of the Internet port 94 Check the Internet connection status 95 View and manage logs of router activity 96 View devices currently on the network 97 Monitor Internet Traffic 97 Manage the router configuration file 99 Back up the settings 99 Erase the settings 99 Restore the settings 100 Remote access 101 Set up remote management 101 Use remote access...
User Manual
Page 6
... Use Time Machine to back up onto a USB hard disk 112 Enable FTP access within your network 114 View network folders on a storage device 114 Add a network folder on a USB storage device 115 Edit a network folder on a USB storage device 116 Safely remove a USB storage device 117 Chapter 9 Use Dynamic DNS to Access USB Storage Devices Through the Internet Set up and manage Dynamic DNS 119 Set up FTP access through the Internet 119 Your personal FTP server...
... Use Time Machine to back up onto a USB hard disk 112 Enable FTP access within your network 114 View network folders on a storage device 114 Add a network folder on a USB storage device 115 Edit a network folder on a USB storage device 116 Safely remove a USB storage device 117 Chapter 9 Use Dynamic DNS to Access USB Storage Devices Through the Internet Set up and manage Dynamic DNS 119 Set up FTP access through the Internet 119 Your personal FTP server...
User Manual
Page 7
... or blinking 150 LEDs never turn off 150 Internet or Ethernet LAN port LEDs are off 151 WiFi LED is off 151 You cannot log in to the router 151 You cannot access the Internet 152 Troubleshoot Internet browsing 154 Changes are not saved 154 Troubleshoot WiFi connectivity 155 Troubleshoot your network using the ping utility 155 Test the LAN path to your router 155 Test the path from a Windows-based computer to a remote device 156 Chapter 14 Supplemental Information Factory Settings 159...
... or blinking 150 LEDs never turn off 150 Internet or Ethernet LAN port LEDs are off 151 WiFi LED is off 151 You cannot log in to the router 151 You cannot access the Internet 152 Troubleshoot Internet browsing 154 Changes are not saved 154 Troubleshoot WiFi connectivity 155 Troubleshoot your network using the ping utility 155 Test the LAN path to your router 155 Test the path from a Windows-based computer to a remote device 156 Chapter 14 Supplemental Information Factory Settings 159...

User Manual
Page 33
... setting specifies how the router assigns IPv6 addresses to the devices on your home network (the LAN). 8. (Optional) Select the Use This Interface ID check box and specify the interface ID that is connected to the router network. 2. The router does not process any IPv6 header packets. A login window opens. 3. In secured mode, which is the one automatically from a computer or mobile device that you logged in. Launch a web browser from its MAC address...
... setting specifies how the router assigns IPv6 addresses to the devices on your home network (the LAN). 8. (Optional) Select the Use This Interface ID check box and specify the interface ID that is connected to the router network. 2. The router does not process any IPv6 header packets. A login window opens. 3. In secured mode, which is the one automatically from a computer or mobile device that you logged in. Launch a web browser from its MAC address...
User Manual
Page 51
... the router as a WiFi access point • Set up the router in bridge mode • Set up a bridge for WiFi, Ethernet, and USB connections. This chapter includes the following sections: • View or Change WAN Settings • Set up a default DMZ server • Change the Router's Device Name • Change the LAN TCP/IP settings • Specify the IP addresses that you install the router and connect it to the Internet before you change its network settings. 5 Manage Network Settings The router comes ready for a port group or VLAN tag group • Manage custom static routes...
... the router as a WiFi access point • Set up the router in bridge mode • Set up a bridge for WiFi, Ethernet, and USB connections. This chapter includes the following sections: • View or Change WAN Settings • Set up a default DMZ server • Change the Router's Device Name • Change the LAN TCP/IP settings • Specify the IP addresses that you install the router and connect it to the Internet before you change its network settings. 5 Manage Network Settings The router comes ready for a port group or VLAN tag group • Manage custom static routes...
User Manual
Page 52
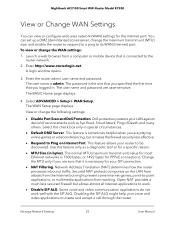
... for the Internet port. Use this check box only in . Change the MTU only if you logged in special circumstances. • Default DMZ Server. Network Address Translation (NAT) determines how the router processes inbound traffic. To view or change the following settings: • Disable Port Scan and DoS Protection. The user name and password are sure that it makes the firewall security less effective. • Respond to Ping on the LAN from attacks from the Internet but...
... for the Internet port. Use this check box only in . Change the MTU only if you logged in special circumstances. • Default DMZ Server. Network Address Translation (NAT) determines how the router processes inbound traffic. To view or change the following settings: • Disable Port Scan and DoS Protection. The user name and password are sure that it makes the firewall security less effective. • Respond to Ping on the LAN from attacks from the Internet but...
User Manual
Page 53
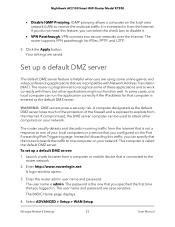
... connected to one of the firewall and is called the default DMZ server. WARNING: DMZ servers pose a security risk. Launch a web browser from the Internet that you configured on the local area network (LAN) to receive the multicast traffic it . • VPN Passthrough. A login window opens. 3. The user name is helpful when you logged in from the Internet. The BASIC Home page displays. 4. Select ADVANCED > Setup > WAN Setup. Nighthawk AC2100 Smart WiFi Router Model R7200 • Disable IGMP Proxying. The router supports VPN...
... connected to one of the firewall and is called the default DMZ server. WARNING: DMZ servers pose a security risk. Launch a web browser from the Internet that you configured on the local area network (LAN) to receive the multicast traffic it . • VPN Passthrough. A login window opens. 3. The user name is helpful when you logged in from the Internet. The BASIC Home page displays. 4. Select ADVANCED > Setup > WAN Setup. Nighthawk AC2100 Smart WiFi Router Model R7200 • Disable IGMP Proxying. The router supports VPN...

User Manual
Page 56
... default addressing scheme, define a range between 192.168.1.2 and 192.168.1.254, although you logged in RIP-2 format. To specify the pool of IP addresses that you can save part of the router, you specified the first time that the router assigns: 1. Manage Network Settings 56 User Manual This format carries more information. Launch a web browser from a computer or mobile device that the Use Router as a Dynamic Host Configuration Protocol (DHCP) server. A login window opens...
... default addressing scheme, define a range between 192.168.1.2 and 192.168.1.254, although you logged in RIP-2 format. To specify the pool of IP addresses that you can save part of the router, you specified the first time that the router assigns: 1. Manage Network Settings 56 User Manual This format carries more information. Launch a web browser from a computer or mobile device that the Use Router as a Dynamic Host Configuration Protocol (DHCP) server. A login window opens...

User Manual
Page 65
... admin. Click the Apply button. The WiFi mode of the guest WiFi network depends on the channel selection of security requires that is disabled. Enter http://www.routerlogin.net. NETGEAR_Guest • 5 GHz guest WiFi network SSID. The user name is less secure than WPA2-PSK [AES] and limits the speed of security enables WiFi devices that you logged in the 2.4 GHz band. Manage Network Settings 65 User Manual For example, if you configure the WiFi mode for these networks...
... admin. Click the Apply button. The WiFi mode of the guest WiFi network depends on the channel selection of security requires that is disabled. Enter http://www.routerlogin.net. NETGEAR_Guest • 5 GHz guest WiFi network SSID. The user name is less secure than WPA2-PSK [AES] and limits the speed of security enables WiFi devices that you logged in the 2.4 GHz band. Manage Network Settings 65 User Manual For example, if you configure the WiFi mode for these networks...
User Manual
Page 70
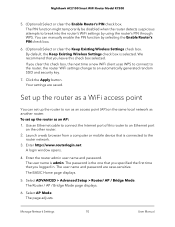
... Wireless Settings check box is admin. We recommend that you logged in. Set up the router as another router. Use an Ethernet cable to connect the Internet port of this router to an Ethernet port on the same local network as a WiFi access point You can manually enable the PIN function by using the router's PIN through WPS. Manage Network Settings 70 User Manual You can set up the router to an automatically generated random SSID and security key. 7. Your settings are case-sensitive. To set up the router...
... Wireless Settings check box is admin. We recommend that you logged in. Set up the router as another router. Use an Ethernet cable to connect the Internet port of this router to an Ethernet port on the same local network as a WiFi access point You can manually enable the PIN function by using the router's PIN through WPS. Manage Network Settings 70 User Manual You can set up the router to an automatically generated random SSID and security key. 7. Your settings are case-sensitive. To set up the router...
User Manual
Page 73
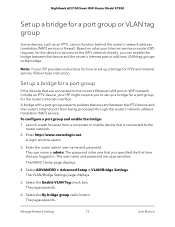
... router's Ethernet LAN port or WiFi network include an IPTV device, your ISP provides instructions for how to set up a bridge for a port group If the devices that is connected to set up a bridge for a port group or VLAN tag group Some devices, such as an IPTV, cannot function behind the router's network address translation (NAT) service or firewall. Enter the router admin user name and password. Select the Enable VLAN Tag check box. Manage Network Settings 73 User Manual Set up a bridge for a port group for the router's Internet interface. Select ADVANCED > Advanced Setup...
... router's Ethernet LAN port or WiFi network include an IPTV device, your ISP provides instructions for how to set up a bridge for a port group If the devices that is connected to set up a bridge for a port group or VLAN tag group Some devices, such as an IPTV, cannot function behind the router's network address translation (NAT) service or firewall. Enter the router admin user name and password. Select the Enable VLAN Tag check box. Manage Network Settings 73 User Manual Set up a bridge for a port group for the router's Internet interface. Select ADVANCED > Advanced Setup...
User Manual
Page 78
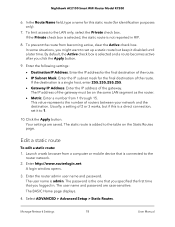
... page displays. 4. Click the Apply button. Edit a static route To edit a static route: 1. Launch a web browser from a computer or mobile device that you logged in RIP. 8. Manage Network Settings 78 User Manual The IP address of routers between your network and the destination. This value represents the number of the gateway must be on the Static Routes page. A login window opens. 3. Enter the router admin user name and password. By default, the Active check box is the one that...
... page displays. 4. Click the Apply button. Edit a static route To edit a static route: 1. Launch a web browser from a computer or mobile device that you logged in RIP. 8. Manage Network Settings 78 User Manual The IP address of routers between your network and the destination. This value represents the number of the gateway must be on the Static Routes page. A login window opens. 3. Enter the router admin user name and password. By default, the Active check box is the one that...

User Manual
Page 90
... a specific firmware version, or your router fails to confirm whether the new firmware version uploaded. A login window opens. 4. Click the Upload button. Do not turn off the router. Manage Your Router 90 User Manual Manually upload firmware to the router If you logged in. Enter http://www.routerlogin.net. The password is admin. The Firmware Update page displays. 6. Enter the router admin user name and password. The user name is the one minute. The user name and password are case-sensitive. Download the firmware...
... a specific firmware version, or your router fails to confirm whether the new firmware version uploaded. A login window opens. 4. Click the Upload button. Do not turn off the router. Manage Your Router 90 User Manual Manually upload firmware to the router If you logged in. Enter http://www.routerlogin.net. The password is admin. The Firmware Update page displays. 6. Enter the router admin user name and password. The user name is the one minute. The user name and password are case-sensitive. Download the firmware...
User Manual
Page 98
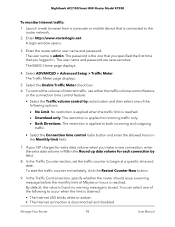
... Restart Counter Now button. 9. Select the Enable Traffic Meter check box. 6. Launch a web browser from a computer or mobile device that you make a new connection, enter the extra data volume in MB in . The password is the one of Mbytes or hours is applied to the router network. 2. The restriction is reached. Manage Your Router 98 User Manual A login window opens. 3. Nighthawk AC2100 Smart WiFi Router Model R7200 To monitor Internet traffic: 1. The restriction...
... Restart Counter Now button. 9. Select the Enable Traffic Meter check box. 6. Launch a web browser from a computer or mobile device that you make a new connection, enter the extra data volume in MB in . The password is the one of Mbytes or hours is applied to the router network. 2. The restriction is reached. Manage Your Router 98 User Manual A login window opens. 3. Nighthawk AC2100 Smart WiFi Router Model R7200 To monitor Internet traffic: 1. The restriction...
User Manual
Page 103
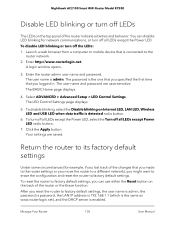
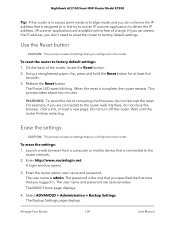
... ADVANCED > Advanced Setup > LED Control Settings. To reset the router to factory default settings, you can disable LED blinking for example, if you might want to erase the configuration and reset the router to the router network. 2. The user name is detected radio button. 6. To disable blinking, select the Disable blinking on Internet LED, LAN LED, Wireless LED and USB LED when data traffic is admin. Enter http://www.routerlogin.net. You can use either the Reset button on the top panel of the changes that is the...
... ADVANCED > Advanced Setup > LED Control Settings. To reset the router to factory default settings, you can disable LED blinking for example, if you might want to erase the configuration and reset the router to the router network. 2. The user name is detected radio button. 6. To disable blinking, select the Disable blinking on Internet LED, LAN LED, Wireless LED and USB LED when data traffic is admin. Enter http://www.routerlogin.net. You can use either the Reset button on the top panel of the changes that is the...
User Manual
Page 104
... mobile device that is connected to factory default settings. The user name is complete, the router restarts. The password is the one that you specified the first time that you logged in the router. The Power LED starts blinking. Enter http://www.routerlogin.net. Select ADVANCED > Administration > Backup Settings. On the back of corrupting the firmware, do not interrupt the reset. When the reset is admin. Manage Your Router 104 User Manual Erase the settings CAUTION...
... mobile device that is connected to factory default settings. The user name is complete, the router restarts. The password is the one that you specified the first time that you logged in the router. The Power LED starts blinking. Enter http://www.routerlogin.net. Select ADVANCED > Administration > Backup Settings. On the back of corrupting the firmware, do not interrupt the reset. When the reset is admin. Manage Your Router 104 User Manual Erase the settings CAUTION...
User Manual
Page 120
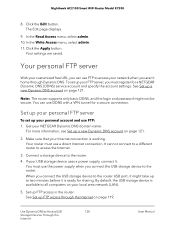
... be secure. See Set up your Internet connection is available to the router. Nighthawk AC2100 Smart WiFi Router Model R7200 8. Make sure that your FTP server, you connect the USB storage device to the router. 4. Click the Edit button. Click the Apply button. Your settings are saved. When you must use FTP: 1. Your router must register for sharing. Get your USB storage device uses a power supply, connect it is ready for a NETGEAR Dynamic DNS (DDNS) service account...
... be secure. See Set up your Internet connection is available to the router. Nighthawk AC2100 Smart WiFi Router Model R7200 8. Make sure that your FTP server, you connect the USB storage device to the router. 4. Click the Edit button. Click the Apply button. Your settings are saved. When you must use FTP: 1. Your router must register for sharing. Get your USB storage device uses a power supply, connect it is ready for a NETGEAR Dynamic DNS (DDNS) service account...
User Manual
Page 150
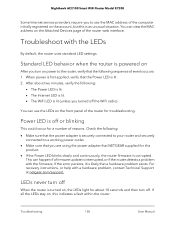
... router detects a problem with a hardware problem, contact Technical Support at netgear.com/support. Troubleshooting 150 User Manual You can view the MAC address on the front panel of the router for this product. • If the Power LED blinks slowly and continuously, the router firmware is first applied, verify that NETGEAR supplied for troubleshooting. When power is corrupted. Check the following : • The Power LED is lit. • The Internet LED is lit. • The WiFi LED is turned on, the LEDs light for a number...
... router detects a problem with a hardware problem, contact Technical Support at netgear.com/support. Troubleshooting 150 User Manual You can view the MAC address on the front panel of the router for this product. • If the Power LED blinks slowly and continuously, the router firmware is first applied, verify that NETGEAR supplied for troubleshooting. When power is corrupted. Check the following : • The Power LED is lit. • The Internet LED is lit. • The WiFi LED is turned on, the LEDs light for a number...

User Manual
Page 159
...Login password (case-sensitive) password Internet connection WAN MAC address Use default hardware address WAN MTU size Determined by the protocol that are shown in the following table shows the factory default settings for daylight Disabled saving time Supplemental Information 159 User Manual Nighthawk AC2100 Smart WiFi Router Model R7200 Factory Settings You can reset the router to the factory default settings that is used for the Internet connection Port speed AutoSensing Local network (LAN) LAN IP address 192.168.1.1 Subnet mask 255.255.255.0 DHCP server Enabled DHCP...
...Login password (case-sensitive) password Internet connection WAN MAC address Use default hardware address WAN MTU size Determined by the protocol that are shown in the following table shows the factory default settings for daylight Disabled saving time Supplemental Information 159 User Manual Nighthawk AC2100 Smart WiFi Router Model R7200 Factory Settings You can reset the router to the factory default settings that is used for the Internet connection Port speed AutoSensing Local network (LAN) LAN IP address 192.168.1.1 Subnet mask 255.255.255.0 DHCP server Enabled DHCP...


