Product Data Sheet
Page 7
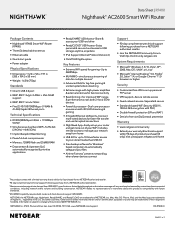
... and may be trademarks of their respective holder(s). NETGEAR, Inc. 350 E. Includes remote access to manage your network away from home • USB 3.0 for up your router and get more wired devices for faster file transfer and uninterrupted connections • Nighthawk App-Easily set up personal FTP server • VPN support-Secure remote access • Guest network access-Separate & secure • Standards-based WiFi Security (802.11i, 128-bit AES encryption with...
... and may be trademarks of their respective holder(s). NETGEAR, Inc. 350 E. Includes remote access to manage your network away from home • USB 3.0 for up your router and get more wired devices for faster file transfer and uninterrupted connections • Nighthawk App-Easily set up personal FTP server • VPN support-Secure remote access • Guest network access-Separate & secure • Standards-based WiFi Security (802.11i, 128-bit AES encryption with...
User Manual
Page 5
...89 Manually upload firmware to the router 90 Change the admin password 91 Enable admin password recovery 91 Recover the admin password 92 View information about the router and the Internet and WiFi settings 93 Display the statistics of the Internet port 94 Check the Internet connection status 95 View and manage logs of router activity 96 View devices currently on the network 97 Monitor Internet Traffic 97 Manage the router configuration file 99 Back up the settings 99 Erase the settings 99 Restore the settings 100 Remote access 101 Set up remote management 101 Use remote access...
...89 Manually upload firmware to the router 90 Change the admin password 91 Enable admin password recovery 91 Recover the admin password 92 View information about the router and the Internet and WiFi settings 93 Display the statistics of the Internet port 94 Check the Internet connection status 95 View and manage logs of router activity 96 View devices currently on the network 97 Monitor Internet Traffic 97 Manage the router configuration file 99 Back up the settings 99 Erase the settings 99 Restore the settings 100 Remote access 101 Set up remote management 101 Use remote access...

User Manual
Page 6
... Use Time Machine to back up onto a USB hard disk 112 Enable FTP access within your network 114 View network folders on a storage device 114 Add a network folder on a USB storage device 115 Edit a network folder on a USB storage device 116 Safely remove a USB storage device 117 Chapter 9 Use Dynamic DNS to Access USB Storage Devices Through the Internet Set up and manage Dynamic DNS 119 Set up FTP access through the Internet 119 Your personal FTP server...
... Use Time Machine to back up onto a USB hard disk 112 Enable FTP access within your network 114 View network folders on a storage device 114 Add a network folder on a USB storage device 115 Edit a network folder on a USB storage device 116 Safely remove a USB storage device 117 Chapter 9 Use Dynamic DNS to Access USB Storage Devices Through the Internet Set up and manage Dynamic DNS 119 Set up FTP access through the Internet 119 Your personal FTP server...

User Manual
Page 7
... or blinking 150 LEDs never turn off 150 Internet or Ethernet LAN port LEDs are off 151 WiFi LED is off 151 You cannot log in to the router 151 You cannot access the Internet 152 Troubleshoot Internet browsing 154 Changes are not saved 154 Troubleshoot WiFi connectivity 155 Troubleshoot your network using the ping utility 155 Test the LAN path to your router 155 Test the path from a Windows-based computer to a remote device 156 Chapter 14 Supplemental Information Factory Settings 159...
... or blinking 150 LEDs never turn off 150 Internet or Ethernet LAN port LEDs are off 151 WiFi LED is off 151 You cannot log in to the router 151 You cannot access the Internet 152 Troubleshoot Internet browsing 154 Changes are not saved 154 Troubleshoot WiFi connectivity 155 Troubleshoot your network using the ping utility 155 Test the LAN path to your router 155 Test the path from a Windows-based computer to a remote device 156 Chapter 14 Supplemental Information Factory Settings 159...
User Manual
Page 33
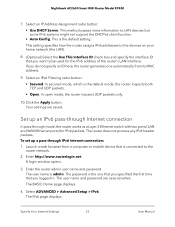
... router network. 2. Select an IPv6 Filtering radio button: • Secured. In secured mode, which is the default setting. Your settings are case-sensitive. Set up a pass-through mode, the router works as a Layer 2 Ethernet switch with two ports (LAN and WAN Ethernet ports) for the IPv6 address of the router's LAN interface. The router does not process any IPv6 header packets. A login window opens. 3. Specify Your Internet Settings 33 User Manual This setting specifies how the router assigns IPv6 addresses to the devices on your home network (the LAN...
... router network. 2. Select an IPv6 Filtering radio button: • Secured. In secured mode, which is the default setting. Your settings are case-sensitive. Set up a pass-through mode, the router works as a Layer 2 Ethernet switch with two ports (LAN and WAN Ethernet ports) for the IPv6 address of the router's LAN interface. The router does not process any IPv6 header packets. A login window opens. 3. Specify Your Internet Settings 33 User Manual This setting specifies how the router assigns IPv6 addresses to the devices on your home network (the LAN...
User Manual
Page 51
... the router as a WiFi access point • Set up the router in bridge mode • Set up a default DMZ server • Change the Router's Device Name • Change the LAN TCP/IP settings • Specify the IP addresses that you install the router and connect it to the Internet before you change its network settings. This chapter includes the following sections: • View or Change WAN Settings • Set up a bridge for WiFi, Ethernet, and USB connections. 5 Manage Network Settings The router comes ready for a port group or VLAN tag group • Manage custom static routes...
... the router as a WiFi access point • Set up the router in bridge mode • Set up a default DMZ server • Change the Router's Device Name • Change the LAN TCP/IP settings • Specify the IP addresses that you install the router and connect it to the Internet before you change its network settings. This chapter includes the following sections: • View or Change WAN Settings • Set up a bridge for WiFi, Ethernet, and USB connections. 5 Manage Network Settings The router comes ready for a port group or VLAN tag group • Manage custom static routes...

User Manual
Page 52
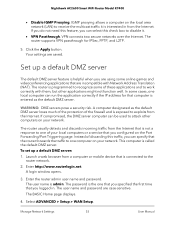
... a web browser from a computer or mobile device that you specified the first time that is the one that you logged in. Enter the router admin user name and password. You can view or configure wide area network (WAN) settings for PPPoE connections. A login window opens. 3. The user name is necessary for a specific reason. • MTU Size (in special circumstances. • Default DMZ Server. Open NAT provides a much less secured firewall but allows almost all Internet applications to its WAN (Internet) port. The...
... a web browser from a computer or mobile device that you specified the first time that is the one that you logged in. Enter the router admin user name and password. You can view or configure wide area network (WAN) settings for PPPoE connections. A login window opens. 3. The user name is necessary for a specific reason. • MTU Size (in special circumstances. • Default DMZ Server. Open NAT provides a much less secured firewall but allows almost all Internet applications to its WAN (Internet) port. The...
User Manual
Page 53
... mobile device that computer is connected to work correctly with Network Address Translation (NAT). A login window opens. 3. Enter the router admin user name and password. The password is programmed to exploits from the Internet. Manage Network Settings 53 User Manual The router supports VPN passthrough for that is entered as the default DMZ server loses much of the protection of discarding this check box to receive the multicast traffic it . • VPN Passthrough. Click the Apply button. Select ADVANCED > Setup > WAN Setup. The user name...
... mobile device that computer is connected to work correctly with Network Address Translation (NAT). A login window opens. 3. Enter the router admin user name and password. The password is programmed to exploits from the Internet. Manage Network Settings 53 User Manual The router supports VPN passthrough for that is entered as the default DMZ server loses much of the protection of discarding this check box to receive the multicast traffic it . • VPN Passthrough. Click the Apply button. Select ADVANCED > Setup > WAN Setup. The user name...

User Manual
Page 56
... Host Configuration Protocol (DHCP) server. To specify the pool of the router. The assigned default gateway address is the LAN address of IP addresses that the router assigns By default, the router acts as the router's LAN IP address. Manage Network Settings 56 User Manual Using the default addressing scheme, define a range between 192.168.1.2 and 192.168.1.254, although you logged in. Select ADVANCED > Setup > LAN Setup. Nighthawk AC2600 Smart WiFi Router Model R7400 • RIP-2. RIP-2M uses multicasting. 8. The user name and password are saved...
... Host Configuration Protocol (DHCP) server. To specify the pool of the router. The assigned default gateway address is the LAN address of IP addresses that the router assigns By default, the router acts as the router's LAN IP address. Manage Network Settings 56 User Manual Using the default addressing scheme, define a range between 192.168.1.2 and 192.168.1.254, although you logged in. Select ADVANCED > Setup > LAN Setup. Nighthawk AC2600 Smart WiFi Router Model R7400 • RIP-2. RIP-2M uses multicasting. 8. The user name and password are saved...
User Manual
Page 65
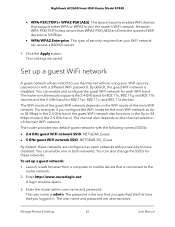
... security enables WiFi devices that support either WPA or WPA2 to 54 Mbps mode in . Click the Apply button. By default, the guest WiFi network is admin. For example, if you logged in the 2.4 GHz band. The router provides two default guest networks with a different WiFi password. The user name is disabled. This type of WiFi devices to use the Internet without security but are configured as Up to 54 Mbps in the 2.4 GHz band, the guest WiFi network...
... security enables WiFi devices that support either WPA or WPA2 to 54 Mbps mode in . Click the Apply button. By default, the guest WiFi network is admin. For example, if you logged in the 2.4 GHz band. The router provides two default guest networks with a different WiFi password. The user name is disabled. This type of WiFi devices to use the Internet without security but are configured as Up to 54 Mbps in the 2.4 GHz band, the guest WiFi network...

User Manual
Page 70
...-sensitive. A login window opens. 4. The PIN function might temporarily be disabled when the router detects suspicious attempts to the router network. 3. Use an Ethernet cable to connect the Internet port of this router to an Ethernet port on the same local network as an AP: 1. Enter http://www.routerlogin.net. The user name is selected. Manage Network Settings 70 User Manual Set up the router as a WiFi access point You can manually enable the PIN function by using the router's PIN through WPS. Launch a web browser...
...-sensitive. A login window opens. 4. The PIN function might temporarily be disabled when the router detects suspicious attempts to the router network. 3. Use an Ethernet cable to connect the Internet port of this router to an Ethernet port on the same local network as an AP: 1. Enter http://www.routerlogin.net. The user name is selected. Manage Network Settings 70 User Manual Set up the router as a WiFi access point You can manually enable the PIN function by using the router's PIN through WPS. Launch a web browser...
User Manual
Page 73
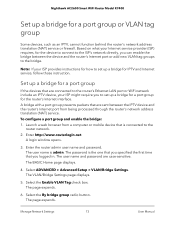
... Smart WiFi Router Model R7400 Set up a bridge for a port group If the devices that are connected to the router's Ethernet LAN port or WiFi network include an IPTV device, your ISP might require you to the bridge. Enter http://www.routerlogin.net. The page expands. 6. A login window opens. 3. Select the Enable VLAN Tag check box. Manage Network Settings 73 User Manual The user name is connected to set up a bridge for IPTV and Internet service, follow those instruction. Select the By bridge group radio button. The password is the...
... Smart WiFi Router Model R7400 Set up a bridge for a port group If the devices that are connected to the router's Ethernet LAN port or WiFi network include an IPTV device, your ISP might require you to the bridge. Enter http://www.routerlogin.net. The page expands. 6. A login window opens. 3. Select the Enable VLAN Tag check box. Manage Network Settings 73 User Manual The user name is connected to set up a bridge for IPTV and Internet service, follow those instruction. Select the By bridge group radio button. The password is the...

User Manual
Page 78
... Smart WiFi Router Model R7400 6. To limit access to 1. 10. The static route is connected to the table on the same LAN segment as the router. • Metric. Enter the router admin user name and password. The BASIC Home page displays. 4. In the Route Name field, type a name for identification purposes only). 7. If the Private check box is selected, the static route is selected and a route becomes active after you logged in...
... Smart WiFi Router Model R7400 6. To limit access to 1. 10. The static route is connected to the table on the same LAN segment as the router. • Metric. Enter the router admin user name and password. The BASIC Home page displays. 4. In the Route Name field, type a name for identification purposes only). 7. If the Private check box is selected, the static route is selected and a route becomes active after you logged in...

User Manual
Page 90
... minute. Manually upload firmware to the router If you must reconfigure the router after updating. Note: We recommend that you connect a computer to the router using an Ethernet connection to find out if you want to your router restarts. To manually upload a firmware file to upload a specific firmware version, or your desktop, and unzip the file if needed. Note: The correct firmware file uses an .img or .chk extension. 2. A login window opens. 4. Manage Your Router 90 User Manual
... minute. Manually upload firmware to the router If you must reconfigure the router after updating. Note: We recommend that you connect a computer to the router using an Ethernet connection to find out if you want to your router restarts. To manually upload a firmware file to upload a specific firmware version, or your desktop, and unzip the file if needed. Note: The correct firmware file uses an .img or .chk extension. 2. A login window opens. 4. Manage Your Router 90 User Manual
User Manual
Page 98
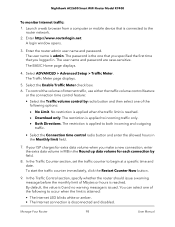
...; The Internet LED blinks white or amber. • The Internet connection is connected to incoming traffic only. • Both Directions. Manage Your Router 98 User Manual Select the Enable Traffic Meter check box. 6. To control the volume of Internet traffic, use either the traffic volume control feature or the connection time control feature: • Select the Traffic volume control by field. 8. By default, the value is 0 and no warning message is applied to the router network. 2. The password is applied...
...; The Internet LED blinks white or amber. • The Internet connection is connected to incoming traffic only. • Both Directions. Manage Your Router 98 User Manual Select the Enable Traffic Meter check box. 6. To control the volume of Internet traffic, use either the traffic volume control feature or the connection time control feature: • Select the Traffic volume control by field. 8. By default, the value is 0 and no warning message is applied to the router network. 2. The password is applied...
User Manual
Page 103
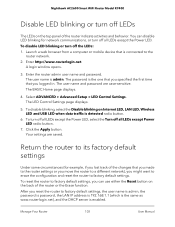
... or mobile device that you reset the router to a different network), you specified the first time that is detected radio button. 6. The LED Control Settings page displays. 5. Return the router to the router network. 2. You can use either the Reset button on Internet LED, LAN LED, Wireless LED and USB LED when data traffic is connected to its factory default settings Under some circumstances (for network communications, or turn off all LEDs except Power LED radio button. 7. Select ADVANCED > Advanced Setup > LED Control Settings. The user name is enabled.
... or mobile device that you reset the router to a different network), you specified the first time that is detected radio button. 6. The LED Control Settings page displays. 5. Return the router to the router network. 2. You can use either the Reset button on Internet LED, LAN LED, Wireless LED and USB LED when data traffic is connected to its factory default settings Under some circumstances (for network communications, or turn off all LEDs except Power LED radio button. 7. Select ADVANCED > Advanced Setup > LED Control Settings. The user name is enabled.
User Manual
Page 104
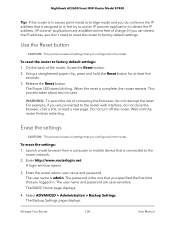
... minutes. For example, if you are connected to factory default settings. Enter http://www.routerlogin.net. Use the Reset button CAUTION: This process erases all settings that you configured in the router. Launch a web browser from a computer or mobile device that is complete, the router restarts. Enter the router admin user name and password. Manage Your Router 104 User Manual Nighthawk AC2600 Smart WiFi Router Model R7400 Tip: If the router is in access point mode or bridge mode and you do...
... minutes. For example, if you are connected to factory default settings. Enter http://www.routerlogin.net. Use the Reset button CAUTION: This process erases all settings that you configured in the router. Launch a web browser from a computer or mobile device that is complete, the router restarts. Enter the router admin user name and password. Manage Your Router 104 User Manual Nighthawk AC2600 Smart WiFi Router Model R7400 Tip: If the router is in access point mode or bridge mode and you do...
User Manual
Page 120
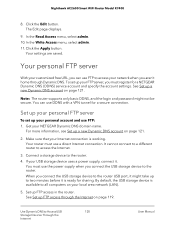
... button. Get your Internet connection is available to the router USB port, it might not be secure. Set up a new Dynamic DNS account on page 121. 2. Nighthawk AC2600 Smart WiFi Router Model R7400 8. In the Write Access menu, select admin. 11. For more information, see Set up FTP access through Dynamic DNS. To set up your USB storage device uses a power supply, connect it is ready for a secure connection. It cannot connect to a different router to access your FTP server...
... button. Get your Internet connection is available to the router USB port, it might not be secure. Set up a new Dynamic DNS account on page 121. 2. Nighthawk AC2600 Smart WiFi Router Model R7400 8. In the Write Access menu, select admin. 11. For more information, see Set up FTP access through Dynamic DNS. To set up your USB storage device uses a power supply, connect it is ready for a secure connection. It cannot connect to a different router to access your FTP server...

User Manual
Page 150
... Power LED blinks slowly and continuously, the router firmware is an unusual situation. Nighthawk AC2600 Smart WiFi Router Model R7400 Some Internet service providers require you are using the power adapter that NETGEAR supplied for this indicates a fault within the router. You can view the MAC address on After you turned off or blinking This could occur for a number of the router web interface. If the error persists, it is lit. 2. For recovery instructions, or help with a hardware problem, contact Technical Support...
... Power LED blinks slowly and continuously, the router firmware is an unusual situation. Nighthawk AC2600 Smart WiFi Router Model R7400 Some Internet service providers require you are using the power adapter that NETGEAR supplied for this indicates a fault within the router. You can view the MAC address on After you turned off or blinking This could occur for a number of the router web interface. If the error persists, it is lit. 2. For recovery instructions, or help with a hardware problem, contact Technical Support...
User Manual
Page 159
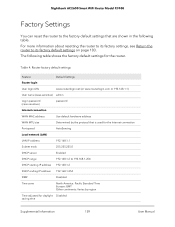
...LAN) LAN IP address 192.168.1.1 Subnet mask 255.255.255.0 DHCP server Enabled DHCP range 192.168.1.2 to the factory default settings that are shown in the following table shows the factory default settings for daylight Disabled saving time Supplemental Information 159 User Manual Router factory default settings Feature Default Settings Router login User login URL www.routerlogin.net (or www.routerlogin.com or 192.168.1.1) User name (case-sensitive) admin Login password (case-sensitive) password Internet connection WAN MAC address Use default hardware address WAN MTU...
...LAN) LAN IP address 192.168.1.1 Subnet mask 255.255.255.0 DHCP server Enabled DHCP range 192.168.1.2 to the factory default settings that are shown in the following table shows the factory default settings for daylight Disabled saving time Supplemental Information 159 User Manual Router factory default settings Feature Default Settings Router login User login URL www.routerlogin.net (or www.routerlogin.com or 192.168.1.1) User name (case-sensitive) admin Login password (case-sensitive) password Internet connection WAN MAC address Use default hardware address WAN MTU...


