Installation Guide
Page 1
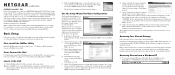
..., Install the RAIDar Utility Install the RAIDar utility from a Windows PC 1. Log in the Windows Explorer address bar. \\nas-BB-7F-A8 The default user name is admin and the password is on the Resource CD and on the ReadyNAS. Click Next to access shares on the NETGEAR support site at least one email address for a list of the ReadyNAS to the ReadyNAS 3200 User Manual for Basic Configuration The Setup Wizard will attempt to change the admin password, and provide a password recovery question...
..., Install the RAIDar Utility Install the RAIDar utility from a Windows PC 1. Log in the Windows Explorer address bar. \\nas-BB-7F-A8 The default user name is admin and the password is on the Resource CD and on the ReadyNAS. Click Next to access shares on the NETGEAR support site at least one email address for a list of the ReadyNAS to the ReadyNAS 3200 User Manual for Basic Configuration The Setup Wizard will attempt to change the admin password, and provide a password recovery question...

Installation Guide
Page 2
... the ReadyNAS share. \\nas-BB-7F-A8 Accessing Shares from a disk failure. 2. To access the same share over the phone is not interrupted. nas-BB-7F-A8 nas-BB-7F-A8 nas-BB-7F-A8 2. This assures an orderly shutdown. Ventilation Twelve large capacity high speed disks can hot add more disks for worldwide regional customer support centers are unobstructed. The ReadyNAS 3200 User Manual provides instructions on a status light to the ReadyNAS 3200 User Manual. Double-click on using...
... the ReadyNAS share. \\nas-BB-7F-A8 Accessing Shares from a disk failure. 2. To access the same share over the phone is not interrupted. nas-BB-7F-A8 nas-BB-7F-A8 nas-BB-7F-A8 2. This assures an orderly shutdown. Ventilation Twelve large capacity high speed disks can hot add more disks for worldwide regional customer support centers are unobstructed. The ReadyNAS 3200 User Manual provides instructions on a status light to the ReadyNAS 3200 User Manual. Double-click on using...
Hardware Manual
Page 3
Table of Contents Chapter 1 Getting Started System Shutdown 6 Factory Settings 6 Chapter 2 ReadyNAS 1500 and 2100 Front Panel 8 Rear Panel 10 Status Information 11 Boot Menu 12 Rack-Mount Setup 14 Considerations 14 Installation 14 Technical Specifications 15 Chapter 3 ReadyNAS 3100 Front Panel 17 Rear Panel 18 Status Information 19 Boot Menu 20 Rack-Mount Setup 22 Considerations 22 Installation 22 Technical Specifications 25 Chapter 4 ReadyNAS 3200, 4200 v1, 4200 v2 Front...
Table of Contents Chapter 1 Getting Started System Shutdown 6 Factory Settings 6 Chapter 2 ReadyNAS 1500 and 2100 Front Panel 8 Rear Panel 10 Status Information 11 Boot Menu 12 Rack-Mount Setup 14 Considerations 14 Installation 14 Technical Specifications 15 Chapter 3 ReadyNAS 3100 Front Panel 17 Rear Panel 18 Status Information 19 Boot Menu 20 Rack-Mount Setup 22 Considerations 22 Installation 22 Technical Specifications 25 Chapter 4 ReadyNAS 3200, 4200 v1, 4200 v2 Front...
Hardware Manual
Page 5
... Shutdown • Factory Settings For detailed information about configuring, managing, and using your purchase of ReadyNAS rack-mount storage products. 1. Visit http://readynas.com for Business Software Manual, which is available at http://www.readynas.com/documentation. ReadyNAS Rack-Mount Storage Systems Hardware Manual describes the physical features of a NETGEAR® ReadyNAS® rack-mount storage unit. NETGEAR maintains a community website that supports ReadyNAS products. Getting Started 1 Congratulations on your ReadyNAS rack-mount storage system, see the ReadyNAS...
... Shutdown • Factory Settings For detailed information about configuring, managing, and using your purchase of ReadyNAS rack-mount storage products. 1. Visit http://readynas.com for Business Software Manual, which is available at http://www.readynas.com/documentation. ReadyNAS Rack-Mount Storage Systems Hardware Manual describes the physical features of a NETGEAR® ReadyNAS® rack-mount storage unit. NETGEAR maintains a community website that supports ReadyNAS products. Getting Started 1 Congratulations on your ReadyNAS rack-mount storage system, see the ReadyNAS...
Hardware Manual
Page 6
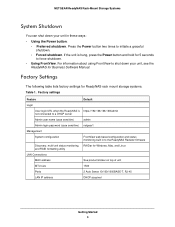
... the ReadyNAS Radiator firmware Discovery, multi-unit status monitoring, RAIDar for Windows, Mac, and Linux and RAID formatting utility LAN Connections MAC address See product sticker on top of unit MTU size 1500 Ports 2 Auto Sense 10/100/1000BASE-T, RJ-45 LAN IP address DHCP acquired Getting Started 6 Press the Power button two times to force shutdown. • Using FrontView. Factory settings Feature Default Login User login URL when the ReadyNAS is hung, press the Power button and hold for ReadyNAS rack mount storage systems...
... the ReadyNAS Radiator firmware Discovery, multi-unit status monitoring, RAIDar for Windows, Mac, and Linux and RAID formatting utility LAN Connections MAC address See product sticker on top of unit MTU size 1500 Ports 2 Auto Sense 10/100/1000BASE-T, RJ-45 LAN IP address DHCP acquired Getting Started 6 Press the Power button two times to force shutdown. • Using FrontView. Factory settings Feature Default Login User login URL when the ReadyNAS is hung, press the Power button and hold for ReadyNAS rack mount storage systems...
Hardware Manual
Page 11
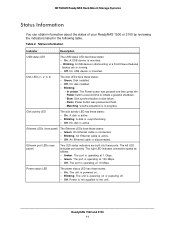
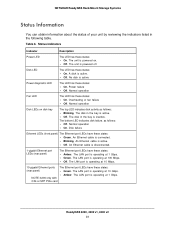
NETGEAR ReadyNAS Rack-Mount Storage Systems Status Information You can obtain information about the status of your ReadyNAS 1500 or 2100 by reviewing the indicators listed in progress. Status information Indicator Description USB status LED The USB status LED has these states: • On. A USB device is active. • Off. Disk LEDs (1, 2, 3, 4) The disk LEDs have these states: • Green. Disk installed • Off. No disk installed. • Blinking: - An Ethernet cable is mounted. • Blinking. The port is powering on . • Blinking. The unit is...
NETGEAR ReadyNAS Rack-Mount Storage Systems Status Information You can obtain information about the status of your ReadyNAS 1500 or 2100 by reviewing the indicators listed in progress. Status information Indicator Description USB status LED The USB status LED has these states: • On. A USB device is active. • Off. Disk LEDs (1, 2, 3, 4) The disk LEDs have these states: • Green. Disk installed • Off. No disk installed. • Blinking: - An Ethernet cable is mounted. • Blinking. The port is powering on . • Blinking. The unit is...
Hardware Manual
Page 12
... the firmware from the internal flash to interpret memory test results. • Disk test. Use the tech support boot mode only when instructed to do so by a NETGEAR technical support representative. • Skip volume check. NETGEAR ReadyNAS Rack-Mount Storage Systems Boot Menu Use the boot menu to restart or troubleshoot your unit, such as Internet protocol settings and the administrator password, to defaults. • Tech support. The pass or fail result is reported using the Power button. • Factory default...
... the firmware from the internal flash to interpret memory test results. • Disk test. Use the tech support boot mode only when instructed to do so by a NETGEAR technical support representative. • Skip volume check. NETGEAR ReadyNAS Rack-Mount Storage Systems Boot Menu Use the boot menu to restart or troubleshoot your unit, such as Internet protocol settings and the administrator password, to defaults. • Tech support. The pass or fail result is reported using the Power button. • Factory default...
Hardware Manual
Page 13
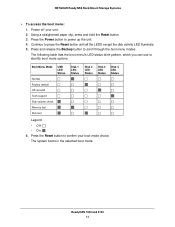
... disk activity LED illuminate. 5. The system boots in the selected boot mode. Press the Power button to identify boot mode options. NETGEAR ReadyNAS Rack-Mount Storage Systems To access the boot menu: 1. Power off your boot mode choice. The following table lists the boot menu's LED status blink pattern, which you can use to power up the unit. 4. Using a straightened paper clip, press and hold the Reset button. 3. Boot Menu Mode Normal Factory default OS reinstall Tech support Skip volume check Memory test Disk test USB LED Status...
... disk activity LED illuminate. 5. The system boots in the selected boot mode. Press the Power button to identify boot mode options. NETGEAR ReadyNAS Rack-Mount Storage Systems To access the boot menu: 1. Power off your boot mode choice. The following table lists the boot menu's LED status blink pattern, which you can use to power up the unit. 4. Using a straightened paper clip, press and hold the Reset button. 3. Boot Menu Mode Normal Factory default OS reinstall Tech support Skip volume check Memory test Disk test USB LED Status...
Hardware Manual
Page 14
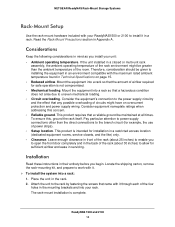
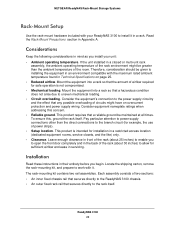
...) to enable you begin. Consider the equipment's connection to allow for installation in servicing. ReadyNAS 1500 and 2100 14 NETGEAR ReadyNAS Rack-Mount Storage Systems Rack-Mount Setup Use the rack-mount hardware included with your unit: • Ambient operating temperature. Installation Read these instructions in Appendix A. This product is complete. Leave enough clearance in front of the rack (about 30 inches) to the power supply circuitry and...
...) to enable you begin. Consider the equipment's connection to allow for installation in servicing. ReadyNAS 1500 and 2100 14 NETGEAR ReadyNAS Rack-Mount Storage Systems Rack-Mount Setup Use the rack-mount hardware included with your unit: • Ambient operating temperature. Installation Read these instructions in Appendix A. This product is complete. Leave enough clearance in front of the rack (about 30 inches) to the power supply circuitry and...
Hardware Manual
Page 15
... (non-condensing) Physical Form factor Dimensions (H x W x D) Weight Optional Spare Parts Disk tray Maximum disk drive size X-Change system module Rack mount Specification 220W server-rated AC power supply 100-240V AC, 50/60Hz 80W typical with 4 1 TB disks Three dual 40 mm ball-bearing chassis cooling fans Hardware LED, software via FrontView and high temperature email alert with auto-shutdown option 0° to 40° C (32° to10°...
... (non-condensing) Physical Form factor Dimensions (H x W x D) Weight Optional Spare Parts Disk tray Maximum disk drive size X-Change system module Rack mount Specification 220W server-rated AC power supply 100-240V AC, 50/60Hz 80W typical with 4 1 TB disks Three dual 40 mm ball-bearing chassis cooling fans Hardware LED, software via FrontView and high temperature email alert with auto-shutdown option 0° to 40° C (32° to10°...

Hardware Manual
Page 17
USB port 3. Ethernet LEDs 2. Power LED 3. Reset button 6 ReadyNAS 3100 17 Disk activity LED 6. Power button 4. Fan LED 5. Control panel The following figure shows the front panel of the ReadyNAS 3100. 2 3 1 Figure 5. Control panel 1. Front panel 1. Drive bays with disk status LEDs 2. NETGEAR ReadyNAS Rack-Mount Storage Systems Front Panel This following figure shows the control panel in more detail. 1 2 3 4 5 Figure 6.
USB port 3. Ethernet LEDs 2. Power LED 3. Reset button 6 ReadyNAS 3100 17 Disk activity LED 6. Power button 4. Fan LED 5. Control panel The following figure shows the front panel of the ReadyNAS 3100. 2 3 1 Figure 5. Control panel 1. Front panel 1. Drive bays with disk status LEDs 2. NETGEAR ReadyNAS Rack-Mount Storage Systems Front Panel This following figure shows the control panel in more detail. 1 2 3 4 5 Figure 6.

Hardware Manual
Page 20
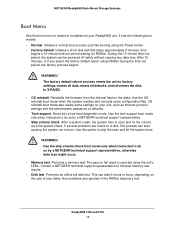
.... Use the tech support boot mode only when instructed to boot. If several problems are reported in the RAIDar discovery tool. Contact a NETGEAR technical support representative to scan and fix the volume via a file system check. NETGEAR ReadyNAS Rack-Mount Storage Systems Boot Menu Use the boot menu to do so by a NETGEAR technical support representative, otherwise data loss might occur. • Memory test. Initiates a normal boot process, just like booting using the Power button. • Factory default...
.... Use the tech support boot mode only when instructed to boot. If several problems are reported in the RAIDar discovery tool. Contact a NETGEAR technical support representative to scan and fix the volume via a file system check. NETGEAR ReadyNAS Rack-Mount Storage Systems Boot Menu Use the boot menu to do so by a NETGEAR technical support representative, otherwise data loss might occur. • Memory test. Initiates a normal boot process, just like booting using the Power button. • Factory default...
Hardware Manual
Page 22
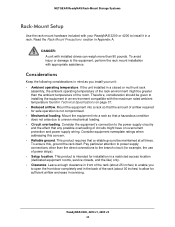
... rack-mounting kit contains two rail assemblies. Installation Read these instructions in a restricted access location (dedicated equipment rooms, service closets, and the like) only. • Clearance. To ensure this concern. • Reliable ground. NETGEAR ReadyNAS Rack-Mount Storage Systems Rack-Mount Setup Use the rack-mount hardware included with your unit: • Ambient operating temperature. Mount the equipment into a rack so that secures directly to install it...
... rack-mounting kit contains two rail assemblies. Installation Read these instructions in a restricted access location (dedicated equipment rooms, service closets, and the like) only. • Clearance. To ensure this concern. • Reliable ground. NETGEAR ReadyNAS Rack-Mount Storage Systems Rack-Mount Setup Use the rack-mount hardware included with your unit: • Ambient operating temperature. Mount the equipment into a rack so that secures directly to install it...
Hardware Manual
Page 31
... fan failure • Off. An Ethernet cable is powered off. The LAN port is active. NOTE: 4200 only with CX4 or SFP PCIe card ReadyNAS 3200, 4200 v1, 4200 v2 31 No disk is operating at 10 Gbps. • Amber. Normal operation Fan LED The LED has these states: • On. The disk in the bay is connected. • Blinking. The bottom LED indicates disk failure, as follows: • Blinking. An Ethernet cable...
... fan failure • Off. An Ethernet cable is powered off. The LAN port is active. NOTE: 4200 only with CX4 or SFP PCIe card ReadyNAS 3200, 4200 v1, 4200 v2 31 No disk is operating at 10 Gbps. • Amber. Normal operation Fan LED The LED has these states: • On. The disk in the bay is connected. • Blinking. The bottom LED indicates disk failure, as follows: • Blinking. An Ethernet cable...

Hardware Manual
Page 32
NETGEAR ReadyNAS Rack-Mount Storage Systems Boot Menu Use the boot menu to restart or troubleshoot your unit, such as Internet protocol settings and the administrator password, to defaults. • Tech support. Initiates a normal boot process, just like booting using the unit's LEDs. Use the tech support boot mode only when instructed to do so by a NETGEAR technical support representative, otherwise data loss might occur. • Memory test. The pass or fail result is reported using the Power button. • Factory default. Performs...
NETGEAR ReadyNAS Rack-Mount Storage Systems Boot Menu Use the boot menu to restart or troubleshoot your unit, such as Internet protocol settings and the administrator password, to defaults. • Tech support. Initiates a normal boot process, just like booting using the unit's LEDs. Use the tech support boot mode only when instructed to do so by a NETGEAR technical support representative, otherwise data loss might occur. • Memory test. The pass or fail result is reported using the Power button. • Factory default. Performs...

Hardware Manual
Page 33
... the boot menu options. NETGEAR ReadyNAS Rack-Mount Storage Systems To access the boot menu: 1. With a straightened paper clip, press and hold the Reset button for 3 seconds to enter the boot menu. 7. Press and release the Reset button to boot the system in the selected boot mode. Watch the blink pattern of the power diagnostic LED and the fan LED. Boot Mode Power Diagnostic LED and Fan LED Blink Pattern Normal Factory default OS reinstall Tech support Skip volume check...
... the boot menu options. NETGEAR ReadyNAS Rack-Mount Storage Systems To access the boot menu: 1. With a straightened paper clip, press and hold the Reset button for 3 seconds to enter the boot menu. 7. Press and release the Reset button to boot the system in the selected boot mode. Watch the blink pattern of the power diagnostic LED and the fan LED. Boot Mode Power Diagnostic LED and Fan LED Blink Pattern Normal Factory default OS reinstall Tech support Skip volume check...
Hardware Manual
Page 34
... rack mount installation with installed drives can weigh more than the ambient temperature of power strips). • Setup location. Leave enough clearance in front of the rack (about 25 inches) to enable you install your ReadyNAS 3200 or 4200 to installing the equipment in an environment compatible with the maximum rated ambient temperature found in Technical Specifications on overcurrent protection and power supply wiring...
... rack mount installation with installed drives can weigh more than the ambient temperature of power strips). • Setup location. Leave enough clearance in front of the rack (about 25 inches) to enable you install your ReadyNAS 3200 or 4200 to installing the equipment in an environment compatible with the maximum rated ambient temperature found in Technical Specifications on overcurrent protection and power supply wiring...
Hardware Manual
Page 37
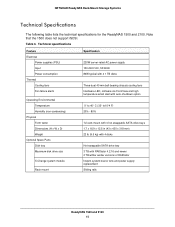
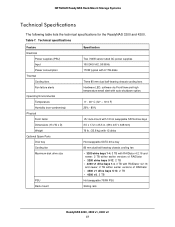
Table 7. NETGEAR ReadyNAS Rack-Mount Storage Systems Technical Specifications The following table lists the technical specifications for the ReadyNAS 3200 and 4200. Technical specifications Feature Electrical Power supplies (PSU) Input Power consumption Thermal Cooling fans Fan failure alerts Operating Environmental Temperature Humidity (non-condensing) Physical Form factor Dimensions (H x W x D) Weight Optional Spare Parts Disk tray Cooling fan Maximum disk drive size PSU Rack mount Specification Two 700W server rated AC power supplies 100-240V AC, 50/60Hz 170W typical...
Table 7. NETGEAR ReadyNAS Rack-Mount Storage Systems Technical Specifications The following table lists the technical specifications for the ReadyNAS 3200 and 4200. Technical specifications Feature Electrical Power supplies (PSU) Input Power consumption Thermal Cooling fans Fan failure alerts Operating Environmental Temperature Humidity (non-condensing) Physical Form factor Dimensions (H x W x D) Weight Optional Spare Parts Disk tray Cooling fan Maximum disk drive size PSU Rack mount Specification Two 700W server rated AC power supplies 100-240V AC, 50/60Hz 170W typical...
Hardware Manual
Page 40
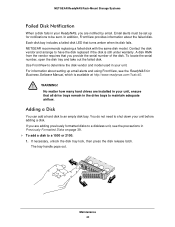
... many hard drives are adding previously formatted disks to a diskless unit, see the ReadyNAS for notifications to a 1500 or 2100: 1. NETGEAR ReadyNAS Rack-Mount Storage Systems Failed Disk Notification When a disk fails in your ReadyNAS, you provide the serial number of the disk. For information about the failed disk. Each disk bay includes a failed disk LED that all drive trays remain in the drive bays to maintain adequate airflow. In addition, FrontView provides information about setting up email...
... many hard drives are adding previously formatted disks to a diskless unit, see the ReadyNAS for notifications to a 1500 or 2100: 1. NETGEAR ReadyNAS Rack-Mount Storage Systems Failed Disk Notification When a disk fails in your ReadyNAS, you provide the serial number of the disk. For information about the failed disk. Each disk bay includes a failed disk LED that all drive trays remain in the drive bays to maintain adequate airflow. In addition, FrontView provides information about setting up email...

Hardware Manual
Page 56
... disk, failure 40 disk, replacing 43 disks, previously formatted 39 disks, supported 39 drive bay 1500 9 2100 9 3100 18 3200 28 4200 28 E electrical safety 50 electrostatic discharge 51 email alerts 40 ESD 51 F factory settings 6 failed disk 40 email alert 40 fan LED 19 fan, replacing 47 front panel 8 1500 8 2100 8 3100 17 3200 27 4200 27 G general safety 51 grounding 1500 14 2100 14 3100 22 3200 34 4200 34 H Hardware...
... disk, failure 40 disk, replacing 43 disks, previously formatted 39 disks, supported 39 drive bay 1500 9 2100 9 3100 18 3200 28 4200 28 E electrical safety 50 electrostatic discharge 51 email alerts 40 ESD 51 F factory settings 6 failed disk 40 email alert 40 fan LED 19 fan, replacing 47 front panel 8 1500 8 2100 8 3100 17 3200 27 4200 27 G general safety 51 grounding 1500 14 2100 14 3100 22 3200 34 4200 34 H Hardware...


