
Installation Guide
Page 2
..., tap CREATE NETGEAR ACCOUNT and follow the onscreen instructions. 5. Add the switch from a DHCP server (or router that you can visit www.netgear.com/support to an uplink. Any non‑NETGEAR trademarks are trademarks of the switch. Align the mounting holes in the brackets with the holes in Canada, you use a Category 6 (Cat 6) cable. You can access this (see the user manual, available at http://downloadcenter.netgear.com/other files, visit www.netgear.com/support...
..., tap CREATE NETGEAR ACCOUNT and follow the onscreen instructions. 5. Add the switch from a DHCP server (or router that you can visit www.netgear.com/support to an uplink. Any non‑NETGEAR trademarks are trademarks of the switch. Align the mounting holes in the brackets with the holes in Canada, you use a Category 6 (Cat 6) cable. You can access this (see the user manual, available at http://downloadcenter.netgear.com/other files, visit www.netgear.com/support...
User Manual
Page 2
.... You can access this document in Canada, you are agreeing to get your network on page 18 and added Ethernet cables and speeds on page 13. 12- Do not use this device, you can also check out our NETGEAR Community for reference purposes only. Changed Install the switch in a new format. or 24-Port 10-Gigabit/Multi-Gigabit Plus Switch Models XS512EM and XS724EM Support and Community Visit netgear.com/support to NETGEAR's Terms...
.... You can access this document in Canada, you are agreeing to get your network on page 18 and added Ethernet cables and speeds on page 13. 12- Do not use this device, you can also check out our NETGEAR Community for reference purposes only. Changed Install the switch in a new format. or 24-Port 10-Gigabit/Multi-Gigabit Plus Switch Models XS512EM and XS724EM Support and Community Visit netgear.com/support to NETGEAR's Terms...
User Manual
Page 4
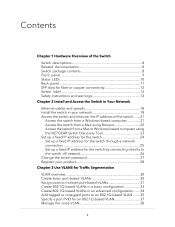
... 1 Hardware Overview of the Switch Switch descriptions 8 Related documentation 8 Switch package contents 8 Front panel 9 Status LEDs 10 Back panel 11 SFP slots for fiber or copper connectivity 12 Switch label 13 Safety instructions and warnings 13 Chapter 2 Install and Access the Switch in Your Network Ethernet cables and speeds 18 Install the switch in your network 18 Access the switch and discover the IP address of the switch........21 Access the switch from a Windows-based computer 21 Access the switch from a Mac using...
... 1 Hardware Overview of the Switch Switch descriptions 8 Related documentation 8 Switch package contents 8 Front panel 9 Status LEDs 10 Back panel 11 SFP slots for fiber or copper connectivity 12 Switch label 13 Safety instructions and warnings 13 Chapter 2 Install and Access the Switch in Your Network Ethernet cables and speeds 18 Install the switch in your network 18 Access the switch and discover the IP address of the switch........21 Access the switch from a Windows-based computer 21 Access the switch from a Mac using...
User Manual
Page 5
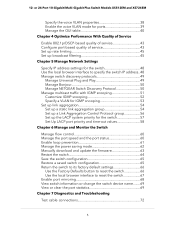
...switch 57 Set Up LACP port priority and time-out values 58 Chapter 6 Manage and Monitor the Switch Manage flow control 60 Manage the port speed and the port status 60 Enable loop prevention 61 Manage the power saving mode 62 Manually download and update the firmware 63 Restart the switch 64 Save the switch configuration 65 Restore a saved switch configuration 65 Return the switch to its factory default settings 66 Use the Factory Defaults button to reset the switch 66 Use the local browser interface to reset the switch 67 Enable port mirroring 68 View switch information or change...
...switch 57 Set Up LACP port priority and time-out values 58 Chapter 6 Manage and Monitor the Switch Manage flow control 60 Manage the port speed and the port status 60 Enable loop prevention 61 Manage the power saving mode 62 Manually download and update the firmware 63 Restart the switch 64 Save the switch configuration 65 Restore a saved switch configuration 65 Return the switch to its factory default settings 66 Use the Factory Defaults button to reset the switch 66 Use the local browser interface to reset the switch 67 Enable port mirroring 68 View switch information or change...
User Manual
Page 8
... high speed connections to the country of sale) • Rack-mount brackets for rack installation • Rack-mount screws for rack installation • Four rubber footpads for tabletop installation • Installation guide Hardware Overview of Service (QoS) and set up prioritization and rate limiting for small and medium-sized business networks and home offices that support either 10 Gbps or 1 Gbps Ethernet links or optional fiber or copper transceiver modules. or 24-Port 10-Gigabit/Multi-Gigabit Plus Switch Models...
... high speed connections to the country of sale) • Rack-mount brackets for rack installation • Rack-mount screws for rack installation • Four rubber footpads for tabletop installation • Installation guide Hardware Overview of Service (QoS) and set up prioritization and rate limiting for small and medium-sized business networks and home offices that support either 10 Gbps or 1 Gbps Ethernet links or optional fiber or copper transceiver modules. or 24-Port 10-Gigabit/Multi-Gigabit Plus Switch Models...
User Manual
Page 23
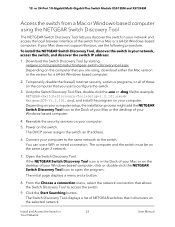
... and a button. 8. Open the Switch Discovery Tool. Depending on the same Layer 2 network. 7. The DHCP server assigns the switch an IP address. 6. You can use the following procedure. Click the Start Searching button. The Switch Discovery Tool displays a list of the switch from a Mac or Windows-based computer using , download either the Mac version or the version for example, NETGEAR+Switch+Discovery+Tool+Setup+1.2.101.exe or NetgearSDT-V1.2.101.dmg), and install the program...
... and a button. 8. Open the Switch Discovery Tool. Depending on the same Layer 2 network. 7. The DHCP server assigns the switch an IP address. 6. You can use the following procedure. Click the Start Searching button. The Switch Discovery Tool displays a list of the switch from a Mac or Windows-based computer using , download either the Mac version or the version for example, NETGEAR+Switch+Discovery+Tool+Setup+1.2.101.exe or NetgearSDT-V1.2.101.dmg), and install the program...
User Manual
Page 24
... connected to a network, or for the switch by a DHCP server) might change the IP address of the switch in 24 Your Network User Manual If the switch and your computer are connected to the login page for quick access on page 24) to the switch. The login page of the switch, click the ADMIN PAGE button. The Switch Information page displays. However, the DHCP server might no longer link to the same network (which is password. The default password...
... connected to a network, or for the switch by a DHCP server) might change the IP address of the switch in 24 Your Network User Manual If the switch and your computer are connected to the login page for quick access on page 24) to the switch. The login page of the switch, click the ADMIN PAGE button. The Switch Information page displays. However, the DHCP server might no longer link to the same network (which is password. The default password...
User Manual
Page 26
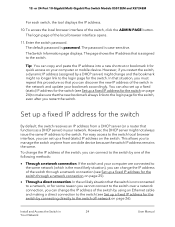
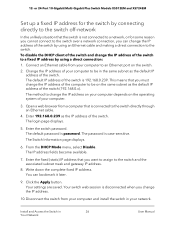
... and gateway IP address. 8. Install and Access the Switch in the same subnet as the IP address of the switch to a fixed IP address by using a direct connection: 1. To disable the DHCP client of the switch and change the IP address of the switch. Connect an Ethernet cable from your network. The default IP address of the computer to the switch off-network In the unlikely situation that you can bookmark it later. 9. Open a web...
... and gateway IP address. 8. Install and Access the Switch in the same subnet as the IP address of the switch to a fixed IP address by using a direct connection: 1. To disable the DHCP client of the switch and change the IP address of the switch. Connect an Ethernet cable from your network. The default IP address of the computer to the switch off-network In the unlikely situation that you can bookmark it later. 9. Open a web...
User Manual
Page 27
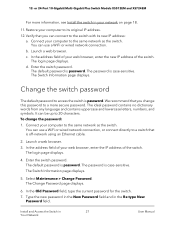
... or wired network connection. c. In the address field of your computer to access the switch is off-network using an Ethernet cable. 2. The login page displays. d. Connect your web browser, enter the new IP address of the switch. Launch a web browser. 3. The Change Password page displays. 6. Install and Access the Switch in the Re-type New Password field. or 24-Port 10-Gigabit/Multi-Gigabit Plus Switch Models XS512EM and XS724EM For more secure password. Change the switch password The default password to the...
... or wired network connection. c. In the address field of your computer to access the switch is off-network using an Ethernet cable. 2. The login page displays. d. Connect your web browser, enter the new IP address of the switch. Launch a web browser. 3. The Change Password page displays. 6. Install and Access the Switch in the Re-type New Password field. or 24-Port 10-Gigabit/Multi-Gigabit Plus Switch Models XS512EM and XS724EM For more secure password. Change the switch password The default password to the...
User Manual
Page 31
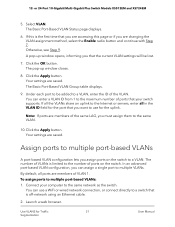
... advanced port-based VLAN configuration, you are accessing this is off-network using an Ethernet cable. 2. You can use for Traffic 31 Segmentation User Manual If this page or if you must assign them to the same VLAN. 10. Otherwise, see Step 9. The pop-up window opens, informing you that you assign ports on the switch. To assign ports to multiple VLANs. The Basic Port-Based VLAN Group table displays. 9. The number of VLANs...
... advanced port-based VLAN configuration, you are accessing this is off-network using an Ethernet cable. 2. You can use for Traffic 31 Segmentation User Manual If this page or if you must assign them to the same VLAN. 10. Otherwise, see Step 9. The pop-up window opens, informing you that you assign ports on the switch. To assign ports to multiple VLANs. The Basic Port-Based VLAN Group table displays. 9. The number of VLANs...
User Manual
Page 33
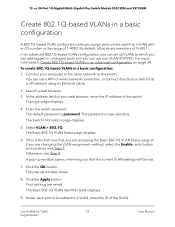
... Segmentation User Manual By default, all ports are saved. Connect your web browser, enter the IP address of 1-4093. Enter the switch password. The password is password. The pop-up VLANs to the same network as the switch. or 24-Port 10-Gigabit/Multi-Gigabit Plus Switch Models XS512EM and XS724EM Create 802.1Q-based VLANs in the range of the switch. The Switch Information page displays. 5. If this is off-network using an Ethernet cable. 2. Click the Apply button...
... Segmentation User Manual By default, all ports are saved. Connect your web browser, enter the IP address of 1-4093. Enter the switch password. The password is password. The pop-up VLANs to the same network as the switch. or 24-Port 10-Gigabit/Multi-Gigabit Plus Switch Models XS512EM and XS724EM Create 802.1Q-based VLANs in the range of the switch. The Switch Information page displays. 5. If this is off-network using an Ethernet cable. 2. Click the Apply button...
User Manual
Page 34
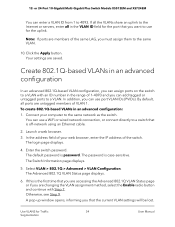
....1Q VLAN Status page or if you are saved. Launch a web browser. 3. If this is off-network using an Ethernet cable. 2. In addition, you want to a VLAN with Step 7. Your settings are changing the VLAN assignment method, select the Enable radio button and continue with an ID number in an advanced configuration: 1. In the address field of your computer to a switch that the current VLAN settings will be lost. The default password is...
....1Q VLAN Status page or if you are saved. Launch a web browser. 3. If this is off-network using an Ethernet cable. 2. In addition, you want to a VLAN with Step 7. Your settings are changing the VLAN assignment method, select the Enable radio button and continue with an ID number in an advanced configuration: 1. In the address field of your computer to a switch that the current VLAN settings will be lost. The default password is...
User Manual
Page 37
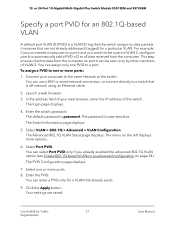
... to the same network as the switch. The Switch Information page displays. 5. The Advanced 802.1Q VLAN Status page displays. Select Port PVID. The PVID Configuration page displays. 7. Click the Apply button. Launch a web browser. 3. The login page displays. 4. The password is password. You can be a part of VLAN 2, configure port 6 to automatically add a PVID of the switch. Use VLANS for a particular VLAN. For example, if you connected a computer on port 6 and you already...
... to the same network as the switch. The Switch Information page displays. 5. The Advanced 802.1Q VLAN Status page displays. Select Port PVID. The PVID Configuration page displays. 7. Click the Apply button. Launch a web browser. 3. The login page displays. 4. The password is password. You can be a part of VLAN 2, configure port 6 to automatically add a PVID of the switch. Use VLANS for a particular VLAN. For example, if you connected a computer on port 6 and you already...
User Manual
Page 40
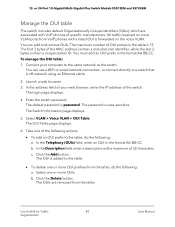
... format AA:BB:CC. Click the Delete button. or 24-Port 10-Gigabit/Multi-Gigabit Plus Switch Models XS512EM and XS724EM Manage the OUI table The switch includes default Organizationally Unique Identifiers (OUIs), which are removed from VoIP phones with a listed OUI is added to a switch that is password. The first 3 bytes of the switch. b. b. Connect your web browser, enter the IP address of the MAC address contain a manufacturer identifier, while the...
... format AA:BB:CC. Click the Delete button. or 24-Port 10-Gigabit/Multi-Gigabit Plus Switch Models XS512EM and XS724EM Manage the OUI table The switch includes default Organizationally Unique Identifiers (OUIs), which are removed from VoIP phones with a listed OUI is added to a switch that is password. The first 3 bytes of the switch. b. b. Connect your web browser, enter the IP address of the MAC address contain a manufacturer identifier, while the...
User Manual
Page 48
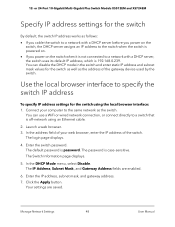
... switch. Enter the switch password. The default password is case-sensitive. Click the Apply button. Your settings are enabled. 6. Use the local browser interface to a switch that is off-network using the local browser interface: 1. The password is password. The IP Address, Subnet Mask, and Gateway Address fields are saved. Launch a web browser. 3. The Switch Information page displays. 5. 12- Connect your web browser, enter the IP address of your computer to a network with a DHCP server, the switch uses its default IP address...
... switch. Enter the switch password. The default password is case-sensitive. Click the Apply button. Your settings are enabled. 6. Use the local browser interface to a switch that is off-network using the local browser interface: 1. The password is password. The IP Address, Subnet Mask, and Gateway Address fields are saved. Launch a web browser. 3. The Switch Information page displays. 5. 12- Connect your web browser, enter the IP address of your computer to a network with a DHCP server, the switch uses its default IP address...
User Manual
Page 53
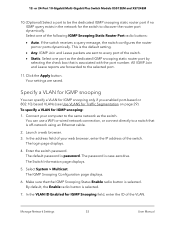
...-network using an Ethernet cable. 2. Connect your web browser, enter the IP address of the following IGMP Snooping Static Router Port radio buttons: • Auto. You can specify a VLAN for IGMP snooping only if you enabled port-based or 802.1Q-based VLANs (see Use VLANS for the switch to the selected port. 11. The login page displays. 4. The Switch Information page displays. 5. The IGMP Snooping Configuration page displays. 6. This is password. The password is selected. Make sure that the IGMP Snooping Status Enable radio button...
...-network using an Ethernet cable. 2. Connect your web browser, enter the IP address of the following IGMP Snooping Static Router Port radio buttons: • Auto. You can specify a VLAN for IGMP snooping only if you enabled port-based or 802.1Q-based VLANs (see Use VLANS for the switch to the selected port. 11. The login page displays. 4. The Switch Information page displays. 5. The IGMP Snooping Configuration page displays. 6. This is password. The password is selected. Make sure that the IGMP Snooping Status Enable radio button...

User Manual
Page 54
...) and Link Aggregation Control Protocol (LACP) groups through IEEE 802.3ad Link Aggregation. Switch model XS512EM can support eight LAGs, and switch model XS724EM can enable LAGs. Manage Network Settings 54 User Manual Set up the LAG on VLAN 1. LAGs can be a combination of static link aggregation and LACP groups. LAGs can be a combination of static link aggregation and LACP groups. Set up link aggregation in each LAG. or 24-Port 10-Gigabit/Multi-Gigabit Plus Switch Models XS512EM and XS724EM By default, if you can support twelve LAGs, with up to the maximum number of...
...) and Link Aggregation Control Protocol (LACP) groups through IEEE 802.3ad Link Aggregation. Switch model XS512EM can support eight LAGs, and switch model XS724EM can enable LAGs. Manage Network Settings 54 User Manual Set up the LAG on VLAN 1. LAGs can be a combination of static link aggregation and LACP groups. LAGs can be a combination of static link aggregation and LACP groups. Set up link aggregation in each LAG. or 24-Port 10-Gigabit/Multi-Gigabit Plus Switch Models XS512EM and XS724EM By default, if you can support twelve LAGs, with up to the maximum number of...
User Manual
Page 57
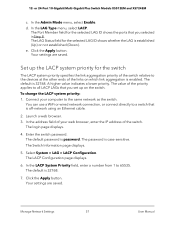
...-network using an Ethernet cable. 2. Connect your web browser, enter the IP address of the switch. The password is password. Select System > LAG > LACP Configuration. In the LACP System Priority field, enter a number from 1 to all LACP LAGs that is enabled. Your settings are saved. 12- The value of the links on the switch. The Switch Information page displays. 5. The login page displays. 4. Manage Network Settings 57 User Manual or 24-Port 10-Gigabit/Multi-Gigabit Plus Switch Models XS512EM and XS724EM c. Your settings are saved. The default password...
...-network using an Ethernet cable. 2. Connect your web browser, enter the IP address of the switch. The password is password. Select System > LAG > LACP Configuration. In the LACP System Priority field, enter a number from 1 to all LACP LAGs that is enabled. Your settings are saved. 12- The value of the links on the switch. The Switch Information page displays. 5. The login page displays. 4. Manage Network Settings 57 User Manual or 24-Port 10-Gigabit/Multi-Gigabit Plus Switch Models XS512EM and XS724EM c. Your settings are saved. The default password...
User Manual
Page 76
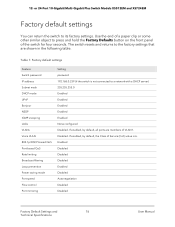
... Class of VLAN 1. Enabled Disabled Disabled Disabled Enabled Disabled Autonegotiation Disabled Disabled Factory Default Settings and 76 Technical Specifications User Manual The switch resets and returns to its factory settings. Factory default settings Feature Switch password IP address Subnet mask DHCP mode UPnP Bonjour NSDP IGMP snooping LAGs VLANs Voice VLAN 802.1p/DSCP-based QoS Port-based QoS Rate limiting Broadcast filtering Loop prevention Power saving mode Port speed Flow control Port mirroring Setting password 192.168.0.239 (if the switch is 6. Table 7. Use the end...
... Class of VLAN 1. Enabled Disabled Disabled Disabled Enabled Disabled Autonegotiation Disabled Disabled Factory Default Settings and 76 Technical Specifications User Manual The switch resets and returns to its factory settings. Factory default settings Feature Switch password IP address Subnet mask DHCP mode UPnP Bonjour NSDP IGMP snooping LAGs VLANs Voice VLAN 802.1p/DSCP-based QoS Port-based QoS Rate limiting Broadcast filtering Loop prevention Power saving mode Port speed Flow control Port mirroring Setting password 192.168.0.239 (if the switch is 6. Table 7. Use the end...
User Manual
Page 77
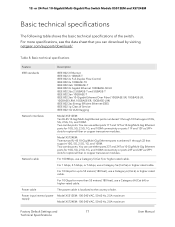
... feet), use a Category 6 (Cat 6) or higher-rated cable. For 10 Gbps for optional fiber or copper transceiver modules. Power input internal power supply Model XS512EM: 100-240 VAC, 50-60 Hz, 2.5A maximum Model XS724EM: 100-240 VAC, 50-60 Hz, 2.0A maximum Factory Default Settings and 77 Technical Specifications User Manual Two combo ports. Model XS724EM: Twenty-two RJ-45 10-Gig/Multi-Gig Ethernet ports numbered 1 through 10 that support 10G, 5G...
... feet), use a Category 6 (Cat 6) or higher-rated cable. For 10 Gbps for optional fiber or copper transceiver modules. Power input internal power supply Model XS512EM: 100-240 VAC, 50-60 Hz, 2.5A maximum Model XS724EM: 100-240 VAC, 50-60 Hz, 2.0A maximum Factory Default Settings and 77 Technical Specifications User Manual Two combo ports. Model XS724EM: Twenty-two RJ-45 10-Gig/Multi-Gig Ethernet ports numbered 1 through 10 that support 10G, 5G...


