
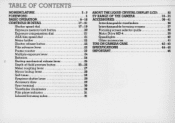
Instruction Manual
Page 4
...-31 Shutter speed dial 17-19 Exposure memory lock button 20 Exposure compensation dial 21 ASA film speed dial 21 Memo holder 22 Shutter release button 22 Film advance lever 23 Frame counter 23 Multiple exposure lever 24 Batteries 24 4 Backup mechanical release lever 25 Depth-of-field preview button 25-26 Meter coupling lever 27 Mirror lockup lever 28 Self-timer 28 Eyepiece shutter lever 29 Accessory shoe 29 Sync terminal 30 Viewfinder illuminator 30 Film...
...-31 Shutter speed dial 17-19 Exposure memory lock button 20 Exposure compensation dial 21 ASA film speed dial 21 Memo holder 22 Shutter release button 22 Film advance lever 23 Frame counter 23 Multiple exposure lever 24 Batteries 24 4 Backup mechanical release lever 25 Depth-of-field preview button 25-26 Meter coupling lever 27 Mirror lockup lever 28 Self-timer 28 Eyepiece shutter lever 29 Accessory shoe 29 Sync terminal 30 Viewfinder illuminator 30 Film...
Instruction Manual
Page 7
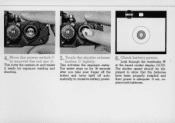
This activates the exposure meter. Check battery power. Look through the viewfinder @ 7 at the liquid crystal display (LCD). If not, replace both batteries. 4. This turns the camera on for exposure reading and shooting. 5 Touch the shutter release • button @ lightly. The shutter speed should be displayed to uncover the red dot ®. Move the power switch ® to show that the batteries have been properly installed and their power is adequate. The meter stays on...
This activates the exposure meter. Check battery power. Look through the viewfinder @ 7 at the liquid crystal display (LCD). If not, replace both batteries. 4. This turns the camera on for exposure reading and shooting. 5 Touch the shutter release • button @ lightly. The shutter speed should be displayed to uncover the red dot ®. Move the power switch ® to show that the batteries have been properly installed and their power is adequate. The meter stays on...
Instruction Manual
Page 9
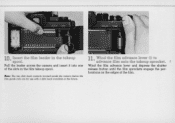
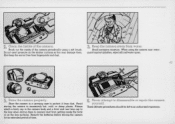
Insert the film leader in Ihe fulure . 11 Wind the film advance lever @ to • advance film onto the takeup sprocket. 9 Wind the film advance lever and depress the shutter release button until the film sprockets engage the perforations on the edges of the slots in the film takeup spool. Note: The Iwo dolo back conlacls localed inside Ihe camera below Ihe film guide rails are for use wilh a dolo back available in the takeup spool. Pull the leader across the camera and insert it into one of the film. 10.
Insert the film leader in Ihe fulure . 11 Wind the film advance lever @ to • advance film onto the takeup sprocket. 9 Wind the film advance lever and depress the shutter release button until the film sprockets engage the perforations on the edges of the slots in the film takeup spool. Note: The Iwo dolo back conlacls localed inside Ihe camera below Ihe film guide rails are for use wilh a dolo back available in the takeup spool. Pull the leader across the camera and insert it into one of the film. 10.
Instruction Manual
Page 10
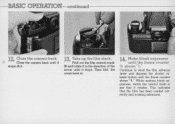
Take up the film slack. While making blank exposures, watch the rewind knob to wind .the film advance lever and depress the shutter release button until it rotates. This indicates that it stops. Then fold the crank back in. 14 Make blank exposures • until it in the direction of the arrow until the frame counter shows "1." Close the camera back. 10 Close...
Take up the film slack. While making blank exposures, watch the rewind knob to wind .the film advance lever and depress the shutter release button until it rotates. This indicates that it stops. Then fold the crank back in. 14 Make blank exposures • until it in the direction of the arrow until the frame counter shows "1." Close the camera back. 10 Close...
Instruction Manual
Page 11
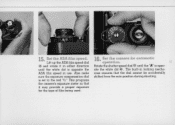
... white dot @. The built-in use. Set the ASA film speed. Set th~ camera for the type of film being used . 16. This programs the camera's exposure meter so that the dial cannot be accidentally shifted from the auto position during shooting . nism ensures that it in either direction until the "A" is oppo- 15. Also make sure the exposure compensation dial is opposite the ASA film speed in locking mecha-
... white dot @. The built-in use. Set the ASA film speed. Set th~ camera for the type of film being used . 16. This programs the camera's exposure meter so that the dial cannot be accidentally shifted from the auto position during shooting . nism ensures that it in either direction until the "A" is oppo- 15. Also make sure the exposure compensation dial is opposite the ASA film speed in locking mecha-
Instruction Manual
Page 12
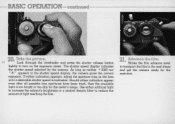
... field, turn the ring until the image ap- nite lines or boundaries. to vertical -format shoot- ing in feet and meters. Out of your right hand around the camera body so that the index finger rests comfortably on the subject. The K focusing screen comes with the thumb and fingers grasping the lens focusing ring @ . The split-image rangefinder works well for...
... field, turn the ring until the image ap- nite lines or boundaries. to vertical -format shoot- ing in feet and meters. Out of your right hand around the camera body so that the index finger rests comfortably on the subject. The K focusing screen comes with the thumb and fingers grasping the lens focusing ring @ . The split-image rangefinder works well for...
Instruction Manual
Page 14
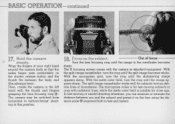
-BASIC OPERATION-continued------------ 20. Take the picture. 14 Look through the viewfinder and press the shutter release button lightly to reduce the amount of light reaching the film. 21. Use either artificial light to increase the subject's brightness or a neutral density filter to turn on the lens until a desirable shutter speed is too bright or too dim for the next shot. Stroke the film advance lever to transport the film to...
-BASIC OPERATION-continued------------ 20. Take the picture. 14 Look through the viewfinder and press the shutter release button lightly to reduce the amount of light reaching the film. 21. Use either artificial light to increase the subject's brightness or a neutral density filter to turn on the lens until a desirable shutter speed is too bright or too dim for the next shot. Stroke the film advance lever to transport the film to...

Instruction Manual
Page 17
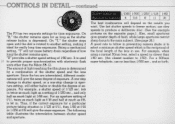
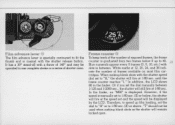
... highest manual shutter speed for proper synchronization with electronic flash except "X." to 8 sec . In addition, above the "M," the following symbols appear: "-," "+" and "- +" indicating underexposure, overexposure and correct exposure, respectively. is a locked setting. to 112 sec . including X, B, and T. To obtain correct exposure, simply turn the shutter speed dial and/or aperture ring until the "- +" symbol appears . To move the shutter speed dial off "A," depress the locking button...
... highest manual shutter speed for proper synchronization with electronic flash except "X." to 8 sec . In addition, above the "M," the following symbols appear: "-," "+" and "- +" indicating underexposure, overexposure and correct exposure, respectively. is a locked setting. to 112 sec . including X, B, and T. To obtain correct exposure, simply turn the shutter speed dial and/or aperture ring until the "- +" symbol appears . To move the shutter speed dial off "A," depress the locking button...
Instruction Manual
Page 18
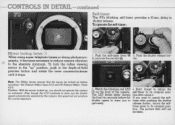
... blur. (See the example pictures on the results you want. "X" provides a shutter speed setting of the shutter speed and the lens aperture. The amount of light reaching the film plane is depressed. For example, a shutter speed of how long the shutter remains open for really long time exposures. use slow speeds to another setting, making it ideal for as long as a setting of exposure. For a 500mm super-telephoto, use . -CONTROLS IN DETAIL-continued...
... blur. (See the example pictures on the results you want. "X" provides a shutter speed setting of the shutter speed and the lens aperture. The amount of light reaching the film plane is depressed. For example, a shutter speed of how long the shutter remains open for really long time exposures. use slow speeds to another setting, making it ideal for as long as a setting of exposure. For a 500mm super-telephoto, use . -CONTROLS IN DETAIL-continued...
Instruction Manual
Page 22
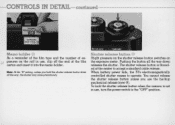
... you use , turn the power switch to the "OFF" position. When battery power fails, the F3's electromagnetically controlled shutter ceases to accept a standard cable release. The shutter release button is not in use, clip off the end of the film carton and insert it into the memo holder. Shutter release button @ Slight pressure on the shutter release button switches on the roll in use the backup mechanical release lever ®. You cannot release the shutter release button unless...
... you use , turn the power switch to the "OFF" position. When battery power fails, the F3's electromagnetically controlled shutter ceases to accept a standard cable release. The shutter release button is not in use, clip off the end of the film carton and insert it into the memo holder. Shutter release button @ Slight pressure on the shutter release button switches on the roll in use the backup mechanical release lever ®. You cannot release the shutter release button unless...
Instruction Manual
Page 23
..."T" should not be operated in the finder. It has a 30 0 stand-off with a throw of exposed frames, the frame counter is displayed . When making blank shots as the shutter will remain locked open. Therefore, to speed up to 40. 23...number of 1400 and may be used when making blank shots with the shutter release button. Or if you set the dial manually between . In addition, the LCD shows SO in one complete stroke or a series of frames available on most film cartridges. White marks at 1/S0 sec . However, if the speed is coaxial with the shutter speed dial set to "A," the shutter...
..."T" should not be operated in the finder. It has a 30 0 stand-off with a throw of exposed frames, the frame counter is displayed . When making blank shots as the shutter will remain locked open. Therefore, to speed up to 40. 23...number of 1400 and may be used when making blank shots with the shutter release button. Or if you set the dial manually between . In addition, the LCD shows SO in one complete stroke or a series of frames available on most film cartridges. White marks at 1/S0 sec . However, if the speed is coaxial with the shutter speed dial set to "A," the shutter...
Instruction Manual
Page 24
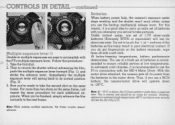
... each additional ex- However, exposure to use of a fresh set of batteries with 24 the F3's multiple exposure lever. The use the F3 in poor e lectrical contact. This is recommended to extremely high temperatures (BO°C and above) may exhibit a slight delay in the motor drive. Batteries When battery power fails, the camera's exposure meter stops working and the shutter won't work either unless you do...
... each additional ex- However, exposure to use of a fresh set of batteries with 24 the F3's multiple exposure lever. The use the F3 in poor e lectrical contact. This is recommended to extremely high temperatures (BO°C and above) may exhibit a slight delay in the motor drive. Batteries When battery power fails, the camera's exposure meter stops working and the shutter won't work either unless you do...
Instruction Manual
Page 25
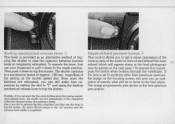
Even when the batteries are exhausted, you can still make time exposures by setting the dial to "T" and using the backup mechanical release lever to anything other than maximum aperture, the image on the focusing screen will remain in the "up" position until the advance lever stroke is completed. regardless of tripping the shutter in the final photo. If the lens is set to trip...
Even when the batteries are exhausted, you can still make time exposures by setting the dial to "T" and using the backup mechanical release lever to anything other than maximum aperture, the image on the focusing screen will remain in the "up" position until the advance lever stroke is completed. regardless of tripping the shutter in the final photo. If the lens is set to trip...
Instruction Manual
Page 28
... return the ® on automatic. Don't forget to its original posi- shutter opens to warn you to the absolute minimum. -CONTROLS IN DETAIL-continued---------- To operate the self-timer: Mirror lockup lever 0 When using super-telephoto lenses or doing photomicro- 28 graphy, it becomes necessary to reduce camera vibration to timer after using it stops . the final two seconds before the If you want...
... return the ® on automatic. Don't forget to its original posi- shutter opens to warn you to the absolute minimum. -CONTROLS IN DETAIL-continued---------- To operate the self-timer: Mirror lockup lever 0 When using super-telephoto lenses or doing photomicro- 28 graphy, it becomes necessary to reduce camera vibration to timer after using it stops . the final two seconds before the If you want...
Instruction Manual
Page 34
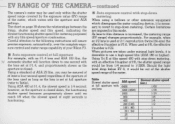
... the meter. When pictures are imposed in this mode. Using Tri-X at film speed 400 with any film speed/aperture combination . Using a standard of ASA 25 film, you may be out of the shutter speed range of your Nikon F3. • Auto exposure control at fll.4, and proportionately slower as the lens is fl22. Table Slowest shutter speed at full aperture (refer to one second with the lens set at full aperture with stop...
... the meter. When pictures are imposed in this mode. Using Tri-X at film speed 400 with any film speed/aperture combination . Using a standard of ASA 25 film, you may be out of the shutter speed range of your Nikon F3. • Auto exposure control at fll.4, and proportionately slower as the lens is fl22. Table Slowest shutter speed at full aperture (refer to one second with the lens set at full aperture with stop...
Instruction Manual
Page 39
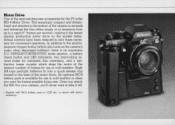
... electromagnetic trigger button (which stops the motor at the desired number of frames for the F3 is available for convenient operation . Eight AA-type penlight batteries fit into a qUick-release clip housed in the base of the camera in seconds and advances the film either singly or in sequence form up . Motor Drive One of the most exciting new accessories for use in...
... electromagnetic trigger button (which stops the motor at the desired number of frames for the F3 is available for convenient operation . Eight AA-type penlight batteries fit into a qUick-release clip housed in the base of the camera in seconds and advances the film either singly or in sequence form up . Motor Drive One of the most exciting new accessories for use in...
Instruction Manual
Page 40
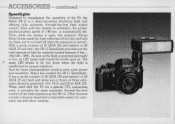
... provides the same automatic through -the-Iens flash output control. -ACCESSORIES-continued Speedlights Designed to complement the versatility of the F3, the Nikon SB-12 is insufficient for proper exposure. Then, while the shutter is open, the camera's Silicon Photo Diode reads the light reflected off when the exposure is automatically set. Even with other cameras . is correct . As soon as the...
... provides the same automatic through -the-Iens flash output control. -ACCESSORIES-continued Speedlights Designed to complement the versatility of the F3, the Nikon SB-12 is insufficient for proper exposure. Then, while the shutter is open, the camera's Silicon Photo Diode reads the light reflected off when the exposure is automatically set. Even with other cameras . is correct . As soon as the...
Instruction Manual
Page 43
... time. 6. Also keep the mirror free from water. Avoid excessive moisture. When using a soft brush . Keep the camera away from fingerprints and dust. 3. Avoid storing the camera in a carrying case to protect it from getting inside of the camera periodically using the camera near water, guard against splashes, especially saltwater spray. 43 .5 Store the camera properly. Remove the batteries before storing the camera...
... time. 6. Also keep the mirror free from water. Avoid excessive moisture. When using a soft brush . Keep the camera away from fingerprints and dust. 3. Avoid storing the camera in a carrying case to protect it from getting inside of the camera periodically using the camera near water, guard against splashes, especially saltwater spray. 43 .5 Store the camera properly. Remove the batteries before storing the camera...
Instruction Manual
Page 44
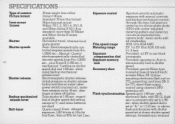
... Nikon type using camera's SPD then remains on ). used when batteries sec. settings; operates on meter (alter for speed set ai "A, " or 1/125 sec. mounting electronic flash unit or initial pressure on shutter release TTL connecting cord from 8 to EV 18 at 8Hz for 16 sec. SPECIFICATIONS Type of rewind knob; LED blinks at 2Hz for TTL direct flash output power switch is are dead set at base of camera Picture format Lens mount Lenses Shutter Shutter speeds 44 Shutter release Backup...
... Nikon type using camera's SPD then remains on ). used when batteries sec. settings; operates on meter (alter for speed set ai "A, " or 1/125 sec. mounting electronic flash unit or initial pressure on shutter release TTL connecting cord from 8 to EV 18 at 8Hz for 16 sec. SPECIFICATIONS Type of rewind knob; LED blinks at 2Hz for TTL direct flash output power switch is are dead set at base of camera Picture format Lens mount Lenses Shutter Shutter speeds 44 Shutter release Backup...
Instruction Manual
Page 45
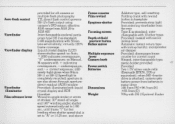
... rewind button in use also shown through aperture- disengages frame counter for fast loading when shutter speed dial is completely recycled; O.SX magnification with 19 other types Provided; and above Frame counter Film rewind Eyepiece shutter Focusing screen Depth-of strokes; 30 0 stand-off -camera or multiple flash photography TTL direct flash control governs SB-12's flash output using camera's SPD sensor; underexposure, and - + correct exposure; aperture in baseplate Provided; prevents stray light...
... rewind button in use also shown through aperture- disengages frame counter for fast loading when shutter speed dial is completely recycled; O.SX magnification with 19 other types Provided; and above Frame counter Film rewind Eyepiece shutter Focusing screen Depth-of strokes; 30 0 stand-off -camera or multiple flash photography TTL direct flash control governs SB-12's flash output using camera's SPD sensor; underexposure, and - + correct exposure; aperture in baseplate Provided; prevents stray light...


