
Instruction Manual
Page 4
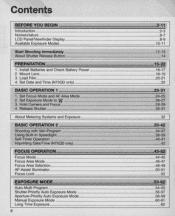
... Lens ...18-19 3. Load Film...20-21 4. Contents BEFORE YOU BEGIN 2-11 Introduction ...2-3 Nomenclature ...6-7 LCD PanelNiewfinder Display 8-9 Available Exposure Modes 10-11 Start Shooting Immediately 12-13 About Shutter Release Button 14 PREPARATION 15-22 1. Install Batteries and Check Battery Power 16-17 2. Set Date and Time (N75QD only 22 BASIC OPERATION 1 23-31 1. Set Exposure Mode to '8 26-27 3. Hold Camera and Focus 28-29 4. Priority Auto Exposure Mode 56-57 Aperture-Priority Auto Exposure Mode 58-59 Manual Exposure Mode...
... Lens ...18-19 3. Load Film...20-21 4. Contents BEFORE YOU BEGIN 2-11 Introduction ...2-3 Nomenclature ...6-7 LCD PanelNiewfinder Display 8-9 Available Exposure Modes 10-11 Start Shooting Immediately 12-13 About Shutter Release Button 14 PREPARATION 15-22 1. Install Batteries and Check Battery Power 16-17 2. Set Date and Time (N75QD only 22 BASIC OPERATION 1 23-31 1. Set Exposure Mode to '8 26-27 3. Hold Camera and Focus 28-29 4. Priority Auto Exposure Mode 56-57 Aperture-Priority Auto Exposure Mode 58-59 Manual Exposure Mode...
Instruction Manual
Page 8
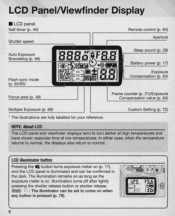
..., when the temperature returns to normal , the displays also return to turn darker at high temperatures and have slower response time at low temperatures. LCD illuminator button e Pressing the button turns exposure meter on (p. 17), and the LCD panel is pressed (p. 76). LCD PanelNiewfinder Display • LCD panel Self-timer (p. 40) Shutter speed Auto Exposure Bracketing (p. 66) Flash sync mode (p. 92/ 95) Focus area (p. 48) Remote control (p. 84) Apertur e r.
..., when the temperature returns to normal , the displays also return to turn darker at high temperatures and have slower response time at low temperatures. LCD illuminator button e Pressing the button turns exposure meter on (p. 17), and the LCD panel is pressed (p. 76). LCD PanelNiewfinder Display • LCD panel Self-timer (p. 40) Shutter speed Auto Exposure Bracketing (p. 66) Flash sync mode (p. 92/ 95) Focus area (p. 48) Remote control (p. 84) Apertur e r.
Instruction Manual
Page 16
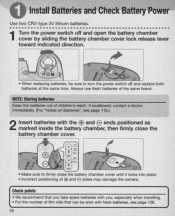
Install Batteries and Check Battery Power Use two CR2-type 3V lithium batteries 1 Turn the power switch off and replace both batteries at the same time. e • Make sure to turn the power switch off and open the battery chamber cover by sliding the battery chamber cover lock release lever toward indicated direction. • When replacing batteries, be shot with the Ee and ends positioned as marked inside the battery chamber, then firmly close the battery chamber cover until it locks into place...
Install Batteries and Check Battery Power Use two CR2-type 3V lithium batteries 1 Turn the power switch off and replace both batteries at the same time. e • Make sure to turn the power switch off and open the battery chamber cover by sliding the battery chamber cover lock release lever toward indicated direction. • When replacing batteries, be shot with the Ee and ends positioned as marked inside the battery chamber, then firmly close the battery chamber cover until it locks into place...
Instruction Manual
Page 17
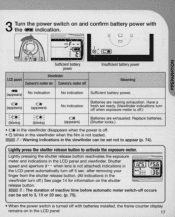
I IB ~ u~~~u Sufficient battery power Insufficient battery power Viewfinder LCD panel Camera's meter on and confirm battery power with the ~ indication. ~ ,--;---F-=_==_ ~~ON .: '. 3 Turn the power switch on Camera's meter off Meaning ~ (appears) No indication No indication Sufficient battery power.
I IB ~ u~~~u Sufficient battery power Insufficient battery power Viewfinder LCD panel Camera's meter on and confirm battery power with the ~ indication. ~ ,--;---F-=_==_ ~~ON .: '. 3 Turn the power switch on Camera's meter off Meaning ~ (appears) No indication No indication Sufficient battery power.
Instruction Manual
Page 21
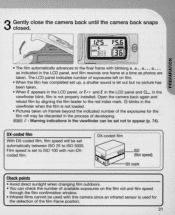
... (p. 74). Open the camera back again and reload fi lm by aligning the film leader to ISO 100 with blinking 0 , 0 _ , 0 __ , 0 __ _ as indicated in the viewfinder blink, film is let out but no picture has aaw:; The LCD panel indicates number of exposures left on frames beyond the indicated number of the exposures for the detection of developing . Film speed is set up, a shutter sound...
... (p. 74). Open the camera back again and reload fi lm by aligning the film leader to ISO 100 with blinking 0 , 0 _ , 0 __ , 0 __ _ as indicated in the viewfinder blink, film is let out but no picture has aaw:; The LCD panel indicates number of exposures left on frames beyond the indicated number of the exposures for the detection of developing . Film speed is set up, a shutter sound...
Instruction Manual
Page 26
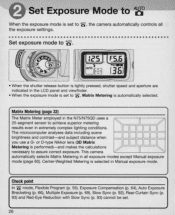
... In '8' mode, Flexible Program (p. 55), Exposure Compensation (p. 64), Auto Exposure Bracketing (p. 66), Multiple Exposure (p. 69), Slow Sync (p. 92), Rear-Curtain Sync (p. 93) and Red-Eye Reduction with Slow Sync (p. 93) cannot be set to ~ , the camera automatically controls all exposure modes except Manual exposure mode (page 60). Set Exposure Mode to A8° When the exposure mode is automatically selected . Ie'S I [FS.6 LJt:~ ff6l ~ / • When the shutter release button is lightly pressed, shutter speed and aperture are...
... In '8' mode, Flexible Program (p. 55), Exposure Compensation (p. 64), Auto Exposure Bracketing (p. 66), Multiple Exposure (p. 69), Slow Sync (p. 92), Rear-Curtain Sync (p. 93) and Red-Eye Reduction with Slow Sync (p. 93) cannot be set to ~ , the camera automatically controls all exposure modes except Manual exposure mode (page 60). Set Exposure Mode to A8° When the exposure mode is automatically selected . Ie'S I [FS.6 LJt:~ ff6l ~ / • When the shutter release button is lightly pressed, shutter speed and aperture are...
Instruction Manual
Page 27
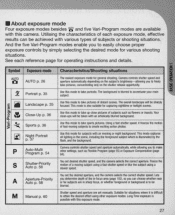
... iii "- ~ Cl 0 "- D;- .;: ~ ~ Landscape p. 35 Close-Up p. 36 Sports p. 36 ~ N i ~ht Portrait p. 7 p Auto - Your close pictures of subjects or shooting situations. Camera controls shutter speed and aperture automatically depending on the shutter release opportunity. You set manually. Freeze the motion of the in·focus area (page 102), so you to easily choose proper exposure controls by the flash, and the background. Lets you determine depth...
... iii "- ~ Cl 0 "- D;- .;: ~ ~ Landscape p. 35 Close-Up p. 36 Sports p. 36 ~ N i ~ht Portrait p. 7 p Auto - Your close pictures of subjects or shooting situations. Camera controls shutter speed and aperture automatically depending on the shutter release opportunity. You set manually. Freeze the motion of the in·focus area (page 102), so you to easily choose proper exposure controls by the flash, and the background. Lets you determine depth...
Instruction Manual
Page 34
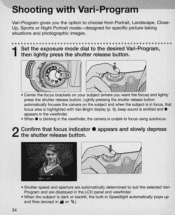
... for specific picture-taking situations and photographic images 1 Set the exposure mode dial to suit the selected VariProgram and are automatically determined to the desired Vari- Shooting with Vari-Bright display (p. 9), beep sound is unable to focus using autofocus. 2 Confirm that focus area is highlighted with Vari-Program- - - is blinking in the viewfinder. • When . Program, then lightly press the shutter release button. • Center the focus brackets...
... for specific picture-taking situations and photographic images 1 Set the exposure mode dial to suit the selected VariProgram and are automatically determined to the desired Vari- Shooting with Vari-Bright display (p. 9), beep sound is unable to focus using autofocus. 2 Confirm that focus area is highlighted with Vari-Program- - - is blinking in the viewfinder. • When . Program, then lightly press the shutter release button. • Center the focus brackets...
Instruction Manual
Page 36
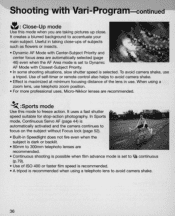
... is dark or backlit. • 80mm to 300mm telephoto lenses are recommended . • Continuous shooting is possible when film advance mode is set to Dynamic AF Mode with Closest-Subject Priority. • In some shooting situations, slow shutter speed is automatically activated and the camera continues to focus on the subject without Focus lock (page 52). • Built-in use a tripod. It uses a fast shutter speed suitable for stop-action...
... is dark or backlit. • 80mm to 300mm telephoto lenses are recommended . • Continuous shooting is possible when film advance mode is set to Dynamic AF Mode with Closest-Subject Priority. • In some shooting situations, slow shutter speed is automatically activated and the camera continues to focus on the subject without Focus lock (page 52). • Built-in use a tripod. It uses a fast shutter speed suitable for stop-action...

Instruction Manual
Page 41
... to be set , self-timer activates and the self- when subject cannot be brought into focus with autofocus). 15 • Once the self-timer is set t o 2, 5 or 20 sec. (p. 76). 41 before the shutter releases at the same output level as the normal Red-Eye Reduction function . • To cancel the self-timer mode or the self-timer during self-timer operation, either turn the power switch off, press the @) button until'::'> and...
... to be set , self-timer activates and the self- when subject cannot be brought into focus with autofocus). 15 • Once the self-timer is set t o 2, 5 or 20 sec. (p. 76). 41 before the shutter releases at the same output level as the normal Red-Eye Reduction function . • To cancel the self-timer mode or the self-timer during self-timer operation, either turn the power switch off, press the @) button until'::'> and...

Instruction Manual
Page 60
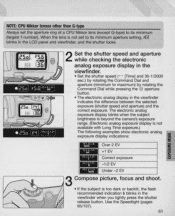
... by adjusting the exposure. Set/confirm aperture with the lens aperture ring . Center-Weighted Metering Center-Weighted Metering places special emphasis on a specific area of the scene. 60 0 Camera's exposure meter cannot be used . See page 106 for basing exposure on brightness within the 12mm-diameter circle in Manual exposure mode. • When a non-CPU Nikkor lens is thus useful for details. appears in the viewfinder, you to set both shutter speed (- [Time) and...
... by adjusting the exposure. Set/confirm aperture with the lens aperture ring . Center-Weighted Metering Center-Weighted Metering places special emphasis on a specific area of the scene. 60 0 Camera's exposure meter cannot be used . See page 106 for basing exposure on brightness within the 12mm-diameter circle in Manual exposure mode. • When a non-CPU Nikkor lens is thus useful for details. appears in the viewfinder, you to set both shutter speed (- [Time) and...
Instruction Manual
Page 61
... picture, focus and shoot. • If the subject is not set the aperture ring of a CPU Nikkor lens (except G-type) to maximum) by rotating the Command Dial while pressing the @ aperture button . • The electronic analog display in the viewfinder when you lightly press the shutter release button . When the lens is too dark or backlit, the flash recommended indication ~ blinks in the viewfinder indicates the difference between the selected exposure (shutter speed...
... picture, focus and shoot. • If the subject is not set the aperture ring of a CPU Nikkor lens (except G-type) to maximum) by rotating the Command Dial while pressing the @ aperture button . • The electronic analog display in the viewfinder when you lightly press the shutter release button . When the lens is too dark or backlit, the flash recommended indication ~ blinks in the viewfinder indicates the difference between the selected exposure (shutter speed...

Instruction Manual
Page 81
... AF operation with the Custom Setting (p. 75) When option 2 in Custom Setting menu 5 to be activated simultaneously by pressing the 00 button (p. 75). To lock exposure, set to activate Auto Exposure Lock by lightly pressing the shutter release button. 81 2 While keeping the CD button pressed, recompose, focus and shoot. ~ 5 : Auto Exposure Lock can be set to be activated by lightly pressing the shutter release button (p. 75). ~ 6 : Auto Exposure Lock and Autofocus lock can be set the option other than 2 in the Custom Setting menu...
... AF operation with the Custom Setting (p. 75) When option 2 in Custom Setting menu 5 to be activated simultaneously by pressing the 00 button (p. 75). To lock exposure, set to activate Auto Exposure Lock by lightly pressing the shutter release button. 81 2 While keeping the CD button pressed, recompose, focus and shoot. ~ 5 : Auto Exposure Lock can be set to be activated by lightly pressing the shutter release button (p. 75). ~ 6 : Auto Exposure Lock and Autofocus lock can be set the option other than 2 in the Custom Setting menu...
Instruction Manual
Page 86
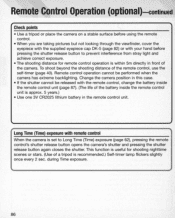
... . • When you are taking pictures but not looking through the viewfinder, cover the eyepiece with the supplied eyepiece cap DK-5 (page 82) or with your hand before pressing the shutter release button to Long Time (Time) exposure (page 62), pressing the remote cont rol's shutter release button opens the camera's shutter and pressing the shutter release button again closes the shutter. Change the camera position in this case. • If...
... . • When you are taking pictures but not looking through the viewfinder, cover the eyepiece with the supplied eyepiece cap DK-5 (page 82) or with your hand before pressing the shutter release button to Long Time (Time) exposure (page 62), pressing the remote cont rol's shutter release button opens the camera's shutter and pressing the shutter release button again closes the shutter. Change the camera position in this case. • If...
Instruction Manual
Page 105
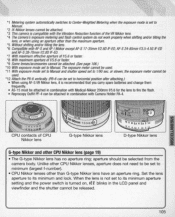
... lenses/accessories cannot be attached. (See page 106.) *10 With exposure mode set to Manual. Set the lens aperture to its minimum aperture setting and the power switch is turned on , FE E blinks in the LCD panel and viewfinder and the shutter cannot be released . 105 aperture shou ld be selected from the camera body. or slower, the exposure meter cannot be used . *11 With exposure mode set to Manual and shutter speed set to its minimum and lock. *1 Metering system automatically switches to...
... lenses/accessories cannot be attached. (See page 106.) *10 With exposure mode set to Manual. Set the lens aperture to its minimum aperture setting and the power switch is turned on , FE E blinks in the LCD panel and viewfinder and the shutter cannot be released . 105 aperture shou ld be selected from the camera body. or slower, the exposure meter cannot be used . *11 With exposure mode set to Manual and shutter speed set to its minimum and lock. *1 Metering system automatically switches to...
Instruction Manual
Page 112
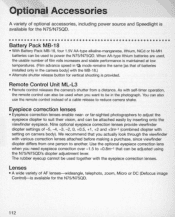
....) • Alternate shutter release button for vertical shooting is maintained at low temperatures. (Film advance speed in ~ mode remains the same [as that can be in the camera body] with self-timer operation, the remote control can also be adjusted using the N75/ N75QD's diopter adjustment lever. or far-sighted photographers to adjust the eyepiece diopter to suit their vision , and can be used to power the N75/ N75QD...
....) • Alternate shutter release button for vertical shooting is maintained at low temperatures. (Film advance speed in ~ mode remains the same [as that can be in the camera body] with self-timer operation, the remote control can also be adjusted using the N75/ N75QD's diopter adjustment lever. or far-sighted photographers to adjust the eyepiece diopter to suit their vision , and can be used to power the N75/ N75QD...

Instruction Manual
Page 117
... not non-CPU lens, set to aperture. 105 its minimum aperture. meter is on again. blinks f- - mode to S, A or M. ~ appears CAiI appears • Batteries are just about • Turn the power off , blink during film rewind . blinks • Non-CPU lens is • Set the Speedlight flash 110 blink not set at TIL Auto Flash mode to TIL, or set the aperture with lens' aperture ring. 117 Troubleshooting fEE blinks fEE blinks • CPU Nikkor lens other • Set lens to minimum...
... not non-CPU lens, set to aperture. 105 its minimum aperture. meter is on again. blinks f- - mode to S, A or M. ~ appears CAiI appears • Batteries are just about • Turn the power off , blink during film rewind . blinks • Non-CPU lens is • Set the Speedlight flash 110 blink not set at TIL Auto Flash mode to TIL, or set the aperture with lens' aperture ring. 117 Troubleshooting fEE blinks fEE blinks • CPU Nikkor lens other • Set lens to minimum...
Instruction Manual
Page 122
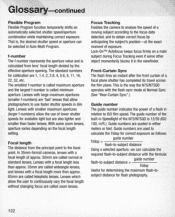
... faster lenses. Lock-OnTM Autofocus keeps focus firmly on the focal length setting. With some zoom lenses, aperture varies depending on a main subject during Focus Tracking even if some other object momentarily blocks it in Auto-Multi Program. The standard numbers for flash photography. 122 In 35mm-format cameras, lenses with the formula: = guide number flash-to use of exposure. Guide numbers are called telephoto lenses. That is the way the N751N7500 operates...
... faster lenses. Lock-OnTM Autofocus keeps focus firmly on the focal length setting. With some zoom lenses, aperture varies depending on a main subject during Focus Tracking even if some other object momentarily blocks it in Auto-Multi Program. The standard numbers for flash photography. 122 In 35mm-format cameras, lenses with the formula: = guide number flash-to use of exposure. Guide numbers are called telephoto lenses. That is the way the N751N7500 operates...
Instruction Manual
Page 124
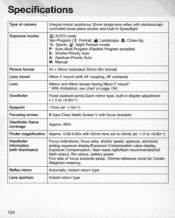
...Dach-mirror type, built-in Speed light Exposure modes '8':AUTO mode Vari-Program (:Z: Portrait, iI: Landscape, _'f,: Close-Up, ~ : Sports, 1i:I: Night Portrait mode) P: Auto-Multi Program (Flexible Program possible) S: Shutter-Priority Auto A: Aperture-Priority Auto M: Manual Picture format 24 x 36mm (standard 35mm film format) Lens mount Nikon F mount (with focus brackets Viewfinder frame coverage Approx. 89 % Finder magnification Approx . O.68-0.60x with 50mm lens set to +O.8m-1) Viewfi nd e r information (with illuminator) Focus indications, focus area, shutter speed, aperture...
...Dach-mirror type, built-in Speed light Exposure modes '8':AUTO mode Vari-Program (:Z: Portrait, iI: Landscape, _'f,: Close-Up, ~ : Sports, 1i:I: Night Portrait mode) P: Auto-Multi Program (Flexible Program possible) S: Shutter-Priority Auto A: Aperture-Priority Auto M: Manual Picture format 24 x 36mm (standard 35mm film format) Lens mount Nikon F mount (with focus brackets Viewfinder frame coverage Approx. 89 % Finder magnification Approx . O.68-0.60x with 50mm lens set to +O.8m-1) Viewfi nd e r information (with illuminator) Focus indications, focus area, shutter speed, aperture...
Instruction Manual
Page 131
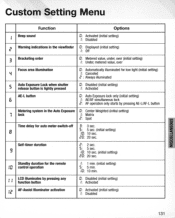
... indications in the Auto Exposure u" .. Canceled c : Always illuminated 5 Auto Exposure Lock when shutter release button is lightly pressed .u" ' . . . Automatically illuminated for the remote ,n '1.1 control operation , ,,, LCD illuminates by pressing AE-UAF-L button , ... .., Metering system in the viewfinder u" .. Disabled (initial setting) Activated ....".u . Custom Setting Menu Function ,, Beep sound Options .u" ' . . . Center-Weighted (initial setting) lock Matri x c: Spot Time delay for auto meter-switch-off a Self-timer duration 9 Standby duration...
... indications in the Auto Exposure u" .. Canceled c : Always illuminated 5 Auto Exposure Lock when shutter release button is lightly pressed .u" ' . . . Automatically illuminated for the remote ,n '1.1 control operation , ,,, LCD illuminates by pressing AE-UAF-L button , ... .., Metering system in the viewfinder u" .. Disabled (initial setting) Activated ....".u . Custom Setting Menu Function ,, Beep sound Options .u" ' . . . Center-Weighted (initial setting) lock Matri x c: Spot Time delay for auto meter-switch-off a Self-timer duration 9 Standby duration...


