

Instruction Manual
Page 2
We recommend that you for purchasing the Nikon N75/N75QD-a camera that is sure to make photography a bigger part of your N75/N75QD camera, and be sure to know your life. Supplied accessories Body cap (P. 19) 2 Accessory shoe cover (P. 108) Eyepiece cap DK-5 (P. 82) Introduction • Thank you keep this manual thoroughly before using it. Get to read this manual handy.
We recommend that you for purchasing the Nikon N75/N75QD-a camera that is sure to make photography a bigger part of your N75/N75QD camera, and be sure to know your life. Supplied accessories Body cap (P. 19) 2 Accessory shoe cover (P. 108) Eyepiece cap DK-5 (P. 82) Introduction • Thank you keep this manual thoroughly before using it. Get to read this manual handy.

Instruction Manual
Page 3
...Take trial shots before shooting at least once every two years. • Using your camera serviced by other manufacturers may not meet Nikon 's criteria for use with other than Nikon brand accessories. Accessories made by an authorized dealer or service center at important occasions like ...weddings or graduations. • Have Nikon spot-check your camera regularly Nikon recommends that the function/mode changes according to 12) indicates that you have your camera correctly The Nikon N75/ N75QO's performance has been optimized for specifications, and ...
...Take trial shots before shooting at least once every two years. • Using your camera serviced by other manufacturers may not meet Nikon 's criteria for use with other than Nikon brand accessories. Accessories made by an authorized dealer or service center at important occasions like ...weddings or graduations. • Have Nikon spot-check your camera regularly Nikon recommends that the function/mode changes according to 12) indicates that you have your camera correctly The Nikon N75/ N75QO's performance has been optimized for specifications, and ...
Instruction Manual
Page 4
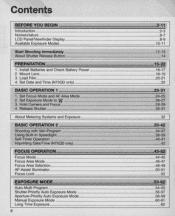
... 2-11 Introduction ...2-3 Nomenclature ...6-7 LCD PanelNiewfinder Display 8-9 Available Exposure Modes 10-11 Start Shooting Immediately 12-13 About Shutter Release Button 14 PREPARATION 15-22 1. Hold Camera and Focus 28-29 4.
... 2-11 Introduction ...2-3 Nomenclature ...6-7 LCD PanelNiewfinder Display 8-9 Available Exposure Modes 10-11 Start Shooting Immediately 12-13 About Shutter Release Button 14 PREPARATION 15-22 1. Hold Camera and Focus 28-29 4.
Instruction Manual
Page 5
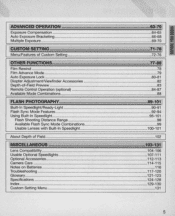
... AdjustmentNiewfind er Accessories 82 Depth-of Field 102 MISCELLANEOUS 103-131 Lens Compatibi lity ...104-106 Usable Optional Speedlights 107-111 Optional Accessories 112-11 3 Camera Care ...114-11 5 Notes on Batteries ...11 6 Troubleshooting ...117-120 Glossary ...121- 123 Specifications ...124-128 Index ...129-130 Custom Setting Menu ...131...
... AdjustmentNiewfind er Accessories 82 Depth-of Field 102 MISCELLANEOUS 103-131 Lens Compatibi lity ...104-106 Usable Optional Speedlights 107-111 Optional Accessories 112-11 3 Camera Care ...114-11 5 Notes on Batteries ...11 6 Troubleshooting ...117-120 Glossary ...121- 123 Specifications ...124-128 Index ...129-130 Custom Setting Menu ...131...

Instruction Manual
Page 6
Nomenclature Built-in Speed light (p. 38/90) Aperture (p . 61 )/Exposure Compensation button (p. 64)/ Film rewind button (p. 78) Camera strap eyelet Self-timer (p. 40)/AF-Assist Illuminator (p. 50)/ Red -Eye Reduction lamp (p. 93) Flash lock-release (p. 95)/ Flash sync mode button (p. 92) Auto Exposure Bracketing (p. 66)/ Multiple Exposure (p. 69)/ Film rewind button 6
Nomenclature Built-in Speed light (p. 38/90) Aperture (p . 61 )/Exposure Compensation button (p. 64)/ Film rewind button (p. 78) Camera strap eyelet Self-timer (p. 40)/AF-Assist Illuminator (p. 50)/ Red -Eye Reduction lamp (p. 93) Flash lock-release (p. 95)/ Flash sync mode button (p. 92) Auto Exposure Bracketing (p. 66)/ Multiple Exposure (p. 69)/ Film rewind button 6

Instruction Manual
Page 7
The camera back of five available displays. 4. Date/time LCD 2. ' : Year indicator 3. SELECT button: Push to select date/time to adjust date/time. 7 M : Month indicator 6. - : Data imprint ...
The camera back of five available displays. 4. Date/time LCD 2. ' : Year indicator 3. SELECT button: Push to select date/time to adjust date/time. 7 M : Month indicator 6. - : Data imprint ...

Instruction Manual
Page 10
...64) are set manually. Available Exposure Modes The exposure mode dial of the Nikon N75/ N75QD can determine various exposure factors. A:Aperture-Priority Auto (p. 58) You set desired shutter speed, and the camera selects the correct aperture. Lets you determine depth of a moving subject or blur.... M: Manual (p. 60) Shutter speed and aperture are possible. 5: Shutter-Priority Auto (p. 56) You set the desired aperture, and the camera selects the correct shutter speed. See pages 26-27, 35-37, 54- 62 for taking photographs with Auto-Multi Program, Shutter-Priority Auto,...
...64) are set manually. Available Exposure Modes The exposure mode dial of the Nikon N75/ N75QD can determine various exposure factors. A:Aperture-Priority Auto (p. 58) You set desired shutter speed, and the camera selects the correct aperture. Lets you determine depth of a moving subject or blur.... M: Manual (p. 60) Shutter speed and aperture are possible. 5: Shutter-Priority Auto (p. 56) You set the desired aperture, and the camera selects the correct shutter speed. See pages 26-27, 35-37, 54- 62 for taking photographs with Auto-Multi Program, Shutter-Priority Auto,...

Instruction Manual
Page 11
• Point-and-shoot exposure mode A~: AUTO mode (p. 26) Camera automatically controls all the exposure settings. r.:::J: Night Portrait mode (p. 37) Use this mode to take portraits. The overall landscape will be sharply focused. ,,-e, :Close-Up ...
• Point-and-shoot exposure mode A~: AUTO mode (p. 26) Camera automatically controls all the exposure settings. r.:::J: Night Portrait mode (p. 37) Use this mode to take portraits. The overall landscape will be sharply focused. ,,-e, :Close-Up ...
Instruction Manual
Page 12
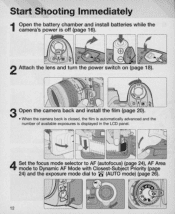
o~" ~ fl . """d) ~ fl ~"d) < 2 " @ '" .. Start Shooting Immediately 1 Open the battery chamber and install batteries while the camera's power is displayed in the LCD panel. 4 Set the focus mode selector to AF (autofocus) (page 24), AF Area mode to Dynamic AF Mode with ... mode dial to A8' (AUTO mode) (page 26). 12 "---~--' Attach the lens and turn the power switch on (page 18). 3 Open the camera back and install the film (page 20). • When the camera back is closed, the film is automatically advanced and the number of available exposures is off (page 16). ~.
o~" ~ fl . """d) ~ fl ~"d) < 2 " @ '" .. Start Shooting Immediately 1 Open the battery chamber and install batteries while the camera's power is displayed in the LCD panel. 4 Set the focus mode selector to AF (autofocus) (page 24), AF Area mode to Dynamic AF Mode with ... mode dial to A8' (AUTO mode) (page 26). 12 "---~--' Attach the lens and turn the power switch on (page 18). 3 Open the camera back and install the film (page 20). • When the camera back is closed, the film is automatically advanced and the number of available exposures is off (page 16). ~.

Instruction Manual
Page 13
appears without blinking and infocus beep sound is emitted, and slowly depress the shutter c release button (page 30). ~ Ii: e~n 7 Film starts to rewind automatically when it reaches the end of the roll (page 31). • Make sure a in the viewfi nder and E in the LCD panel are blinking when removing the film cartridge. 13 5 Hold the camera properly, compose frame and focus (page 28) by lightly pressing the shutter release button (page 18). .~.. .c~.. ~ i! 6 §c::I Confirm focus indicator.
appears without blinking and infocus beep sound is emitted, and slowly depress the shutter c release button (page 30). ~ Ii: e~n 7 Film starts to rewind automatically when it reaches the end of the roll (page 31). • Make sure a in the viewfi nder and E in the LCD panel are blinking when removing the film cartridge. 13 5 Hold the camera properly, compose frame and focus (page 28) by lightly pressing the shutter release button (page 18). .~.. .c~.. ~ i! 6 §c::I Confirm focus indicator.

Instruction Manual
Page 14
... 1 Lightly press the shutter release button. Before pressing Lightly pressing • When the focus mode selector is set to AF (autofocus), camera starts to focus on the exposure meter.) 2 Fully depress the shutter release button. ~[lJ • Fully depressing the shutter release button ...releases shutter and film automatically advances to press the shutter release button slowly. 14 Lightly pressing Fully depressing NOTE: Camera shake Pressing the shutter release button abruptly can result in the LCD panel and viewfinder (for information on the subject when the...
... 1 Lightly press the shutter release button. Before pressing Lightly pressing • When the focus mode selector is set to AF (autofocus), camera starts to focus on the exposure meter.) 2 Fully depress the shutter release button. ~[lJ • Fully depressing the shutter release button ...releases shutter and film automatically advances to press the shutter release button slowly. 14 Lightly pressing Fully depressing NOTE: Camera shake Pressing the shutter release button abruptly can result in the LCD panel and viewfinder (for information on the subject when the...
Instruction Manual
Page 16
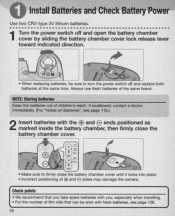
Always use fresh batteries of EB and poles may damage the camera. Install Batteries and Check Battery Power Use two CR2-type 3V lithium batteries 1 Turn the power switch off and replace both batteries at the same ...
Always use fresh batteries of EB and poles may damage the camera. Install Batteries and Check Battery Power Use two CR2-type 3V lithium batteries 1 Turn the power switch off and replace both batteries at the same ...
Instruction Manual
Page 17
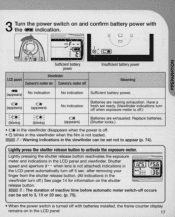
I IB ~ u~~~u Sufficient battery power Insufficient battery power Viewfinder LCD panel Camera's meter on and confirm battery power with the ~ indication. ~ ,--;---F-=_==_ ~~ON .: '. 3 Turn the power switch on Camera's meter off Meaning ~ (appears) No indication No indication Sufficient battery power.
I IB ~ u~~~u Sufficient battery power Insufficient battery power Viewfinder LCD panel Camera's meter on and confirm battery power with the ~ indication. ~ ,--;---F-=_==_ ~~ON .: '. 3 Turn the power switch on Camera's meter off Meaning ~ (appears) No indication No indication Sufficient battery power.
Instruction Manual
Page 18
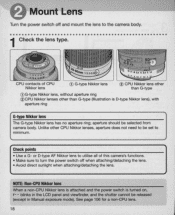
... The G-type Nikkor lens has no aperture ring; blinks in Manual exposure mode). See page 106 for a non-CPU lens. 18 CPU contacts of this camera's functions. • Make sure to minimum . Check points • Use a G- or D-type AF Nikkor lens to utilise all of CPU Nikkor lens G) G-type Nikkor ... Nikkor lenses other CPU Nikkor lenses, aperture does not need to be set to turn the power switch off and mount the lens to the camera body. 1 Check the lens type. Mount Lens Turn the power switch off when attaching/detaching the lens. • Avoid direct sunlight when attaching/detaching ...
... The G-type Nikkor lens has no aperture ring; blinks in Manual exposure mode). See page 106 for a non-CPU lens. 18 CPU contacts of this camera's functions. • Make sure to minimum . Check points • Use a G- or D-type AF Nikkor lens to utilise all of CPU Nikkor lens G) G-type Nikkor ... Nikkor lenses other CPU Nikkor lenses, aperture does not need to be set to turn the power switch off and mount the lens to the camera body. 1 Check the lens type. Mount Lens Turn the power switch off when attaching/detaching the lens. • Avoid direct sunlight when attaching/detaching ...
Instruction Manual
Page 19
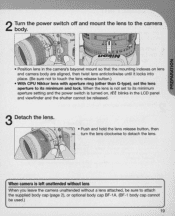
... body cap (page 2), or optional body cap BF-1A. (BF-1 body cap cannot be released. When camera is turned on, FE E blinks in the camera's bayonet mount so that the mounting indexes on lens and camera body are aligned, then twist lens anticlockwise until it locks into place. (Be sure not to touch... hold the lens release button, then turn the lens clockwise to detach the lens. 2 Turn t he power switch off and mount t he lens to the camera body. • Position lens in the LCD panel and viewfinder and the shutter cannot be used .) 19
... body cap (page 2), or optional body cap BF-1A. (BF-1 body cap cannot be released. When camera is turned on, FE E blinks in the camera's bayonet mount so that the mounting indexes on lens and camera body are aligned, then twist lens anticlockwise until it locks into place. (Be sure not to touch... hold the lens release button, then turn the lens clockwise to detach the lens. 2 Turn t he power switch off and mount t he lens to the camera body. • Position lens in the LCD panel and viewfinder and the shutter cannot be used .) 19

Instruction Manual
Page 20
...of available exposures is properly positioned with your finger or the film leader. 20 NOTE: Loading/removing film Shutter curtains are very thin . When the camera back is closed, the film automatically advances and the number of or beyond the mark), film may not be loaded properly. • Hold the ...in the LCD panel. 1 Turn the power switch on and load OX-coded film . load Film Turn the power switch on , open the camera back by sliding the camera back lock release lever and load film. ------ • Film cartridge can be loaded smoothly if inserted from the bottom. • Make sure ...
...of available exposures is properly positioned with your finger or the film leader. 20 NOTE: Loading/removing film Shutter curtains are very thin . When the camera back is closed, the film automatically advances and the number of or beyond the mark), film may not be loaded properly. • Hold the ...in the LCD panel. 1 Turn the power switch on and load OX-coded film . load Film Turn the power switch on , open the camera back by sliding the camera back lock release lever and load film. ------ • Film cartridge can be loaded smoothly if inserted from the bottom. • Make sure ...
Instruction Manual
Page 21
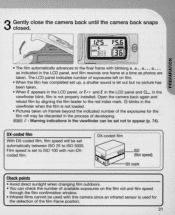
... panel and 8_ in the viewfinder when the film is set automatically between ISO 25 to ISO 100 with this camera since an infrared sensor is not properly installed . Open the camera back again and reload fi lm by aligning the film leader to appear (p. 74). been taken. OX-coded ...- c : 001'ffil!J Warning indicat ions in the LCD panel , and film rewinds one frame at a time as photos are i taken. 3 Gently close the camera back until the camera back snaps closed . The LCD panel indicates number of exposures left on frames beyond the indicated number of the film frame position. 21
... panel and 8_ in the viewfinder when the film is set automatically between ISO 25 to ISO 100 with this camera since an infrared sensor is not properly installed . Open the camera back again and reload fi lm by aligning the film leader to appear (p. 74). been taken. OX-coded ...- c : 001'ffil!J Warning indicat ions in the LCD panel , and film rewinds one frame at a time as photos are i taken. 3 Gently close the camera back until the camera back snaps closed . The LCD panel indicates number of exposures left on frames beyond the indicated number of the film frame position. 21

Instruction Manual
Page 22
... after installing batteries for more than 1 sec. • Push SELECT button until the date/time display stops blinking. Set Date and Time (N75QD only) This camera allows you to imprint Year/Month/Day, Day/Hour/Minute (24-hour clock), Month/Day/Year or Day/Month/Year on your picture in any... at low temperatures. 22 Push SELECT button so section to select one of the date or time displays. Quartz Date power source Batteries in the camera body also power the quartz date.
... after installing batteries for more than 1 sec. • Push SELECT button until the date/time display stops blinking. Set Date and Time (N75QD only) This camera allows you to imprint Year/Month/Day, Day/Hour/Minute (24-hour clock), Month/Day/Year or Day/Month/Year on your picture in any... at low temperatures. 22 Push SELECT button so section to select one of the date or time displays. Quartz Date power source Batteries in the camera body also power the quartz date.
Instruction Manual
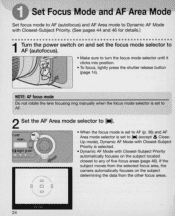
Page 24
Up mode), Dynamic AF Mode with Closest-Subject Priority is set to [_ ] (except .'E. If the subject moves from the selected focus area, the camera automatically focuses on and set to AF (p. 36) and AF Area mode selector is selected. • Dynamic AF Mode with Closest-Subject Priority automatically focuses ...
Up mode), Dynamic AF Mode with Closest-Subject Priority is set to [_ ] (except .'E. If the subject moves from the selected focus area, the camera automatically focuses on and set to AF (p. 36) and AF Area mode selector is selected. • Dynamic AF Mode with Closest-Subject Priority automatically focuses ...

Instruction Manual
Page 25
... other background. In such situations, focus manually using the clear matte field (page 45) or focus on a different subject located at different distances from the camera For example, when photographing an animal in a cage or a person in the following situations.
... other background. In such situations, focus manually using the clear matte field (page 45) or focus on a different subject located at different distances from the camera For example, when photographing an animal in a cage or a person in the following situations.