
S60 User's Manual
Page 9
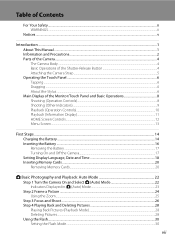
... (Operation Controls)...10 Playback (Information Display)...11 HOME Screen Controls...12 Menu Screen...13 First Steps ...14 Charging the Battery ...14 Inserting the Battery ...16 Removing the Battery ...17 Turning On and Off the Camera...17 Setting Display Language, Date and Time 18 Inserting Memory Cards ...20 Removing Memory Cards...20 A Basic Photography and Playback: Auto Mode 22 Step 1 Turn the Camera On and Select A (Auto) Mode 22 Indicators Displayed in A (Auto) Mode 23 Step 2 Frame a Picture ...24 Using the Zoom...25 Step 3 Focus and Shoot ...26 Step 4 Playing Back and Deleting...
... (Operation Controls)...10 Playback (Information Display)...11 HOME Screen Controls...12 Menu Screen...13 First Steps ...14 Charging the Battery ...14 Inserting the Battery ...16 Removing the Battery ...17 Turning On and Off the Camera...17 Setting Display Language, Date and Time 18 Inserting Memory Cards ...20 Removing Memory Cards...20 A Basic Photography and Playback: Auto Mode 22 Step 1 Turn the Camera On and Select A (Auto) Mode 22 Indicators Displayed in A (Auto) Mode 23 Step 2 Frame a Picture ...24 Using the Zoom...25 Step 3 Focus and Shoot ...26 Step 4 Playing Back and Deleting...
S60 User's Manual
Page 11
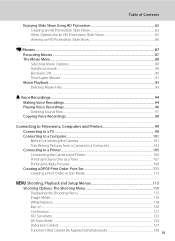
......101 Before Connecting the Camera...101 Transferring Pictures from a Camera to a Computer 102 Connecting to a Printer...105 Connecting the Camera and Printer...106 Printing Pictures One at a Time ...107 Printing Multiple Pictures ...108 Creating a DPOF Print Order: Print Set 111 Creating a Print Order in Sort Mode ...113 d Shooting, Playback and Setup Menus 115 Shooting Options: The Shooting Menu 115 Displaying the Shooting Menu...115 Image Mode...116 White Balance ...118 Exp.+/- ...120 Continuous...121 ISO Sensitivity...123 AF Area Mode ...124 Distortion Control ...127 Functions that...
......101 Before Connecting the Camera...101 Transferring Pictures from a Camera to a Computer 102 Connecting to a Printer...105 Connecting the Camera and Printer...106 Printing Pictures One at a Time ...107 Printing Multiple Pictures ...108 Creating a DPOF Print Order: Print Set 111 Creating a Print Order in Sort Mode ...113 d Shooting, Playback and Setup Menus 115 Shooting Options: The Shooting Menu 115 Displaying the Shooting Menu...115 Image Mode...116 White Balance ...118 Exp.+/- ...120 Continuous...121 ISO Sensitivity...123 AF Area Mode ...124 Distortion Control ...127 Functions that...
S60 User's Manual
Page 13
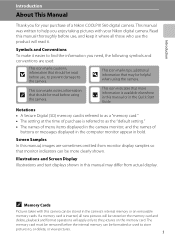
... view pictures. 1 Illustrations and Screen Display Illustrations and text displays shown in the camera's internal memory or on the memory card. Screen Samples In this manual may be stored on the memory card and delete, playback and format operations will read it. This icon marks notes, information C that may differ from monitor display samples so that should be read before use , to prevent damage to as a "memory card." • The setting at the time of a Nikon COOLPIX S60 digital camera...
... view pictures. 1 Illustrations and Screen Display Illustrations and text displays shown in the camera's internal memory or on the memory card. Screen Samples In this manual may be stored on the memory card and delete, playback and format operations will read it. This icon marks notes, information C that may differ from monitor display samples so that should be read before use , to prevent damage to as a "memory card." • The setting at the time of a Nikon COOLPIX S60 digital camera...

S60 User's Manual
Page 33
... adapter • Do not use (A 145). Format card? If the switch is not formatted. When the confirmation dialog is being written to or deleted from , the memory card. Be sure to make copies of data or in the "lock" position, data cannot be written to, or deleted from the memory card, or during formatting, while data is displayed, tap Yes. Note that formatting permanently deletes all pictures and other devices into the COOLPIX S60, be formatted...
... adapter • Do not use (A 145). Format card? If the switch is not formatted. When the confirmation dialog is being written to or deleted from , the memory card. Be sure to make copies of data or in the "lock" position, data cannot be written to, or deleted from the memory card, or during formatting, while data is displayed, tap Yes. Note that formatting permanently deletes all pictures and other devices into the COOLPIX S60, be formatted...

S60 User's Manual
Page 34
... prepare to turn on the capacity of the internal memory or memory card and image mode setting (A 117). 22 Cannot shoot. The camera enters A (auto) mode. Proceed to step 4. 2 Tap the shooting mode control. Shooting 4 Check the battery level and number of purchase. Recharge or replace with a fully charged battery. 9 Number of exposures remaining Number of Exposures Remaining The number of digital cameras. 1 Press the power switch to charge or replace the battery. Description Battery fully charged. The power-on lamp (green) will light for first-time users of pictures that...
... prepare to turn on the capacity of the internal memory or memory card and image mode setting (A 117). 22 Cannot shoot. The camera enters A (auto) mode. Proceed to step 4. 2 Tap the shooting mode control. Shooting 4 Check the battery level and number of purchase. Recharge or replace with a fully charged battery. 9 Number of exposures remaining Number of Exposures Remaining The number of digital cameras. 1 Press the power switch to charge or replace the battery. Description Battery fully charged. The power-on lamp (green) will light for first-time users of pictures that...
S60 User's Manual
Page 41
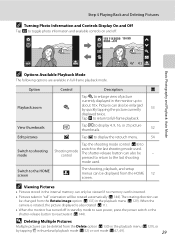
... shooting mode control (A 8) to Switch to shooting mode Shooting mode control switch to the last shooting mode used . Switch to the HOME screen The shooting, playback, and setup a menus can also be enlarged by tapping q in thumbnail playback mode (A 52) or sort mode (A 67, 69). 29 D Deleting Multiple Pictures Multiple pictures can also be pressed to return to the last shooting - Tap d to return to enlarge view of picture currently displayed in the playback menu (A 129). The shutter-release button can be deleted from the Delete...
... shooting mode control (A 8) to Switch to shooting mode Shooting mode control switch to the last shooting mode used . Switch to the HOME screen The shooting, playback, and setup a menus can also be enlarged by tapping q in thumbnail playback mode (A 52) or sort mode (A 67, 69). 29 D Deleting Multiple Pictures Multiple pictures can also be pressed to return to the last shooting - Tap d to return to enlarge view of picture currently displayed in the playback menu (A 129). The shutter-release button can be deleted from the Delete...
S60 User's Manual
Page 44
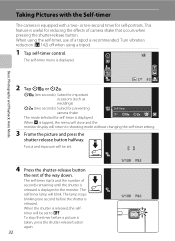
... Playback: Auto Mode 9 2 Tap Y or Z. The self-timer starts and the number of the way down. Y (ten seconds): Suited for important occasions (such as weddings) Z (two seconds): Suited for preventing camera shake Self-timer The mode selected for self-timer is released. When d is taken, press the shutter-release button again. 1 / 1 2 5 F 3.8 1 / 1 2 5 F 3.8 The lamp stops blinking one second before a picture is tapped, the menu will close and the monitor display will blink...
... Playback: Auto Mode 9 2 Tap Y or Z. The self-timer starts and the number of the way down. Y (ten seconds): Suited for important occasions (such as weddings) Z (two seconds): Suited for preventing camera shake Self-timer The mode selected for self-timer is released. When d is taken, press the shutter-release button again. 1 / 1 2 5 F 3.8 1 / 1 2 5 F 3.8 The lamp stops blinking one second before a picture is tapped, the menu will close and the monitor display will blink...
S60 User's Manual
Page 47
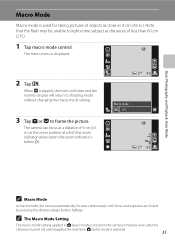
... display will return to shooting mode without changing the macro mode setting. Macro mode 3 Tap e or f to light entire subject at distances of 9 cm (3.6 in.) at the zoom position at a distance of less than 60 cm (2 ft.). 1 Tap macro mode control. The camera can focus at which the zoom indicator glows green (the zoom indicator is before Q). 9 C Macro Mode In macro mode, the camera automatically focuses continuously until focus and exposure are locked by pressing the shutter-release button halfway. Note that the flash...
... display will return to shooting mode without changing the macro mode setting. Macro mode 3 Tap e or f to light entire subject at distances of 9 cm (3.6 in.) at the zoom position at a distance of less than 60 cm (2 ft.). 1 Tap macro mode control. The camera can focus at which the zoom indicator glows green (the zoom indicator is before Q). 9 C Macro Mode In macro mode, the camera automatically focuses continuously until focus and exposure are locked by pressing the shutter-release button halfway. Note that the flash...
S60 User's Manual
Page 52
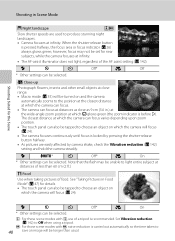
...; Macro mode (A 35) will focus (A 24). Note that the flash may not be selected. Shooting Suited for the Scene Shooting in .) at the wide-angle zoom position at which C glows green (the zoom indicator is before Q). m W n Off* p On * Other settings can focus at distances as 9 cm (3.6 in Scene Mode j Night landscape OQ Slow shutter speeds are easily affected by pressing the shutter-release button halfway. • As pictures...
...; Macro mode (A 35) will focus (A 24). Note that the flash may not be selected. Shooting Suited for the Scene Shooting in .) at the wide-angle zoom position at which C glows green (the zoom indicator is before Q). m W n Off* p On * Other settings can focus at distances as 9 cm (3.6 in Scene Mode j Night landscape OQ Slow shutter speeds are easily affected by pressing the shutter-release button halfway. • As pictures...
S60 User's Manual
Page 60
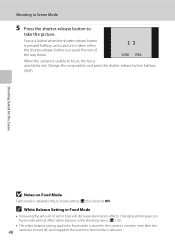
... the next time food mode is unable to take the picture. Shooting Suited for the Scene B Notes on Food Mode Flash mode is fixed at ON. Change the composition and press the shutter-release button halfway again. C White Balance Setting in Food Mode • Increasing the amount of the way down. 1 / 6 0 F 3.8 When the camera is selected. Shooting in Scene Mode 5 Press the shutter-release button to focus, the focus area blinks red. Changing white balance in food mode will...
... the next time food mode is unable to take the picture. Shooting Suited for the Scene B Notes on Food Mode Flash mode is fixed at ON. Change the composition and press the shutter-release button halfway again. C White Balance Setting in Food Mode • Increasing the amount of the way down. 1 / 6 0 F 3.8 When the camera is selected. Shooting in Scene Mode 5 Press the shutter-release button to focus, the focus area blinks red. Changing white balance in food mode will...

S60 User's Manual
Page 66
... the internal memory or on the memory card. Apply perspective control similar to make or model of camera. • If a copy created using this camera is viewed on a different digital camera, the picture may not be displayed or may not be transferred to create them as separate files (A 151). C Picture Editing • The editing functions of this camera cannot be used for pictures taken with another make the subject appear thinner or wider, and save...
... the internal memory or on the memory card. Apply perspective control similar to make or model of camera. • If a copy created using this camera is viewed on a different digital camera, the picture may not be displayed or may not be transferred to create them as separate files (A 151). C Picture Editing • The editing functions of this camera cannot be used for pictures taken with another make the subject appear thinner or wider, and save...

S60 User's Manual
Page 95
Save OK? If you wish to change the settings, create a new HD Pictmotion slide show with COOLPIX S60 cannot be played back using another model of camera. • HD Pictmotion slide shows can be played back on this camera or on a TV to which they have been transferred. • The current memory card holds up to that shown in the internal memory cannot be displayed. If the current...
Save OK? If you wish to change the settings, create a new HD Pictmotion slide show with COOLPIX S60 cannot be played back using another model of camera. • HD Pictmotion slide shows can be played back on this camera or on a TV to which they have been transferred. • The current memory card holds up to that shown in the internal memory cannot be displayed. If the current...
S60 User's Manual
Page 130
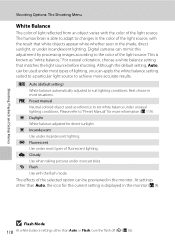
Digital cameras can mimic this adjustment by processing images according to "Preset Manual" for direct sunlight. Please refer to the color of the selected option can be used as "white balance." f Cloudy Use when taking pictures under unusual lighting conditions. g Flash Use with the color of the light source. B Flash Mode 118 At white-balance settings other than Auto or Flash, turn the flash off (W) (A 30). a Auto (default setting) White balance automatically adjusted to achieve more information (A 119). b Preset manual Neutral-colored object used under ...
Digital cameras can mimic this adjustment by processing images according to "Preset Manual" for direct sunlight. Please refer to the color of the selected option can be used as "white balance." f Cloudy Use when taking pictures under unusual lighting conditions. g Flash Use with the color of the light source. B Flash Mode 118 At white-balance settings other than Auto or Flash, turn the flash off (W) (A 30). a Auto (default setting) White balance automatically adjusted to achieve more information (A 119). b Preset manual Neutral-colored object used under ...
S60 User's Manual
Page 133
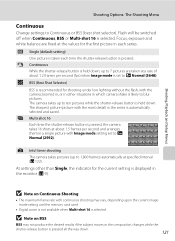
... U Single (default setting) One picture is taken each series. X Intvl timer shooting The camera takes pictures (up to Continuous or BSS (best shot selector). B Note on BSS BSS may vary, depending upon the current image mode setting and the memory card used. • Digital zoom is not available when Multi-shot 16 is pressed. W Multi-shot 16 Each time the shutter-release button is selected. Flash will be switched off when Continuous, BSS or Multi-shot 16...
... U Single (default setting) One picture is taken each series. X Intvl timer shooting The camera takes pictures (up to Continuous or BSS (best shot selector). B Note on BSS BSS may vary, depending upon the current image mode setting and the memory card used. • Digital zoom is not available when Multi-shot 16 is pressed. W Multi-shot 16 Each time the shutter-release button is selected. Flash will be switched off when Continuous, BSS or Multi-shot 16...
S60 User's Manual
Page 145
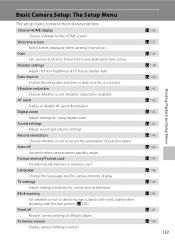
..., Playback and Setup Menus Choose HOME display Choose a design for camera monitor display. Welcome screen Select screen displayed when camera is enabled. Firmware version Display camera firmware version. Monitor settings Adjust monitor brightness and choose display style. Auto off Set time before camera enters standby mode. TV settings Adjust settings necessary for using digital zoom. AF assist Enable or disable AF-assist illumination. Sound settings Adjust sound and volume settings. Record orientation Choose whether or not to television. Date imprint Imprint shooting date...
..., Playback and Setup Menus Choose HOME display Choose a design for camera monitor display. Welcome screen Select screen displayed when camera is enabled. Firmware version Display camera firmware version. Monitor settings Adjust monitor brightness and choose display style. Auto off Set time before camera enters standby mode. TV settings Adjust settings necessary for using digital zoom. AF assist Enable or disable AF-assist illumination. Sound settings Adjust sound and volume settings. Record orientation Choose whether or not to television. Date imprint Imprint shooting date...
S60 User's Manual
Page 157
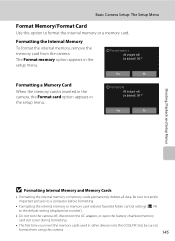
... setup menu. The Format memory option appears in the setup menu. OK?" Format card All images will be deleted! OK?" Be sure to transfer important pictures to a computer before formatting. • Formatting the internal memory or memory card restores favorites folder control settings (A 74) to the default setting (displayed as number). • Do not turn the camera off, disconnect the AC adapter, or open the battery-chamber/memory card slot cover during formatting. • The first time you insert the memory cards used in other devices into the COOLPIX S60...
... setup menu. The Format memory option appears in the setup menu. OK?" Format card All images will be deleted! OK?" Be sure to transfer important pictures to a computer before formatting. • Formatting the internal memory or memory card restores favorites folder control settings (A 74) to the default setting (displayed as number). • Do not turn the camera off, disconnect the AC adapter, or open the battery-chamber/memory card slot cover during formatting. • The first time you insert the memory cards used in other devices into the COOLPIX S60...
S60 User's Manual
Page 169
... as home. No pictures are hidden. using playback mode or list 70 by date mode. internal memory contains and destination. 98 no image data. File not created with COOLPIX S60. View file on again. N Picture is in same time Travel destination is protected. Lens error Q Lens error. The picture has not been • Add pictures to favorites 75 added to the memory card. 132 Display the playback menu and select Copy. in containing the sorted 69 auto sort mode. Turn camera off and then...
... as home. No pictures are hidden. using playback mode or list 70 by date mode. internal memory contains and destination. 98 no image data. File not created with COOLPIX S60. View file on again. N Picture is in same time Travel destination is protected. Lens error Q Lens error. The picture has not been • Add pictures to favorites 75 added to the memory card. 132 Display the playback menu and select Copy. in containing the sorted 69 auto sort mode. Turn camera off and then...
S60 User's Manual
Page 171
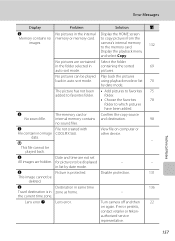
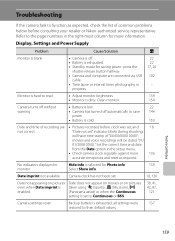
...; Pictures recorded before consulting your retailer or Nikon-authorized service representative. No indicators displayed in Hide info is dirty. Refer to their default values. Display, Settings and Power Supply Problem Cause/Solution A Monitor is blank • Camera is off automatically to save 144 power. • Battery is exhausted; Set the correct time and date from the Date option in the setup menu. • Check camera clock regularly against more information. Troubleshooting If the camera fails...
...; Pictures recorded before consulting your retailer or Nikon-authorized service representative. No indicators displayed in Hide info is dirty. Refer to their default values. Display, Settings and Power Supply Problem Cause/Solution A Monitor is blank • Camera is off automatically to save 144 power. • Battery is exhausted; Set the correct time and date from the Date option in the setup menu. • Check camera clock regularly against more information. Troubleshooting If the camera fails...
S60 User's Manual
Page 174
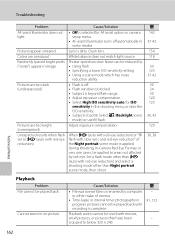
... scene mode, then shoot. Cannot zoom in image. Cause/Solution • Off is applied during shooting, In-Camera Red-Eye Fix may, in some modes. Lens is backlit. Select o (Backlight scene mode) or use fill flash. Troubleshooting Problem AF-assist illuminator does not light. Shutter speed too slow. Pictures are too dark (underexposed). Set a flash mode other than V (auto with slow sync and red-eye reduction" of camera. • Time-lapse or interval timer photography in the shooting menu, or raise the ISO sensitivity...
... scene mode, then shoot. Cannot zoom in image. Cause/Solution • Off is applied during shooting, In-Camera Red-Eye Fix may, in some modes. Lens is backlit. Select o (Backlight scene mode) or use fill flash. Troubleshooting Problem AF-assist illuminator does not light. Shutter speed too slow. Pictures are too dark (underexposed). Set a flash mode other than V (auto with slow sync and red-eye reduction" of camera. • Time-lapse or interval timer photography in the shooting menu, or raise the ISO sensitivity...
S60 User's Manual
Page 183
... Playback menu 129 Playback zoom 53 Playing voice recordings 96 Portrait K 37 Power 18, 22 Power switch 4, 22 Power-on lamp 4, 22 Preset manual 119 Print 107, 108, 111 Print Set 111 Printer 105 Protect 131 R Rechargable battery 150 Rechargable Li-ion battery 14, 16 Record orientation 144 Recording movies 87 Red-eye reduction 30, 31 Reset all 147 Rotate image 131 S Scene auto selector 43 Scene auto selector A 37 Scene mode 36, 37 Self-timer 32 Self-timer lamp 4, 32 Setup menu 133 Shooting...
... Playback menu 129 Playback zoom 53 Playing voice recordings 96 Portrait K 37 Power 18, 22 Power switch 4, 22 Power-on lamp 4, 22 Preset manual 119 Print 107, 108, 111 Print Set 111 Printer 105 Protect 131 R Rechargable battery 150 Rechargable Li-ion battery 14, 16 Record orientation 144 Recording movies 87 Red-eye reduction 30, 31 Reset all 147 Rotate image 131 S Scene auto selector 43 Scene auto selector A 37 Scene mode 36, 37 Self-timer 32 Self-timer lamp 4, 32 Setup menu 133 Shooting...


