

User Manual
Page 2
Internet is a trademark of the SD Card Association. The SD logo is a trademark. PictBridge is a trademark of Digital Equipment Corporation. All other trade names mentioned in this manual or the other documentation provided with your Nikon product are trademarks of Apple Computer, Inc. Finder, Power Mac, iMac, and iBook are trademarks or registered trademarks...
Internet is a trademark of the SD Card Association. The SD logo is a trademark. PictBridge is a trademark of Digital Equipment Corporation. All other trade names mentioned in this manual or the other documentation provided with your Nikon product are trademarks of Apple Computer, Inc. Finder, Power Mac, iMac, and iBook are trademarks or registered trademarks...

User Manual
Page 4
... remains. • Immediately after use, or when the product is unplugged. • Use only rechargeable Nikon ENEL5 lithium-ion batteries (supplied). • When inserting the battery, do not attempt to insert it...be taken to maintain compliance with product regulations. • Before replacing the battery, turn the camera off and make sure the power-on lamp has gone out. Avoid contact with metal objects such... of reach of children Particular care should not be played back on which the software and manuals are using an AC adapter kit, be taken to avoid injury due to broken glass and...
... remains. • Immediately after use, or when the product is unplugged. • Use only rechargeable Nikon ENEL5 lithium-ion batteries (supplied). • When inserting the battery, do not attempt to insert it...be taken to maintain compliance with product regulations. • Before replacing the battery, turn the camera off and make sure the power-on lamp has gone out. Avoid contact with metal objects such... of reach of children Particular care should not be played back on which the software and manuals are using an AC adapter kit, be taken to avoid injury due to broken glass and...

User Manual
Page 5
...the FCC rules. Wash hands after handling. Using other reproductive harm. Tel.: 631-547-4200 iii Notice for customers in the State of California WARNING: Handling the cord on this...Statement This equipment has been tested and found to comply with the limits for a Class B digital device, pursuant to radio communications. If this equipment does cause harmful interference to radio or ...8226; No part of the manuals included with this product may be reproduced, transmitted, transcribed, stored in a retrieval system, or translated into an outlet on a cir- Nikon Inc., 1300 Walt Whitman Road,...
...the FCC rules. Wash hands after handling. Using other reproductive harm. Tel.: 631-547-4200 iii Notice for customers in the State of California WARNING: Handling the cord on this...Statement This equipment has been tested and found to comply with the limits for a Class B digital device, pursuant to radio communications. If this equipment does cause harmful interference to radio or ...8226; No part of the manuals included with this product may be reproduced, transmitted, transcribed, stored in a retrieval system, or translated into an outlet on a cir- Nikon Inc., 1300 Walt Whitman Road,...
User Manual
Page 11
...camera. Read this manual or in this manual thoroughly before use , and keep it easier to find the information you enjoy taking pictures with your Nikon digital camera. Before You Begin First Steps Basic Photography Scene Mode More on Photography Movies More on the card instead of a Nikon COOLPIX 4200 digital camera...Start Guide. Introduction Thank you insert a memory card into the camera, pictures will automatically be stored on Playback The Shooting Menu The Playback Menu The Setup Menu Technical Notes 1 This manual has been written to help you need, the following symbols and ...
...camera. Read this manual or in this manual thoroughly before use , and keep it easier to find the information you enjoy taking pictures with your Nikon digital camera. Before You Begin First Steps Basic Photography Scene Mode More on Photography Movies More on the card instead of a Nikon COOLPIX 4200 digital camera...Start Guide. Introduction Thank you insert a memory card into the camera, pictures will automatically be stored on Playback The Shooting Menu The Playback Menu The Setup Menu Technical Notes 1 This manual has been written to help you need, the following symbols and ...

User Manual
Page 19
... that the power-on lamp has gone out before opening the battery-chamber cover. tion when removing the battery. Alternative Power Sources To power the camera continuously for EH-62A AC adapter kit, see "Connecting the EH-62A AC Adapter Kit" ( 124). 9 Read Battery Warnings Read and follow the... the cover is inserted. Observe due cau- ii and page 128 of AC adapter. For more information on pages i - Failure to observe this manual, together with any circumstances, use an optional EH-62A AC adapter kit. The orange battery latch is pushed aside as the battery is closed firmly...
... that the power-on lamp has gone out before opening the battery-chamber cover. tion when removing the battery. Alternative Power Sources To power the camera continuously for EH-62A AC adapter kit, see "Connecting the EH-62A AC Adapter Kit" ( 124). 9 Read Battery Warnings Read and follow the... the cover is inserted. Observe due cau- ii and page 128 of AC adapter. For more information on pages i - Failure to observe this manual, together with any circumstances, use an optional EH-62A AC adapter kit. The orange battery latch is pushed aside as the battery is closed firmly...

User Manual
Page 26
..., provided software can be set when traveling abroad. See the provided software Reference Manual (on CD) for details. Time Zones The local time or daylight saving time can be used to set the camera clock to PTP ( 60) in shooting mode and all pictures will charge in the setup menu for details. 16... The Camera Clock The camera clock is powered by an EH-62A AC adapter kit (optional), the clock battery...
..., provided software can be set when traveling abroad. See the provided software Reference Manual (on CD) for details. Time Zones The local time or daylight saving time can be used to set the camera clock to PTP ( 60) in shooting mode and all pictures will charge in the setup menu for details. 16... The Camera Clock The camera clock is powered by an EH-62A AC adapter kit (optional), the clock battery...
User Manual
Page 32
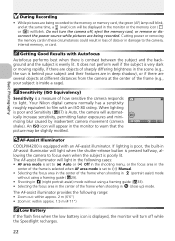
...of the frame is selected when AF area mode is set to Manual. • Selecting the focus area in the center of the frame when shooting in (portrait assist) mode without using a framing guide ( 29). • Shooting in (night portrait assist) mode without using a framing guide ( ...When lighting is poor and Sensitivity ( 87) is evenly lit. If lighting is poor, the built-in (close up) mode. Your Nikon digital camera normally has a sensitivity roughly equivalent to light. Basic Photography During Recording • While pictures are being recorded. Sensitivity (ISO Equivalency) Sensitivity ...
...of the frame is selected when AF area mode is set to Manual. • Selecting the focus area in the center of the frame when shooting in (portrait assist) mode without using a framing guide ( 29). • Shooting in (night portrait assist) mode without using a framing guide ( ...When lighting is poor and Sensitivity ( 87) is evenly lit. If lighting is poor, the built-in (close up) mode. Your Nikon digital camera normally has a sensitivity roughly equivalent to light. Basic Photography During Recording • While pictures are being recorded. Sensitivity (ISO Equivalency) Sensitivity ...

User Manual
Page 39
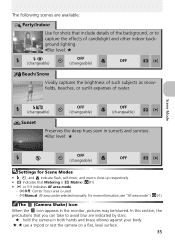
...assist) mode helps you frame off-center subjects and compose tall or wide shots and two-person portraits. AF area mode is automatically set to Manual. • Select a focus area according to and press the MENU button ( 28). Portrait right Use to compose shot with your subject ( ... stands out clearly while background details are softened. Portrait close-up Use to compose shot with two subjects positioned side-by-side. • Camera will focus on subject in framing guide. A framing assist menu helps you frame portraits in monitor. This lends the composition a sense of depth...
...assist) mode helps you frame off-center subjects and compose tall or wide shots and two-person portraits. AF area mode is automatically set to Manual. • Select a focus area according to and press the MENU button ( 28). Portrait right Use to compose shot with your subject ( ... stands out clearly while background details are softened. Portrait close-up Use to compose shot with two subjects positioned side-by-side. • Camera will focus on subject in framing guide. A framing assist menu helps you frame portraits in monitor. This lends the composition a sense of depth...
User Manual
Page 45
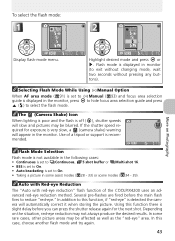
The (Camera Shake) Icon When the icon appears in the monitor, pictures may be selected manually. Manual: AF area can take to capture the effects of candlelight and other indoor background lighting. •Blur level: (changeable) OFF (changeable) OFF Beach/Snow Vividly ...
The (Camera Shake) Icon When the icon appears in the monitor, pictures may be selected manually. Manual: AF area can take to capture the effects of candlelight and other indoor background lighting. •Blur level: (changeable) OFF (changeable) OFF Beach/Snow Vividly ...
User Manual
Page 47
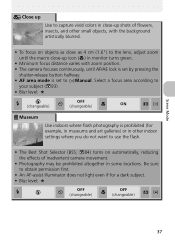
... Best Shot Selector (BSS; 84) turns on objects as close as 4 cm (1.6") to the lens, adjust zoom until the macro close -up shots of inadvertent camera movement. • Photography may be prohibited altogether in other small objects, with zoom position. • The...
... Best Shot Selector (BSS; 84) turns on objects as close as 4 cm (1.6") to the lens, adjust zoom until the macro close -up shots of inadvertent camera movement. • Photography may be prohibited altogether in other small objects, with zoom position. • The...
User Manual
Page 53
... release again for exposure is displayed in the monitor, press to hide focus area selection guide and press ( ) to Manual ( 93) and focus area selection guide is very slow, a (camera shake) warning will appear in the monitor. In addition to this function, if "red-eye" is set to On.... the desired results. In this function there is recommended. In some assist modes ( 28 - 33) or scene modes ( 34 - 39). The (Camera Shake) Icon When lighting is poor and the flash is displayed in some rare cases, other picture areas may be blurred. Depending on Photography Display...
... release again for exposure is displayed in the monitor, press to hide focus area selection guide and press ( ) to Manual ( 93) and focus area selection guide is very slow, a (camera shake) warning will appear in the monitor. In addition to this function, if "red-eye" is set to On.... the desired results. In this function there is recommended. In some assist modes ( 28 - 33) or scene modes ( 34 - 39). The (Camera Shake) Icon When lighting is poor and the flash is displayed in some rare cases, other picture areas may be blurred. Depending on Photography Display...
User Manual
Page 55
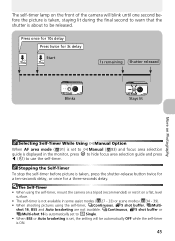
shot 16, BSS and Auto bracketing are not available. The self-timer lamp on the front of the camera will be automatically OFF while the self-timer is not available in the monitor, press to hide focus area selection guide and press ( ) to be ... modes ( 27 - 33) or scene modes ( 34 - 39). • When shooting pictures using the self-timer, mount the camera on a tripod (recommended) or rest it on Photography Selecting Self-Timer While Using Manual Option When AF area mode ( 91) is set to Manual ( 93) and focus area selection guide is taken, press the shutter...
shot 16, BSS and Auto bracketing are not available. The self-timer lamp on the front of the camera will be automatically OFF while the self-timer is not available in the monitor, press to hide focus area selection guide and press ( ) to be ... modes ( 27 - 33) or scene modes ( 34 - 39). • When shooting pictures using the self-timer, mount the camera on a tripod (recommended) or rest it on Photography Selecting Self-Timer While Using Manual Option When AF area mode ( 91) is set to Manual ( 93) and focus area selection guide is taken, press the shutter...

User Manual
Page 56
Use the monitor for taking close-up menu. icon appears in monitor when camera is in macro close-up (to exit without pressing any buttons). More on Photography Selecting Macro Close-Up Mode While Using Manual Option When AF area mode ( 91) is set to use the macro close -up shots of 4 cm... (1.6"). Exit menu. Display macro close -up is not available in assist modes ( 27 - 33) or some scene modes ( 34 - 39). 46 Frame picture. • If camera is zoomed out until...
Use the monitor for taking close-up menu. icon appears in monitor when camera is in macro close-up (to exit without pressing any buttons). More on Photography Selecting Macro Close-Up Mode While Using Manual Option When AF area mode ( 91) is set to use the macro close -up shots of 4 cm... (1.6"). Exit menu. Display macro close -up is not available in assist modes ( 27 - 33) or some scene modes ( 34 - 39). 46 Frame picture. • If camera is zoomed out until...

User Manual
Page 57
...Manual Option When AF area mode ( 91) is set to exit without changing setting, wait two seconds without pressing any buttons). Exposure Compensation Exposure compensation is not available when the scene mode. (fireworks show) ( 38) is used to alter the exposure from the value suggested by the camera. In another shooting... mode, exposure compensation returns to use the exposure compensation. icon and a value for the selected mode when the camera is turned off or the mode dial is turned off. Exposure compensation can be set to Manual ( 93) and focus area ...
...Manual Option When AF area mode ( 91) is set to exit without changing setting, wait two seconds without pressing any buttons). Exposure Compensation Exposure compensation is not available when the scene mode. (fireworks show) ( 38) is used to alter the exposure from the value suggested by the camera. In another shooting... mode, exposure compensation returns to use the exposure compensation. icon and a value for the selected mode when the camera is turned off or the mode dial is turned off. Exposure compensation can be set to Manual ( 93) and focus area ...

User Manual
Page 69
... the A/V cable. 2 Connect the A/V cable to the camera Open the interface connector cover and insert the black plug of the A/V cable into the audio-in jack. 4 Tune the television to the video channel For more information, see the manual for your television or VCR and the white plug into... the camera's Audio/Video (A/V) out connector. 3 Connect the A/V cable to a television or video-cassette recorder (VCR). More on ...
... the A/V cable. 2 Connect the A/V cable to the camera Open the interface connector cover and insert the black plug of the A/V cable into the audio-in jack. 4 Tune the television to the video channel For more information, see the manual for your television or VCR and the white plug into... the camera's Audio/Video (A/V) out connector. 3 Connect the A/V cable to a television or video-cassette recorder (VCR). More on ...
User Manual
Page 70
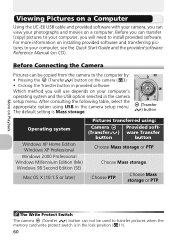
... system and the USB option selected in the lock position ( 11). 60 After consulting the following table, select the appropriate option using : Camera Provided soft- (Transfer ) ware Transfer button button Choose Mass storage or PTP. Viewing Pictures on a Computer Using the UC-E6 USB cable... use depends on your computer, see the Quick Start Guide and the provided software Reference Manual (on Playback The Write Protect Switch The camera (Transfer ) button can not be copied from the camera to transfer pictures when the memory card write protect switch is Mass storage. (Transfer )...
... system and the USB option selected in the lock position ( 11). 60 After consulting the following table, select the appropriate option using : Camera Provided soft- (Transfer ) ware Transfer button button Choose Mass storage or PTP. Viewing Pictures on a Computer Using the UC-E6 USB cable... use depends on your computer, see the Quick Start Guide and the provided software Reference Manual (on Playback The Write Protect Switch The camera (Transfer ) button can not be copied from the camera to transfer pictures when the memory card write protect switch is Mass storage. (Transfer )...
User Manual
Page 74
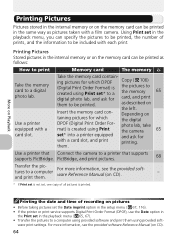
... pictures to the memory 65 digital photo lab, and ask for which the digital DPOF (Digital Print Order For- as pictures taken with each print. ing pictures for which DPOF Copy ( 106) (Digital Print Order Format) is created using Print the camera 65 set in the same way... PictBridge, and print pictures. 68 Transfer the pictures to a computer and print them . For more information, see the provided software Reference Manual (on the left. Insert the memory card con- ware print settings. Memory card The memory Take the memory card contain- Use a ...
... pictures to the memory 65 digital photo lab, and ask for which the digital DPOF (Digital Print Order For- as pictures taken with each print. ing pictures for which DPOF Copy ( 106) (Digital Print Order Format) is created using Print the camera 65 set in the same way... PictBridge, and print pictures. 68 Transfer the pictures to a computer and print them . For more information, see the provided software Reference Manual (on the left. Insert the memory card con- ware print settings. Memory card The memory Take the memory card contain- Use a ...
User Manual
Page 78
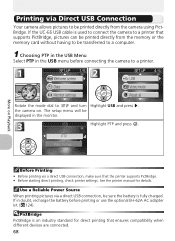
..., check printer settings. Use a Reliable Power Source When printing pictures via a direct USB connection, be sure the battery is used to connect the camera to a printer that ensures compatibility when different devices are connected. 68 Rotate the mode dial to and turn Highlight USB and press . The setup... Menu Select PTP in the USB menu before printing or use the optional EH-62A AC adapter kit ( 124). See the printer manual for direct printing that supports PictBridge, pictures can be printed directly from the camera using PictBridge. If the UC-E6 USB cable is fully charged.
..., check printer settings. Use a Reliable Power Source When printing pictures via a direct USB connection, be sure the battery is used to connect the camera to a printer that ensures compatibility when different devices are connected. 68 Rotate the mode dial to and turn Highlight USB and press . The setup... Menu Select PTP in the USB menu before printing or use the optional EH-62A AC adapter kit ( 124). See the printer manual for direct printing that supports PictBridge, pictures can be printed directly from the camera using PictBridge. If the UC-E6 USB cable is fully charged.

User Manual
Page 81
Select Cancel to resume printing. To interrupt printing, press , then turn camera off and disconnect USB cable. • To print continuously press . The display returns to exit without printing the remaining images. 71 Error Messages If an ...: • Select Start print to start printing. • Select Back to return to print selection dialog shown in the printer manual, highlight Resume and press to exit without printing pictures. Turn camera off and disconnect USB cable. After checking the printer and resolving any problems as directed in Step 3. • Select Cancel...
Select Cancel to resume printing. To interrupt printing, press , then turn camera off and disconnect USB cable. • To print continuously press . The display returns to exit without printing the remaining images. 71 Error Messages If an ...: • Select Start print to start printing. • Select Back to return to print selection dialog shown in the printer manual, highlight Resume and press to exit without printing pictures. Turn camera off and disconnect USB cable. After checking the printer and resolving any problems as directed in Step 3. • Select Cancel...
User Manual
Page 83
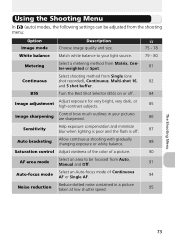
...) on or off . 87 Auto bracketing Allow continuous shooting with gradually changing exposure or white balance. 88 Saturation control Adjust vividness of the color of a picture. 90 AF area mode Select an area to be focused from Auto, Manual and Off. 91 Auto-focus mode Select an Auto-...focus mode of Continuous AF or Single AF. 94 Noise reduction Reduce dotted noise contained in your light source. 79 - 80 Metering Select a metering method from Matrix, Center-weighted or Spot. 81 Select shooting method from Single...
...) on or off . 87 Auto bracketing Allow continuous shooting with gradually changing exposure or white balance. 88 Saturation control Adjust vividness of the color of a picture. 90 AF area mode Select an area to be focused from Auto, Manual and Off. 91 Auto-focus mode Select an Auto-...focus mode of Continuous AF or Single AF. 94 Noise reduction Reduce dotted noise contained in your light source. 79 - 80 Metering Select a metering method from Matrix, Center-weighted or Spot. 81 Select shooting method from Single...


