
User Manual
Page 2
... to get the most from your camera. Please be found in this manual: This icon marks cautions, information that you should read before using your camera. The documentation for your camera. Overview Thank you for your purchase of unpacking and setting up your Nikon digital camera, taking your first pictures, and transferring them to Digital Photography (this manual) provides complete operating instructions for this product includes the...
... to get the most from your camera. Please be found in this manual: This icon marks cautions, information that you should read before using your camera. The documentation for your camera. Overview Thank you for your purchase of unpacking and setting up your Nikon digital camera, taking your first pictures, and transferring them to Digital Photography (this manual) provides complete operating instructions for this product includes the...
User Manual
Page 5
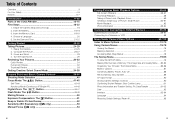
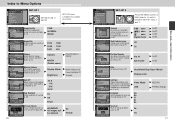
...-22 Parts of Memory: The Image Size and Quality Menu .....80-82 Organizing Your Pictures: The Folders Menu 83-86 Monitor Options 87 Conserving Battery Power: Auto Off 88 File Numbering: Seq. Insert the Battery 16-18 3. Number 89 CF Card Format 90 Storing Camera Settings: Controls 90 Confirming Shutter Release: Shot Confirm Lamp 91 Photo Information and Transfer Setting: Pic Data/Transfer 91-92 Date ...92 Interface 92-94 Language 94 Restoring Default Settings: Reset All 95 9 Ready the Camera 24-25 2. Turn the Camera...
...-22 Parts of Memory: The Image Size and Quality Menu .....80-82 Organizing Your Pictures: The Folders Menu 83-86 Monitor Options 87 Conserving Battery Power: Auto Off 88 File Numbering: Seq. Insert the Battery 16-18 3. Number 89 CF Card Format 90 Storing Camera Settings: Controls 90 Confirming Shutter Release: Shot Confirm Lamp 91 Photo Information and Transfer Setting: Pic Data/Transfer 91-92 Date ...92 Interface 92-94 Language 94 Restoring Default Settings: Reset All 95 9 Ready the Camera 24-25 2. Turn the Camera...
User Manual
Page 6
The Shooting Menu 96-116 Keeping Colors True: White-Balance 97-98 Measuring Light: Metering 99 Taking Pictures in a Sequence: Continuous 100-101 Getting Sharper Pictures: BSS (Best-Shot Selector 102 Adjusting Contrast and Brightness: Image Adjustment 103 Making Edges More Distinct: Image Sharpening 104 Setting for Optional Lens Converters: Lens 105-106 Modifying Sensitivity from a Menu: Sensitivity 106 Exposure Options 106-110 Focus Options 111-113 Auto Bracketing 114-115 Avoid "Grainy" Photographs...
The Shooting Menu 96-116 Keeping Colors True: White-Balance 97-98 Measuring Light: Metering 99 Taking Pictures in a Sequence: Continuous 100-101 Getting Sharper Pictures: BSS (Best-Shot Selector 102 Adjusting Contrast and Brightness: Image Adjustment 103 Making Edges More Distinct: Image Sharpening 104 Setting for Optional Lens Converters: Lens 105-106 Modifying Sensitivity from a Menu: Sensitivity 106 Exposure Options 106-110 Focus Options 111-113 Auto Bracketing 114-115 Avoid "Grainy" Photographs...
User Manual
Page 8
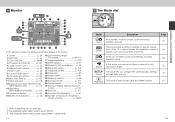
... 2 Self-timer p. 42 3 Zoom indicator p. 26/46 4 Progress bar (Ultra HS p. 100 5 "Date not set" icon*1 p. 22 6 Manual focus indicator p. 54 7 Flash mode p. 48 8 Current Folder name*2 p. 86 9 Converter lens setting p. 105 10 Best Shot Selector p. 102 11 Noise reduction p. 116 12 Exposure lock (Auto exposure lock/ White balance lock p. 110 13 Bracketing/ White-balance bracketing .......p. 114 14 Continuous setting p. 100 15 Battery level indicator*3 p. 25 16 Spot metering target/ Focus area p. 99/112 17 Image sharpening p. 104 18 White balance p. 97 19 Sensitivity (ISO...
... 2 Self-timer p. 42 3 Zoom indicator p. 26/46 4 Progress bar (Ultra HS p. 100 5 "Date not set" icon*1 p. 22 6 Manual focus indicator p. 54 7 Flash mode p. 48 8 Current Folder name*2 p. 86 9 Converter lens setting p. 105 10 Best Shot Selector p. 102 11 Noise reduction p. 116 12 Exposure lock (Auto exposure lock/ White balance lock p. 110 13 Bracketing/ White-balance bracketing .......p. 114 14 Continuous setting p. 100 15 Battery level indicator*3 p. 25 16 Spot metering target/ Focus area p. 99/112 17 Image sharpening p. 104 18 White balance p. 97 19 Sensitivity (ISO...
User Manual
Page 11
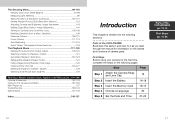
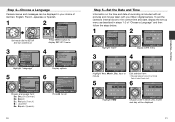
... to set 20 Step 5-Set the Date and Time Information on the time and date of recording is included with all pictures and movies taken with your choice of German, English, French, Japanese or Spanish. 1 Set mode dial to SETUP and turn camera on 2 SET-UP2 Controls Shot Confirm Lamp Pic data/Transfer Date Interface Language Reset All PAGE1 SELECT SET Press MENU button to display SET-UP 2 menu 3 SET-UP2 Controls Shot Confirm Lamp Pic data/Transfer Date Interface Language Reset All PAGE1 SELECT SET Highlight "Language" 4 LANGUAGE Controls Shot Confirm Lamp Pic Data/Transfer De Date...
... to set 20 Step 5-Set the Date and Time Information on the time and date of recording is included with all pictures and movies taken with your choice of German, English, French, Japanese or Spanish. 1 Set mode dial to SETUP and turn camera on 2 SET-UP2 Controls Shot Confirm Lamp Pic data/Transfer Date Interface Language Reset All PAGE1 SELECT SET Press MENU button to display SET-UP 2 menu 3 SET-UP2 Controls Shot Confirm Lamp Pic data/Transfer Date Interface Language Reset All PAGE1 SELECT SET Highlight "Language" 4 LANGUAGE Controls Shot Confirm Lamp Pic Data/Transfer De Date...
User Manual
Page 16
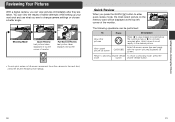
... to view images recorded before the current picture or > for the next shot, press the shutter release button halfway. Reviewing Your Pictures With a digital camera, you can view the results of earlier attempts while setting up your next shot and use what you press the QUICK p button to the desired picture. Getting Started-Reviewing Your Pictures 30 31 JPG > > 1 > 2272 2272 2272 1/250 F2.8 156 1/250 F2.8 15 1/ 1 Shooting Mode Quick Review Last picture taken displayed in...
... to view images recorded before the current picture or > for the next shot, press the shutter release button halfway. Reviewing Your Pictures With a digital camera, you can view the results of earlier attempts while setting up your next shot and use what you press the QUICK p button to the desired picture. Getting Started-Reviewing Your Pictures 30 31 JPG > > 1 > 2272 2272 2272 1/250 F2.8 156 1/250 F2.8 15 1/ 1 Shooting Mode Quick Review Last picture taken displayed in...
User Manual
Page 17
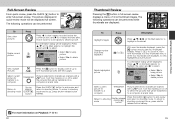
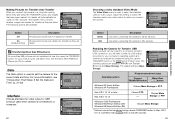
... date. Full-Screen Review From quick review, press the QUICK p button to shooting mode and focus, press shutter release button halfway. Turn this marking on Playback: P. 55-64 32 Thumbnail Review Pressing the 7 button in quick-review mode will be displayed. To return to enter full-screen review. Delete current picture 5 (1) Erase 1 Image(s) Yes/No? • Select No to keep picture • Select Yes to delete picture Select current picture for transfer to a computer TRANSFER Pictures selected for images recorded after. JPG The following operations can...
... date. Full-Screen Review From quick review, press the QUICK p button to shooting mode and focus, press shutter release button halfway. Turn this marking on Playback: P. 55-64 32 Thumbnail Review Pressing the 7 button in quick-review mode will be displayed. To return to enter full-screen review. Delete current picture 5 (1) Erase 1 Image(s) Yes/No? • Select No to keep picture • Select Yes to delete picture Select current picture for transfer to a computer TRANSFER Pictures selected for images recorded after. JPG The following operations can...
User Manual
Page 22
... self-timer lamp will start to blink when the shutter release button is pressed, and continue to light the entire subject. Beyond Point-and-Shoot-Focus Mode Macro Close-Up At widest zoom position where ™ is displayed in yellow, you can focus as close as 4cm (1.6 in.) from the lens. • We recommend that you frame pictures in the monitor when using macro close-up. • While the flash...
... self-timer lamp will start to blink when the shutter release button is pressed, and continue to light the entire subject. Beyond Point-and-Shoot-Focus Mode Macro Close-Up At widest zoom position where ™ is displayed in yellow, you can focus as close as 4cm (1.6 in.) from the lens. • We recommend that you frame pictures in the monitor when using macro close-up. • While the flash...
User Manual
Page 36
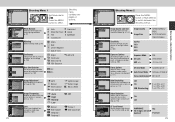
... SELECT SET Date Set date and time (p. 92) INTERFACE Controls Shot Confirm Lamp Pic Data/Transfer Date Interface Video Mode Language USB Reset All SELECT SET Interface Choose USB protocol used for all settings to default values (p. 95) Press the MENU button or Multi selector to save Digital Zoom Off On On/Off On/Off On/Off On/Off info. Numbers Brightness CF Card Format SELECT SET Monitor Options Turn monitor and picture review on or off , control monitor display (p. 87) AUTO OFF Image Quality Image Size Folders Monitor Options Auto...
... SELECT SET Date Set date and time (p. 92) INTERFACE Controls Shot Confirm Lamp Pic Data/Transfer Date Interface Video Mode Language USB Reset All SELECT SET Interface Choose USB protocol used for all settings to default values (p. 95) Press the MENU button or Multi selector to save Digital Zoom Off On On/Off On/Off On/Off On/Off info. Numbers Brightness CF Card Format SELECT SET Monitor Options Turn monitor and picture review on or off , control monitor display (p. 87) AUTO OFF Image Quality Image Size Folders Monitor Options Auto...
User Manual
Page 37
... Image Darken Image Black & White Off Fisheye 1 Slide Copy Adptr IMAGE SIZE & QUALITY Shooting Menu 2 OFF SELECT SET IMAGE SIZE & QUALITY Image Quality Image Size Image Quality and Size Set image quality and size used for use in the COOLPIX 4300 (p. 90) Press the MENU button or Multi selector to switch between the Shooting menus. OFF SELECT SET Exposure Options Set exposure mode, turn AE Lock and Auto Bracketing on or off, set exposure compensation (p. 106) FOCUS OPTIONS AF Area Mode Auto-Focus Mode Focus Confirmation OFF SELECT SET Focus Options Select AF Area, change Autofocus mode...
... Image Darken Image Black & White Off Fisheye 1 Slide Copy Adptr IMAGE SIZE & QUALITY Shooting Menu 2 OFF SELECT SET IMAGE SIZE & QUALITY Image Quality Image Size Image Quality and Size Set image quality and size used for use in the COOLPIX 4300 (p. 90) Press the MENU button or Multi selector to switch between the Shooting menus. OFF SELECT SET Exposure Options Set exposure mode, turn AE Lock and Auto Bracketing on or off, set exposure compensation (p. 106) FOCUS OPTIONS AF Area Mode Auto-Focus Mode Focus Confirmation OFF SELECT SET Focus Options Select AF Area, change Autofocus mode...
User Manual
Page 39
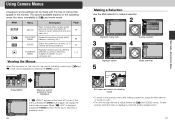
... view through the lens is on the operating mode. Mode SETUP å i p Menu SET-UP SHOOTING MENU SCENE PLAYBACK MENU Description Page Basic camera setup (image quality and size setting, formatting CF memory cards, setting the time and 79 date, etc.) Advanced shooting options (white balance, metering, etc.) 96 Select the scene from a menu of the menu, pressing the MENU button again will display the menu's second page. To take pictures while the menu is available in the monitor. No menu is displayed, press the shutter-release button. 77 Menu Guide-Using Camera...
... view through the lens is on the operating mode. Mode SETUP å i p Menu SET-UP SHOOTING MENU SCENE PLAYBACK MENU Description Page Basic camera setup (image quality and size setting, formatting CF memory cards, setting the time and 79 date, etc.) Advanced shooting options (white balance, metering, etc.) 96 Select the scene from a menu of the menu, pressing the MENU button again will display the menu's second page. To take pictures while the menu is available in the monitor. No menu is displayed, press the shutter-release button. 77 Menu Guide-Using Camera...
User Manual
Page 45
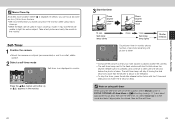
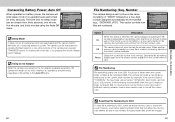
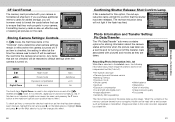
... memory card or format the current card. Conserving Battery Power: Auto Off When operated on battery power, the camera will enter sleep mode if no operations are deactivated and the camera itself is effectively off, consuming almost no power. Numbers CF Card Format SELECT 30S 1M 5M 3 0M SET Sleep Mode In sleep mode, all data it may contain, including hidden and protected images. 89 Menu Guide-The Set-Up Menu If the memory card is "100NIKON," the new folder will continue...
... memory card or format the current card. Conserving Battery Power: Auto Off When operated on battery power, the camera will enter sleep mode if no operations are deactivated and the camera itself is effectively off, consuming almost no power. Numbers CF Card Format SELECT 30S 1M 5M 3 0M SET Sleep Mode In sleep mode, all data it may contain, including hidden and protected images. 89 Menu Guide-The Set-Up Menu If the memory card is "100NIKON," the new folder will continue...
User Manual
Page 46
... be restored Save Save Save Digital Zoom Done the next time the camera is checked, digital zoom functions normally (p. 46). txt Off Interface Auto Transfer On Language Reset All SELECT SET • Shutter speed • White balance • Aperture • Sharpening • Exposure compensation • Date of recording • Focal length and digital zoom • Image size and quality • Image adjustment • Focus area • Sensitivity (ISO equivalency) The info.txt file is turned off will however need to format the cards before first use to...
... be restored Save Save Save Digital Zoom Done the next time the camera is checked, digital zoom functions normally (p. 46). txt Off Interface Auto Transfer On Language Reset All SELECT SET • Shutter speed • White balance • Aperture • Sharpening • Exposure compensation • Date of recording • Focal length and digital zoom • Image size and quality • Image adjustment • Focus area • Sensitivity (ISO equivalency) The info.txt file is turned off will however need to format the cards before first use to...
User Manual
Page 47
... at one time using : Camera TRANSFER button Nikon View button Windows XP Home Edition Windows XP Professional Choose Mass Storage or PTP. USB Controls Shot Confirm Lamp Pic Data/Transfer Date PTP Interface Mass Storage Language USB Reset All SELECT SET Operating system Pictures transferred using the TRANSFER button. See the Nikon View Reference Manual (on CD) for transfer. Date The Date option is used for video output. Adjust this setting to a computer. 92 INTERFACE Controls Shot Confirm Lamp Pic Data/Transfer Date Interface Video Mode Language USB Reset All...
... at one time using : Camera TRANSFER button Nikon View button Windows XP Home Edition Windows XP Professional Choose Mass Storage or PTP. USB Controls Shot Confirm Lamp Pic Data/Transfer Date PTP Interface Mass Storage Language USB Reset All SELECT SET Operating system Pictures transferred using the TRANSFER button. See the Nikon View Reference Manual (on CD) for transfer. Date The Date option is used for video output. Adjust this setting to a computer. 92 INTERFACE Controls Shot Confirm Lamp Pic Data/Transfer Date Interface Video Mode Language USB Reset All...
User Manual
Page 48
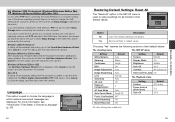
... displayed. Windows Millennium Edition (Me) After displaying a message stating that the computer is used to choose the language in the USB menu before connecting the camera to use the driver needed for the first time, as described below. LANGUAGE Controls Shot Confirm Lamp Pic Data/Transfer De Date En Interface Fr Language EI Reset All Es SELECT SET 94 Restoring Default Settings: Reset All The "Reset All" option in the SET-UP menu is unable to your computer. RESET ALL Reset all modes...
... displayed. Windows Millennium Edition (Me) After displaying a message stating that the computer is used to choose the language in the USB menu before connecting the camera to use the driver needed for the first time, as described below. LANGUAGE Controls Shot Confirm Lamp Pic Data/Transfer De Date En Interface Fr Language EI Reset All Es SELECT SET 94 Restoring Default Settings: Reset All The "Reset All" option in the SET-UP menu is unable to your computer. RESET ALL Reset all modes...
User Manual
Page 49
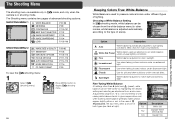
... Speed l i ght OFF SELECT SET Option Description A Auto White balance automatically adjusted to give images a blue cast, while lowering white balance generally makes photos appear slightly yellow or red. Speedlight White balance adjusted to set white balance under unusual lighting conditions. Press MENU button to display å shooting menu. 96 Keeping Colors True: White-Balance White Balance is used as reference to match light produced by highlighting the desired setting and selecting an adjustment from a sub-menu. Cloudy Use for direct sunlight. raising white...
... Speed l i ght OFF SELECT SET Option Description A Auto White balance automatically adjusted to give images a blue cast, while lowering white balance generally makes photos appear slightly yellow or red. Speedlight White balance adjusted to set white balance under unusual lighting conditions. Press MENU button to display å shooting menu. 96 Keeping Colors True: White-Balance White Balance is used as reference to match light produced by highlighting the desired setting and selecting an adjustment from a sub-menu. Cloudy Use for direct sunlight. raising white...
User Manual
Page 56
... lock is in place of focus lock when subject is chosen or white balance, focus mode, shutter speed or aperture adjusted, these icons will turn yellow to indicated that exposure will be reset with the 1 button, exposure compensation can be used in effect, flash will choose the focus area in the monitor. This setting determines how the camera will be set to Off): FOCUS OPTIONS AF Area Mode Auto-Focus Mode Focus Confirmation OFF SELECT SET AF AREA MODE AF Area Mode Auto-Focus Mode Auto Focus Confirmation Manual...
... lock is in place of focus lock when subject is chosen or white balance, focus mode, shutter speed or aperture adjusted, these icons will turn yellow to indicated that exposure will be reset with the 1 button, exposure compensation can be used in effect, flash will choose the focus area in the monitor. This setting determines how the camera will be set to Off): FOCUS OPTIONS AF Area Mode Auto-Focus Mode Focus Confirmation OFF SELECT SET AF AREA MODE AF Area Mode Auto-Focus Mode Auto Focus Confirmation Manual...
User Manual
Page 65
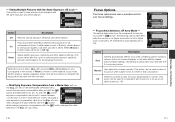
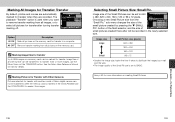
... model of Nikon digital camera can be transferred. Selecting Small Picture Size: Small Pic. All OFF Remove transfer marking from the "Small Pic." See the Nikon View Reference Manual (on the memory card. x 480, 320 x 240, 160 x 120 or 96 x 72 pixels. See p. 60 for transfer after will be transferred when the memory card is set to BASIC. Marking Pictures for Transfer with Other Cameras Pictures selected for transfer when they are recorded. Image files of Transfer 640 Small Pic. 30S Auto...
... model of Nikon digital camera can be transferred. Selecting Small Picture Size: Small Pic. All OFF Remove transfer marking from the "Small Pic." See the Nikon View Reference Manual (on the memory card. x 480, 320 x 240, 160 x 120 or 96 x 72 pixels. See p. 60 for transfer after will be transferred when the memory card is set to BASIC. Marking Pictures for Transfer with Other Cameras Pictures selected for transfer when they are recorded. Image files of Transfer 640 Small Pic. 30S Auto...
User Manual
Page 67
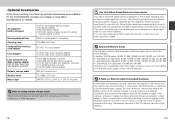
... data not recorded to operate within the operational and safety requirements of this phenomenon is not guaranteed with your Nikon digital camera are using remote release cable The remote cord does not function when the camera is set to Movie, Continuous or VGA Sequence. 132 Use Only Nikon Brand Electronic Accessories Your Nikon COOLPIX digital camera is designed to the highest standards and includes complex electronic circuitry. Turn the camera off, remove and replace the battery, and turn the camera...
... data not recorded to operate within the operational and safety requirements of this phenomenon is not guaranteed with your Nikon digital camera are using remote release cable The remote cord does not function when the camera is set to Movie, Continuous or VGA Sequence. 132 Use Only Nikon Brand Electronic Accessories Your Nikon COOLPIX digital camera is designed to the highest standards and includes complex electronic circuitry. Turn the camera off, remove and replace the battery, and turn the camera...

User Manual
Page 72
... information needed for transfer before connecting camera again. 32, 57, 58, 128 Check that the battery is fully 67 charged. USB cable If error message displayed disconnected or in review mode: 30 half-press shutter release button to return to shooting mode. • Mode dial set to p 15 (playback mode): turn camera on memory card to exit Nikon View. Turn camera off , reconnect 66 transferred to format card, 90 Format No > COOLPIX4300. Error occurs during image transfer. Display Problem Solution Page ALL IMAGES ARE All images in camera setup menu and...
... information needed for transfer before connecting camera again. 32, 57, 58, 128 Check that the battery is fully 67 charged. USB cable If error message displayed disconnected or in review mode: 30 half-press shutter release button to return to shooting mode. • Mode dial set to p 15 (playback mode): turn camera on memory card to exit Nikon View. Turn camera off , reconnect 66 transferred to format card, 90 Format No > COOLPIX4300. Error occurs during image transfer. Display Problem Solution Page ALL IMAGES ARE All images in camera setup menu and...


