
Reference Manual
Page 2
...quickly and easily. Capture perfect portraits Smart Portrait Mode A 39 This mode is perfect for you 'll capture vibrant shots of the COOLPIX L27 Let your camera take pictures in situations that person's face. Simply press the shutter-release button to take over G (Easy Auto) Mode A ...32 When you aim the camera at a person, the camera focuses automatically on that normally require difficult settings, such as when shooting with backlighting or shooting at night. With options like Smile...
...quickly and easily. Capture perfect portraits Smart Portrait Mode A 39 This mode is perfect for you 'll capture vibrant shots of the COOLPIX L27 Let your camera take pictures in situations that person's face. Simply press the shutter-release button to take over G (Easy Auto) Mode A ...32 When you aim the camera at a person, the camera focuses automatically on that normally require difficult settings, such as when shooting with backlighting or shooting at night. With options like Smile...
Reference Manual
Page 3
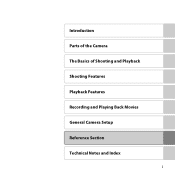
Introduction Parts of the Camera The Basics of Shooting and Playback Shooting Features Playback Features Recording and Playing Back Movies General Camera Setup Reference Section Technical Notes and Index i
Introduction Parts of the Camera The Basics of Shooting and Playback Shooting Features Playback Features Recording and Playing Back Movies General Camera Setup Reference Section Technical Notes and Index i

Reference Manual
Page 4
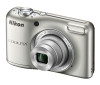
After reading, please keep this manual. ii Introduction Introduction Read This First Thank you for purchasing the Nikon COOLPIX L27 digital camera. Before using the camera, please read the information in "For Your Safety" (A x) and familiarize yourself with the information provided in this manual handy and refer to it to enhance your enjoyment of your new camera.
After reading, please keep this manual. ii Introduction Introduction Read This First Thank you for purchasing the Nikon COOLPIX L27 digital camera. Before using the camera, please read the information in "For Your Safety" (A x) and familiarize yourself with the information provided in this manual handy and refer to it to enhance your enjoyment of your new camera.
Reference Manual
Page 5
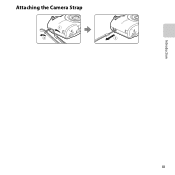
Attaching the Camera Strap 1 2 3 Introduction iii
Attaching the Camera Strap 1 2 3 Introduction iii
Reference Manual
Page 6
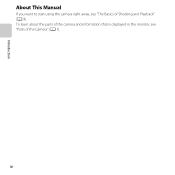
To learn about the parts of the camera and information that is displayed in the monitor, see "The Basics of the Camera" (A 1). iv Introduction About This Manual If you want to start using the camera right away, see "Parts of Shooting and Playback" (A 9).
To learn about the parts of the camera and information that is displayed in the monitor, see "The Basics of the Camera" (A 1). iv Introduction About This Manual If you want to start using the camera right away, see "Parts of Shooting and Playback" (A 9).
Reference Manual
Page 7
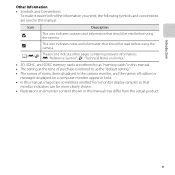
...; Illustrations and monitor content shown in this manual may differ from monitor display samples so that should be read before using the camera. Introduction Other Information • Symbols and Conventions To make it easier to as "memory cards" in this manual. •...In this manual, images are used in this manual: Icon Description B This icon indicates cautions and information that should be read before using the camera. A/E/F These icons indicate other pages containing relevant information; E: "Reference Section", F: "Technical Notes and Index." • SD, SDHC, and...
...; Illustrations and monitor content shown in this manual may differ from monitor display samples so that should be read before using the camera. Introduction Other Information • Symbols and Conventions To make it easier to as "memory cards" in this manual. •...In this manual, images are used in this manual: Icon Description B This icon indicates cautions and information that should be read before using the camera. A/E/F These icons indicate other pages containing relevant information; E: "Reference Section", F: "Technical Notes and Index." • SD, SDHC, and...

Reference Manual
Page 8
... frequently asked questions (FAQs), and general advice on digital imaging and photography. Only Nikon brand electronic accessories (including battery chargers, batteries, and AC adapters) certified by Nikon specifically for contact information: http://imaging.nikon.com/ Use Only Nikon Brand Electronic Accessories Nikon COOLPIX cameras are engineered and proven to operate within the operational and safety requirements of...
... frequently asked questions (FAQs), and general advice on digital imaging and photography. Only Nikon brand electronic accessories (including battery chargers, batteries, and AC adapters) certified by Nikon specifically for contact information: http://imaging.nikon.com/ Use Only Nikon Brand Electronic Accessories Nikon COOLPIX cameras are engineered and proven to operate within the operational and safety requirements of...

Reference Manual
Page 9
... written permission. • Nikon reserves the right to change the specifications of the hardware and software described in these manuals at weddings or before taking the camera on a trip), take a test shot to ensure that the camera is accurate and complete, we would appreciate it were you... to bring any damages resulting from product malfunction. Introduction Before Taking Important Pictures Before taking pictures on important occasions (such as at any time and without prior notice. • Nikon will not ...
... written permission. • Nikon reserves the right to change the specifications of the hardware and software described in these manuals at weddings or before taking the camera on a trip), take a test shot to ensure that the camera is accurate and complete, we would appreciate it were you... to bring any damages resulting from product malfunction. Introduction Before Taking Important Pictures Before taking pictures on important occasions (such as at any time and without prior notice. • Nikon will not ...

Reference Manual
Page 10
Unless the prior permission of the government was digitally copied or reproduced by means of a scanner, digital camera or other device may be provided for business use this product for the purpose of making illegal copies or to be punishable by law. • ...
Unless the prior permission of the government was digitally copied or reproduced by means of a scanner, digital camera or other device may be provided for business use this product for the purpose of making illegal copies or to be punishable by law. • ...

Reference Manual
Page 11
... commercial deletion software, or format the device and then completely refill it with images containing no private information (for the Select an image option in camera memory does not completely erase the original image data. Ensuring the privacy of such data is the user's responsibility. ix Be sure to property when...
... commercial deletion software, or format the device and then completely refill it with images containing no private information (for the Select an image option in camera memory does not completely erase the original image data. Ensuring the privacy of such data is the user's responsibility. ix Be sure to property when...

Reference Manual
Page 12
...event of an infant or child. After removing or disconnecting the power source, take the product to a Nikon-authorized service representative for inspection. Do not use the camera or AC adapter in the presence of flammable gas Do not use the product will read them. Do ...disassemble Touching the internal parts of a fall or other accident, take the equipment to a Nikon-authorized service representative for inspection, after unplugging the product and/or removing the batteries. Should the camera or AC adapter break open x as this could result in explosion or fire. Continued operation...
...event of an infant or child. After removing or disconnecting the power source, take the product to a Nikon-authorized service representative for inspection. Do not use the camera or AC adapter in the presence of flammable gas Do not use the product will read them. Do ...disassemble Touching the internal parts of a fall or other accident, take the equipment to a Nikon-authorized service representative for inspection, after unplugging the product and/or removing the batteries. Should the camera or AC adapter break open x as this could result in explosion or fire. Continued operation...

Reference Manual
Page 13
... using an AC adapter, be sure it is unplugged. • Use only the batteries approved for extended periods while the devices are compatible with COOLPIX L27. • Insert batteries in the correct orientation. • Do not short or disassemble batteries or attempt to remove or break battery insulation or ... not combine old and new batteries or batteries of the devices become hot. Leaving the devices in direct contact with Nikon digital cameras only, and are on or in use in contact with the camera, battery charger, or AC adapter for use Parts of different makes or types. • If...
... using an AC adapter, be sure it is unplugged. • Use only the batteries approved for extended periods while the devices are compatible with COOLPIX L27. • Insert batteries in the correct orientation. • Do not short or disassemble batteries or attempt to remove or break battery insulation or ... not combine old and new batteries or batteries of the devices become hot. Leaving the devices in direct contact with Nikon digital cameras only, and are on or in use in contact with the camera, battery charger, or AC adapter for use Parts of different makes or types. • If...
Reference Manual
Page 15
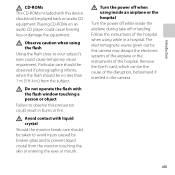
...using the flash Using the flash close to prevent liquid crystal from the subject. Turn the power off when using while in the camera. Follow the instructions of the hospital when using inside an airplane or the hospital Turn the power off while inside the airplane during ... or entering the eyes or mouth. Do not operate the flash with the flash window touching a person or object Failure to observe this camera may disrupt the electronic systems of the airplane or the instruments of the disruption, beforehand if inserted in a hospital. The electromagnetic waves given...
...using the flash Using the flash close to prevent liquid crystal from the subject. Turn the power off when using while in the camera. Follow the instructions of the hospital when using inside an airplane or the hospital Turn the power off while inside the airplane during ... or entering the eyes or mouth. Do not operate the flash with the flash window touching a person or object Failure to observe this camera may disrupt the electronic systems of the airplane or the instruments of the disruption, beforehand if inserted in a hospital. The electromagnetic waves given...

Reference Manual
Page 18
... iii About This Manual iv Information and Precautions vi For Your Safety x WARNINGS x Notices xiv Parts of the Camera 1 The Camera Body 2 Using Menus (d Button 4 The Monitor 6 Shooting Mode 6 Playback Mode 8 The Basics of Shooting and Playback.... 9 Preparation 1 Insert the Batteries... Memory Card.......... 12 Internal Memory and Memory Cards......... 13 Preparation 3 Set the Display Language, Date, and Time 14 Step 1 Turn the Camera On 18 Turning the Camera On and Off 19 Step 2 Select a Shooting Mode 20 Available Shooting Modes 21 Step 3 Frame a Picture 22 Using the Zoom 23 ...
... iii About This Manual iv Information and Precautions vi For Your Safety x WARNINGS x Notices xiv Parts of the Camera 1 The Camera Body 2 Using Menus (d Button 4 The Monitor 6 Shooting Mode 6 Playback Mode 8 The Basics of Shooting and Playback.... 9 Preparation 1 Insert the Batteries... Memory Card.......... 12 Internal Memory and Memory Cards......... 13 Preparation 3 Set the Display Language, Date, and Time 14 Step 1 Turn the Camera On 18 Turning the Camera On and Off 19 Step 2 Select a Shooting Mode 20 Available Shooting Modes 21 Step 3 Frame a Picture 22 Using the Zoom 23 ...

Reference Manual
Page 19
... Playback Features 61 Playback Zoom 62 Thumbnail Display, Calendar Display........ 63 Features That Can Be Set by Pressing the d Button (Playback Menu 64 Connecting the Camera to a TV, Computer, or Printer 65 Using ViewNX 2 67 Installing ViewNX 2 67 Transferring Images to a Printer ... E7 e Skin Softening: Softening ...Movies.... 73 Recording Movies 74 Features That Can Be Set by Pressing the d Button (Movie Menu 77 Playing Back Movies 78 General Camera Setup 81 Features That Can Be Set by Pressing the d Button (Setup Menu 82 Reference Section E1 Using Panorama Assist E2 Editing ...
... Playback Features 61 Playback Zoom 62 Thumbnail Display, Calendar Display........ 63 Features That Can Be Set by Pressing the d Button (Playback Menu 64 Connecting the Camera to a TV, Computer, or Printer 65 Using ViewNX 2 67 Installing ViewNX 2 67 Transferring Images to a Printer ... E7 e Skin Softening: Softening ...Movies.... 73 Recording Movies 74 Features That Can Be Set by Pressing the d Button (Movie Menu 77 Playing Back Movies 78 General Camera Setup 81 Features That Can Be Set by Pressing the d Button (Setup Menu 82 Reference Section E1 Using Panorama Assist E2 Editing ...
Reference Manual
Page 20
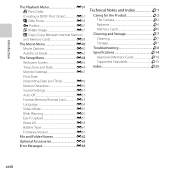
... Firmware Version E61 File and Folder Names E62 Optional Accessories E63 Error Messages E64 Technical Notes and Index F1 Caring for the Product F2 The Camera F2 Batteries F4 Memory Cards F6 Cleaning and Storage F7 Cleaning F7 Storage F7 Troubleshooting F8 Specifications F14 Approved Memory Cards F18 Supported Standards F19...
... Firmware Version E61 File and Folder Names E62 Optional Accessories E63 Error Messages E64 Technical Notes and Index F1 Caring for the Product F2 The Camera F2 Batteries F4 Memory Cards F6 Cleaning and Storage F7 Cleaning F7 Storage F7 Troubleshooting F8 Specifications F14 Approved Memory Cards F18 Supported Standards F19...
Reference Manual
Page 21
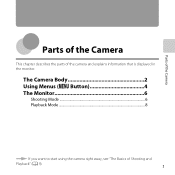
The Camera Body 2 Using Menus (d Button 4 The Monitor 6 Shooting Mode 6 Playback Mode 8 If you want to start using the camera right away, see "The Basics of the camera and explains information that is displayed in the monitor. Parts of the Camera Parts of the Camera This chapter describes the parts of Shooting and Playback" (A 9). 1
The Camera Body 2 Using Menus (d Button 4 The Monitor 6 Shooting Mode 6 Playback Mode 8 If you want to start using the camera right away, see "The Basics of the camera and explains information that is displayed in the monitor. Parts of the Camera Parts of the Camera This chapter describes the parts of Shooting and Playback" (A 9). 1
Reference Manual
Page 22
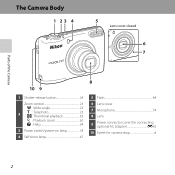
The Camera Body 1 23 4 5 Lens cover closed 6 7 Parts of the Camera 8 10 9 1 Shutter-release button 24 Zoom control 23 f : Wide-angle 23 2 g : Telephoto 23 h : Thumbnail playback 63 i : Playback zoom 62 j : Help 34 3 Power switch/power-on lamp 18 4 Self-timer lamp 47 5 Flash 44 6 Lens cover 7 Microphone 74 8 Lens 9 Power connector cover (for connecting optional AC adapter E63 10 Eyelet for camera strap iii 2
The Camera Body 1 23 4 5 Lens cover closed 6 7 Parts of the Camera 8 10 9 1 Shutter-release button 24 Zoom control 23 f : Wide-angle 23 2 g : Telephoto 23 h : Thumbnail playback 63 i : Playback zoom 62 j : Help 34 3 Power switch/power-on lamp 18 4 Self-timer lamp 47 5 Flash 44 6 Lens cover 7 Microphone 74 8 Lens 9 Power connector cover (for connecting optional AC adapter E63 10 Eyelet for camera strap iii 2

Reference Manual
Page 23
1 16 2 3 4 5 6 15 7 8 13 12 9 14 11 10 Parts of the Camera 1 Flash lamp 46 2 b (e movie-record) button 74 3 A (shooting mode) button...32, 33, 39, 42 4 c (playback) button 26 5 Multi selector 6 k (apply selection) button 7 d button 4, 54, 64, 77, 82 8 l (delete) button 28 9 Battery-chamber/ memory card slot cover 10, 12 10 Battery chamber 10 11 Memory card slot 12 12 USB/audio/video output connector.......65 13 Connector cover 65 14 Tripod socket F16 15 Speaker 79 16 Monitor 6 3
1 16 2 3 4 5 6 15 7 8 13 12 9 14 11 10 Parts of the Camera 1 Flash lamp 46 2 b (e movie-record) button 74 3 A (shooting mode) button...32, 33, 39, 42 4 c (playback) button 26 5 Multi selector 6 k (apply selection) button 7 d button 4, 54, 64, 77, 82 8 l (delete) button 28 9 Battery-chamber/ memory card slot cover 10, 12 10 Battery chamber 10 11 Memory card slot 12 12 USB/audio/video output connector.......65 13 Connector cover 65 14 Tripod socket F16 15 Speaker 79 16 Monitor 6 3

Reference Manual
Page 24
Parts of the Camera Using Menus (d Button) You can now select items within the menu. tab. • You can use the multi selector and the k button to select another ...
Parts of the Camera Using Menus (d Button) You can now select items within the menu. tab. • You can use the multi selector and the k button to select another ...


