
Reference Manual
Page 4
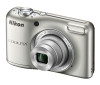
Introduction Introduction Read This First Thank you for purchasing the Nikon COOLPIX L27 digital camera. Before using the camera, please read the information in "For Your Safety" (A x) and familiarize yourself with the information provided in this manual handy and refer to it to enhance your enjoyment of your new camera. ii After reading, please keep this manual.
Introduction Introduction Read This First Thank you for purchasing the Nikon COOLPIX L27 digital camera. Before using the camera, please read the information in "For Your Safety" (A x) and familiarize yourself with the information provided in this manual handy and refer to it to enhance your enjoyment of your new camera. ii After reading, please keep this manual.
Reference Manual
Page 6
iv Introduction About This Manual If you want to start using the camera right away, see "Parts of Shooting and Playback" (A 9). To learn about the parts of the camera and information that is displayed in the monitor, see "The Basics of the Camera" (A 1).
iv Introduction About This Manual If you want to start using the camera right away, see "Parts of Shooting and Playback" (A 9). To learn about the parts of the camera and information that is displayed in the monitor, see "The Basics of the Camera" (A 1).
Reference Manual
Page 7
...C This icon indicates notes and information that monitor indicators can be more clearly shown. • Illustrations and monitor content shown in this manual: Icon Description B This icon indicates cautions and information that should be read before using the camera. A/E/F These icons indicate other pages containing... relevant information; Introduction Other Information • Symbols and Conventions To make it easier to as "memory cards" in this manual. • The setting at the time of buttons or messages displayed on a computer monitor appear in bold. • In this...
...C This icon indicates notes and information that monitor indicators can be more clearly shown. • Illustrations and monitor content shown in this manual: Icon Description B This icon indicates cautions and information that should be read before using the camera. A/E/F These icons indicate other pages containing... relevant information; Introduction Other Information • Symbols and Conventions To make it easier to as "memory cards" in this manual. • The setting at the time of buttons or messages displayed on a computer monitor appear in bold. • In this...

Reference Manual
Page 9
... for any errors or omissions to ensure that the information in these manuals at weddings or before taking the camera on important occasions (such as at any time and without prior notice. • Nikon will not be held liable for damages or lost profits that may...any language in any form, by any means, without Nikon's prior written permission. • Nikon reserves the right to change the specifications of the Nikon representative in your area (address provided separately). About the Manuals • No part of the manuals included with this product. • While every effort was...
... for any errors or omissions to ensure that the information in these manuals at weddings or before taking the camera on important occasions (such as at any time and without prior notice. • Nikon will not be held liable for damages or lost profits that may...any language in any form, by any means, without Nikon's prior written permission. • Nikon reserves the right to change the specifications of the Nikon representative in your area (address provided separately). About the Manuals • No part of the manuals included with this product. • While every effort was...

Reference Manual
Page 18
Introduction Table of Contents Introduction ii Read This First ii Attaching the Camera Strap iii About This Manual iv Information and Precautions vi For Your Safety x WARNINGS x Notices xiv Parts of the Camera 1 The Camera Body 2 Using Menus (d Button 4 The Monitor 6 Shooting Mode 6 ...
Introduction Table of Contents Introduction ii Read This First ii Attaching the Camera Strap iii About This Manual iv Information and Precautions vi For Your Safety x WARNINGS x Notices xiv Parts of the Camera 1 The Camera Body 2 Using Menus (d Button 4 The Monitor 6 Shooting Mode 6 ...
Reference Manual
Page 58
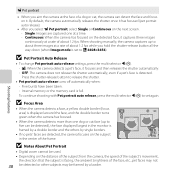
... change Pet portrait auto release settings, press the multi selector J (n). - Five bursts have been taken. - Internal memory or the memory card is detected. When shooting manually, the camera captures up to P 4608×3456). Y: When the camera detects a pet's face, it . B Focus Area • When the camera detects a face, a yellow double...
... change Pet portrait auto release settings, press the multi selector J (n). - Five bursts have been taken. - Internal memory or the memory card is detected. When shooting manually, the camera captures up to P 4608×3456). Y: When the camera detects a pet's face, it . B Focus Area • When the camera detects a face, a yellow double...
Reference Manual
Page 60
... camera detects a face and flashes quickly immediately after the shutter is activated and the camera turns off when either of the frame. C Releasing the Shutter Manually The shutter can be set to On, the auto off function (A 82) is released. C When the Self-timer Lamp Flashes When using the multi selector...
... camera detects a face and flashes quickly immediately after the shutter is activated and the camera turns off when either of the frame. C Releasing the Shutter Manually The shutter can be set to On, the auto off function (A 82) is released. C When the Self-timer Lamp Flashes When using the multi selector...
Reference Manual
Page 75
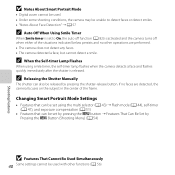
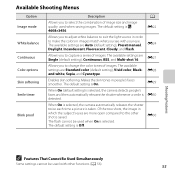
..., and Multi-shot 16. The default setting is Off. Of the two shots, the image in which the subject's eyes are Auto (default setting), Preset manual, Daylight, Incandescent, Fluorescent, Cloudy, and Flash. E30 Shooting Features C Features That Cannot Be Used Simultaneously Some settings cannot be used when saving images. Available Shooting...
..., and Multi-shot 16. The default setting is Off. Of the two shots, the image in which the subject's eyes are Auto (default setting), Preset manual, Daylight, Incandescent, Fluorescent, Cloudy, and Flash. E30 Shooting Features C Features That Cannot Be Used Simultaneously Some settings cannot be used when saving images. Available Shooting...
Reference Manual
Page 92
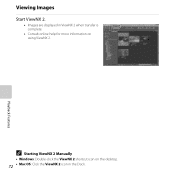
Viewing Images Start ViewNX 2. • Images are displayed in the Dock. C Starting ViewNX 2 Manually • Windows: Double-click the ViewNX 2 shortcut icon on the desktop. 72 • Mac OS: Click the ViewNX 2 icon in ViewNX 2 when transfer is complete. • Consult online help for more information on using ViewNX 2. Playback Features
Viewing Images Start ViewNX 2. • Images are displayed in the Dock. C Starting ViewNX 2 Manually • Windows: Double-click the ViewNX 2 shortcut icon on the desktop. 72 • Mac OS: Click the ViewNX 2 icon in ViewNX 2 when transfer is complete. • Consult online help for more information on using ViewNX 2. Playback Features

Reference Manual
Page 128
... mimic this adjustment by processing images according to suit lighting conditions. d Incandescent Use when shooting under unusual lighting (E25). This is in direct sunlight. b Preset manual Use when shooting under incandescent lighting. The icon for the current setting is displayed in the monitor when the camera is known as "white balance."
... mimic this adjustment by processing images according to suit lighting conditions. d Incandescent Use when shooting under unusual lighting (E25). This is in direct sunlight. b Preset manual Use when shooting under incandescent lighting. The icon for the current setting is displayed in the monitor when the camera is known as "white balance."
Reference Manual
Page 129
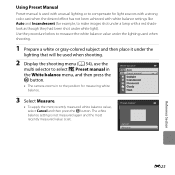
... used when shooting. 2 Display the shooting menu (A 54), use the multi selector to select b Preset manual in the White balance menu, and then press the k button. • The camera zooms in to the position for example, to compensate for light sources ... then place it under the lighting that will be used with unusual lighting or to make images shot under white light). White balance Auto Preset manual Daylight Incandescent Fluorescent Cloudy Flash 3 Select Measure. • To apply the most recently measured value is not measured again and the most recently measured white...
... used when shooting. 2 Display the shooting menu (A 54), use the multi selector to select b Preset manual in the White balance menu, and then press the k button. • The camera zooms in to the position for example, to compensate for light sources ... then place it under the lighting that will be used with unusual lighting or to make images shot under white light). White balance Auto Preset manual Daylight Incandescent Fluorescent Cloudy Flash 3 Select Measure. • To apply the most recently measured value is not measured again and the most recently measured white...

Reference Manual
Page 130
... settings cannot be measured with other than Auto and Flash (A 44). B Notes About Preset Manual A value for preset manual. • The shutter is released and the new white-balance value is saved. E26 Preset manual Cancel Measure Measuring window 5 Press the k button to any setting other functions (A 56). ...• Set the flash to W (off) when white balance is set to measure a value for flash lighting cannot be used with Preset manual. When shooting using the flash, set . No image is set White balance to Auto or Flash. 4 Frame the reference object in the measuring window...
... settings cannot be measured with other than Auto and Flash (A 44). B Notes About Preset Manual A value for preset manual. • The shutter is released and the new white-balance value is saved. E26 Preset manual Cancel Measure Measuring window 5 Press the k button to any setting other functions (A 56). ...• Set the flash to W (off) when white balance is set to measure a value for flash lighting cannot be used with Preset manual. When shooting using the flash, set . No image is set White balance to Auto or Flash. 4 Frame the reference object in the measuring window...

Reference Manual
Page 161
... About Eye-Fi Cards • Note that country. • When this setting is not compatible with this feature to Disable. • Refer to the instruction manual of your computer. When it in other countries, refer to laws and regulations of that images are drained faster than normal. C Eye-Fi Upload Indicator...
... About Eye-Fi Cards • Note that country. • When this setting is not compatible with this feature to Disable. • Refer to the instruction manual of your computer. When it in other countries, refer to laws and regulations of that images are drained faster than normal. C Eye-Fi Upload Indicator...

Reference Manual
Page 164
Shooting menu: Preset manual data (E25) acquired for Welcome screen (E43), Time zone and date (E44), Language (E54), Video mode (E55), and Battery type (E61) Reference Section E60 Setup ...
Shooting menu: Preset manual data (E25) acquired for Welcome screen (E43), Time zone and date (E44), Language (E54), Video mode (E55), and Battery type (E61) Reference Section E60 Setup ...

Reference Manual
Page 189
... that n HD 720p (1280×720) is reached if camera temperature becomes elevated. F17 Technical Notes and Index B Specifications • Nikon will not be held liable for any errors this manual may end before this product and its specifications are for Movie options. Figures may vary with every other shot. The included...
... that n HD 720p (1280×720) is reached if camera temperature becomes elevated. F17 Technical Notes and Index B Specifications • Nikon will not be held liable for any errors this manual may end before this product and its specifications are for Movie options. Figures may vary with every other shot. The included...
Reference Manual
Page 191
...SDHC and SD Logos are trademarks of SD-3C, LLC. • PictBridge is a trademark. • All other trade names mentioned in this manual or the other countries. • Macintosh, Mac OS, and QuickTime are trademarks or registered trademarks of camera. • DPOF: Digital Print Order... Format is a standard that allows information saved with your Nikon product are trademarks of Apple Inc., registered in the digital camera industry to ensure compatibility among different makes of their respective holders....
...SDHC and SD Logos are trademarks of SD-3C, LLC. • PictBridge is a trademark. • All other trade names mentioned in this manual or the other countries. • Macintosh, Mac OS, and QuickTime are trademarks or registered trademarks of camera. • DPOF: Digital Print Order... Format is a standard that allows information saved with your Nikon product are trademarks of Apple Inc., registered in the digital camera industry to ensure compatibility among different makes of their respective holders....
Reference Manual
Page 195
Playback zoom 62 Portrait b 34 Power 18, 19 Power switch/power-on lamp.... 2, 18, 19 Preset manual E25 Pressing halfway 25 Print 64, 66, E17, E19, E31 Print date 17, 82, E49 Print order 64, E31 Print order option .......... 17, E32, E33 ...
Playback zoom 62 Portrait b 34 Power 18, 19 Power switch/power-on lamp.... 2, 18, 19 Preset manual E25 Pressing halfway 25 Print 64, 66, E17, E19, E31 Print date 17, 82, E49 Print order 64, E31 Print order option .......... 17, E32, E33 ...

Reference Manual
Page 200
No reproduction in any form of this manual, in whole or in part (except for brief quotation in critical articles or reviews), may be made without written authorization from NIKON CORPORATION. CT2L02(11) 6MN16811-02
No reproduction in any form of this manual, in whole or in part (except for brief quotation in critical articles or reviews), may be made without written authorization from NIKON CORPORATION. CT2L02(11) 6MN16811-02


