
Reference Manual
Page 2
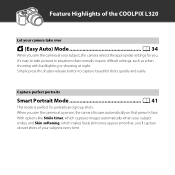
... appropriate settings for portraits and group shots. Feature Highlights of your subjects every time. It's easy to capture beautiful shots quickly and easily. Simply press the shutter-release button to take over G (Easy Auto) Mode A 34 When you 'll capture vibrant shots of the COOLPIX L320 Let your subject smiles, and Skin softening...
... appropriate settings for portraits and group shots. Feature Highlights of your subjects every time. It's easy to capture beautiful shots quickly and easily. Simply press the shutter-release button to take over G (Easy Auto) Mode A 34 When you 'll capture vibrant shots of the COOLPIX L320 Let your subject smiles, and Skin softening...
Reference Manual
Page 3
Introduction Parts of the Camera The Basics of Shooting and Playback Shooting Features Playback Features Recording and Playing Back Movies General Camera Setup Reference Section Technical Notes and Index i
Introduction Parts of the Camera The Basics of Shooting and Playback Shooting Features Playback Features Recording and Playing Back Movies General Camera Setup Reference Section Technical Notes and Index i
Reference Manual
Page 18
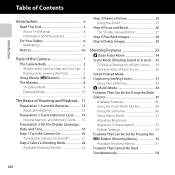
...24 Using the Zoom 25 Step 4 Focus and Shoot 26 The Shutter-release Button 27 Step 5 Play Back Images 28 Step 6 Delete Images 30 Shooting Features 33 G (Easy Auto) Mode 34 Scene Mode (Shooting Suited to Scenes) ... 35 To View a Description of Each Scene......... 36 Characteristics of Each ...Scene 36 Smart Portrait Mode (Capturing Smiling Faces 41 Using Skin Softening 43 A (Auto) Mode 44 Features That Can Be Set Using the Multi Selector 45 Available Features 45 Using the Flash (Flash Modes 46 Using the Self-timer 49 Using Macro Mode 51 Adjusting Brightness (Exposure ...
...24 Using the Zoom 25 Step 4 Focus and Shoot 26 The Shutter-release Button 27 Step 5 Play Back Images 28 Step 6 Delete Images 30 Shooting Features 33 G (Easy Auto) Mode 34 Scene Mode (Shooting Suited to Scenes) ... 35 To View a Description of Each Scene......... 36 Characteristics of Each ...Scene 36 Smart Portrait Mode (Capturing Smiling Faces 41 Using Skin Softening 43 A (Auto) Mode 44 Features That Can Be Set Using the Multi Selector 45 Available Features 45 Using the Flash (Flash Modes 46 Using the Self-timer 49 Using Macro Mode 51 Adjusting Brightness (Exposure ...

Reference Manual
Page 19
...Skin Softening E32 Smile Timer E33 Blink Proof E33 xvii Introduction Focusing 59 Using Face Detection 59 Focus Lock 60 Playback Features 63 Playback Zoom 64 Thumbnail Display, Calendar Display........ 65 Features That Can Be Set by Pressing the d Button (Playback Menu 66 Connecting the Camera to a TV, Computer, or... Printer (Direct Print E16 Connecting the Camera to the Computer ...... 72 Viewing Images 74 Recording and Playing Back Movies.... 75 Recording Movies 76 Features That Can Be Set by Pressing the d Button (Movie Menu 79 Playing Back Movies 80 General Camera Setup 83...
...Skin Softening E32 Smile Timer E33 Blink Proof E33 xvii Introduction Focusing 59 Using Face Detection 59 Focus Lock 60 Playback Features 63 Playback Zoom 64 Thumbnail Display, Calendar Display........ 65 Features That Can Be Set by Pressing the d Button (Playback Menu 66 Connecting the Camera to a TV, Computer, or... Printer (Direct Print E16 Connecting the Camera to the Computer ...... 72 Viewing Images 74 Recording and Playing Back Movies.... 75 Recording Movies 76 Features That Can Be Set by Pressing the d Button (Movie Menu 79 Playing Back Movies 80 General Camera Setup 83...
Reference Manual
Page 43
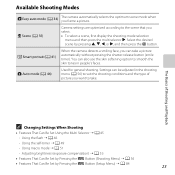
..., you want to suit the shooting conditions and the type of Shooting and Playback C Changing Settings When Shooting • Features That Can Be Set Using the Multi Selector ➝ A 45 - Adjusting brightness (exposure compensation) ➝ A 53 •...; Features That Can Be Set by Pressing the d Button (Shooting Menu) ➝ A 56 • Features That Can Be Set by pressing H, I, J, or K, and then press the k button. Using the flash ➝ A...
..., you want to suit the shooting conditions and the type of Shooting and Playback C Changing Settings When Shooting • Features That Can Be Set Using the Multi Selector ➝ A 45 - Adjusting brightness (exposure compensation) ➝ A 53 •...; Features That Can Be Set by Pressing the d Button (Shooting Menu) ➝ A 56 • Features That Can Be Set by pressing H, I, J, or K, and then press the k button. Using the flash ➝ A...
Reference Manual
Page 49
... detected face, the images are automatically rotated for playback display. C More Information • Playback Zoom ➝ A 64 • Thumbnail Display, Calendar Display ➝ A 65 • Features That Can Be Set by Pressing the d Button (Playback Menu) ➝ A 66 29
... detected face, the images are automatically rotated for playback display. C More Information • Playback Zoom ➝ A 64 • Thumbnail Display, Calendar Display ➝ A 65 • Features That Can Be Set by Pressing the d Button (Playback Menu) ➝ A 66 29
Reference Manual
Page 53
... and the kind of pictures you want to Scenes 35 Smart Portrait Mode (Capturing Smiling Faces) ... 41 A (Auto) Mode 44 Features That Can Be Set Using the Multi Selector .... 45 Using the Flash (Flash Modes 46 Using the Self-timer 49 Using Macro Mode... 51 Adjusting Brightness (Exposure Compensation 53 Features That Can Be Set by Pressing the d Button (Shooting Menu) ... 56 Features That Cannot Be Used Simultaneously..... 58 Focusing 59 33 Shooting Features Shooting Features This chapter describes the camera's shooting modes and the features that are available when using each shooting ...
... and the kind of pictures you want to Scenes 35 Smart Portrait Mode (Capturing Smiling Faces) ... 41 A (Auto) Mode 44 Features That Can Be Set Using the Multi Selector .... 45 Using the Flash (Flash Modes 46 Using the Self-timer 49 Using Macro Mode... 51 Adjusting Brightness (Exposure Compensation 53 Features That Can Be Set by Pressing the d Button (Shooting Menu) ... 56 Features That Cannot Be Used Simultaneously..... 58 Focusing 59 33 Shooting Features Shooting Features This chapter describes the camera's shooting modes and the features that are available when using each shooting ...
Reference Manual
Page 54
... automatically selects the optimum scene mode when you can press the multi selector H (X), J (n), or K (o) to set the corresponding features. ➝ "Features That Can Be Set Using the Multi Selector" (A 45), "Default Settings" (A 54) • Features that can be set by pressing the d button ➝ Image mode (image size and quality; A 57, E24) 34...
... automatically selects the optimum scene mode when you can press the multi selector H (X), J (n), or K (o) to set the corresponding features. ➝ "Features That Can Be Set Using the Multi Selector" (A 45), "Default Settings" (A 54) • Features that can be set by pressing the d button ➝ Image mode (image size and quality; A 57, E24) 34...
Reference Manual
Page 55
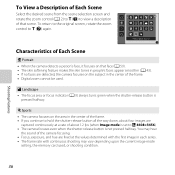
A 57, E24) Shooting Features 35 A 36) f Party/indoor (A 37) i Dusk/dawn (A 37) l Museum (A 38) U Panorama assist (A 39) c Landscape (A 36) Z Beach (A 37) j Night landscape (A 38) m Fireworks show (A 39) O Pet portrait ...; Enter shooting mode M A (shooting mode) button M b (second icon from the top*) M K M H, I (p), J (n), or K (o) can be set the corresponding features. ➝ "Features That Can Be Set Using the Multi Selector" (A 45), "Default Settings" (A 54) • Features that can be used to Scenes) When one of the last scene selected is selected, camera settings are...
A 57, E24) Shooting Features 35 A 36) f Party/indoor (A 37) i Dusk/dawn (A 37) l Museum (A 38) U Panorama assist (A 39) c Landscape (A 36) Z Beach (A 37) j Night landscape (A 38) m Fireworks show (A 39) O Pet portrait ...; Enter shooting mode M A (shooting mode) button M b (second icon from the top*) M K M H, I (p), J (n), or K (o) can be set the corresponding features. ➝ "Features That Can Be Set Using the Multi Selector" (A 45), "Default Settings" (A 54) • Features that can be used to Scenes) When one of the last scene selected is selected, camera settings are...
Reference Manual
Page 56
...; If you continue to hold the shutter-release button all the way down, about 1.2 fps (when Image mode is set to g (j) again. Shooting Features 36 c Landscape • The focus area or focus indicator (A 9) always turns green when the shutter-release button is not pressed halfway. You may vary... control (A 2) to g (j) to view a description of about four images are fixed at a rate of that face (A 59). • The skin softening feature makes the skin tones in people's faces appear smoother (A 43). • If no faces are detected, the camera focuses on the area in each series...
...; If you continue to hold the shutter-release button all the way down, about 1.2 fps (when Image mode is set to g (j) again. Shooting Features 36 c Landscape • The focus area or focus indicator (A 9) always turns green when the shutter-release button is not pressed halfway. You may vary... control (A 2) to g (j) to view a description of about four images are fixed at a rate of that face (A 59). • The skin softening feature makes the skin tones in people's faces appear smoother (A 43). • If no faces are detected, the camera focuses on the area in each series...
Reference Manual
Page 57
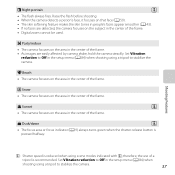
... frame. • Digital zoom cannot be used. h Sunset O • The camera focuses on the subject in the center of the frame. Shooting Features O: Shutter speed is reduced when using a tripod to Off in people's faces appear smoother (A 43). • If no faces are easily affected by... camera shake, hold the camera steadily. Z Beach • The camera focuses on that face (A 59). • The skin softening feature makes the skin tones in the setup menu (A 84) when shooting using scene modes indicated with O; Set Vibration reduction to stabilize the camera. 37...
... frame. • Digital zoom cannot be used. h Sunset O • The camera focuses on the subject in the center of the frame. Shooting Features O: Shutter speed is reduced when using a tripod to Off in people's faces appear smoother (A 43). • If no faces are easily affected by... camera shake, hold the camera steadily. Z Beach • The camera focuses on that face (A 59). • The skin softening feature makes the skin tones in the setup menu (A 84) when shooting using scene modes indicated with O; Set Vibration reduction to stabilize the camera. 37...
Reference Manual
Page 58
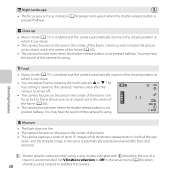
... (A 9) always turns green when the shutter-release button is held all the way down, and the sharpest image in the center of the frame. Shooting Features u Food • Macro mode (A 51) is enabled and the camera automatically zooms to 10 images while the shutter-release button is pressed halfway. k Close-up...
... (A 9) always turns green when the shutter-release button is held all the way down, and the sharpest image in the center of the frame. Shooting Features u Food • Macro mode (A 51) is enabled and the camera automatically zooms to 10 images while the shutter-release button is pressed halfway. k Close-up...
Reference Manual
Page 59
... that will be connected to capture a series of a tripod is recommended. therefore, the use the Panorama Maker (A 71, E4) software to complete the panorama. Shooting Features O: Shutter speed is pressed halfway, the focus indicator (A 9) always turns green. Set Vibration reduction to Off in when capturing images, and press the k button. •...
... that will be connected to capture a series of a tripod is recommended. therefore, the use the Panorama Maker (A 71, E4) software to complete the panorama. Shooting Features O: Shutter speed is pressed halfway, the focus indicator (A 9) always turns green. Set Vibration reduction to Off in when capturing images, and press the k button. •...
Reference Manual
Page 60
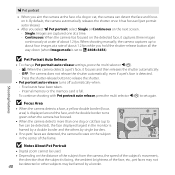
... the center of the frame. 29m 0s 970 B Notes About Pet Portrait • Digital zoom cannot be used. • Depending on the next screen. - Shooting Features B Pet Portrait Auto Release • To change Pet portrait auto release settings, press the multi selector J (n). -
... the center of the frame. 29m 0s 970 B Notes About Pet Portrait • Digital zoom cannot be used. • Depending on the next screen. - Shooting Features B Pet Portrait Auto Release • To change Pet portrait auto release settings, press the multi selector J (n). -
Reference Manual
Page 61
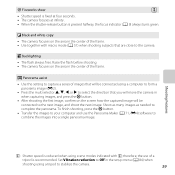
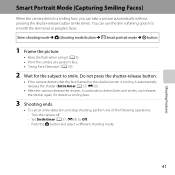
Set Smile timer (A 57, E33) to smile. Shooting Features Smart Portrait Mode (Capturing Smiling Faces) When the camera detects a smiling face, you can use the skin softening option to smooth the skin tones in ...
Set Smile timer (A 57, E33) to smile. Shooting Features Smart Portrait Mode (Capturing Smiling Faces) When the camera detects a smiling face, you can use the skin softening option to smooth the skin tones in ...
Reference Manual
Page 62
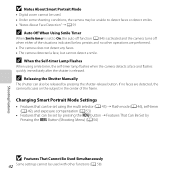
... 45) ➝ Flash mode (A 46), self-timer (A 49), and exposure compensation (A 53) • Features that can also be released by Pressing the d Button (Shooting Menu) (A 56) B Features That Cannot Be Used Simultaneously 42 Some settings cannot be used . • Under some shooting conditions, the camera...detects a face and flashes quickly immediately after the shutter is activated and the camera turns off function (A 84) is released. Shooting Features B Notes About Smart Portrait Mode • Digital zoom cannot be used with other operations are detected, the camera focuses on the ...
... 45) ➝ Flash mode (A 46), self-timer (A 49), and exposure compensation (A 53) • Features that can also be released by Pressing the d Button (Shooting Menu) (A 56) B Features That Cannot Be Used Simultaneously 42 Some settings cannot be used . • Under some shooting conditions, the camera...detects a face and flashes quickly immediately after the shutter is activated and the camera turns off function (A 84) is released. Shooting Features B Notes About Smart Portrait Mode • Digital zoom cannot be used with other operations are detected, the camera focuses on the ...
Reference Manual
Page 63
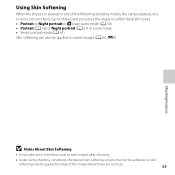
... (A 36) or Night portrait (A 37) in scene mode • Smart portrait mode (A 41) Skin softening can also be applied to saved images (A 66, E8). Shooting Features B Notes About Skin Softening • It may take more time than usual to save images after shooting. • Under some shooting conditions, the desired skin...
... (A 36) or Night portrait (A 37) in scene mode • Smart portrait mode (A 41) Skin softening can also be applied to saved images (A 66, E8). Shooting Features B Notes About Skin Softening • It may take more time than usual to save images after shooting. • Under some shooting conditions, the desired skin...

Reference Manual
Page 64
...used with other functions (A 58). Changing A (Auto) Mode Settings • Features that can be set by pressing the d button ➝ Features That Can Be Set by Pressing the d Button (Shooting Menu) (A 56) B Features That Cannot Be Used Simultaneously 44 Some settings cannot be adjusted in the center... of picture you want to suit the shooting conditions and the type of the frame. Shooting Features A (Auto) Mode Used for general shooting. Enter shooting mode M A (shooting mode) button M A (auto) mode M k button • The camera ...
...used with other functions (A 58). Changing A (Auto) Mode Settings • Features that can be set by pressing the d button ➝ Features That Can Be Set by Pressing the d Button (Shooting Menu) (A 56) B Features That Cannot Be Used Simultaneously 44 Some settings cannot be adjusted in the center... of picture you want to suit the shooting conditions and the type of the frame. Shooting Features A (Auto) Mode Used for general shooting. Enter shooting mode M A (shooting mode) button M A (auto) mode M k button • The camera ...
Reference Manual
Page 65
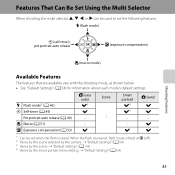
... Can Be Set Using the Multi Selector When shooting, the multi selector H, I, J, or K can be set the following features. X (flash mode) n (self-timer), pet portrait auto release o (exposure compensation) Shooting Features p (macro mode) Available Features The features that are available vary with the shooting mode, as shown below. • See "Default Settings" (A 54) for...
... Can Be Set Using the Multi Selector When shooting, the multi selector H, I, J, or K can be set the following features. X (flash mode) n (self-timer), pet portrait auto release o (exposure compensation) Shooting Features p (macro mode) Available Features The features that are available vary with the shooting mode, as shown below. • See "Default Settings" (A 54) for...
Reference Manual
Page 66
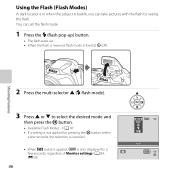
... the flash by pressing the k button within a few seconds, the selection is only displayed for a few seconds, regardless of Monitor settings (A 84, E50). 46 Shooting Features Using the Flash (Flash Modes) In dark locations or when the subject is backlit, you can set the flash mode. 1 Press the m (flash pop-up...
... the flash by pressing the k button within a few seconds, the selection is only displayed for a few seconds, regardless of Monitor settings (A 84, E50). 46 Shooting Features Using the Flash (Flash Modes) In dark locations or when the subject is backlit, you can set the flash mode. 1 Press the m (flash pop-up...


