

Product Manual
Page 21
Parts of the Camera The Camera Body 1 23 4 56 7 3 8 Parts of the Camera 9 10 14 13 12 11 Zoom control 25 f : wide-angle 25 1 g : telephoto 25 h : thumbnail playback 63 i : playback zoom 62 j : help 32 2 Shutter-release button 26 3 Eyelet for camera strap 4 4 Power switch/power-on lamp 20 5 Self-timer lamp 47 AF-assist illuminator 72 6 Speaker 70 7 Microphone (stereo 65 8 Flash 5, 44 9 USB/audio/video output connector.......74 10 HDMI micro connector (Type D 74 11 Connector cover 74 12 m (flash pop-up) button 5, 44 13 Side zoom control 25 14 Lens 1
Parts of the Camera The Camera Body 1 23 4 56 7 3 8 Parts of the Camera 9 10 14 13 12 11 Zoom control 25 f : wide-angle 25 1 g : telephoto 25 h : thumbnail playback 63 i : playback zoom 62 j : help 32 2 Shutter-release button 26 3 Eyelet for camera strap 4 4 Power switch/power-on lamp 20 5 Self-timer lamp 47 AF-assist illuminator 72 6 Speaker 70 7 Microphone (stereo 65 8 Flash 5, 44 9 USB/audio/video output connector.......74 10 HDMI micro connector (Type D 74 11 Connector cover 74 12 m (flash pop-up) button 5, 44 13 Side zoom control 25 14 Lens 1

Product Manual
Page 94
... separately) is sufficient and turn the camera off. Do not use any other make sure to a TV, computer, or printer. USB/audio/video output connector HDMI micro connector (Type D) Open the connector cover.
... separately) is sufficient and turn the camera off. Do not use any other make sure to a TV, computer, or printer. USB/audio/video output connector HDMI micro connector (Type D) Open the connector cover.
Product Manual
Page 95
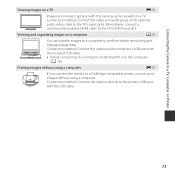
..., install ViewNX 2 on a computer A 76 You can transfer images to a computer to perform simple retouching and manage image data. Alternatively, connect a commercially available HDMI cable to the TV's HDMI input jack. Connecting the Camera to a TV, Computer, or Printer Viewing images on a TV E16 Images and movies captured with the camera can...
..., install ViewNX 2 on a computer A 76 You can transfer images to a computer to perform simple retouching and manage image data. Alternatively, connect a commercially available HDMI cable to the TV's HDMI input jack. Connecting the Camera to a TV, Computer, or Printer Viewing images on a TV E16 Images and movies captured with the camera can...

Product Manual
Page 116
Do not insert or remove the plugs at an angle when connecting or disconnecting them. Connecting the Camera to a TV (Viewing Images on a TV) 1 Turn off the camera and connect it to HDMI jack HDMI micro connector (Type D) When using the audio/video cable Yellow White Red When using a commercially available HDMI cable Reference Section E16 to the TV. • Make sure that the plugs are properly oriented.
Do not insert or remove the plugs at an angle when connecting or disconnecting them. Connecting the Camera to a TV (Viewing Images on a TV) 1 Turn off the camera and connect it to HDMI jack HDMI micro connector (Type D) When using the audio/video cable Yellow White Red When using a commercially available HDMI cable Reference Section E16 to the TV. • Make sure that the plugs are properly oriented.

Product Manual
Page 117
...Reference Section 2 Set the TV's input to external video input. • See the documentation provided with your TV. C Using a TV Remote Control (HDMI Device Control) The remote control of TV settings to turn on the camera. • Images are displayed on the TV. • The camera monitor ... images, start and pause movie playback, switch between full-screen playback mode and four-image thumbnail display, etc. • Set the HDMI device control setting (E68) of an HDMI-CEC-compatible TV can be used by your TV for details. 3 Hold down the c button to On (default setting) and then...
...Reference Section 2 Set the TV's input to external video input. • See the documentation provided with your TV. C Using a TV Remote Control (HDMI Device Control) The remote control of TV settings to turn on the camera. • Images are displayed on the TV. • The camera monitor ... images, start and pause movie playback, switch between full-screen playback mode and four-image thumbnail display, etc. • Set the HDMI device control setting (E68) of an HDMI-CEC-compatible TV can be used by your TV for details. 3 Hold down the c button to On (default setting) and then...

Product Manual
Page 166
... About Auto Off • The time that elapses before the camera enters standby mode (A 21). When shooting using the AC Adapter EH-67. When an HDMI cable is connected: 30 minutes • The camera does not enter standby mode when using Pet portrait auto release: 5 minutes (when auto off Sleep mode...
... About Auto Off • The time that elapses before the camera enters standby mode (A 21). When shooting using the AC Adapter EH-67. When an HDMI cable is connected: 30 minutes • The camera does not enter standby mode when using Pet portrait auto release: 5 minutes (when auto off Sleep mode...

Product Manual
Page 168
...is connected is automatically selected from NTSC and PAL. Language d button M z menu icon M Language M k button Select a language for HDMI output. E68 When Auto (default setting) is a multimedia interface. Both NTSC and PAL are standards for analog color television broadcasting. •... The frame rate settings available for connection to inter-operate. Option Video mode HDMI HDMI device control Description Select from 480p, 720p, or 1080i. C HDMI and HDMI-CEC HDMI (High-Definition Multimedia Interface) is selected, the option best suited to the TV to ...
...is connected is automatically selected from NTSC and PAL. Language d button M z menu icon M Language M k button Select a language for HDMI output. E68 When Auto (default setting) is a multimedia interface. Both NTSC and PAL are standards for analog color television broadcasting. •... The frame rate settings available for connection to inter-operate. Option Video mode HDMI HDMI device control Description Select from 480p, 720p, or 1080i. C HDMI and HDMI-CEC HDMI (High-Definition Multimedia Interface) is selected, the option best suited to the TV to ...

Product Manual
Page 185
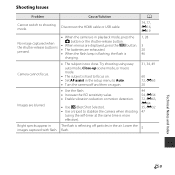
...and computer are connected via a USB cable. 74, 77 • The camera and TV are connected via an audio/ 74, E16 video cable or HDMI cable. Leave - If the problem persists, turn off, remove and reinsert the battery or batteries or, if you are exhausted. 20 • The ..., and then try turning it on but does not respond. Camera turns off until the inside of common problems below before consulting your retailer or Nikon-authorized service representative. If the camera does not turn the camera off to save power. 1, 21 Press the power switch, shutter-release button, A ...
...and computer are connected via a USB cable. 74, 77 • The camera and TV are connected via an audio/ 74, E16 video cable or HDMI cable. Leave - If the problem persists, turn off, remove and reinsert the battery or batteries or, if you are exhausted. 20 • The ..., and then try turning it on but does not respond. Camera turns off until the inside of common problems below before consulting your retailer or Nikon-authorized service representative. If the camera does not turn the camera off to save power. 1, 21 Press the power switch, shutter-release button, A ...
Product Manual
Page 187
.... 31, 34, 49 60 72, E65 20 Images are exhausted. • When the flash lamp is flashing, the flash is 3 20 46 charging. Disconnect the HDMI cable or USB cable. 74, 77, E16, E19 • When the camera is in images captured with flash. The flash is more effective). 44 54...
.... 31, 34, 49 60 72, E65 20 Images are exhausted. • When the flash lamp is flashing, the flash is 3 20 46 charging. Disconnect the HDMI cable or USB cable. 74, 77, E16, E19 • When the camera is in images captured with flash. The flash is more effective). 44 54...
Product Manual
Page 190
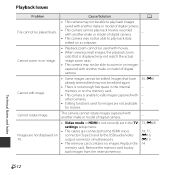
... camera may not be edited again. • There is not enough free space in the internal memory or on TV. Images are connected to the HDMI micro connector (Type D) and to zoom in on image. Cause/Solution • This camera may not be able to play back images saved with another... or model of digital camera. • This camera cannot play back movies recorded with another make or model of digital camera. • Video mode or HDMI is not correctly set in on images captured with another make or model of digital camera. • Some images cannot be able to the USB...
... camera may not be edited again. • There is not enough free space in the internal memory or on TV. Images are connected to the HDMI micro connector (Type D) and to zoom in on image. Cause/Solution • This camera may not be able to play back images saved with another... or model of digital camera. • This camera cannot play back movies recorded with another make or model of digital camera. • Video mode or HDMI is not correctly set in on images captured with another make or model of digital camera. • Some images cannot be able to the USB...

Product Manual
Page 194
Aperture Range Self-timer Flash Range (approx.) (ISO sensitivity: Auto) Flash control Interface Data transfer protocol Video output HDMI output I /O (USB) HDMI micro connector (Type D) (HDMI output), DC input connector Arabic, Bengali, Bulgarian, Chinese (Simplified and Traditional), Czech, Danish, Dutch, English, Finnish, French, German, Greek, Hindi, Hungarian, Indonesian, Italian, Japanese, Korean, ...
Aperture Range Self-timer Flash Range (approx.) (ISO sensitivity: Auto) Flash control Interface Data transfer protocol Video output HDMI output I /O (USB) HDMI micro connector (Type D) (HDMI output), DC input connector Arabic, Bengali, Bulgarian, Chinese (Simplified and Traditional), Czech, Danish, Dutch, English, Finnish, French, German, Greek, Hindi, Hungarian, Indonesian, Italian, Japanese, Korean, ...

Product Manual
Page 198
...2014 The FreeType Project (http://www.freetype.org). FreeType License (FreeType2) Portions of this manual or the other documentation provided with your Nikon product are copyright © 2014 The HarfBuzz Project (http://www.freedesktop.org/wiki/Software/HarfBuzz). F20 Technical Notes and Index MIT ...License (HarfBuzz) Portions of this software are trademarks or registered trademarks of HDMI Licensing LLC. • All other countries. • Adobe and Acrobat are registered trademarks of Adobe Systems Inc. • SDXC,...
...2014 The FreeType Project (http://www.freetype.org). FreeType License (FreeType2) Portions of this manual or the other documentation provided with your Nikon product are copyright © 2014 The HarfBuzz Project (http://www.freedesktop.org/wiki/Software/HarfBuzz). F20 Technical Notes and Index MIT ...License (HarfBuzz) Portions of this software are trademarks or registered trademarks of HDMI Licensing LLC. • All other countries. • Adobe and Acrobat are registered trademarks of Adobe Systems Inc. • SDXC,...
Product Manual
Page 201
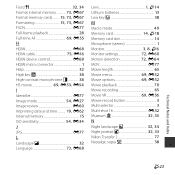
..., E67 Format memory cards ......... 15, 73, E67 Formatting 15, 73, E67 FSCN E77 Full-frame playback 28 Full-time AF 69, E55 H HDMI E68 HDMI cable 75, E16 HDMI device control E68 HDMI micro connector 1 Help 32 High key G 38 High-contrast monochrome F 38 HS movie 69, E53, E54 I Identifier E77 Image mode 54... 65 Movie VR 69, E56 Movie-record button 3 Multi selector 3 Multi-shot 16 E32 Museum l 32, 35 N Night landscape j 32, 34 Night portrait e 32, 33 Nikon Transfer 2 77 Nostalgic sepia E 38 Technical Notes and Index F23
..., E67 Format memory cards ......... 15, 73, E67 Formatting 15, 73, E67 FSCN E77 Full-frame playback 28 Full-time AF 69, E55 H HDMI E68 HDMI cable 75, E16 HDMI device control E68 HDMI micro connector 1 Help 32 High key G 38 High-contrast monochrome F 38 HS movie 69, E53, E54 I Identifier E77 Image mode 54... 65 Movie VR 69, E56 Movie-record button 3 Multi selector 3 Multi-shot 16 E32 Museum l 32, 35 N Night landscape j 32, 34 Night portrait e 32, 33 Nikon Transfer 2 77 Nostalgic sepia E 38 Technical Notes and Index F23


