
Reference Manual complete instructions - English
Page 2
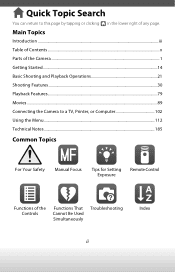
Main Topics Introduction ...iii Table of Contents ...x Parts of the Camera ...1 Getting Started...14 Basic Shooting and Playback Operations 21 Shooting Features...30 Playback Features...79 Movies ...89 Connecting the Camera to this page by tapping or clicking in the lower right of the Controls Functions That Cannot Be Used Simultaneously Troubleshooting Index ii Quick Topic Search You can return to a TV, Printer, or Computer 102 Using the Menu...112 Technical Notes...185 Common Topics For Your Safety Manual Focus Tips for Setting Remote Control Exposure Functions of any page.
Main Topics Introduction ...iii Table of Contents ...x Parts of the Camera ...1 Getting Started...14 Basic Shooting and Playback Operations 21 Shooting Features...30 Playback Features...79 Movies ...89 Connecting the Camera to this page by tapping or clicking in the lower right of the Controls Functions That Cannot Be Used Simultaneously Troubleshooting Index ii Quick Topic Search You can return to a TV, Printer, or Computer 102 Using the Menu...112 Technical Notes...185 Common Topics For Your Safety Manual Focus Tips for Setting Remote Control Exposure Functions of any page.
Reference Manual complete instructions - English
Page 30
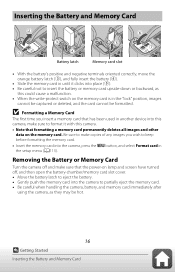
... the write-protect switch on lamp and screen have turned off and make sure to partially eject the memory card. • Be careful when handling the camera, battery, and memory card immediately after using the camera, as this camera, make sure that the power-on the memory card is in the "lock" position, images cannot be captured or deleted, and the card cannot be hot. 16 Getting Started Inserting the Battery and Memory Card B Formatting a Memory Card The first time you...
... the write-protect switch on lamp and screen have turned off and make sure to partially eject the memory card. • Be careful when handling the camera, battery, and memory card immediately after using the camera, as this camera, make sure that the power-on the memory card is in the "lock" position, images cannot be captured or deleted, and the card cannot be hot. 16 Getting Started Inserting the Battery and Memory Card B Formatting a Memory Card The first time you...
Reference Manual complete instructions - English
Page 130
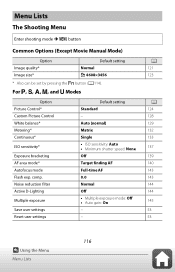
Noise reduction filter Active D-Lighting Multiple exposure Save user settings Reset user settings Default setting Standard - Auto (normal) Matrix Single • ISO sensitivity: Auto • Minimum shutter speed: None Off Target finding AF Full-time AF 0.0 Normal Off • Multiple exposure mode: Off • Auto gain: On - - Menu Lists The Shooting Menu Enter shooting mode M d button Common Options (Except Movie Manual Mode) Option Default setting Image quality* Image size* Normal i 4608×3456 * Also can be set by pressing the w button (A114). A 121 123 A 124 128 129 132...
Noise reduction filter Active D-Lighting Multiple exposure Save user settings Reset user settings Default setting Standard - Auto (normal) Matrix Single • ISO sensitivity: Auto • Minimum shutter speed: None Off Target finding AF Full-time AF 0.0 Normal Off • Multiple exposure mode: Off • Auto gain: On - - Menu Lists The Shooting Menu Enter shooting mode M d button Common Options (Except Movie Manual Mode) Option Default setting Image quality* Image size* Normal i 4608×3456 * Also can be set by pressing the w button (A114). A 121 123 A 124 128 129 132...
Reference Manual complete instructions - English
Page 135
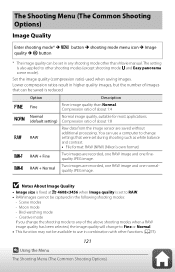
... Raw data from the image sensor are recorded, one RAW image and one normalquality JPEG image. The Shooting Menu (The Common Shooting Options) Image Quality Enter shooting mode* M d button M shooting mode menu icon M Image quality M k button * The image quality can be available to use in any of about 1:4 b Normal (default setting) Normal image quality, suitable for most applications. Compression ratio of images that were set during shooting such as white balance and contrast. • File format: RAW (NRW) (Nikon's own format) j RAW...
... Raw data from the image sensor are recorded, one RAW image and one normalquality JPEG image. The Shooting Menu (The Common Shooting Options) Image Quality Enter shooting mode* M d button M shooting mode menu icon M Image quality M k button * The image quality can be available to use in any of about 1:4 b Normal (default setting) Normal image quality, suitable for most applications. Compression ratio of images that were set during shooting such as white balance and contrast. • File format: RAW (NRW) (Nikon's own format) j RAW...

Reference Manual complete instructions - English
Page 141
... frame. 127 Using the Menu The Shooting Menu (j, k, l, or m Mode) B Notes About Image Sharpening The effects of the subject in playback mode. The values set manually are disabled if quick adjust is selected enables you to adjust the saturation. • Default setting: B&W (black-and-white) 1 Quick adjust is not available in monochrome photographs from B&W (black-and-white), Sepia, and Cyanotype (blue-tinted monochrome). Option Description Toning 3 Controls the tint used after manual setting. 2 Not displayed for Monochrome...
... frame. 127 Using the Menu The Shooting Menu (j, k, l, or m Mode) B Notes About Image Sharpening The effects of the subject in playback mode. The values set manually are disabled if quick adjust is selected enables you to adjust the saturation. • Default setting: B&W (black-and-white) 1 Quick adjust is not available in monochrome photographs from B&W (black-and-white), Sepia, and Cyanotype (blue-tinted monochrome). Option Description Toning 3 Controls the tint used after manual setting. 2 Not displayed for Monochrome...
Reference Manual complete instructions - English
Page 151
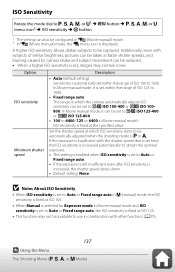
... adjusted when the shooting mode is j or l. In Movie manual mode, it can be captured. Additionally, even with other functions (A75). 137 Using the Menu The Shooting Menu (j, k, l, or m Mode) In Movie manual mode, it is set within the range of ISO 100 to 1600. Option ISO sensitivity Minimum shutter speed Description • Auto (default setting): Sensitivity is automatically set within the range of ISO 125 to 1600. • Fixed range auto: The range in which ISO sensitivity starts...
... adjusted when the shooting mode is j or l. In Movie manual mode, it can be captured. Additionally, even with other functions (A75). 137 Using the Menu The Shooting Menu (j, k, l, or m Mode) In Movie manual mode, it is set within the range of ISO 100 to 1600. Option ISO sensitivity Minimum shutter speed Description • Auto (default setting): Sensitivity is automatically set within the range of ISO 125 to 1600. • Fixed range auto: The range in which ISO sensitivity starts...

Reference Manual complete instructions - English
Page 181
... indicators, press the s (display) button when On is selected (A8). 167 Using the Menu The Setup Menu When in j, k, l, or m mode (if Face priority, Manual (spot), Manual (normal), or Manual (wide) is used . Virtual horizon* Set whether or not to display a virtual horizon on the screen while using manual focus. Monitor Settings Press the d button M z menu icon M Monitor settings M k button Option Description Image review Set whether or not to display the captured image immediately after shooting. • Default setting: On Monitor options Adjust...
... indicators, press the s (display) button when On is selected (A8). 167 Using the Menu The Setup Menu When in j, k, l, or m mode (if Face priority, Manual (spot), Manual (normal), or Manual (wide) is used . Virtual horizon* Set whether or not to display a virtual horizon on the screen while using manual focus. Monitor Settings Press the d button M z menu icon M Monitor settings M k button Option Description Image review Set whether or not to display the captured image immediately after shooting. • Default setting: On Monitor options Adjust...
Reference Manual complete instructions - English
Page 211
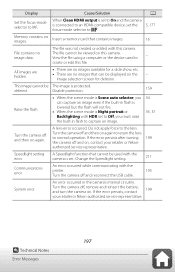
... Nikonauthorized service representative. View the file using a computer or the device used with HDR set to capture an image. 34 35, 37 Turn the camera off and reconnect the USB cable. 105 System error An error occurred in flash to On and the camera is protected. This image cannot be displayed on again. Disable protection. 159 Raise the flash. • When the scene mode is set the 5, 177 focus-mode selector to an HDMI-compatible device, set...
... Nikonauthorized service representative. View the file using a computer or the device used with HDR set to capture an image. 34 35, 37 Turn the camera off and reconnect the USB cable. 105 System error An error occurred in flash to On and the camera is protected. This image cannot be displayed on again. Disable protection. 159 Raise the flash. • When the scene mode is set the 5, 177 focus-mode selector to an HDMI-compatible device, set...
Reference Manual complete instructions - English
Page 212
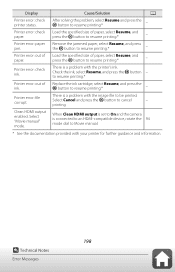
... a problem with the printer's ink. There is connected to an HDMI-compatible device, rotate the 94 mode dial to be printed. After solving the problem, select Resume and press the k button to resume printing.* - Printer error: check ink. Replace the ink cartridge, select Resume, and press the k button to resume printing.* - When Clean HDMI output is set to On and the camera is a problem with the image file to Movie manual...
... a problem with the printer's ink. There is connected to an HDMI-compatible device, rotate the 94 mode dial to be printed. After solving the problem, select Resume and press the k button to resume printing.* - Printer error: check ink. Replace the ink cartridge, select Resume, and press the k button to resume printing.* - When Clean HDMI output is set to On and the camera is a problem with the image file to Movie manual...
Reference Manual complete instructions - English
Page 215
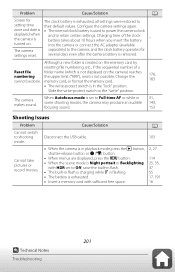
... the write-protect switch to setting time their default values. memory card, or format the memory card. 176, 183 • The write-protect switch is and to power the camera clock displayed when the camera is in flash is charging while q is flashing. • The battery is Night portrait or Backlighting with sufficient free space. 2, 27 114 25, 35, 37 55 17, 191 16 201 Technical Notes Troubleshooting Cannot take pictures or record movies. Configure the camera settings again. Charging time of a Reset file folder...
... the write-protect switch to setting time their default values. memory card, or format the memory card. 176, 183 • The write-protect switch is and to power the camera clock displayed when the camera is in flash is charging while q is flashing. • The battery is Night portrait or Backlighting with sufficient free space. 2, 27 114 25, 35, 37 55 17, 191 16 201 Technical Notes Troubleshooting Cannot take pictures or record movies. Configure the camera settings again. Charging time of a Reset file folder...
Reference Manual complete instructions - English
Page 218
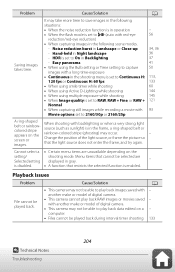
... still images while recording a movie with Movie options set to V (auto with a long time-exposure • Continuous in the shooting menu is set to Continuous H: 120 fps or Continuous H: 60 fps • When using smile timer while shooting • When using Active D-Lighting while shooting • When using the Bulb setting or Time setting to capture images with red-eye reduction/red-eye reduction) • When capturing images in the frame, a ring-shaped belt or rainbow-colored stripe (ghosting) may take more time...
... still images while recording a movie with Movie options set to V (auto with a long time-exposure • Continuous in the shooting menu is set to Continuous H: 120 fps or Continuous H: 60 fps • When using smile timer while shooting • When using Active D-Lighting while shooting • When using the Bulb setting or Time setting to capture images with red-eye reduction/red-eye reduction) • When capturing images in the frame, a ring-shaped belt or rainbow-colored stripe (ghosting) may take more time...
Reference Manual complete instructions - English
Page 219
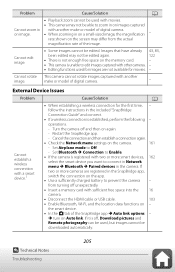
... HDMI cable or USB cable. 103 • Enable Bluetooth, Wi-Fi, and the location data functions on again. - follow the instructions in on a small-sized image, the magnification - with another image. Cannot rotate This camera cannot rotate images captured with two or more cameras are not available for the first time, - Problem Cause/Solution A • Playback zoom cannot be used with movies. • This camera may differ from turning off , Download pictures and Remote...
... HDMI cable or USB cable. 103 • Enable Bluetooth, Wi-Fi, and the location data functions on again. - follow the instructions in on a small-sized image, the magnification - with another image. Cannot rotate This camera cannot rotate images captured with two or more cameras are not available for the first time, - Problem Cause/Solution A • Playback zoom cannot be used with movies. • This camera may differ from turning off , Download pictures and Remote...

Reference Manual
Page 158
... settings] using 1 or 3 and press J to assign current settings to that position. Rotating the mode dial to U1, U2, or U3 recalls the settings last saved to the selected position. 5 Take pictures using the saved settings. 4 Save user settings. D User Settings U1, U2, and U3 The release mode is not saved. In addition, the following settings are not saved. • PHOTO SHOOTING MENU - [Storage folder] - [Manage Picture Control] - [Multiple exposure] - [Interval timer shooting] - [Time-lapse movie] - [Focus shift shooting] • MOVIE SHOOTING MENU - [Manage Picture Control] 116 The Mode...
... settings] using 1 or 3 and press J to assign current settings to that position. Rotating the mode dial to U1, U2, or U3 recalls the settings last saved to the selected position. 5 Take pictures using the saved settings. 4 Save user settings. D User Settings U1, U2, and U3 The release mode is not saved. In addition, the following settings are not saved. • PHOTO SHOOTING MENU - [Storage folder] - [Manage Picture Control] - [Multiple exposure] - [Interval timer shooting] - [Time-lapse movie] - [Focus shift shooting] • MOVIE SHOOTING MENU - [Manage Picture Control] 116 The Mode...

Reference Manual
Page 712
... reference data recorded after image sensor cleaning is connected to a computer. ˔ Pictures are not displayed on HDMI devices: Confirm that an HDMI cable is correctly connected. ˔ Output to HDMI devices does not function as expected: • Confirm that an HDMI cable is correctly connected. • Is [On] selected for [HDMI] > [Advanced] > [External recording control] in the setup menu? • Pictures may be viewed using Nikon software. Copy pictures from the memory card...
... reference data recorded after image sensor cleaning is connected to a computer. ˔ Pictures are not displayed on HDMI devices: Confirm that an HDMI cable is correctly connected. ˔ Output to HDMI devices does not function as expected: • Confirm that an HDMI cable is correctly connected. • Is [On] selected for [HDMI] > [Advanced] > [External recording control] in the setup menu? • Pictures may be viewed using Nikon software. Copy pictures from the memory card...

Reference Guide PDF Edition
Page 112
... of windows in a skyscraper). • The display may brighten or darken while the camera focuses. • The focus point may take longer to focus when lighting is poor. the focus point includes night-time spot lighting or a neon sign or other special filter is used, - vapor, or similar lighting, - D Cautions: Autofocus • The camera may be displayed in green when the camera is unable to focus. • The camera...
... of windows in a skyscraper). • The display may brighten or darken while the camera focuses. • The focus point may take longer to focus when lighting is poor. the focus point includes night-time spot lighting or a neon sign or other special filter is used, - vapor, or similar lighting, - D Cautions: Autofocus • The camera may be displayed in green when the camera is unable to focus. • The camera...

Reference Guide PDF Edition
Page 397
... errors involving wireless LAN and Ethernet connections. • For information on the Wireless Transmitter Utility, see "Error Codes" (0399). "Connecting to some common issues are listed below. The camera displays the message, "Ethernet cable is not connected". Troubleshooting Wireless LAN and Ethernet Connections 397 see the utility's online help. Problems and Solutions Solutions to computer" does not clear from the camera Check firewall settings (0355, 371). Problem Solution • The camera displays Connection settings require adjustment...
... errors involving wireless LAN and Ethernet connections. • For information on the Wireless Transmitter Utility, see "Error Codes" (0399). "Connecting to some common issues are listed below. The camera displays the message, "Ethernet cable is not connected". Troubleshooting Wireless LAN and Ethernet Connections 397 see the utility's online help. Problems and Solutions Solutions to computer" does not clear from the camera Check firewall settings (0355, 371). Problem Solution • The camera displays Connection settings require adjustment...
Reference Guide PDF Edition
Page 781
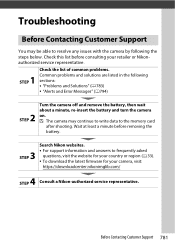
...; "Problems and Solutions" (0783) • "Alerts and Error Messages" (0794) 2 STEP Turn the camera off and remove the battery, then wait about a minute, re-insert the battery and turn the camera on. Troubleshooting Before Contacting Customer Support You may continue to write data to frequently asked questions, visit the website for your country or region (033). • To download the latest firmware for your retailer or Nikonauthorized service representative...
...; "Problems and Solutions" (0783) • "Alerts and Error Messages" (0794) 2 STEP Turn the camera off and remove the battery, then wait about a minute, re-insert the battery and turn the camera on. Troubleshooting Before Contacting Customer Support You may continue to write data to frequently asked questions, visit the website for your country or region (033). • To download the latest firmware for your retailer or Nikonauthorized service representative...

Reference Guide PDF Edition
Page 791
... taken after image sensor cleaning is performed. ˔ The effects of [Set Picture Control], [Active D-Lighting], or [Vignette control] are not displayed on the operating system, you may be copied to a computer: Depending on HDMI devices: Confirm that an HDMI cable is correctly connected. • Is [ON] selected for [External rec. View NEF (RAW) pictures using Nikon software. Copy pictures from the memory card to HDMI devices does not function as...
... taken after image sensor cleaning is performed. ˔ The effects of [Set Picture Control], [Active D-Lighting], or [Vignette control] are not displayed on the operating system, you may be copied to a computer: Depending on HDMI devices: Confirm that an HDMI cable is correctly connected. • Is [ON] selected for [External rec. View NEF (RAW) pictures using Nikon software. Copy pictures from the memory card to HDMI devices does not function as...
Reference Guide PDF Edition
Page 913
... USB cable 4 USB connection priority 737 USB power delivery 744 Z Zebra pattern 686 V Vibration reduction 526 Video file type 214 Video flicker reduction 585 Video recording menu 576 Video-record button 93 View all in continuous mode ....... 629 View assist 685 View mode (photo Lv 624 Viewfinder brightness 711 Viewfinder color balance 712 Vignette control 516, 584 Virtual horizon type 631 Vivid (Set Picture Control 193 Voice memo 295 Voice memo options 732 W Warm display colors 626 WB bracketing 183 U button 158 White balance...
... USB cable 4 USB connection priority 737 USB power delivery 744 Z Zebra pattern 686 V Vibration reduction 526 Video file type 214 Video flicker reduction 585 Video recording menu 576 Video-record button 93 View all in continuous mode ....... 629 View assist 685 View mode (photo Lv 624 Viewfinder brightness 711 Viewfinder color balance 712 Vignette control 516, 584 Virtual horizon type 631 Vivid (Set Picture Control 193 Voice memo 295 Voice memo options 732 W Warm display colors 626 WB bracketing 183 U button 158 White balance...
Setting Guide Video Edition
Page 4
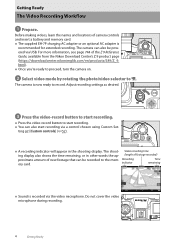
... be powered via the video microphone. Adjust recording settings as desired. 3 Press the video-record button to start recording. ● Press the video-record button to the mem- Getting Ready The Video Recording Workflow 1 Prepare. indicator remaining ● Sound is recommended for extended recording. Before making videos, learn the names and locations of camera controls and insert a battery and memory card. ● The supplied EH-7P charging AC adapter or an optional AC adapter is recorded via USB. The shoot- Do...
... be powered via the video microphone. Adjust recording settings as desired. 3 Press the video-record button to start recording. ● Press the video-record button to the mem- Getting Ready The Video Recording Workflow 1 Prepare. indicator remaining ● Sound is recommended for extended recording. Before making videos, learn the names and locations of camera controls and insert a battery and memory card. ● The supplied EH-7P charging AC adapter or an optional AC adapter is recorded via USB. The shoot- Do...

