Reference Manual
Page 24
... of Shooting and Playback .... 9 Preparation 1 Insert the Batteries 10 Applicable Batteries 11 Preparation 2 Insert a Memory Card.......... 12 Internal Memory and Memory Cards......... 14 Approved Memory Cards 14 Preparation 3 Set the Display Language, Date, and Time 15 Step 1 Turn the Camera On 18 Turning the Camera On and Off 19 Step 2 Frame a Picture 20 Using the Zoom 21 Step 3 Focus and Shoot 22 The Shutter-release Button 23 Step 4 Play Back Images 25 Step 5 Delete Images 26 Shooting Features 29 A (Auto) Mode 30 Changing A (Auto) Mode Settings........... 31 Change Colors 32...
... of Shooting and Playback .... 9 Preparation 1 Insert the Batteries 10 Applicable Batteries 11 Preparation 2 Insert a Memory Card.......... 12 Internal Memory and Memory Cards......... 14 Approved Memory Cards 14 Preparation 3 Set the Display Language, Date, and Time 15 Step 1 Turn the Camera On 18 Turning the Camera On and Off 19 Step 2 Frame a Picture 20 Using the Zoom 21 Step 3 Focus and Shoot 22 The Shutter-release Button 23 Step 4 Play Back Images 25 Step 5 Delete Images 26 Shooting Features 29 A (Auto) Mode 30 Changing A (Auto) Mode Settings........... 31 Change Colors 32...
Reference Manual
Page 26
... Playback Menu E22 F Favorites E22 D Photo Albums E26 m Slide Show E27 G Choose by Date E29 d Rotate Pictures E30 a Print Order (Creating a DPOF Print Order E31 h Copy (Copy Between Internal Memory and Memory Card E33 E Exchange Messages E36 Erase E40 The Setup Menu E41 Welcome Screen E41 Date and Time E42 Brightness E42 Print Date (Imprinting Date and Time E43 Electronic VR E44 Format Memory/Format Card E45 Language E46 Menu Background E47 Video Mode E47 Reset All E48 Battery Type E50 Firmware Version E50 File and Folder...
... Playback Menu E22 F Favorites E22 D Photo Albums E26 m Slide Show E27 G Choose by Date E29 d Rotate Pictures E30 a Print Order (Creating a DPOF Print Order E31 h Copy (Copy Between Internal Memory and Memory Card E33 E Exchange Messages E36 Erase E40 The Setup Menu E41 Welcome Screen E41 Date and Time E42 Brightness E42 Print Date (Imprinting Date and Time E43 Electronic VR E44 Format Memory/Format Card E45 Language E46 Menu Background E47 Video Mode E47 Reset All E48 Battery Type E50 Firmware Version E50 File and Folder...
Reference Manual
Page 32
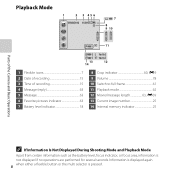
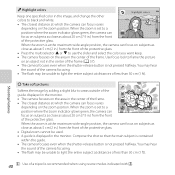
... 12 1 Flexible icons 7 2 Date of recording 15 3 Time of recording 15 4 Message (reply 63 5 Message 63 6 Favorite pictures indicator 63 7 Battery level indicator 18 8 Crop indicator 60, E9 9 Volume 78 10 Switch to full-frame 61 11 Playback mode 62 12 Movie/message length 63, E39 13 Current image number 25 14 Internal memory indicator 25 C If Information Is Not Displayed During Shooting Mode and Playback Mode Apart from certain information such as the battery level, focus indicator, or focus area, information...
... 12 1 Flexible icons 7 2 Date of recording 15 3 Time of recording 15 4 Message (reply 63 5 Message 63 6 Favorite pictures indicator 63 7 Battery level indicator 18 8 Crop indicator 60, E9 9 Volume 78 10 Switch to full-frame 61 11 Playback mode 62 12 Movie/message length 63, E39 13 Current image number 25 14 Internal memory indicator 25 C If Information Is Not Displayed During Shooting Mode and Playback Mode Apart from certain information such as the battery level, focus indicator, or focus area, information...
Reference Manual
Page 41
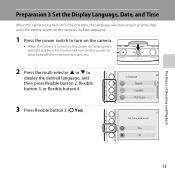
Language 3 Press flexible button 3 (R Yes). Set time and date? The Basics of Shooting and Playback Preparation 3 Set the Display Language, Date, and Time When the camera is turned on for the first time, the language-selection screen and the date and time setting screen for the camera clock are displayed. 1 Press the power switch to turn on the camera. • When the camera is turned on, the power-on lamp (green) will light and then the monitor will turn on (the power-on lamp turns off...
Language 3 Press flexible button 3 (R Yes). Set time and date? The Basics of Shooting and Playback Preparation 3 Set the Display Language, Date, and Time When the camera is turned on for the first time, the language-selection screen and the date and time setting screen for the camera clock are displayed. 1 Press the power switch to turn on the camera. • When the camera is turned on, the power-on lamp (green) will light and then the monitor will turn on (the power-on lamp turns off...

Reference Manual
Page 45
... camera turns off, the power-on lamp and the display turn off. • Press and hold the c (shooting/playback mode) button to turn off the camera, press the power switch. Turning the Camera On and Off • When the camera is in standby mode, the monitor turns back on if you perform any of Shooting and Playback C Power Saving Function (Auto Off) • If no operations are performed for approximately another three minutes, the camera will flash...
... camera turns off, the power-on lamp and the display turn off. • Press and hold the c (shooting/playback mode) button to turn off the camera, press the power switch. Turning the Camera On and Off • When the camera is in standby mode, the monitor turns back on if you perform any of Shooting and Playback C Power Saving Function (Auto Off) • If no operations are performed for approximately another three minutes, the camera will flash...
Reference Manual
Page 49
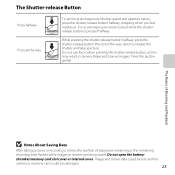
... camera shake and blurred images. Press the button gently. chamber/memory card slot cover or internal cover. Focus and exposure remain locked while the shutterrelease button is pressed halfway. The Basics of Shooting and Playback B Notes About Saving Data After taking pictures or recording a movie, the number of the way down to release the shutter and take a picture. The Shutter-release Button Press halfway Press all the way To set focus and exposure (shutter speed and aperture value), press the shutter...
... camera shake and blurred images. Press the button gently. chamber/memory card slot cover or internal cover. Focus and exposure remain locked while the shutterrelease button is pressed halfway. The Basics of Shooting and Playback B Notes About Saving Data After taking pictures or recording a movie, the number of the way down to release the shutter and take a picture. The Shutter-release Button Press halfway Press all the way To set focus and exposure (shutter speed and aperture value), press the shutter...
Reference Manual
Page 64
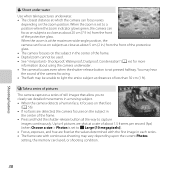
... and hold the shutter-release button all the way to D Large (10 megapixels)). • Focus, exposure, and hue are shot at a rate of about 1.5 frames per second (fps) (when Choose a size > Photos is not pressed halfway. Up to 4 pictures are fixed at distances of less than 30 cm (1 ft). When the zoom is set to capture images continuously. Shooting Features J Shoot under water Use when taking pictures underwater. •...
... and hold the shutter-release button all the way to D Large (10 megapixels)). • Focus, exposure, and hue are shot at a rate of about 1.5 frames per second (fps) (when Choose a size > Photos is not pressed halfway. Up to 4 pictures are fixed at distances of less than 30 cm (1 ft). When the zoom is set to capture images continuously. Shooting Features J Shoot under water Use when taking pictures underwater. •...
Reference Manual
Page 65
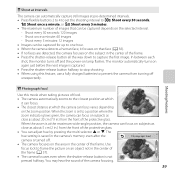
Shooting Features X Photograph food Use this feature, use a fully charged batteries to prevent the camera from turning off unexpectedly. Use focus lock to frame the picture on an object not in the center of the frame (A 57). • The camera focuses even when the shutter-release button is captured. • Press the shutter-release button halfway to stop shooting. • When using this mode when taking pictures of food. • The camera automatically zooms to...
Shooting Features X Photograph food Use this feature, use a fully charged batteries to prevent the camera from turning off unexpectedly. Use focus lock to frame the picture on an object not in the center of the frame (A 57). • The camera focuses even when the shutter-release button is captured. • Press the shutter-release button halfway to stop shooting. • When using this mode when taking pictures of food. • The camera automatically zooms to...
Reference Manual
Page 66
... zoom indicator glows green, the camera can 780 15m 0s focus on the area in the center of less than 30 cm (1 ft). Shooting Features Q Take soft pictures Softens the image by adding a slight blur to areas outside of the guide displayed in the monitor. • The camera focuses on the area in the monitor. When the zoom is recommended when using scene modes indicated with O. Use focus lock to light...
... zoom indicator glows green, the camera can 780 15m 0s focus on the area in the center of less than 30 cm (1 ft). Shooting Features Q Take soft pictures Softens the image by adding a slight blur to areas outside of the guide displayed in the monitor. • The camera focuses on the area in the monitor. When the zoom is recommended when using scene modes indicated with O. Use focus lock to light...

Reference Manual
Page 67
... within the guide. • The camera focuses even when the shutter-release button is pressed halfway. This effect is set to capture the light from the front of the protective glass. • The camera focuses on the subject in the center of the frame. • Digital zoom cannot be unable to make your images look like a miniature model. K Photograph fireworks O Slow shutter speeds are used . • A guide is at...
... within the guide. • The camera focuses even when the shutter-release button is pressed halfway. This effect is set to capture the light from the front of the protective glass. • The camera focuses on the subject in the center of the frame. • Digital zoom cannot be unable to make your images look like a miniature model. K Photograph fireworks O Slow shutter speeds are used . • A guide is at...
Reference Manual
Page 106
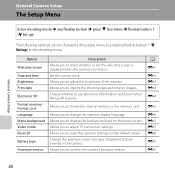
... E47 E47 E48 E50 E50 General Camera Setup 80 Change this setting to select whether or not the welcome screen is displayed when the camera is turned on images. Option Welcome screen Date and time Brightness Print date Electronic VR Format memory/ Format card Language Menu background Video mode Reset all Battery type Firmware version Description Allows you to use electronic VR (vibration reduction) when taking still pictures. Choose whether to adjust TV-connection settings. Allows you to match the type...
... E47 E47 E48 E50 E50 General Camera Setup 80 Change this setting to select whether or not the welcome screen is displayed when the camera is turned on images. Option Welcome screen Date and time Brightness Print date Electronic VR Format memory/ Format card Language Menu background Video mode Reset all Battery type Firmware version Description Allows you to use electronic VR (vibration reduction) when taking still pictures. Choose whether to adjust TV-connection settings. Allows you to match the type...
Reference Manual
Page 138
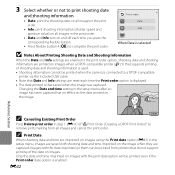
... connected to a DPOF-compatible printer via the included USB cable. • Note that Date and Info settings are saved with the date imprinted on them can be printed, even if the Print order date option is that do not support printing of "a Print Order (Creating a DPOF Print Order)" to remove print marking from printers that saved when the image was captured. C Print Date When shooting date and time are imprinted on images using the Print date option (E43) in the setup menu, images...
... connected to a DPOF-compatible printer via the included USB cable. • Note that Date and Info settings are saved with the date imprinted on them can be printed, even if the Print order date option is that do not support printing of "a Print Order (Creating a DPOF Print Order)" to remove print marking from printers that saved when the image was captured. C Print Date When shooting date and time are imprinted on images using the Print date option (E43) in the setup menu, images...
Reference Manual
Page 146
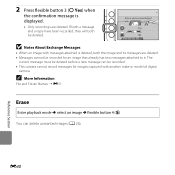
... deleted. C More Information File and Folder Names ➝ E51 Erase Enter playback mode M select an image M flexible button 4 (n) You can be deleted before a new message can delete unwanted images (A 26). Reference Section E40 The current message must be recorded. • This camera cannot record messages for an image that already has two messages attached to it. Yes No B Notes About Exchange Messages • When an image with another make or model of digital camera. Erase voice recordings...
... deleted. C More Information File and Folder Names ➝ E51 Erase Enter playback mode M select an image M flexible button 4 (n) You can be deleted before a new message can delete unwanted images (A 26). Reference Section E40 The current message must be recorded. • This camera cannot record messages for an image that already has two messages attached to it. Yes No B Notes About Exchange Messages • When an image with another make or model of digital camera. Erase voice recordings...
Reference Manual
Page 157
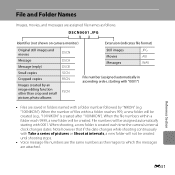
... movies Message Message (reply) DSCN DSCA DSCB Still images Movies Messages .JPG .AVI .WAV Small copies Cropped copies Images created by "NIKON" (e.g. File numbers will be created. File and Folder Names Images, movies, and messages are assigned file names as the images to which the messages are attached. When shooting, a new folder is created after "100NIKON"). When the number of pictures or Shoot at intervals, a new folder will be created (e.g., "101NIKON" is created each time the camera's internal clock changes dates...
... movies Message Message (reply) DSCN DSCA DSCB Still images Movies Messages .JPG .AVI .WAV Small copies Cropped copies Images created by "NIKON" (e.g. File numbers will be created. File and Folder Names Images, movies, and messages are assigned file names as the images to which the messages are attached. When shooting, a new folder is created after "100NIKON"). When the number of pictures or Shoot at intervals, a new folder will be created (e.g., "101NIKON" is created each time the camera's internal clock changes dates...
Reference Manual
Page 161
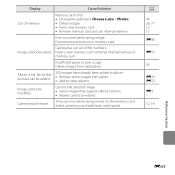
Camera has run out of memory. Album is full. • Change the setting for Choose a size > Photos. • Delete images. • Insert new memory card. • Remove memory card and use internal memory. Cannot edit selected image. • Select images that support editing function. • Movies cannot be saved. Select a memory card with faster write speed. Delete images from album. • Add to other albums. Image cannot be added. 200 images have already been added to save a copy. Time out error while saving movie on the memory card. Format internal memory or...
Camera has run out of memory. Album is full. • Change the setting for Choose a size > Photos. • Delete images. • Insert new memory card. • Remove memory card and use internal memory. Cannot edit selected image. • Select images that support editing function. • Movies cannot be saved. Select a memory card with faster write speed. Delete images from album. • Add to other albums. Image cannot be added. 200 images have already been added to save a copy. Time out error while saving movie on the memory card. Format internal memory or...

Reference Manual
Page 169
...) before taking pictures. B Notes About Using Batteries • Used batteries may be difficult to read and follow the warnings noted in the operating instructions included with the COOLPIX S30, charge the batteries two at the time of a different make or model. • When using EN-MH2 batteries with the battery charger. F5 Technical Notes and Index B Charging Rechargeable Batteries • Do not mix batteries with different amounts of charge remaining, or batteries of purchase...
...) before taking pictures. B Notes About Using Batteries • Used batteries may be difficult to read and follow the warnings noted in the operating instructions included with the COOLPIX S30, charge the batteries two at the time of a different make or model. • When using EN-MH2 batteries with the battery charger. F5 Technical Notes and Index B Charging Rechargeable Batteries • Do not mix batteries with different amounts of charge remaining, or batteries of purchase...
Reference Manual
Page 171
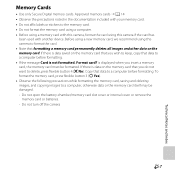
... memory card, press flexible button 3 (R Yes). • Observe the following precautions while formatting the memory card, saving and deleting images, and copying images to a computer before formatting. • If the message Card is not formatted. Do not open the battery-chamber/memory card slot cover or internal cover or remove the memory card or batteries. - If there is data saved on the memory card. Copy that data to the memory card. • Do not format the memory card using a computer. • Before using a memory card with this camera, format the card using this camera...
... memory card, press flexible button 3 (R Yes). • Observe the following precautions while formatting the memory card, saving and deleting images, and copying images to a computer before formatting. • If the message Card is not formatted. Do not open the battery-chamber/memory card slot cover or internal cover or remove the memory card or batteries. - If there is data saved on the memory card. Copy that data to the memory card. • Do not format the memory card using a computer. • Before using a memory card with this camera, format the card using this camera...
Reference Manual
Page 174
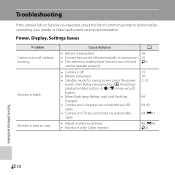
... F8 Technical Notes and Index F10 Power, Display, Settings Issues Problem Camera turns off . • Battery exhausted. • Standby mode for saving power: press the power switch, the shutter-release button, c (shooting/ playback mode) button, or b (e movie-record) button. • When flash lamp flashes, wait until flash has charged. • Camera and computer are connected via USB cable. • Camera and TV are connected via audio/video cable. 19 18 2, 19 44 64, 69 64, E11 • Adjust monitor brightness. • Monitor is hard...
... F8 Technical Notes and Index F10 Power, Display, Settings Issues Problem Camera turns off . • Battery exhausted. • Standby mode for saving power: press the power switch, the shutter-release button, c (shooting/ playback mode) button, or b (e movie-record) button. • When flash lamp flashes, wait until flash has charged. • Camera and computer are connected via USB cable. • Camera and TV are connected via audio/video cable. 19 18 2, 19 44 64, 69 64, E11 • Adjust monitor brightness. • Monitor is hard...
Reference Manual
Page 176
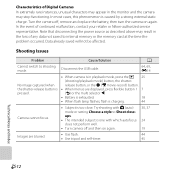
... shutter-release button is • When menus are blurred. • Use flash. • Use tripod and self-timer. 44 45 Technical Notes and Index F12 Characteristics of continued malfunction, contact your retailer or Nikon-authorized service representative. Shooting Issues Problem Cause/Solution A Cannot switch to Shoot closeups. • The intended subject is in the loss of any data not saved to internal memory or the memory card at the time the problem occurred. Turn...
... shutter-release button is • When menus are blurred. • Use flash. • Use tripod and self-timer. 44 45 Technical Notes and Index F12 Characteristics of continued malfunction, contact your retailer or Nikon-authorized service representative. Shooting Issues Problem Cause/Solution A Cannot switch to Shoot closeups. • The intended subject is in the loss of any data not saved to internal memory or the memory card at the time the problem occurred. Turn...
Reference Manual
Page 179
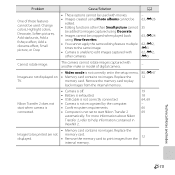
... connected. • Camera is off. • Battery is exhausted. • USB cable is not correctly connected. • Camera is not recognized by the computer. • Confirm system requirements. • Computer is not correctly set to start Nikon Transfer 2 automatically. Remove the memory card to edit images captured with movies. • Images created using Decorate. • Images cannot be printed are not displayed on TV. Replace the memory card. Replace the Images to be cropped when played back using View...
... connected. • Camera is off. • Battery is exhausted. • USB cable is not correctly connected. • Camera is not recognized by the computer. • Confirm system requirements. • Computer is not correctly set to start Nikon Transfer 2 automatically. Remove the memory card to edit images captured with movies. • Images created using Decorate. • Images cannot be printed are not displayed on TV. Replace the memory card. Replace the Images to be cropped when played back using View...


