S5100 User's Manual
Page 9
... the Battery ...14 Turning On and Off the Camera...17 Setting Display Language, Date, and Time 18 Inserting Memory Cards ...20 Removing Memory Cards...20 Basic Photography and Playback: A (Auto) Mode 22 Step 1 Turn the Camera On and Select A (Auto) Mode 22 Indicators Displayed in A (Auto) Mode 23 Step 2 Frame a Picture ...24 Using the Zoom...25 Step 3 Focus and Shoot ...26 Step 4 Playing Back and Deleting Images 28 Playing Back Images (Playback Mode)...28 Deleting Unwanted Images...29 Using the Flash...30 Setting the Flash Mode...30 Taking Pictures with the Self-timer 32 Macro Mode...33...
... the Battery ...14 Turning On and Off the Camera...17 Setting Display Language, Date, and Time 18 Inserting Memory Cards ...20 Removing Memory Cards...20 Basic Photography and Playback: A (Auto) Mode 22 Step 1 Turn the Camera On and Select A (Auto) Mode 22 Indicators Displayed in A (Auto) Mode 23 Step 2 Frame a Picture ...24 Using the Zoom...25 Step 3 Focus and Shoot ...26 Step 4 Playing Back and Deleting Images 28 Playing Back Images (Playback Mode)...28 Deleting Unwanted Images...29 Using the Flash...30 Setting the Flash Mode...30 Taking Pictures with the Self-timer 32 Macro Mode...33...
S5100 User's Manual
Page 18
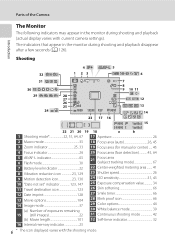
... shooting mode. Parts of exposures remaining 15 (still images 22 (b) Movie length 101 21 Focus area (subject tracking mode 67 22 Center-weighted metering area ........ 41 23 Shutter speed 26 24 ISO sensitivity 31, 43 25 Exposure compensation value 34 26 Skin softening 66 27 Smile timer 66 28 Blink proof icon 66 29 Color options 44 30 White balance mode 39 31 Continuous shooting mode 42 32 Self-timer indicator 32 16 Internal memory indicator 23 6 * The icon displayed...
... shooting mode. Parts of exposures remaining 15 (still images 22 (b) Movie length 101 21 Focus area (subject tracking mode 67 22 Center-weighted metering area ........ 41 23 Shutter speed 26 24 ISO sensitivity 31, 43 25 Exposure compensation value 34 26 Skin softening 66 27 Smile timer 66 28 Blink proof icon 66 29 Color options 44 30 White balance mode 39 31 Continuous shooting mode 42 32 Self-timer indicator 32 16 Internal memory indicator 23 6 * The icon displayed...
S5100 User's Manual
Page 20
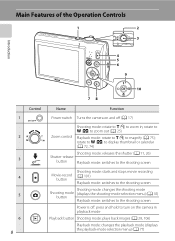
... of the Operation Controls 1 2 3 Introduction 4 5 6 9 1 2 3 4 5 6 8 Control 10 78 Name Function Power switch Turns the camera on and off : press and hold to zoom in playback mode Playback button Shooting mode: plays back images (A 28, 106) Playback mode: changes the playback mode (displays the playback-mode selection menu) (A 77) rotate to f (h) to display thumbnail or calendar (A 72, 74) Shooting mode: releases the shutter (A 11, 26) Shutter-release button Playback mode: switches to the shooting screen Movie-record button Shooting mode: starts and stops movie recording...
... of the Operation Controls 1 2 3 Introduction 4 5 6 9 1 2 3 4 5 6 8 Control 10 78 Name Function Power switch Turns the camera on and off : press and hold to zoom in playback mode Playback button Shooting mode: plays back images (A 28, 106) Playback mode: changes the playback mode (displays the playback-mode selection menu) (A 77) rotate to f (h) to display thumbnail or calendar (A 72, 74) Shooting mode: releases the shutter (A 11, 26) Shutter-release button Playback mode: switches to the shooting screen Movie-record button Shooting mode: starts and stops movie recording...
S5100 User's Manual
Page 23
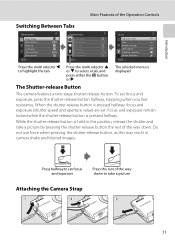
... the Operation Controls Switching Between Tabs Shooting menu Image mode White balance Metering Continuous ISO sensitivity Color options Exit Shooting menu Image mode White balance Metering Continuous ISO sensitivity Color options Exit Set up Welcome screen Date Monitor settings Date imprint Vibration reduction Motion detection Exit Press the multi selector J to highlight the tab Press the multi selector H or I to take a picture by pressing the shutter-release button the rest of the way down. Focus and exposure remain locked while the shutter-release button is...
... the Operation Controls Switching Between Tabs Shooting menu Image mode White balance Metering Continuous ISO sensitivity Color options Exit Shooting menu Image mode White balance Metering Continuous ISO sensitivity Color options Exit Set up Welcome screen Date Monitor settings Date imprint Vibration reduction Motion detection Exit Press the multi selector J to highlight the tab Press the multi selector H or I to take a picture by pressing the shutter-release button the rest of the way down. Focus and exposure remain locked while the shutter-release button is...
S5100 User's Manual
Page 32
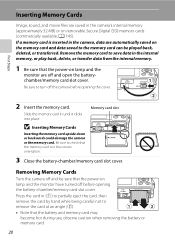
... during use; Remove the memory card to turn off and open the batterychamber/memory card slot cover. observe caution when removing the battery or memory card. 20 A 145). Removing Memory Cards Turn the camera off and be played back, deleted, or transferred. Be sure to check that the memory card is inserted in the camera, data are automatically saved on the memory card and data saved to remove the card at an angle (2). • Note that the power-on removable Secure Digital (SD) memory cards (commercially...
... during use; Remove the memory card to turn off and open the batterychamber/memory card slot cover. observe caution when removing the battery or memory card. 20 A 145). Removing Memory Cards Turn the camera off and be played back, deleted, or transferred. Be sure to check that the memory card is inserted in the camera, data are automatically saved on the memory card and data saved to remove the card at an angle (2). • Note that the power-on removable Secure Digital (SD) memory cards (commercially...
S5100 User's Manual
Page 33
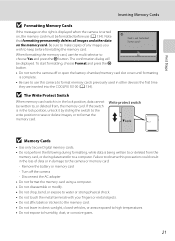
... camera - Write protect switch B Memory Cards • Use only Secure Digital memory cards. • Do not perform the following during data transfer to format memory cards previously used in the lock position, unlock it by sliding the switch to the write position to save or delete images, or to humidity, dust, or corrosive gases. 21 Note that formatting permanently deletes all images and other devices the first time they are inserted into the COOLPIX S5100 (A 134). Format card? Remove the battery or memory card - Card...
... camera - Write protect switch B Memory Cards • Use only Secure Digital memory cards. • Do not perform the following during data transfer to format memory cards previously used in the lock position, unlock it by sliding the switch to the write position to save or delete images, or to humidity, dust, or corrosive gases. 21 Note that formatting permanently deletes all images and other devices the first time they are inserted into the COOLPIX S5100 (A 134). Format card? Remove the battery or memory card - Card...
S5100 User's Manual
Page 35
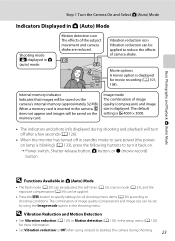
... image size can be set by using a tripod to stabilize the camera during shooting and playback will turn it back on. ➝ Power switch, Shutter-release button, A button, or b (movie-record) button D Functions Available in the setup menu (A 120) for movie recording (A 101, 9 104). Vibration reduction icon Vibration reduction can be applied to shooting conditions. Basic Photography and Playback: A (Auto) Mode Step 1 Turn the Camera On and Select A (Auto) Mode Indicators Displayed in A (Auto) Mode Shooting mode A displayed in the shooting menu. Movie options A movie option...
... image size can be set by using a tripod to stabilize the camera during shooting and playback will turn it back on. ➝ Power switch, Shutter-release button, A button, or b (movie-record) button D Functions Available in the setup menu (A 120) for movie recording (A 101, 9 104). Vibration reduction icon Vibration reduction can be applied to shooting conditions. Basic Photography and Playback: A (Auto) Mode Step 1 Turn the Camera On and Select A (Auto) Mode Indicators Displayed in A (Auto) Mode Shooting mode A displayed in the shooting menu. Movie options A movie option...
S5100 User's Manual
Page 40
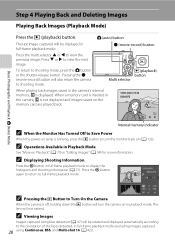
... b (movie-record) button will be displayed in Playback Mode See "More on in full-frame playback mode (excluding images captured 28 using Continuous, BSS, and Multi-shot 16 (A 42)). To return to the orientation of the faces detected, in playback mode. The lens will be rotated and displayed automatically according to shooting mode, press the A button or the shutter-release button. A (auto) button The last image captured will not extend. Step 4 Playing Back and Deleting Images Playing Back Images (Playback Mode...
... b (movie-record) button will be displayed in Playback Mode See "More on in full-frame playback mode (excluding images captured 28 using Continuous, BSS, and Multi-shot 16 (A 42)). To return to the orientation of the faces detected, in playback mode. The lens will be rotated and displayed automatically according to shooting mode, press the A button or the shutter-release button. A (auto) button The last image captured will not extend. Step 4 Playing Back and Deleting Images Playing Back Images (Playback Mode...
S5100 User's Manual
Page 43
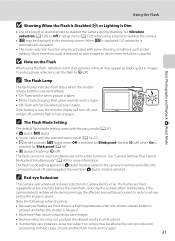
... red-eye reduction (In-Camera Red-Eye Fix). Basic Photography and Playback: A (Auto) Mode Using the Flash B Shooting When the Flash Is Disabled (W) or Lighting Is Dim • Use of a tripod is taken. • Blinks: Flash charging. Set Vibration reduction (A 129) to which noise reduction is selected for more information. in the air may be affected by red-eye reduction processing; C The Flash Mode Setting The default flash mode setting varies with shooting mode (A 35). • A (auto): U (auto) • Scene: varies with certain functions. fixed...
... red-eye reduction (In-Camera Red-Eye Fix). Basic Photography and Playback: A (Auto) Mode Using the Flash B Shooting When the Flash Is Disabled (W) or Lighting Is Dim • Use of a tripod is taken. • Blinks: Flash charging. Set Vibration reduction (A 129) to which noise reduction is selected for more information. in the air may be affected by red-eye reduction processing; C The Flash Mode Setting The default flash mode setting varies with shooting mode (A 35). • A (auto): U (auto) • Scene: varies with certain functions. fixed...
S5100 User's Manual
Page 44
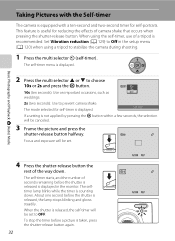
... shutter-release button halfway. 10 Focus and exposure will be set to prevent camera shake. The self-timer starts, and the number of camera shake that occurs when pressing the shutter-release button. When using a tripod to Off in the monitor. Self-timer If a setting is displayed in the setup menu (A 120) when using the self-timer, use of the way down . The mode selected for self-timer is equipped with the Self-timer The camera is displayed. Basic Photography and Playback: A (Auto) Mode Taking Pictures...
... shutter-release button halfway. 10 Focus and exposure will be set to prevent camera shake. The self-timer starts, and the number of camera shake that occurs when pressing the shutter-release button. When using a tripod to Off in the monitor. Self-timer If a setting is displayed in the setup menu (A 120) when using the self-timer, use of the way down . The mode selected for self-timer is equipped with the Self-timer The camera is displayed. Basic Photography and Playback: A (Auto) Mode Taking Pictures...

S5100 User's Manual
Page 45
... the zoom position. When using A (auto) mode, if Autofocus mode (A 48) is set to Full-time AF, the camera focuses continuously until the shutter-release button is pressed halfway to the left of G), the camera can focus on . Basic Photography and Playback: A (Auto) Mode Macro Mode Macro mode is used for taking pictures of objects as close as 2 cm (0.8 in .) from the lens. Macro mode 3 Rotate the zoom control to choose ON and press the k button. C Autofocus When using other shooting modes, Full-time...
... the zoom position. When using A (auto) mode, if Autofocus mode (A 48) is set to Full-time AF, the camera focuses continuously until the shutter-release button is pressed halfway to the left of G), the camera can focus on . Basic Photography and Playback: A (Auto) Mode Macro Mode Macro mode is used for taking pictures of objects as close as 2 cm (0.8 in .) from the lens. Macro mode 3 Rotate the zoom control to choose ON and press the k button. C Autofocus When using other shooting modes, Full-time...

S5100 User's Manual
Page 51
...able to adapt to the color of the light source. Digital cameras can mimic this setting cannot be specified manually to achieve more accurate results. d Incandescent Use under unusual lighting. Although the default setting, Auto, can be enabled. a Auto (default setting) White balance is displayed. Changing A (Auto) Mode Settings (Shooting Menu) White Balance (Adjusting Hue) A (auto) M d (Shooting menu) M White balance More on White Balance • There may be functions with which this adjustment by processing images according to changes in the color of the light source, with...
...able to adapt to the color of the light source. Digital cameras can mimic this setting cannot be specified manually to achieve more accurate results. d Incandescent Use under unusual lighting. Although the default setting, Auto, can be enabled. a Auto (default setting) White balance is displayed. Changing A (Auto) Mode Settings (Shooting Menu) White Balance (Adjusting Hue) A (auto) M d (Shooting menu) M White balance More on White Balance • There may be functions with which this adjustment by processing images according to changes in the color of the light source, with...
S5100 User's Manual
Page 54
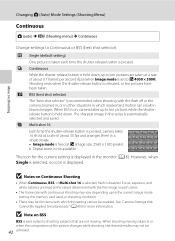
... each time the shutter-release button is displayed. When BSS is not available. W Multi-shot 16 Each time the shutter-release button is pressed, camera takes 16 shots at a rate of the picture changes while shooting, the desired results may be functions with continuous shooting may vary depending upon the current image mode setting, the memory card used, or shooting condition. • There may not be enabled. However, when Single is selected, no icon is...
... each time the shutter-release button is displayed. When BSS is not available. W Multi-shot 16 Each time the shutter-release button is pressed, camera takes 16 shots at a rate of the picture changes while shooting, the desired results may be functions with continuous shooting may vary depending upon the current image mode setting, the memory card used, or shooting condition. • There may not be enabled. However, when Single is selected, no icon is...
S5100 User's Manual
Page 120
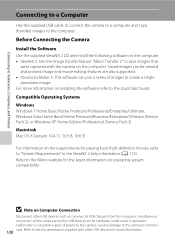
... a single panorama image. Image and movie editing features are also supported. • Panorama Maker 5: This software can be viewed and printed. Refer to the Nikon website for the latest information on the requirements for more information on installing the software, refer to "System Requirements" in operation malfunction or excessive supply of the camera and other USB devices for playing back high-definition movies, refer to the Quick Start Guide. Compatible Operating Systems Windows Windows...
... a single panorama image. Image and movie editing features are also supported. • Panorama Maker 5: This software can be viewed and printed. Refer to the Nikon website for the latest information on the requirements for more information on installing the software, refer to "System Requirements" in operation malfunction or excessive supply of the camera and other USB devices for playing back high-definition movies, refer to the Quick Start Guide. Compatible Operating Systems Windows Windows...
S5100 User's Manual
Page 132
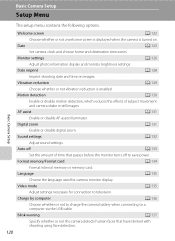
... blinked with shooting using face detection. 120 Video mode A 135 Adjust settings necessary for camera monitor display. Date A 123 Set camera clock and choose home and destination time zones. Auto off A 133 Set the amount of subject movement and camera shake in still images. Language A 135 Choose the language used for connection to a computer via the USB cable. Basic Camera Setup Setup Menu The setup menu contains the following options. Basic Camera Setup Welcome screen A 122 Choose whether or not a welcome screen is displayed...
... blinked with shooting using face detection. 120 Video mode A 135 Adjust settings necessary for camera monitor display. Date A 123 Set camera clock and choose home and destination time zones. Auto off A 133 Set the amount of subject movement and camera shake in still images. Language A 135 Choose the language used for connection to a computer via the USB cable. Basic Camera Setup Setup Menu The setup menu contains the following options. Basic Camera Setup Welcome screen A 122 Choose whether or not a welcome screen is displayed...
S5100 User's Manual
Page 146
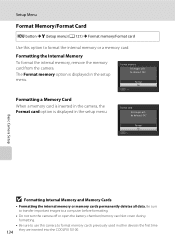
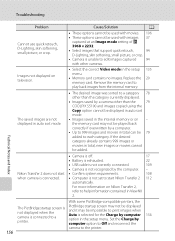
... turn the camera off or open the battery-chamber/memory card slot cover during formatting. • Be sure to use this option to format memory cards previously used in the setup menu. Formatting the Internal Memory To format the internal memory, remove the memory card from the camera. OK? The Format memory option is displayed in other devices the first time 134 they are inserted into the COOLPIX S5100. Format card All images will be deleted! Format memory All images will be deleted! OK? Format No Exit Basic Camera Setup B Formatting Internal Memory and Memory Cards...
... turn the camera off or open the battery-chamber/memory card slot cover during formatting. • Be sure to use this option to format memory cards previously used in the setup menu. Formatting the Internal Memory To format the internal memory, remove the memory card from the camera. OK? The Format memory option is displayed in other devices the first time 134 they are inserted into the COOLPIX S5100. Format card All images will be deleted! Format memory All images will be deleted! OK? Format No Exit Basic Camera Setup B Formatting Internal Memory and Memory Cards...
S5100 User's Manual
Page 160
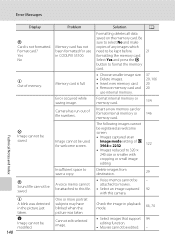
... images that support 94 editing function. • Movies cannot be saved. Error Messages Display Problem Solution A P Card is full. • Choose smaller image size. • Delete images. • Insert new memory card. • Remove memory card and use in COOLPIX S5100. Formatting deletes all data saved on the memory card. Select Yes and press the k button to 320 × 240 size or smaller with this file. • Voice memos cannot be used for use internal memory. 37 29, 106 20 20 Error occurred while saving image. Delete images from destination. 29 P Sound file...
... images that support 94 editing function. • Movies cannot be saved. Error Messages Display Problem Solution A P Card is full. • Choose smaller image size. • Delete images. • Insert new memory card. • Remove memory card and use in COOLPIX S5100. Formatting deletes all data saved on the memory card. Select Yes and press the k button to 320 × 240 size or smaller with this file. • Voice memos cannot be used for use internal memory. 37 29, 106 20 20 Error occurred while saving image. Delete images from destination. 29 P Sound file...
S5100 User's Manual
Page 163
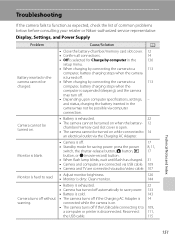
... for saving power: press the power switch, the shutter-release button, A button, c 8, 11, 17 button, or b (movie-record) button. • When flash lamp blinks, wait until flash has charged. 31 • Camera and computer are connected via USB cable. 109 • Camera and TV are connected via audio/video cable. 107 Monitor is hard to function as expected, check the list of common problems below before consulting your retailer or Nikon-authorized service representative. and status, charging the battery...
... for saving power: press the power switch, the shutter-release button, A button, c 8, 11, 17 button, or b (movie-record) button. • When flash lamp blinks, wait until flash has charged. 31 • Camera and computer are connected via USB cable. 109 • Camera and TV are connected via audio/video cable. 107 Monitor is hard to function as expected, check the list of common problems below before consulting your retailer or Nikon-authorized service representative. and status, charging the battery...
S5100 User's Manual
Page 168
...; Battery is exhausted. 22 • USB cable is not correctly connected. 109 • Camera is selected for the Charge by computer option in the internal memory or on Nikon Transfer 2, refer to each category. Set the Charge by a camera other than the 79 COOLPIX S5100 and images copied using the Copy option cannot be used with other cameras. • Select the correct Video mode in auto sort mode. • The desired image was sorted to start •...
...; Battery is exhausted. 22 • USB cable is not correctly connected. 109 • Camera is selected for the Charge by computer option in the internal memory or on Nikon Transfer 2, refer to each category. Set the Charge by a camera other than the 79 COOLPIX S5100 and images copied using the Copy option cannot be used with other cameras. • Select the correct Video mode in auto sort mode. • The desired image was sorted to start •...
S5100 User's Manual
Page 176
... Print set 84 Print set date option 85, 86 Printer 114 Protect 88 Q Quick retouch 96 QVGA 104 R Rechargeable battery 145 Rechargeable Li-ion battery 12, 14, 145 Recording movies 101 Red-eye reduction 30, 31 Reset all 139 164 Rotate image 90 RSCN 146 S Scene auto selector x 52 Scene mode 51, 54 Self-timer 32 Self-timer lamp 32, 65 Sepia 44 Setup menu 120 Shooting 22, 24, 26 Shooting information 71 Shooting menu 36 Shutter sound 132 Shutter speed 26 Shutter...
... Print set 84 Print set date option 85, 86 Printer 114 Protect 88 Q Quick retouch 96 QVGA 104 R Rechargeable battery 145 Rechargeable Li-ion battery 12, 14, 145 Recording movies 101 Red-eye reduction 30, 31 Reset all 139 164 Rotate image 90 RSCN 146 S Scene auto selector x 52 Scene mode 51, 54 Self-timer 32 Self-timer lamp 32, 65 Sepia 44 Setup menu 120 Shooting 22, 24, 26 Shooting information 71 Shooting menu 36 Shutter sound 132 Shutter speed 26 Shutter...


