S5100 User's Manual
Page 9
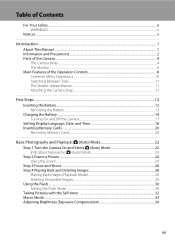
... Contents For Your Safety...ii WARNINGS...ii Notices ...v Introduction ...1 About This Manual ...1 Information and Precautions...2 Parts of the Camera...4 The Camera Body ...4 The Monitor...6 Main Features of the Operation Controls 8 Common Menu Operations...10 Switching Between Tabs...11 The Shutter-release Button...11 Attaching the Camera Strap ...11 First Steps ...12...
... Contents For Your Safety...ii WARNINGS...ii Notices ...v Introduction ...1 About This Manual ...1 Information and Precautions...2 Parts of the Camera...4 The Camera Body ...4 The Monitor...6 Main Features of the Operation Controls 8 Common Menu Operations...10 Switching Between Tabs...11 The Shutter-release Button...11 Attaching the Camera Strap ...11 First Steps ...12...
S5100 User's Manual
Page 10
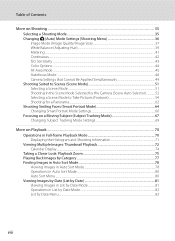
... Mode 51 Selecting a Scene Mode...51 Shooting in the Scene Mode Selected by the Camera (Scene Auto Selector 52 Selecting a Scene Mode to Take Pictures (Features 54 Shooting for a Panorama...62 Shooting Smiling Faces (Smart Portrait Mode 64 Changing Smart Portrait Mode Settings 66 Focusing on a Moving Subject (Subject Tracking Mode...
... Mode 51 Selecting a Scene Mode...51 Shooting in the Scene Mode Selected by the Camera (Scene Auto Selector 52 Selecting a Scene Mode to Take Pictures (Features 54 Shooting for a Panorama...62 Shooting Smiling Faces (Smart Portrait Mode 64 Changing Smart Portrait Mode Settings 66 Focusing on a Moving Subject (Subject Tracking Mode...
S5100 User's Manual
Page 20
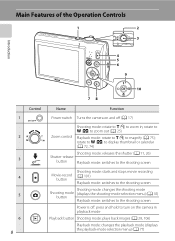
... playback mode Playback button Shooting mode: plays back images (A 28, 106) Playback mode: changes the playback mode (displays the playback-mode selection menu) (A 77) Main Features of the Operation Controls 1 2 3 Introduction 4 5 6 9 1 2 3 4 5 6 8 Control 10 78 Name Function Power switch Turns the camera on and off : press and hold to turn on the...
... playback mode Playback button Shooting mode: plays back images (A 28, 106) Playback mode: changes the playback mode (displays the playback-mode selection menu) (A 77) Main Features of the Operation Controls 1 2 3 Introduction 4 5 6 9 1 2 3 4 5 6 8 Control 10 78 Name Function Power switch Turns the camera on and off : press and hold to turn on the...
S5100 User's Manual
Page 21
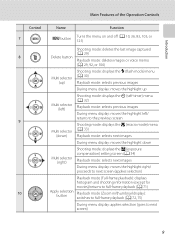
Introduction Main Features of the Operation Controls Control 7 8 9 10 Name Function d button Turns the menu on and off (A 10, 36, 83, 103, or 121) Delete button Multi selector (...
Introduction Main Features of the Operation Controls Control 7 8 9 10 Name Function d button Turns the menu on and off (A 10, 36, 83, 103, or 121) Delete button Multi selector (...
S5100 User's Manual
Page 22
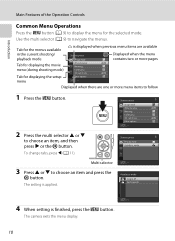
... is applied. Use the multi selector (A 9) to choose an item, and then press K or the k button. The camera exits the menu display. 10 Introduction Main Features of the Operation Controls Common Menu Operations Press the d button (A 9) to display the menu for displaying the setup menu K is displayed when previous menu items...
... is applied. Use the multi selector (A 9) to choose an item, and then press K or the k button. The camera exits the menu display. 10 Introduction Main Features of the Operation Controls Common Menu Operations Press the d button (A 9) to display the menu for displaying the setup menu K is displayed when previous menu items...
S5100 User's Manual
Page 23
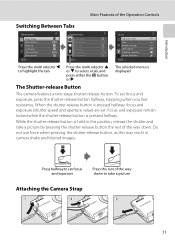
While the shutter-release button is displayed The Shutter-release Button The camera features a two-stage shutter-release button. To set . Do not use force when pressing the shutter-release button, as this may result in this position... (shutter speed and aperture value) are set focus and exposure, press the shutter-release button halfway, stopping when you feel resistance. Introduction Main Features of the Operation Controls Switching Between Tabs Shooting menu Image mode White balance Metering Continuous ISO sensitivity Color options Exit Shooting menu Image mode White...
While the shutter-release button is displayed The Shutter-release Button The camera features a two-stage shutter-release button. To set . Do not use force when pressing the shutter-release button, as this may result in this position... (shutter speed and aperture value) are set focus and exposure, press the shutter-release button halfway, stopping when you feel resistance. Introduction Main Features of the Operation Controls Switching Between Tabs Shooting menu Image mode White balance Metering Continuous ISO sensitivity Color options Exit Shooting menu Image mode White...
S5100 User's Manual
Page 44
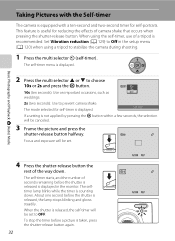
... displayed. Self-timer If a setting is released, the self-timer will be set . 4 Press the shutter-release button the rest of the way down . This feature is equipped with a ten-second and two-second timer for self-portraits. Basic Photography and Playback: A (Auto) Mode Taking Pictures with the Self-timer The...
... displayed. Self-timer If a setting is released, the self-timer will be set . 4 Press the shutter-release button the rest of the way down . This feature is equipped with a ten-second and two-second timer for self-portraits. Basic Photography and Playback: A (Auto) Mode Taking Pictures with the Self-timer The...
S5100 User's Manual
Page 63
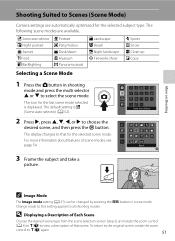
... from the scene selection screen (step 2) and rotate the zoom control (A 4) to g (j) to view a description of scene modes, see page 54. For more information about features of that for the last scene mode selected is x (Scene auto selector) (A 52). 2 Press K, press H, I to g (j) again. 51 Change made to this setting applies to...
... from the scene selection screen (step 2) and rotate the zoom control (A 4) to g (j) to view a description of scene modes, see page 54. For more information about features of that for the last scene mode selected is x (Scene auto selector) (A 52). 2 Press K, press H, I to g (j) again. 51 Change made to this setting applies to...
S5100 User's Manual
Page 66
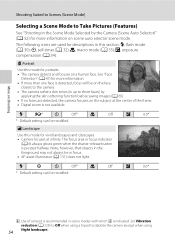
... be modified. More on Shooting Shooting Suited to Scenes (Scene Mode) Selecting a Scene Mode to stabilize the camera (except when using a tripod to Take Pictures (Features) See "Shooting in the Scene Mode Selected by applying the skin softening function before saving images (A 65). • If no faces are used for descriptions...
... be modified. More on Shooting Shooting Suited to Scenes (Scene Mode) Selecting a Scene Mode to stabilize the camera (except when using a tripod to Take Pictures (Features) See "Shooting in the Scene Mode Selected by applying the skin softening function before saving images (A 65). • If no faces are used for descriptions...
S5100 User's Manual
Page 72
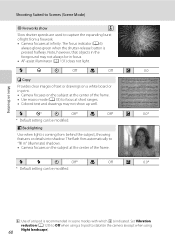
... is recommended in the foreground may not show O Slow shutter speeds are used to capture the expanding burst of light from behind the subject, throwing features or details into shadow. More on Shooting Shooting Suited to Scenes (Scene Mode) m Fireworks show up well. Set Vibration reduction (A 129) to Off when using...
... is recommended in the foreground may not show O Slow shutter speeds are used to capture the expanding burst of light from behind the subject, throwing features or details into shadow. More on Shooting Shooting Suited to Scenes (Scene Mode) m Fireworks show up well. Set Vibration reduction (A 129) to Off when using...
S5100 User's Manual
Page 101
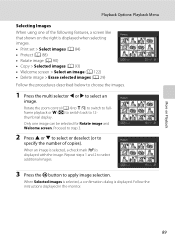
... back to apply image selection. thumbnail display. Proceed to step 3. 2 Press H or I to select or deselect (or to Protect specify the number of the following features, a screen like Protect that shown on Playback 89 When an image is selected, a check mark (y) is displayed. More on the right is displayed when selecting...
... back to apply image selection. thumbnail display. Proceed to step 3. 2 Press H or I to select or deselect (or to Protect specify the number of the following features, a screen like Protect that shown on Playback 89 When an image is selected, a check mark (y) is displayed. More on the right is displayed when selecting...
S5100 User's Manual
Page 111
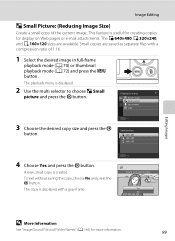
... copy size and press the k button. Exit Small picture 640 × 480 320 × 240 160 × 120 4 Choose Yes and press the k button. This feature is displayed with a compression ratio of the current image.
... copy size and press the k button. Exit Small picture 640 × 480 320 × 240 160 × 120 4 Choose Yes and press the k button. This feature is displayed with a compression ratio of the current image.
S5100 User's Manual
Page 120
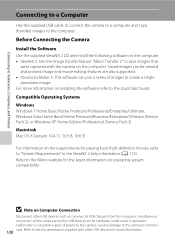
... with other USB devices such as commercial USB chargers from the computer. Image and movie editing features are also supported. • Panorama Maker 5: This software can be viewed and printed. For more information. Refer to the Nikon website for the latest information on installing the software, refer to the Quick Start Guide... XP Home Edition/Professional (Service Pack 3) Macintosh Mac OS X (version 10.4.11, 10.5.8, 10.6.3) For information on the computer. • ViewNX 2: Use the image transfer feature "Nikon Transfer 2" to the computer.
... with other USB devices such as commercial USB chargers from the computer. Image and movie editing features are also supported. • Panorama Maker 5: This software can be viewed and printed. For more information. Refer to the Nikon website for the latest information on installing the software, refer to the Quick Start Guide... XP Home Edition/Professional (Service Pack 3) Macintosh Mac OS X (version 10.4.11, 10.5.8, 10.6.3) For information on the computer. • ViewNX 2: Use the image transfer feature "Nikon Transfer 2" to the computer.
S5100 User's Manual
Page 122
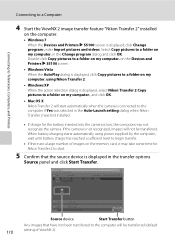
...been transferred to the computer will not be transferred (default 110 setting of ViewNX 2). When battery charging starts automatically using Nikon Transfer 2. • Windows XP When the action selection dialog is displayed in the Change program dialog and click OK. .... Connecting to Televisions, Computers, and Printers Connecting to a Computer 4 Start the ViewNX 2 image transfer feature "Nikon Transfer 2" installed on my computer. on the Devices and Printers K S5100 screen. • Windows Vista When the AutoPlay dialog is displayed, click Copy pictures to a folder on...
...been transferred to the computer will not be transferred (default 110 setting of ViewNX 2). When battery charging starts automatically using Nikon Transfer 2. • Windows XP When the action selection dialog is displayed in the Change program dialog and click OK. .... Connecting to Televisions, Computers, and Printers Connecting to a Computer 4 Start the ViewNX 2 image transfer feature "Nikon Transfer 2" installed on my computer. on the Devices and Printers K S5100 screen. • Windows Vista When the AutoPlay dialog is displayed, click Copy pictures to a folder on...
S5100 User's Manual
Page 124
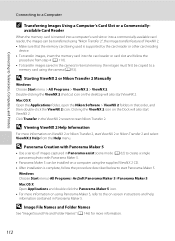
.... • To transfer images, insert the memory card into a commercially-available card reader, the images can be transferred using "Nikon Transfer 2", the image transfer feature of ViewNX 2. • Make sure that order, and then double-click the ViewNX 2 icon. Clicking the ViewNX 2 icon... on ViewNX 2 or Nikon Transfer 2, start ViewNX 2. D Viewing ViewNX 2 Help Information For more information. 112 D Image File Names and Folder Names ...
.... • To transfer images, insert the memory card into a commercially-available card reader, the images can be transferred using "Nikon Transfer 2", the image transfer feature of ViewNX 2. • Make sure that order, and then double-click the ViewNX 2 icon. Clicking the ViewNX 2 icon... on ViewNX 2 or Nikon Transfer 2, start ViewNX 2. D Viewing ViewNX 2 Help Information For more information. 112 D Image File Names and Folder Names ...


