
Reference Manual
Page 4
After reading, please keep this manual. Introduction Introduction Read This First Thank you for purchasing the Nikon COOLPIX S9500 or COOLPIX S9400 digital camera. Before using the camera, please read the information in "For Your Safety" (Avi to Aviii) and familiarize yourself with the information provided in this manual handy and refer to it to enhance your enjoyment of your new camera. ii
After reading, please keep this manual. Introduction Introduction Read This First Thank you for purchasing the Nikon COOLPIX S9500 or COOLPIX S9400 digital camera. Before using the camera, please read the information in "For Your Safety" (Avi to Aviii) and familiarize yourself with the information provided in this manual handy and refer to it to enhance your enjoyment of your new camera. ii

Reference Manual
Page 5
... on a computer monitor appear in bold. • In this manual, images are referred to as the "default setting." • The names of menu items displayed in the monitor screen, and the names of the Camera and Main Functions" (A 1) for both the COOLPIX S9500 and the COOLPIX S9400 are provided when necessary. Illustrations for more clearly...
... on a computer monitor appear in bold. • In this manual, images are referred to as the "default setting." • The names of menu items displayed in the monitor screen, and the names of the Camera and Main Functions" (A 1) for both the COOLPIX S9500 and the COOLPIX S9400 are provided when necessary. Illustrations for more clearly...

Reference Manual
Page 24
... USB connector cover 14, 77, 80 15 HDMI micro connector (Type D).........77 16 USB/Audio video connector 14, 77, 80 1 The OLED monitor is sometimes referred to as "monitor" in this manual. 2 The rotary multi selector is sometimes referred to as "multi selector" in this...
... USB connector cover 14, 77, 80 15 HDMI micro connector (Type D).........77 16 USB/Audio video connector 14, 77, 80 1 The OLED monitor is sometimes referred to as "monitor" in this manual. 2 The rotary multi selector is sometimes referred to as "multi selector" in this...
Reference Manual
Page 141
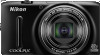
... interface. B When Nothing Appears on this camera is oriented correctly. E21 Reference Section Connecting the Camera to a TV (Viewing Images on a TV) 3 Tune the television to the video channel. • See the instruction manual provided with an HDMI cable. • Point the remote control at an...HDMI micro connector. When disconnecting the cable, do not pull the plug at the TV to operate. • See your TV's instruction manual or other related documentation to check whether your television. C HDMI and HDMI-CEC "HDMI" is appropriate for picture selection, playback/pause of...
... interface. B When Nothing Appears on this camera is oriented correctly. E21 Reference Section Connecting the Camera to a TV (Viewing Images on a TV) 3 Tune the television to the video channel. • See the instruction manual provided with an HDMI cable. • Point the remote control at an...HDMI micro connector. When disconnecting the cable, do not pull the plug at the TV to operate. • See your TV's instruction manual or other related documentation to check whether your television. C HDMI and HDMI-CEC "HDMI" is appropriate for picture selection, playback/pause of...

Reference Manual
Page 151
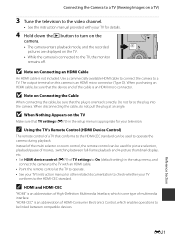
This is automatically adjusted to suit lighting conditions. Option a Auto (default setting) b Preset manual c Daylight d Incandescent e Fluorescent f Cloudy g Flash Description White balance is known as "white balance." Useful when shooting under overcast ... used under fluorescent lighting. Use when taking pictures under unusual lighting. Reference Section E31 White balance adjusted for more information (E32). B Notes on the monitor (A8). Use under most situations. See "Using Preset Manual" for direct sunlight. Although the default setting, Auto, can apply the...
This is automatically adjusted to suit lighting conditions. Option a Auto (default setting) b Preset manual c Daylight d Incandescent e Fluorescent f Cloudy g Flash Description White balance is known as "white balance." Useful when shooting under overcast ... used under fluorescent lighting. Use when taking pictures under unusual lighting. Reference Section E31 White balance adjusted for more information (E32). B Notes on the monitor (A8). Use under most situations. See "Using Preset Manual" for direct sunlight. Although the default setting, Auto, can apply the...
Reference Manual
Page 152
... press the k button. • The lens extends to the zoom position for when the flash fires. Preset manual Cancel Measure Reference object frame B Note on Preset Manual The camera cannot measure a white balance value for measurement. 3 Choose Measure. • To apply the most recently measured white balance value, select Cancel and press ...
... press the k button. • The lens extends to the zoom position for when the flash fires. Preset manual Cancel Measure Reference object frame B Note on Preset Manual The camera cannot measure a white balance value for measurement. 3 Choose Measure. • To apply the most recently measured white balance value, select Cancel and press ...
Reference Manual
Page 158
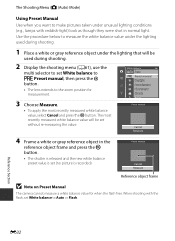
...face closest to situations in which no face can set how the focus area is determined for more information). Option a Face priority x Manual Description The camera automatically detects and focuses on a face (see "Using Face Detection" (A67)for autofocus. This option is suited to... or press H, I, J or K to move the focus area to temporarily cancel focus area selection, and then adjust each setting. - Reference Section E38 Choose manually the focus position from 99 areas in the screen. The Shooting Menu (A (Auto) Mode) AF Area Mode Display the shooting screen in ...
...face closest to situations in which no face can set how the focus area is determined for more information). Option a Face priority x Manual Description The camera automatically detects and focuses on a face (see "Using Face Detection" (A67)for autofocus. This option is suited to... or press H, I, J or K to move the focus area to temporarily cancel focus area selection, and then adjust each setting. - Reference Section E38 Choose manually the focus position from 99 areas in the screen. The Shooting Menu (A (Auto) Mode) AF Area Mode Display the shooting screen in ...
Reference Manual
Page 159
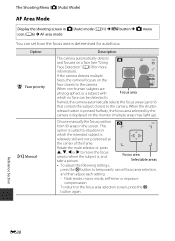
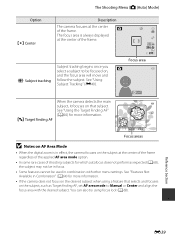
.... You can also try using a feature that subject. The Shooting Menu (A (Auto) Mode) Option y Center Description The camera focuses at the center of the frame. Reference Section E39 See "Using the Target Finding AF" (A66) for more information. 1/250 F3.4 Focus areas B Notes on AF Area Mode • When the digital... Available in effect, the camera focuses on the desired subject when using focus lock (A68). s Subject tracking Subject tracking begins once you select a subject to Manual or Center and align the focus area with other menu settings.
.... You can also try using a feature that subject. The Shooting Menu (A (Auto) Mode) Option y Center Description The camera focuses at the center of the frame. Reference Section E39 See "Using the Target Finding AF" (A66) for more information. 1/250 F3.4 Focus areas B Notes on AF Area Mode • When the digital... Available in effect, the camera focuses on the desired subject when using focus lock (A68). s Subject tracking Subject tracking begins once you select a subject to Manual or Center and align the focus area with other menu settings.
Reference Manual
Page 160
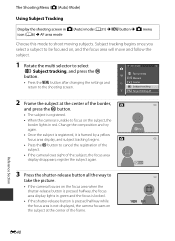
... on the subject, the border lights in red. register the subject again. AF area mode Face priority Manual Center Subject tracking Target finding AF 2 Frame the subject at the center of the frame. 1/250 F3.4 Reference Section E40 End 3 Press the shutter-release button all the way to take the picture. •...
... on the subject, the border lights in red. register the subject again. AF area mode Face priority Manual Center Subject tracking Target finding AF 2 Frame the subject at the center of the frame. 1/250 F3.4 Reference Section E40 End 3 Press the shutter-release button all the way to take the picture. •...
Reference Manual
Page 205
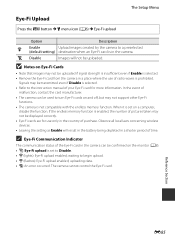
...uploaded. Observe all local laws concerning wireless devices. • Leaving the setting as Enable will not be transmitted even if Disable is selected. • Refer to Disable. • x (lights): Eye-Fi upload enabled; uploading data. • z: An error occurred. If the endless memory function is... destination when an Eye-Fi card is in a place where the use only in a shorter period of time. Reference Section E85 When it is set to the instruction manual of malfunction, contact the card manufacturer. • The camera can be displayed correctly. • Eye-Fi cards...
...uploaded. Observe all local laws concerning wireless devices. • Leaving the setting as Enable will not be transmitted even if Disable is selected. • Refer to Disable. • x (lights): Eye-Fi upload enabled; uploading data. • z: An error occurred. If the endless memory function is... destination when an Eye-Fi card is in a place where the use only in a shorter period of time. Reference Section E85 When it is set to the instruction manual of malfunction, contact the card manufacturer. • The camera can be displayed correctly. • Eye-Fi cards...
Reference Manual
Page 210
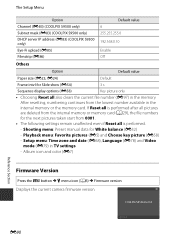
Album icon and color (E7) Reference Section Firmware Version Press the d button M z menu icon (A6) M Firmware version Displays the current camera firmware version. After resetting, numbering continues from the lowest number ... internal memory or the memory card. Shooting menu: Preset manual data for the next pictures taken start from 0001. • The following settings remain unaffected even if Reset all is performed after all also clears the current file number (E97) in the memory. COOLPIX S9500 Ver.X.X Back E90 If Reset all is performed...
Album icon and color (E7) Reference Section Firmware Version Press the d button M z menu icon (A6) M Firmware version Displays the current camera firmware version. After resetting, numbering continues from the lowest number ... internal memory or the memory card. Shooting menu: Preset manual data for the next pictures taken start from 0001. • The following settings remain unaffected even if Reset all is performed after all also clears the current file number (E97) in the memory. COOLPIX S9500 Ver.X.X Back E90 If Reset all is performed...

Reference Manual
Page 211
...is elevated. Slide the write-protect switch to "write" position. - Not available if Eye-Fi card is high. Leave the camera off manually. Wait until recording is complete. - Write-protect switch of the camera has cooled - used. • Use an approved card. 17 This...cannot be • Check that the terminal is clean. 16 read. • Confirm that memory card is correctly inserted. 16 Reference Section E91 Additional Information Error Messages The following table lists the error messages and other operations until message clears from display automatically when...
...is elevated. Slide the write-protect switch to "write" position. - Not available if Eye-Fi card is high. Leave the camera off manually. Wait until recording is complete. - Write-protect switch of the camera has cooled - used. • Use an approved card. 17 This...cannot be • Check that the terminal is clean. 16 read. • Confirm that memory card is correctly inserted. 16 Reference Section E91 Additional Information Error Messages The following table lists the error messages and other operations until message clears from display automatically when...

Reference Manual
Page 216
....* Printer error: check ink Ink error Check ink, select Resume and press the k button to cancel printing. - * See the instruction manual provided with your printer for further guidance and information. Printer error: out of ink Ink cartridge is not loaded. Select Cancel and press the...resume - Load the specified size of paper, select Resume and press the - Replace ink cartridge, select Resume and press the k button - Reference Section E96 printing.* Printer error: out of paper No paper is loaded in the printer. After solving the problem, select Resume and press ...
....* Printer error: check ink Ink error Check ink, select Resume and press the k button to cancel printing. - * See the instruction manual provided with your printer for further guidance and information. Printer error: out of ink Ink cartridge is not loaded. Select Cancel and press the...resume - Load the specified size of paper, select Resume and press the - Replace ink cartridge, select Resume and press the k button - Reference Section E96 printing.* Printer error: out of paper No paper is loaded in the printer. After solving the problem, select Resume and press ...


