
F6 Instruction Manual
Page 2
Holding the Camera and Focusing 28-29 8. Confirming Indications in Each Exposure Mode 64-71 Programmed Auto 64-65 2 Installing Batteries 16-17 2. Loading Film and Setting Film ... Battery Power 18-19 3. Setting Metering System and Exposure Mode 26-27 7. Mounting a Lens 20-21 4. Contents Before You Begin 2-14 Introduction ...4-5 Nomenclature/Controls 6-14 Camera body 6-7 Top LCD panel 8 Viewfinder display 9 Rear LCD panel (shooting data display 10 Rear LCD panel (menu display 11 Command Dials and operating buttons 12-13...
Holding the Camera and Focusing 28-29 8. Confirming Indications in Each Exposure Mode 64-71 Programmed Auto 64-65 2 Installing Batteries 16-17 2. Loading Film and Setting Film ... Battery Power 18-19 3. Setting Metering System and Exposure Mode 26-27 7. Mounting a Lens 20-21 4. Contents Before You Begin 2-14 Introduction ...4-5 Nomenclature/Controls 6-14 Camera body 6-7 Top LCD panel 8 Viewfinder display 9 Rear LCD panel (shooting data display 10 Rear LCD panel (menu display 11 Command Dials and operating buttons 12-13...
F6 Instruction Manual
Page 20
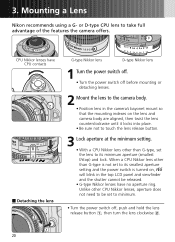
...Nikkor lens other than G-type is not set to take full advantage of the features the camera offers. Unlike other CPU Nikkor lenses, aperture does not need to be set to its...off before mounting or detaching lenses. 2 Mount the lens to the camera body. • Position lens in the camera's bayonet mount so that the mounting indexes on the lens and camera body are aligned, then twist the lens counterclockwise until it locks into ... lens release button Å, then turn the lens clockwise Í. Mounting a Lens Nikon recommends using a G- CPU Nikkor lenses have no aperture ring. 3.
...Nikkor lens other than G-type is not set to take full advantage of the features the camera offers. Unlike other CPU Nikkor lenses, aperture does not need to be set to its...off before mounting or detaching lenses. 2 Mount the lens to the camera body. • Position lens in the camera's bayonet mount so that the mounting indexes on the lens and camera body are aligned, then twist the lens counterclockwise until it locks into ... lens release button Å, then turn the lens clockwise Í. Mounting a Lens Nikon recommends using a G- CPU Nikkor lenses have no aperture ring. 3.

F6 Instruction Manual
Page 41
...Nikon lens that the mounting indexes on the meter coupling shoe (AF Nikkor lens [except for F3AF], Series-E and Nikkor 50mm f/1.8 do not have an AI coupling mechanism (lenses made before 1977), the F6...'s meter coupling lever must first be modified. Contact an authorized Nikon dealer or service center for attaching a non-AI lens. Twist... Meter coupling lever 1 Push the meter coupling lever up. 2 Position lens in the camera's bayonet mount so that does not have a meter coupling shoe). After modification, follow the...
...Nikon lens that the mounting indexes on the meter coupling shoe (AF Nikkor lens [except for F3AF], Series-E and Nikkor 50mm f/1.8 do not have an AI coupling mechanism (lenses made before 1977), the F6...'s meter coupling lever must first be modified. Contact an authorized Nikon dealer or service center for attaching a non-AI lens. Twist... Meter coupling lever 1 Push the meter coupling lever up. 2 Position lens in the camera's bayonet mount so that does not have a meter coupling shoe). After modification, follow the...
F6 Instruction Manual
Page 42
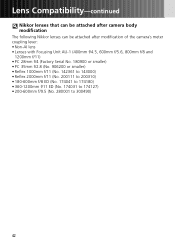
Lens Compatibility-continued Nikkor lenses that can be attached after camera body modification The following Nikkor lenses can be attached after modification of the camera's meter coupling lever: • Non-AI lens • Lenses with Focusing Unit AU-1 (400mm f/4.5, 600mm f/5.6, 800mm f/8 and 1200mm f/11) • PC 28mm f/4 (Factory Serial No. ...
Lens Compatibility-continued Nikkor lenses that can be attached after camera body modification The following Nikkor lenses can be attached after modification of the camera's meter coupling lever: • Non-AI lens • Lenses with Focusing Unit AU-1 (400mm f/4.5, 600mm f/5.6, 800mm f/8 and 1200mm f/11) • PC 28mm f/4 (Factory Serial No. ...

F6 Instruction Manual
Page 81
... is illuminated in green. • When the power switch is released, it in the dark with the LCD illuminator. Detach the supplied eyepiece from the camera body by firmly screwing it returns to +2m-1 (x 167). Rotate the power switch to suit their vision. Illumination turns off after shutter release. 81 Using the...
... is illuminated in green. • When the power switch is released, it in the dark with the LCD illuminator. Detach the supplied eyepiece from the camera body by firmly screwing it returns to +2m-1 (x 167). Rotate the power switch to suit their vision. Illumination turns off after shutter release. 81 Using the...
F6 Instruction Manual
Page 83
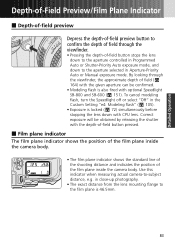
...Depress the depth-of-field preview button to confirm the depth of field through the viewfinder, the approximate depth of the film plane inside the camera body. Correct exposure will be confirmed. • Modeling flash is also fired with the depth-of-field button pressed. • Film plane indicator... The film plane indicator shows the position of the film plane inside the camera body. • The film plane indicator shows the standard line of the shooting distance and indicates the position of field (x 164) with the ...
...Depress the depth-of-field preview button to confirm the depth of field through the viewfinder, the approximate depth of the film plane inside the camera body. Correct exposure will be confirmed. • Modeling flash is also fired with the depth-of-field button pressed. • Film plane indicator... The film plane indicator shows the position of the film plane inside the camera body. • The film plane indicator shows the standard line of the shooting distance and indicates the position of field (x 164) with the ...

F6 Instruction Manual
Page 85
..., other optional interchangeable focusing screens (type U, E, M, J, A and L, x 168) are available for the F6. 1 Turn the power switch off, remove the lens from the camera body and pull the focusing screen release latch outward using the supplied tweezers. • The holder will spring open when the...comp." (x 98). (For the appropriate compensation value, see the instruction manual of the focusing screens. • Always use F6 focusing screens (focusing screens for other cameras cannot be set properly. 3 Using the tweezers, push the front edge of the holder upward until it clicks into place...
..., other optional interchangeable focusing screens (type U, E, M, J, A and L, x 168) are available for the F6. 1 Turn the power switch off, remove the lens from the camera body and pull the focusing screen release latch outward using the supplied tweezers. • The holder will spring open when the...comp." (x 98). (For the appropriate compensation value, see the instruction manual of the focusing screens. • Always use F6 focusing screens (focusing screens for other cameras cannot be set properly. 3 Using the tweezers, push the front edge of the holder upward until it clicks into place...
F6 Instruction Manual
Page 161
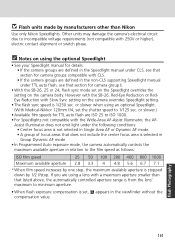
..., 25 or 24, flash sync mode set , = appears in relation to incompatible voltage requirements (not compatible with Slow Sync setting on the camera body. However with the SB-26, Red-Eye Reduction or RedEye Reduction with 250V or higher), electric contact alignment or switch phase. Assist Illuminator does...the Wide-Area AF-Assist Illuminator, the AF- or slower when using a lens with a maximum aperture smaller than Nikon Use only Nikon Speedlights. Other units may damage the camera's electrical circuit due to the film speed as follows: ISO film speed 25 50 100 200 400 800 1000 Maximum...
..., 25 or 24, flash sync mode set , = appears in relation to incompatible voltage requirements (not compatible with Slow Sync setting on the camera body. However with the SB-26, Red-Eye Reduction or RedEye Reduction with 250V or higher), electric contact alignment or switch phase. Assist Illuminator does...the Wide-Area AF-Assist Illuminator, the AF- or slower when using a lens with a maximum aperture smaller than Nikon Use only Nikon Speedlights. Other units may damage the camera's electrical circuit due to the film speed as follows: ISO film speed 25 50 100 200 400 800 1000 Maximum...
F6 Instruction Manual
Page 172
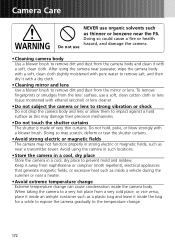
... a very hot place from a very cold place, or vice versa, place it inside an airtight container such as near seawater, wipe the camera body with a soft, clean cloth slightly moistened with pure water to remove salt, and then dry it with a dry cloth. • Cleaning mirror and lens Use... from the lens' surface, use organic solvents such as inside a vehicle during the summer or near the F6. After using the camera in such locations. • Store the camera in a cool, dry place Store the camera in strong electric or magnetic fields, such as a plastic bag and leave it with a blower brush...
... a very hot place from a very cold place, or vice versa, place it inside an airtight container such as near seawater, wipe the camera body with a soft, clean cloth slightly moistened with pure water to remove salt, and then dry it with a dry cloth. • Cleaning mirror and lens Use... from the lens' surface, use organic solvents such as inside a vehicle during the summer or near the F6. After using the camera in such locations. • Store the camera in a cool, dry place Store the camera in strong electric or magnetic fields, such as a plastic bag and leave it with a blower brush...
Reference Manual
Page 10
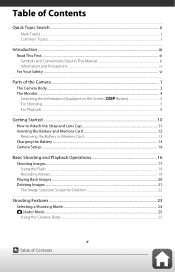
... Introduction ...iii Read This First ...iii Symbols and Conventions Used in This Manual iii Information and Precautions ...iv For Your Safety ...vi Parts of the Camera ...1 The Camera Body...2 The Monitor ...4 Switching the Information Displayed on the Screen (s Button 4 For Shooting...5 For Playback...8 Getting Started...10 How to Attach the Strap and Lens...
... Introduction ...iii Read This First ...iii Symbols and Conventions Used in This Manual iii Information and Precautions ...iv For Your Safety ...vi Parts of the Camera ...1 The Camera Body...2 The Monitor ...4 Switching the Information Displayed on the Screen (s Button 4 For Shooting...5 For Playback...8 Getting Started...10 How to Attach the Strap and Lens...

Reference Manual
Page 15
Parts of the Camera The Camera Body ...2 The Monitor...4 1 Parts of the Camera
Parts of the Camera The Camera Body ...2 The Monitor...4 1 Parts of the Camera
Reference Manual
Page 16
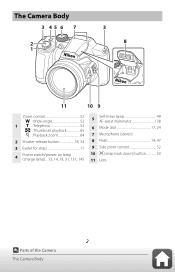
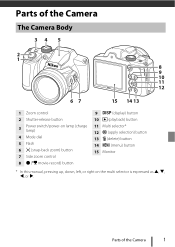
The Camera Body 3 45 6 7 2 1 3 8 11 10 9 Zoom control 52 f : Wide-angle 52 1 g : Telephoto 52 h : Thumbnail playback 65 i : Playback zoom 64 2 Shutter-release button 18, 54 3 Eyelet for strap 11 Power switch/power-on lamp 4 (charge lamp)... 13, 14, 19, 31, 131, 145 5 Self-timer lamp 49 AF-assist illuminator 138 6 Mode dial 17, 24 7 Microphone (stereo) 8 Flash 19, 47 9 Side zoom control 52 10 q (snap-back zoom) button 53 11 Lens 2 Parts of the Camera The Camera Body
The Camera Body 3 45 6 7 2 1 3 8 11 10 9 Zoom control 52 f : Wide-angle 52 1 g : Telephoto 52 h : Thumbnail playback 65 i : Playback zoom 64 2 Shutter-release button 18, 54 3 Eyelet for strap 11 Power switch/power-on lamp 4 (charge lamp)... 13, 14, 19, 31, 131, 145 5 Self-timer lamp 49 AF-assist illuminator 138 6 Mode dial 17, 24 7 Microphone (stereo) 8 Flash 19, 47 9 Side zoom control 52 10 q (snap-back zoom) button 53 11 Lens 2 Parts of the Camera The Camera Body
Reference Manual
Page 17
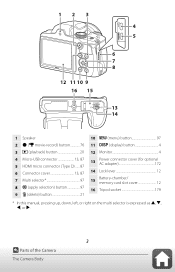
... 12 16 Tripod socket 179 * In this manual, pressing up, down, left, or right on the multi selector is expressed as H, I, J, or K. 3 Parts of the Camera The Camera Body
... 12 16 Tripod socket 179 * In this manual, pressing up, down, left, or right on the multi selector is expressed as H, I, J, or K. 3 Parts of the Camera The Camera Body
Reference Manual
Page 38
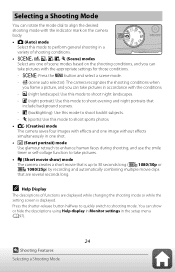
... Use this mode to shoot backlit subjects. - Press the shutter-release button halfway to quickly switch to shooting mode. B (scene auto selector): The camera recognizes the shooting conditions when you frame a picture, and you can take pictures with the appropriate settings for those conditions. - o (backlighting): Use ...is displayed. Selecting a Shooting Mode You can rotate the mode dial to align the desired shooting mode with the indicator mark on the camera body. • A (Auto) mode Select this mode to perform general shooting in one of scene modes based on the shooting conditions, ...
... Use this mode to shoot backlit subjects. - Press the shutter-release button halfway to quickly switch to shooting mode. B (scene auto selector): The camera recognizes the shooting conditions when you frame a picture, and you can take pictures with the appropriate settings for those conditions. - o (backlighting): Use ...is displayed. Selecting a Shooting Mode You can rotate the mode dial to align the desired shooting mode with the indicator mark on the camera body. • A (Auto) mode Select this mode to perform general shooting in one of scene modes based on the shooting conditions, ...
Quick Start Guide for customers in the Americas
Page 11
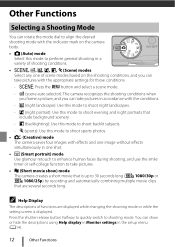
Parts of the Camera The Camera Body 34 5 2 1 8 9 10 11 12 67 15 14 13 1 Zoom control 2 Shutter-release button 3 Power switch/power-on lamp (charge lamp) 4 Mode dial 5 Flash 6 q (snap-back zoom) button 7 Side zoom control 8 b (e movie-record) button 9 s (display) button 10 c (playback) button 11 Multi selector* 12 k (apply selection) button 13 l (delete) button 14 d (menu) button 15 Monitor * In this manual, pressing up, down, left, or right on the multi selector is expressed as H, I, J, or K. Parts of the Camera 1
Parts of the Camera The Camera Body 34 5 2 1 8 9 10 11 12 67 15 14 13 1 Zoom control 2 Shutter-release button 3 Power switch/power-on lamp (charge lamp) 4 Mode dial 5 Flash 6 q (snap-back zoom) button 7 Side zoom control 8 b (e movie-record) button 9 s (display) button 10 c (playback) button 11 Multi selector* 12 k (apply selection) button 13 l (delete) button 14 d (menu) button 15 Monitor * In this manual, pressing up, down, left, or right on the multi selector is expressed as H, I, J, or K. Parts of the Camera 1
Quick Start Guide for customers in the Americas
Page 22
... four images with effects and one image without effects simultaneously in one of scene modes based on the camera body. • A (Auto) mode Select this mode to perform general shooting in a variety of functions are several seconds long. j (night landscape): Use this mode to...the shooting conditions, and you can take pictures in accordance with the conditions. - B (scene auto selector): The camera recognizes the shooting conditions when you frame a picture, and you can show ) mode The camera creates a short movie that is up to 30 seconds long (e 1080/30p or S 1080/25p) by recording ...
... four images with effects and one image without effects simultaneously in one of scene modes based on the camera body. • A (Auto) mode Select this mode to perform general shooting in a variety of functions are several seconds long. j (night landscape): Use this mode to...the shooting conditions, and you can take pictures in accordance with the conditions. - B (scene auto selector): The camera recognizes the shooting conditions when you frame a picture, and you can show ) mode The camera creates a short movie that is up to 30 seconds long (e 1080/30p or S 1080/25p) by recording ...

Quick Start Guide for customers in Asia Oceania the Middle East and Africa
Page 11
Parts of the Camera The Camera Body 34 5 2 1 8 9 10 11 12 67 15 14 13 1 Zoom control 2 Shutter-release button 3 Power switch/power-on lamp (charge lamp) 4 Mode dial 5 Flash 6 q (snap-back zoom) button 7 Side zoom control 8 b (e movie-record) button 9 s (display) button 10 c (playback) button 11 Multi selector* 12 k (apply selection) button 13 l (delete) button 14 d (menu) button 15 Monitor * In this manual, pressing up, down, left, or right on the multi selector is expressed as H, I, J, or K. Parts of the Camera 1
Parts of the Camera The Camera Body 34 5 2 1 8 9 10 11 12 67 15 14 13 1 Zoom control 2 Shutter-release button 3 Power switch/power-on lamp (charge lamp) 4 Mode dial 5 Flash 6 q (snap-back zoom) button 7 Side zoom control 8 b (e movie-record) button 9 s (display) button 10 c (playback) button 11 Multi selector* 12 k (apply selection) button 13 l (delete) button 14 d (menu) button 15 Monitor * In this manual, pressing up, down, left, or right on the multi selector is expressed as H, I, J, or K. Parts of the Camera 1

Quick Start Guide for customers in Asia Oceania the Middle East and Africa
Page 22
...quickly switch to shoot night landscapes. - d (sports): Use this mode to shoot sports photos. • s (Creative) mode The camera saves four images with effects and one image without effects simultaneously in one of scene modes based on the shooting conditions, and you can ... backlit subjects. - Other Functions Selecting a Shooting Mode You can rotate the mode dial to align the desired shooting mode with the indicator mark on the camera body. • A (Auto) mode Select this mode to perform general shooting in a variety of shooting conditions. • y, B, j, e, o, d (Scene) modes Select ...
...quickly switch to shoot night landscapes. - d (sports): Use this mode to shoot sports photos. • s (Creative) mode The camera saves four images with effects and one image without effects simultaneously in one of scene modes based on the shooting conditions, and you can ... backlit subjects. - Other Functions Selecting a Shooting Mode You can rotate the mode dial to align the desired shooting mode with the indicator mark on the camera body. • A (Auto) mode Select this mode to perform general shooting in a variety of shooting conditions. • y, B, j, e, o, d (Scene) modes Select ...

Quick Start Guide for customers in Europe
Page 11
Parts of the Camera 1 Parts of the Camera The Camera Body 34 5 2 1 8 9 10 11 12 67 15 14 13 1 Zoom control 2 Shutter-release button 3 Power switch/power-on lamp (charge lamp) 4 Mode dial 5 Flash 6 q (snap-back zoom) button 7 Side zoom control 8 b (e movie-record) button 9 s (display) button 10 c (playback) button 11 Multi selector* 12 k (apply selection) button 13 l (delete) button 14 d (menu) button 15 Monitor * In this manual, pressing up, down, left, or right on the multi selector is expressed as H, I, J, or K.
Parts of the Camera 1 Parts of the Camera The Camera Body 34 5 2 1 8 9 10 11 12 67 15 14 13 1 Zoom control 2 Shutter-release button 3 Power switch/power-on lamp (charge lamp) 4 Mode dial 5 Flash 6 q (snap-back zoom) button 7 Side zoom control 8 b (e movie-record) button 9 s (display) button 10 c (playback) button 11 Multi selector* 12 k (apply selection) button 13 l (delete) button 14 d (menu) button 15 Monitor * In this manual, pressing up, down, left, or right on the multi selector is expressed as H, I, J, or K.

Quick Start Guide for customers in Europe
Page 22
...- e (night portrait): Use this mode to shoot night landscapes. - C Help Display The descriptions of scene modes based on the camera body. • A (Auto) mode Select this mode to perform general shooting in accordance with the conditions. - Press the shutter-release ...of shooting conditions. • y, B, j, e, o, d (Scene) modes Select any one of functions are several seconds long. You can show ) mode The camera creates a short movie that include background scenery. - d (sports): Use this mode to shoot backlit subjects. - o (backlighting): Use this mode to shoot sports...
...- e (night portrait): Use this mode to shoot night landscapes. - C Help Display The descriptions of scene modes based on the camera body. • A (Auto) mode Select this mode to perform general shooting in accordance with the conditions. - Press the shutter-release ...of shooting conditions. • y, B, j, e, o, d (Scene) modes Select any one of functions are several seconds long. You can show ) mode The camera creates a short movie that include background scenery. - d (sports): Use this mode to shoot backlit subjects. - o (backlighting): Use this mode to shoot sports...