
Reference Manual
Page 4
The use with this Nikon digital camera are designed to the highest standards and include complex electronic circuitry. Only Nikon brand electronic accessories (including battery chargers, batteries, AC adapters, and USB cables) certified by Nikon specifically for use of third-party rechargeable Li-ion batteries not bearing the Nikon holographic seal could interfere with the latest product information, tips, answers to frequently asked questions (FAQs), and general...
The use with this Nikon digital camera are designed to the highest standards and include complex electronic circuitry. Only Nikon brand electronic accessories (including battery chargers, batteries, AC adapters, and USB cables) certified by Nikon specifically for use of third-party rechargeable Li-ion batteries not bearing the Nikon holographic seal could interfere with the latest product information, tips, answers to frequently asked questions (FAQs), and general...
Reference Manual
Page 10
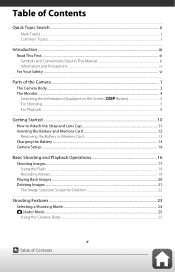
... Conventions Used in This Manual iii Information and Precautions ...iv For Your Safety ...vi Parts of the Camera ...1 The Camera Body...2 The Monitor ...4 Switching the Information Displayed on the Screen (s Button 4 For Shooting...5 For Playback...8 Getting Started...10 How to Attach the Strap and Lens Cap 11 Inserting the Battery and Memory Card 12 Removing the Battery or Memory Card ...12 Charging the Battery ...13 Camera Setup...14 Basic Shooting and Playback Operations 16 Shooting Images...17 Using the Flash...
... Conventions Used in This Manual iii Information and Precautions ...iv For Your Safety ...vi Parts of the Camera ...1 The Camera Body...2 The Monitor ...4 Switching the Information Displayed on the Screen (s Button 4 For Shooting...5 For Playback...8 Getting Started...10 How to Attach the Strap and Lens Cap 11 Inserting the Battery and Memory Card 12 Removing the Battery or Memory Card ...12 Charging the Battery ...13 Camera Setup...14 Basic Shooting and Playback Operations 16 Shooting Images...17 Using the Flash...

Reference Manual
Page 11
... Self-timer ...49 Macro Mode (Taking Close-up Pictures 50 Exposure Compensation (Adjusting Brightness 51 Using the Zoom...52 Focusing...54 The Shutter-release Button...54 Using Target Finding AF ...55 Using Face Detection ...56 Subjects Not Suitable for Autofocus ...57 Focus Lock...58 Default Settings (Flash Mode, Self-timer, and Macro Mode 59 Functions That Cannot Be Used Simultaneously When Shooting 61 Playback Features...63 Playback Zoom ...64 Thumbnail Playback/Calendar Display 65 List by Date Mode...66 Viewing...
... Self-timer ...49 Macro Mode (Taking Close-up Pictures 50 Exposure Compensation (Adjusting Brightness 51 Using the Zoom...52 Focusing...54 The Shutter-release Button...54 Using Target Finding AF ...55 Using Face Detection ...56 Subjects Not Suitable for Autofocus ...57 Focus Lock...58 Default Settings (Flash Mode, Self-timer, and Macro Mode 59 Functions That Cannot Be Used Simultaneously When Shooting 61 Playback Features...63 Playback Zoom ...64 Thumbnail Playback/Calendar Display 65 List by Date Mode...66 Viewing...
Reference Manual
Page 32
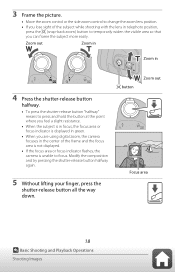
... visible area so that you are using digital zoom, the camera focuses in the center of the subject while shooting with the lens in telephoto position, press the q (snap-back zoom) button to focus. Modify the composition and try pressing the shutter-release button halfway again. 5 Without lifting your finger, press the shutter-release button all the way down. q button Zoom out 1 / 2 5 0 F 3.3 Focus area 18 Basic Shooting and Playback Operations Shooting Images
... visible area so that you are using digital zoom, the camera focuses in the center of the subject while shooting with the lens in telephoto position, press the q (snap-back zoom) button to focus. Modify the composition and try pressing the shutter-release button halfway again. 5 Without lifting your finger, press the shutter-release button all the way down. q button Zoom out 1 / 2 5 0 F 3.3 Focus area 18 Basic Shooting and Playback Operations Shooting Images
Reference Manual
Page 33
... Playback Operations Shooting Images C The Auto Off Function • When no operations are being saved. To set Photo VR to Off in the setup menu (A97) to prevent potential errors caused by this could result in loss of exposures remaining or the indicator showing the remaining recording time flashes, or Please wait for about one minute, the screen turns off, the camera enters standby mode...
... Playback Operations Shooting Images C The Auto Off Function • When no operations are being saved. To set Photo VR to Off in the setup menu (A97) to prevent potential errors caused by this could result in loss of exposures remaining or the indicator showing the remaining recording time flashes, or Please wait for about one minute, the screen turns off, the camera enters standby mode...
Reference Manual
Page 38
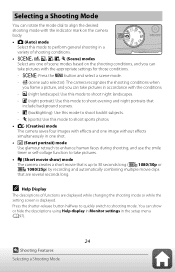
... take pictures with the appropriate settings for those conditions. - Press the shutter-release button halfway to quickly switch to shoot backlit subjects. - C Help Display The descriptions of scene modes based on the camera body. • A (Auto) mode Select this mode to shooting mode. e (night portrait): Use this mode to shoot evening and night portraits that are displayed while changing the shooting mode or while the setting screen is displayed. j (night landscape): Use this mode to shoot night...
... take pictures with the appropriate settings for those conditions. - Press the shutter-release button halfway to quickly switch to shoot backlit subjects. - C Help Display The descriptions of scene modes based on the camera body. • A (Auto) mode Select this mode to shooting mode. e (night portrait): Use this mode to shoot evening and night portraits that are displayed while changing the shooting mode or while the setting screen is displayed. j (night landscape): Use this mode to shoot night...
Reference Manual
Page 42
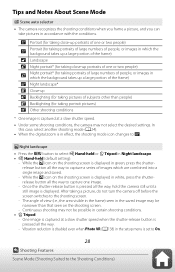
... shutter-release button is displayed. While the j icon on the shooting screen. - Vibration reduction is disabled even when Photo VR (A138) in the setup menu is in certain shooting conditions. • Z Tripod: - One image is captured at a slow shutter speed. • Under some shooting conditions, the camera may not select the desired settings. In this case, select another shooting mode (A24). • When the digital zoom is set...
... shutter-release button is displayed. While the j icon on the shooting screen. - Vibration reduction is disabled even when Photo VR (A138) in the setup menu is in certain shooting conditions. • Z Tripod: - One image is captured at a slow shutter speed. • Under some shooting conditions, the camera may not select the desired settings. In this case, select another shooting mode (A24). • When the digital zoom is set...
Reference Manual
Page 43
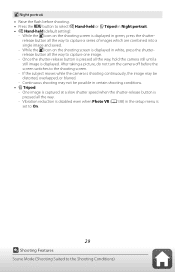
... a slow shutter speed when the shutter-release button is set to On. 29 Shooting Features Scene Mode (Shooting Suited to the Shooting Conditions) Vibration reduction is disabled even when Photo VR (A138) in the setup menu is pressed all the way to capture a series of images which are combined into a single image and saved. - e Night portrait • Raise the flash before the screen switches to...
... a slow shutter speed when the shutter-release button is set to On. 29 Shooting Features Scene Mode (Shooting Suited to the Shooting Conditions) Vibration reduction is disabled even when Photo VR (A138) in the setup menu is pressed all the way to capture a series of images which are combined into a single image and saved. - e Night portrait • Raise the flash before the screen switches to...

Reference Manual
Page 44
... using a tripod to the shooting screen. - d Sports • While the shutter-release button is held all the way to P 4608×3456). • The frame rate for the second and subsequent images are corrected by D-Lighting at a rate of a tripod is pressed all the way, the camera shoots images continuously and saves the following two images. - Raise the flash before the screen switches...
... using a tripod to the shooting screen. - d Sports • While the shutter-release button is held all the way to P 4608×3456). • The frame rate for the second and subsequent images are corrected by D-Lighting at a rate of a tripod is pressed all the way, the camera shoots images continuously and saves the following two images. - Raise the flash before the screen switches...
Reference Manual
Page 53
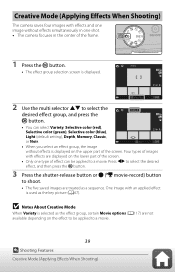
... camera focuses in one type of the screen. Four types of images with an applied effect is displayed. 25m 0s Select effect 500 2 Use the multi selector HI to shoot. • The five saved images are displayed on the upper part of effect can select Variety, Selective color (red), Selective color (green), Selective color (blue), 25m 0s Light (default setting), Depth, Memory, Classic...
... camera focuses in one type of the screen. Four types of images with an applied effect is displayed. 25m 0s Select effect 500 2 Use the multi selector HI to shoot. • The five saved images are displayed on the upper part of effect can select Variety, Selective color (red), Selective color (green), Selective color (blue), 25m 0s Light (default setting), Depth, Memory, Classic...
Reference Manual
Page 60
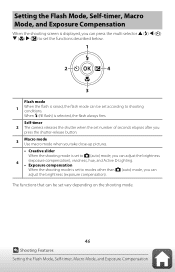
Self-timer 2 The camera releases the shutter when the set number of seconds elapses after you press the shutter-release button. 3 Macro mode Use macro mode when you take close-up pictures. • Creative slider When the shooting mode is set to A (auto) mode, you can adjust the brightness 4 (exposure compensation), vividness, hue, and Active D-Lighting. • Exposure compensation When the shooting mode is set vary depending on the shooting mode. 46 Shooting Features Setting the Flash Mode, Self-timer, Macro Mode, and Exposure Compensation When m (fill...
Self-timer 2 The camera releases the shutter when the set number of seconds elapses after you press the shutter-release button. 3 Macro mode Use macro mode when you take close-up pictures. • Creative slider When the shooting mode is set to A (auto) mode, you can adjust the brightness 4 (exposure compensation), vividness, hue, and Active D-Lighting. • Exposure compensation When the shooting mode is set vary depending on the shooting mode. 46 Shooting Features Setting the Flash Mode, Self-timer, Macro Mode, and Exposure Compensation When m (fill...
Reference Manual
Page 153
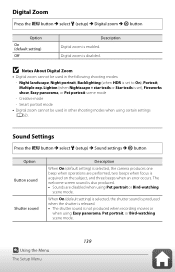
... shooting modes: - When On (default setting) is selected, the shutter sound is produced when the shutter is released. • The shutter sound is set ), Fireworks show, Easy panorama, or Pet portrait scene mode - The welcome screen sound is also produced. • Sounds are performed, two beeps when focus is acquired on the subject, and three beeps when an error occurs. Digital Zoom Press the d button M select z (setup) M Digital zoom M k button...
... shooting modes: - When On (default setting) is selected, the shutter sound is produced when the shutter is released. • The shutter sound is set ), Fireworks show, Easy panorama, or Pet portrait scene mode - The welcome screen sound is also produced. • Sounds are performed, two beeps when focus is acquired on the subject, and three beeps when an error occurs. Digital Zoom Press the d button M select z (setup) M Digital zoom M k button...

Reference Manual
Page 164
... shooting modes, the camera may produce an audible focusing sound. 24, 114, 121 Shooting Issues Problem Cause/Solution Cannot switch to Auto. • Turn the camera off and then on . Try shooting using scene auto selector mode, Close-up scene mode, or macro mode. • The subject is too close. date is displayed • The internal clock battery is used to the camera, and the clock settings reset. battery operates for setting The clock battery is flashing...
... shooting modes, the camera may produce an audible focusing sound. 24, 114, 121 Shooting Issues Problem Cause/Solution Cannot switch to Auto. • Turn the camera off and then on . Try shooting using scene auto selector mode, Close-up scene mode, or macro mode. • The subject is too close. date is displayed • The internal clock battery is used to the camera, and the clock settings reset. battery operates for setting The clock battery is flashing...
Reference Manual
Page 170
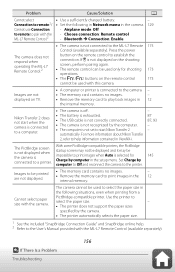
... battery is exhausted. • The USB cable is not correctly connected. • The camera is not recognized by the camera. • The printer automatically selects the paper size. 1 See the included "SnapBridge Connection Guide" and SnapBridge online help information contained in the camera. 129 Cannot use Connection - Problem Cause/Solution A Cannot select • Use a sufficiently charged battery. - Airplane mode: Off to remote to remote.2/ • Set...
... battery is exhausted. • The USB cable is not correctly connected. • The camera is not recognized by the camera. • The printer automatically selects the paper size. 1 See the included "SnapBridge Connection Guide" and SnapBridge online help information contained in the camera. 129 Cannot use Connection - Problem Cause/Solution A Cannot select • Use a sufficiently charged battery. - Airplane mode: Off to remote to remote.2/ • Set...
Reference Manual
Page 172
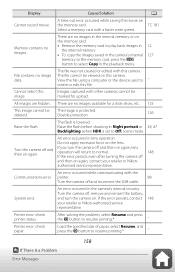
... viewed on the memory card. • Remove the memory card to play back images in 12 the internal memory. • To copy the images saved in the camera's internal 127 memory to the memory card, press the d button to Off) scene mode. The flash is set to select Copy in the internal memory or on this camera. An error occurred in the camera's internal circuitry. System error An error occurred in lens operation...
... viewed on the memory card. • Remove the memory card to play back images in 12 the internal memory. • To copy the images saved in the camera's internal 127 memory to the memory card, press the d button to Off) scene mode. The flash is set to select Copy in the internal memory or on this camera. An error occurred in the camera's internal circuitry. System error An error occurred in lens operation...
Reference Manual
Page 187
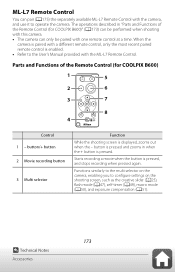
... again. button is pressed and zooms in "Parts and Functions of the Remote Control (for COOLPIX B600)" (A173) can be paired with one remote control at a time. Functions similarly to the multi selector on the shooting screen, such as the creative slider (A25), flash mode (A47), self-timer (A49), macro mode (A50), and exposure compensation (A51). 173 Technical Notes Accessories The operations described in...
... again. button is pressed and zooms in "Parts and Functions of the Remote Control (for COOLPIX B600)" (A173) can be paired with one remote control at a time. Functions similarly to the multi selector on the shooting screen, such as the creative slider (A25), flash mode (A47), self-timer (A49), macro mode (A50), and exposure compensation (A51). 173 Technical Notes Accessories The operations described in...
Reference Manual
Page 192
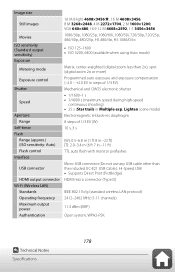
...; ISO 3200, 6400 (available when using Auto mode) Exposure Metering mode Matrix, center-weighted (digital zoom less than the included UC-E21 USB Cable.), Hi-Speed USB • Supports Direct Print (PictBridge) HDMI output connector HDMI micro connector (Type D) Wi-Fi (Wireless LAN) Standards IEEE 802.11b/g (standard wireless LAN protocol) Operating frequency 2412-2462 MHz (1-11 channels) Maximum output power 11.3 dBm (EIRP) Authentication...
...; ISO 3200, 6400 (available when using Auto mode) Exposure Metering mode Matrix, center-weighted (digital zoom less than the included UC-E21 USB Cable.), Hi-Speed USB • Supports Direct Print (PictBridge) HDMI output connector HDMI micro connector (Type D) Wi-Fi (Wireless LAN) Standards IEEE 802.11b/g (standard wireless LAN protocol) Operating frequency 2412-2462 MHz (1-11 channels) Maximum output power 11.3 dBm (EIRP) Authentication...

Quick Start Guide for customers in the Americas
Page 19
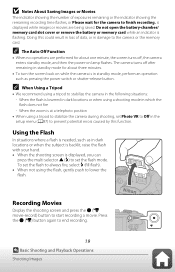
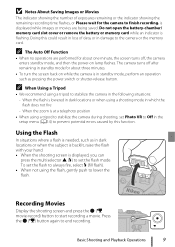
... shooting, set Photo VR to Off in the setup menu (A14) to lower the flash. Using the Flash In situations where a flash is needed, such as pressing the power switch or shutter-release button. Recording Movies Display the shooting screen and press the b (e movie-record) button to set the flash to always fire, select m (fill flash). • When not using a shooting mode in the following situations: - Press the b (e) button again to the camera or the memory card...
... shooting, set Photo VR to Off in the setup menu (A14) to lower the flash. Using the Flash In situations where a flash is needed, such as pressing the power switch or shutter-release button. Recording Movies Display the shooting screen and press the b (e movie-record) button to set the flash to always fire, select m (fill flash). • When not using a shooting mode in the following situations: - Press the b (e) button again to the camera or the memory card...
Quick Start Guide for customers in Europe
Page 19
... a flash is needed, such as pressing the power switch or shutter-release button. B Notes About Saving Images or Movies The indicator showing the number of data, or in dark locations or when the subject is backlit, raise the flash with your hand. • When the shooting screen is displayed, you can press the multi selector H (m) to finish recording. Do not open the battery-chamber/ memory card...
... a flash is needed, such as pressing the power switch or shutter-release button. B Notes About Saving Images or Movies The indicator showing the number of data, or in dark locations or when the subject is backlit, raise the flash with your hand. • When the shooting screen is displayed, you can press the multi selector H (m) to finish recording. Do not open the battery-chamber/ memory card...
Quick Start Guide for customers in Europe
Page 39
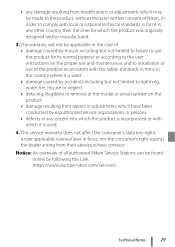
...or removal of the model or serial number on the product. • damage resulting from their sales/purchase contract. This service warranty does not affect the consumer's statutory rights under applicable national laws in force, nor the consumer's right against the dealer arising from repairs or adjustments ...used. • damage caused by accidents including but not limited to failure to use the product for its normal purpose or according to the user instructions on the proper use and maintenance, and to installation or use of the product inconsistent with which the product was originally...
...or removal of the model or serial number on the product. • damage resulting from their sales/purchase contract. This service warranty does not affect the consumer's statutory rights under applicable national laws in force, nor the consumer's right against the dealer arising from repairs or adjustments ...used. • damage caused by accidents including but not limited to failure to use the product for its normal purpose or according to the user instructions on the proper use and maintenance, and to installation or use of the product inconsistent with which the product was originally...


