

Reference Manual
Page 1
DIGITAL CAMERA Reference Manual • Read this manual thoroughly before using the camera. • To ensure proper use of the camera, be sure to read "For Your Safety" (page vi). • After reading this manual, keep it in a readily accessible place for future reference.
DIGITAL CAMERA Reference Manual • Read this manual thoroughly before using the camera. • To ensure proper use of the camera, be sure to read "For Your Safety" (page vi). • After reading this manual, keep it in a readily accessible place for future reference.
Reference Manual
Page 3
...the time of purchase is referred to as "memory cards" in bold. • In this manual, images are referred to as the "default setting." • The names of menu items displayed on the camera screen, and the names of each page to display "Quick Topic Search" Symbol Description This ...icon marks cautions and information that should be read before using the camera. This icon marks notes and information that screen indicators can be more clearly shown. iii Introduction Read This First This icon marks other ...
...the time of purchase is referred to as "memory cards" in bold. • In this manual, images are referred to as the "default setting." • The names of menu items displayed on the camera screen, and the names of each page to display "Quick Topic Search" Symbol Description This ...icon marks cautions and information that should be read before using the camera. This icon marks notes and information that screen indicators can be more clearly shown. iii Introduction Read This First This icon marks other ...
Reference Manual
Page 5
... in a retrieval system, or translated into any language in any form, by any means, without Nikon's prior written permission. • Illustrations and screen content shown in this manual may be restricted in the case of photographs or recordings of such data is accurate and complete, we... all data in the device using commercially available software, potentially resulting in the malicious use , but note that the camera complies with the camera can sometimes be recovered from discarded storage devices using commercial deletion software, or format the device in Format memory or Format...
... in a retrieval system, or translated into any language in any form, by any means, without Nikon's prior written permission. • Illustrations and screen content shown in this manual may be restricted in the case of photographs or recordings of such data is accurate and complete, we... all data in the device using commercially available software, potentially resulting in the malicious use , but note that the camera complies with the camera can sometimes be recovered from discarded storage devices using commercial deletion software, or format the device in Format memory or Format...
Reference Manual
Page 10
... Common Topics ...ii Introduction ...iii Read This First ...iii Symbols and Conventions Used in This Manual iii Information and Precautions ...iv For Your Safety ...vi Parts of the Camera ...1 The Camera Body...2 The Monitor ...4 Switching the Information Displayed on the Screen (s Button 4 For Shooting...5... For Playback...8 Getting Started...10 How to Attach the Strap and Lens Cap 11 Inserting the ...
... Common Topics ...ii Introduction ...iii Read This First ...iii Symbols and Conventions Used in This Manual iii Information and Precautions ...iv For Your Safety ...vi Parts of the Camera ...1 The Camera Body...2 The Monitor ...4 Switching the Information Displayed on the Screen (s Button 4 For Shooting...5... For Playback...8 Getting Started...10 How to Attach the Strap and Lens Cap 11 Inserting the ...
Reference Manual
Page 17
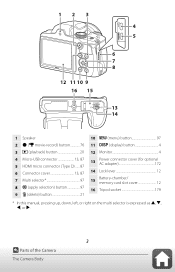
... 15 4 5 6 7 8 13 14 1 Speaker 2 b (e movie-record) button 76 3 c (playback) button 20 10 d (menu) button 97 11 s (display) button 4 12 Monitor 4 4 Micro-USB connector 13, 87 5 HDMI micro connector (Type D) ...... 87 6 Connector cover 13, 87 7 Multi selector 97 8 k (... cover (for optional 13 AC adapter 172 14 Lock lever 12 Battery-chamber/ 15 memory card slot cover 12 16 Tripod socket 179 * In this manual, pressing up, down, left, or right on the multi selector is expressed as H, I, J, or K. 3 Parts of the...
... 15 4 5 6 7 8 13 14 1 Speaker 2 b (e movie-record) button 76 3 c (playback) button 20 10 d (menu) button 97 11 s (display) button 4 12 Monitor 4 4 Micro-USB connector 13, 87 5 HDMI micro connector (Type D) ...... 87 6 Connector cover 13, 87 7 Multi selector 97 8 k (... cover (for optional 13 AC adapter 172 14 Lock lever 12 Battery-chamber/ 15 memory card slot cover 12 16 Tripod socket 179 * In this manual, pressing up, down, left, or right on the multi selector is expressed as H, I, J, or K. 3 Parts of the...
Reference Manual
Page 21
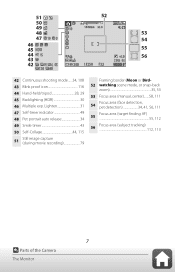
... 51 Still image capture (during movie recording 79 Framing border (Moon or Bird52 watching scene mode, or snap-back zoom 35, 53 53 Focus area (manual, center).......58, 111 54 Focus area (face detection, pet detection 34, 41, 56, 111 Focus area (target finding AF) 55 55, 112 56 Focus... area (subject tracking 112, 113 7 Parts of the Camera The Monitor 51 52 50 49 10 1440mm x2.0 48 53 47 10 3 54 46 45 HDR 55 44 +1.0 56 43 29m 0s 42 H L 120 60 2 0 0 1 / 2 5 0 F 3.3 999 42 Continuous shooting mode...
... 51 Still image capture (during movie recording 79 Framing border (Moon or Bird52 watching scene mode, or snap-back zoom 35, 53 53 Focus area (manual, center).......58, 111 54 Focus area (face detection, pet detection 34, 41, 56, 111 Focus area (target finding AF) 55 55, 112 56 Focus... area (subject tracking 112, 113 7 Parts of the Camera The Monitor 51 52 50 49 10 1440mm x2.0 48 53 47 10 3 54 46 45 HDR 55 44 +1.0 56 43 29m 0s 42 H L 120 60 2 0 0 1 / 2 5 0 F 3.3 999 42 Continuous shooting mode...

Reference Manual
Page 74
1 The camera automatically selects the flash mode appropriate for the shooting conditions it has selected. When set to ... flash mode is fixed at auto with red-eye reduction flash mode. 7 Y Pet portrait auto release can be changed. The camera enters macro mode when i is set to On, the flash cannot be used. 9 a Smile timer (A43) and n Self-Collage (A44...) can be selected manually. 2 Cannot be used in addition to slow sync with red-eye reduction. The flash does not fire when HDR is selected. 3 Cannot...
1 The camera automatically selects the flash mode appropriate for the shooting conditions it has selected. When set to ... flash mode is fixed at auto with red-eye reduction flash mode. 7 Y Pet portrait auto release can be changed. The camera enters macro mode when i is set to On, the flash cannot be used. 9 a Smile timer (A43) and n Self-Collage (A44...) can be selected manually. 2 Cannot be used in addition to slow sync with red-eye reduction. The flash does not fire when HDR is selected. 3 Cannot...

Reference Manual
Page 120
... see with your eyes. Use under overcast skies. Use with Auto, Incandescent, etc. (A107). The Shooting Menu (for A (Auto) Mode) Option a Auto (default setting) b Preset manual c Daylight d Incandescent e Fluorescent f Cloudy g Flash Description White balance is not achieved with the flash. Use under fluorescent lighting. Use when the desired result is automatically...
... see with your eyes. Use under overcast skies. Use with Auto, Incandescent, etc. (A107). The Shooting Menu (for A (Auto) Mode) Option a Auto (default setting) b Preset manual c Daylight d Incandescent e Fluorescent f Cloudy g Flash Description White balance is not achieved with the flash. Use under fluorescent lighting. Use when the desired result is automatically...

Reference Manual
Page 121
...the k button. • The lens extends to Auto or Flash. 107 Using the Menu The Shooting Menu (for measurement. Using Preset Manual Follow the procedures described below to measure the white balance value under the lighting used during shooting. 1 Place a white or gray reference ...object under the lighting that will be measured with Preset manual. Preset manual 4 Frame the white or gray reference object in the measuring window, and press the k button to measure the value. • The shutter...
...the k button. • The lens extends to Auto or Flash. 107 Using the Menu The Shooting Menu (for measurement. Using Preset Manual Follow the procedures described below to measure the white balance value under the lighting used during shooting. 1 Place a white or gray reference ...object under the lighting that will be measured with Preset manual. Preset manual 4 Frame the white or gray reference object in the measuring window, and press the k button to measure the value. • The shutter...

Reference Manual
Page 125
.... AF Area Mode Rotate the mode dial to A M d button M select A (shooting menu) M AF area mode M k button Set how the camera selects the focus area for A (Auto) Mode) See "Using Face Detection" (A56) for more of movable focus area Focus area 111 Using the Menu The... Shooting Menu (for autofocus. a Face priority x Manual When framing a composition with no human subjects or detected faces, the camera automatically selects one or more information. Focus area 25m 0s 500 1 / 2 5 0 F 3.3 Focus areas Scope of...
.... AF Area Mode Rotate the mode dial to A M d button M select A (shooting menu) M AF area mode M k button Set how the camera selects the focus area for A (Auto) Mode) See "Using Face Detection" (A56) for more of movable focus area Focus area 111 Using the Menu The... Shooting Menu (for autofocus. a Face priority x Manual When framing a composition with no human subjects or detected faces, the camera automatically selects one or more information. Focus area 25m 0s 500 1 / 2 5 0 F 3.3 Focus areas Scope of...

Reference Manual
Page 151
... whether to cancel the self-timer after shooting. • After shooting in self-timer mode The self-timer photography continues after shooting. • When the camera is turned off, self-timer is canceled. • Self-Collage is canceled after using it to shoot (A49). Option Exit self-timer mode (default setting... Using the Menu The Setup Menu Lighten or Moon scene mode, self-timer is set the self-timer setting to n3s (3 seconds). To end selftimer, manually set to k. • Pet portrait auto release and Smile timer are not canceled.
... whether to cancel the self-timer after shooting. • After shooting in self-timer mode The self-timer photography continues after shooting. • When the camera is turned off, self-timer is canceled. • Self-Collage is canceled after using it to shoot (A49). Option Exit self-timer mode (default setting... Using the Menu The Setup Menu Lighten or Moon scene mode, self-timer is set the self-timer setting to n3s (3 seconds). To end selftimer, manually set to k. • Pet portrait auto release and Smile timer are not canceled.
Reference Manual
Page 170
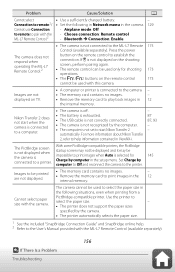
... pairing again. • The remote control can be used only for Charge by computer in 12 the internal memory. Nikon Transfer 2 does not start Nikon Transfer 2 automatically. With some PictBridge-compatible printers, the PictBridge startup screen may not be displayed and it may be printed...• The printer does not support the paper sizes specified by computer to Off and reconnect the camera to the printer. 145 Images to be impossible to the User's Manual provided with the camera. Airplane mode: Off to remote to establish the connection. Press the power button on TV. &#...
... pairing again. • The remote control can be used only for Charge by computer in 12 the internal memory. Nikon Transfer 2 does not start Nikon Transfer 2 automatically. With some PictBridge-compatible printers, the PictBridge startup screen may not be displayed and it may be printed...• The printer does not support the paper sizes specified by computer to Off and reconnect the camera to the printer. 145 Images to be impossible to the User's Manual provided with the camera. Airplane mode: Off to remote to establish the connection. Press the power button on TV. &#...
Reference Manual
Page 187
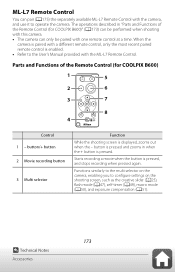
... a movie when the button is displayed, zooms out when the - Functions similarly to the multi selector on the camera, enabling you to the User's Manual provided with the ML-L7 Remote Control. When the camera is paired with a different remote control, only the most recent paired remote control is pressed and zooms in... While the shooting screen is pressed, and stops recording when pressed again. ML-L7 Remote Control You can only be performed when shooting with this camera. • The camera can pair (A175) the separately available ML-L7 Remote Control with the...
... a movie when the button is displayed, zooms out when the - Functions similarly to the multi selector on the camera, enabling you to the User's Manual provided with the ML-L7 Remote Control. When the camera is paired with a different remote control, only the most recent paired remote control is pressed and zooms in... While the shooting screen is pressed, and stops recording when pressed again. ML-L7 Remote Control You can only be performed when shooting with this camera. • The camera can pair (A175) the separately available ML-L7 Remote Control with the...

Reference Manual
Page 191
type CMOS; Specifications Nikon COOLPIX B600 Digital Camera Type Compact digital camera Number of effective pixels 16.0 million (Image processing may reduce the number of lens) Focus-area selection Face priority, manual with 99 focus areas, center, subject tracking, target finding AF Monitor 7.6 cm (3-in.), approx. 921k-dot, wide viewing angle TFT LCD with 60...
type CMOS; Specifications Nikon COOLPIX B600 Digital Camera Type Compact digital camera Number of effective pixels 16.0 million (Image processing may reduce the number of lens) Focus-area selection Face priority, manual with 99 focus areas, center, subject tracking, target finding AF Monitor 7.6 cm (3-in.), approx. 921k-dot, wide viewing angle TFT LCD with 60...
Reference Manual
Page 194
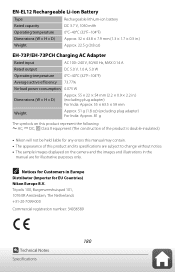
C Notices for Customers in the manual are for EU Countries) Nikon Europe B.V. Tripolis 100, Burgerweeshuispad 101, 1076 ER Amsterdam, The Netherlands +31-20-7099-000 Commercial registration number: 34036589 180 Technical Notes Specifications EN-EL12 ...on this product represent the following: D AC, E DC, F Class II equipment (The construction of the product is double-insulated.) • Nikon will not be held liable for any errors this manual may contain. • The appearance of this product and its specifications are subject to change without notice. • The sample images...
C Notices for Customers in the manual are for EU Countries) Nikon Europe B.V. Tripolis 100, Burgerweeshuispad 101, 1076 ER Amsterdam, The Netherlands +31-20-7099-000 Commercial registration number: 34036589 180 Technical Notes Specifications EN-EL12 ...on this product represent the following: D AC, E DC, F Class II equipment (The construction of the product is double-insulated.) • Nikon will not be held liable for any errors this manual may contain. • The appearance of this product and its specifications are subject to change without notice. • The sample images...
Reference Manual
Page 196
...or was encoded by the developer to meet Apple performance standards. Use of the Made for any other use of this accessory with your Nikon product are the trademarks or registered trademarks of their respective holders. Please note that was obtained from a video provider licensed to (i) ...encode video in this manual or the other documentation provided with an Apple product may be obtained from MPEG LA, L.L.C. No license is licensed under the AVC Patent...
...or was encoded by the developer to meet Apple performance standards. Use of the Made for any other use of this accessory with your Nikon product are the trademarks or registered trademarks of their respective holders. Please note that was obtained from a video provider licensed to (i) ...encode video in this manual or the other documentation provided with an Apple product may be obtained from MPEG LA, L.L.C. No license is licensed under the AVC Patent...

Reference Manual
Page 199
..., 67, 83 Playback menu 97, 124 Playback mode 20 Playback zoom 20, 64 Portrait b 27 Power switch/power-on lamp...... 2, 14 Pre-focus 114 Preset manual 107 Pre-shooting cache 108, 109 Pressing halfway 54 Print 87, 90, 91 Printer 87, 89 Protect 101, 126 Q Quick effects 20, 69 Quick retouch...
..., 67, 83 Playback menu 97, 124 Playback mode 20 Playback zoom 20, 64 Portrait b 27 Power switch/power-on lamp...... 2, 14 Pre-focus 114 Preset manual 107 Pre-shooting cache 108, 109 Pressing halfway 54 Print 87, 90, 91 Printer 87, 89 Protect 101, 126 Q Quick effects 20, 69 Quick retouch...

Reference Manual
Page 201
No reproduction in any form of this manual, in whole or in part (except for brief quotation in critical articles or reviews), may be made without written authorization from NIKON CORPORATION. 2019 CT0B04(11) 6MQ01911-04
No reproduction in any form of this manual, in whole or in part (except for brief quotation in critical articles or reviews), may be made without written authorization from NIKON CORPORATION. 2019 CT0B04(11) 6MQ01911-04
Quick Start Guide for customers in the Americas
Page 1
DIGITAL CAMERA Quick Start Guide Introduction ii Parts of the Camera 1 Getting Started 2 Basic Shooting and Playback Operations 7 Other Functions 12 If There Is a Problem 16 Technical Notes 17 • Read this manual thoroughly before using the camera. • To ensure proper use of the camera, be sure to read "For Your Safety" (page vii). • After reading this manual, keep it in a readily accessible place for future reference.
DIGITAL CAMERA Quick Start Guide Introduction ii Parts of the Camera 1 Getting Started 2 Basic Shooting and Playback Operations 7 Other Functions 12 If There Is a Problem 16 Technical Notes 17 • Read this manual thoroughly before using the camera. • To ensure proper use of the camera, be sure to read "For Your Safety" (page vii). • After reading this manual, keep it in a readily accessible place for future reference.

Quick Start Guide for customers in the Americas
Page 2
... from our Download Center. See the "Reference Manual" for Nikon imaging products, computer software, or firmware. SnapBridge online help: Explains details about setting the camera. For Detailed Usage Reference Manual (PDF format): Detailed manual that can be viewed using the SnapBridge app. The following manuals are included in the manual. • Detailed explanations for this document): Explains...
... from our Download Center. See the "Reference Manual" for Nikon imaging products, computer software, or firmware. SnapBridge online help: Explains details about setting the camera. For Detailed Usage Reference Manual (PDF format): Detailed manual that can be viewed using the SnapBridge app. The following manuals are included in the manual. • Detailed explanations for this document): Explains...
