

Reference Manual
Page 1
DIGITAL CAMERA Reference Manual • Read this manual thoroughly before using the camera. • To ensure proper use of the camera, be sure to read "For Your Safety" (page vi). • After reading this manual, keep it in a readily accessible place for future reference.
DIGITAL CAMERA Reference Manual • Read this manual thoroughly before using the camera. • To ensure proper use of the camera, be sure to read "For Your Safety" (page vi). • After reading this manual, keep it in a readily accessible place for future reference.
Reference Manual
Page 2
Quick Topic Search You can return to this page by tapping or clicking in the lower right of the Camera ...1 Getting Started...10 Basic Shooting and Playback Operations 16 Shooting Features...23 Playback Features...63 Movies ...75 Connecting the Camera to a TV, Printer, or Computer 86 Using the Menu...96 If There Is a Problem...147 Technical Notes...160 Common Topics For Your Safety Creative Mode Self-timer Macro mode Zoom Continuous Shooting Troubleshooting ii Index Main Topics Introduction ...iii Table of Contents ...x Parts of any page.
Quick Topic Search You can return to this page by tapping or clicking in the lower right of the Camera ...1 Getting Started...10 Basic Shooting and Playback Operations 16 Shooting Features...23 Playback Features...63 Movies ...75 Connecting the Camera to a TV, Printer, or Computer 86 Using the Menu...96 If There Is a Problem...147 Technical Notes...160 Common Topics For Your Safety Creative Mode Self-timer Macro mode Zoom Continuous Shooting Troubleshooting ii Index Main Topics Introduction ...iii Table of Contents ...x Parts of any page.
Reference Manual
Page 3
... the time of purchase is referred to as the "default setting." • The names of menu items displayed on the camera screen, and the names of each page to as "memory cards" in bold. • In this manual. •...; Smartphones and tablets are sometimes omitted from screen display samples so that should be read before using the camera. iii Introduction Read This First This icon marks other pages containing relevant information. • SD, SDHC, and SDXC ... icon marks notes and information that screen indicators can be read before using the camera.
... the time of purchase is referred to as the "default setting." • The names of menu items displayed on the camera screen, and the names of each page to as "memory cards" in bold. • In this manual. •...; Smartphones and tablets are sometimes omitted from screen display samples so that should be read before using the camera. iii Introduction Read This First This icon marks other pages containing relevant information. • SD, SDHC, and SDXC ... icon marks notes and information that screen indicators can be read before using the camera.
Reference Manual
Page 4
... pictures on important occasions (such as an authentic Nikon product. For more information about Nikon brand accessories, contact a local authorized Nikon dealer. https://imaging.nikon.com/ Use Only Nikon Brand Electronic Accessories Nikon COOLPIX cameras are engineered and proven to operate within the operational and safety requirements of this Nikon digital camera are designed to the highest standards and include...
... pictures on important occasions (such as an authentic Nikon product. For more information about Nikon brand accessories, contact a local authorized Nikon dealer. https://imaging.nikon.com/ Use Only Nikon Brand Electronic Accessories Nikon COOLPIX cameras are engineered and proven to operate within the operational and safety requirements of this Nikon digital camera are designed to the highest standards and include...
Reference Manual
Page 5
...Comply with Copyright Notices Under copyright law, photographs or recordings of copyrighted works made to ensure that even personal use may differ from the actual product. • Nikon reserves the right to change the specifications of the hardware and software described in these manuals at any time ... any language in any form, by any means, without Nikon's prior written permission. • Illustrations and screen content shown in this product. • While every effort was made with the camera can sometimes be recovered from the use of this manual may be restricted in the case of ...
...Comply with Copyright Notices Under copyright law, photographs or recordings of copyrighted works made to ensure that even personal use may differ from the actual product. • Nikon reserves the right to change the specifications of the hardware and software described in these manuals at any time ... any language in any form, by any means, without Nikon's prior written permission. • Illustrations and screen content shown in this product. • While every effort was made with the camera can sometimes be recovered from the use of this manual may be restricted in the case of ...
Reference Manual
Page 6
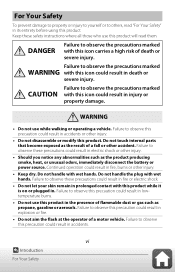
... or other accident. Continued operation could result in injury or property damage. Failure to observe these safety instructions where all those who use this product. DANGER Failure to observe the precautions marked with wet hands. Failure to observe the precautions marked CAUTION with this precaution could...prevent damage to property or injury to yourself or to others, read "For Your Safety" in its entirety before using this product will read them. WARNING • Do not use this precaution could result in the presence of a fall or other injury. • Keep dry. Failure to...
... or other accident. Continued operation could result in injury or property damage. Failure to observe these safety instructions where all those who use this product. DANGER Failure to observe the precautions marked with wet hands. Failure to observe the precautions marked CAUTION with this precaution could...prevent damage to property or injury to yourself or to others, read "For Your Safety" in its entirety before using this product will read them. WARNING • Do not use this precaution could result in the presence of a fall or other injury. • Keep dry. Failure to...

Reference Manual
Page 7
... Failure to observe these precautions could result in fire or electric shock. • Do not handle the plug when charging the product or using batteries, chargers, AC adapters, and USB cables designated for an extended period. Damage, modify, forcibly tug or bend the cords or cables...; Remove the battery and disconnect the AC adapter if this precaution could result in injury or product malfunction. vii Introduction For Your Safety When using the AC adapter during thunderstorms. Failure to observe this product, do not: - Failure to -AC inverters. • Keep this precaution could...
... Failure to observe these precautions could result in fire or electric shock. • Do not handle the plug when charging the product or using batteries, chargers, AC adapters, and USB cables designated for an extended period. Damage, modify, forcibly tug or bend the cords or cables...; Remove the battery and disconnect the AC adapter if this precaution could result in injury or product malfunction. vii Introduction For Your Safety When using the AC adapter during thunderstorms. Failure to observe this product, do not: - Failure to -AC inverters. • Keep this precaution could...
Reference Manual
Page 8
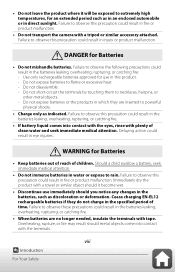
...hairpins, or other metal objects. - Failure to observe these precautions could result in water or expose to observe this product. - Use only rechargeable batteries approved for Batteries • Keep batteries out of reach of time. Do not expose batteries or the products in... to powerful physical shocks. • Charge only as in an enclosed automobile or in fire or product malfunction. • Do not transport the camera with tape. Should a child swallow a battery, seek immediate medical attention. • Do not immerse batteries in the batteries leaking, overheating, rupturing...
...hairpins, or other metal objects. - Failure to observe these precautions could result in water or expose to observe this product. - Use only rechargeable batteries approved for Batteries • Keep batteries out of reach of time. Do not expose batteries or the products in... to powerful physical shocks. • Charge only as in an enclosed automobile or in fire or product malfunction. • Do not transport the camera with tape. Should a child swallow a battery, seek immediate medical attention. • Do not immerse batteries in the batteries leaking, overheating, rupturing...
Reference Manual
Page 10
... Topics...ii Common Topics ...ii Introduction ...iii Read This First ...iii Symbols and Conventions Used in This Manual iii Information and Precautions ...iv For Your Safety ...vi Parts of the Camera ...1 The Camera Body...2 The Monitor ...4 Switching the Information Displayed on the Screen (s Button 4 For ...Playback...8 Getting Started...10 How to Attach the Strap and Lens Cap 11 Inserting the Battery and Memory Card 12 Removing the Battery or Memory Card ...12 Charging the Battery ...13 Camera Setup...14 Basic Shooting and Playback Operations 16 Shooting Images...17 Using the Flash ...19...
... Topics...ii Common Topics ...ii Introduction ...iii Read This First ...iii Symbols and Conventions Used in This Manual iii Information and Precautions ...iv For Your Safety ...vi Parts of the Camera ...1 The Camera Body...2 The Monitor ...4 Switching the Information Displayed on the Screen (s Button 4 For ...Playback...8 Getting Started...10 How to Attach the Strap and Lens Cap 11 Inserting the Battery and Memory Card 12 Removing the Battery or Memory Card ...12 Charging the Battery ...13 Camera Setup...14 Basic Shooting and Playback Operations 16 Shooting Images...17 Using the Flash ...19...

Reference Manual
Page 11
...Playback with Easy Panorama ...38 Creative Mode (Applying Effects When Shooting 39 Smart Portrait Mode (Enhancing Human Faces When Shooting 41 Using Smile Timer...43 Using Self-Collage...44 Setting the Flash Mode, Self-timer, Macro Mode, and Exposure Compensation.......... 46 Flash Mode...47 Self-timer...Suitable for Autofocus ...57 Focus Lock...58 Default Settings (Flash Mode, Self-timer, and Macro Mode 59 Functions That Cannot Be Used Simultaneously When Shooting 61 Playback Features...63 Playback Zoom ...64 Thumbnail Playback/Calendar Display 65 List by Date Mode...66 Viewing and Deleting...
...Playback with Easy Panorama ...38 Creative Mode (Applying Effects When Shooting 39 Smart Portrait Mode (Enhancing Human Faces When Shooting 41 Using Smile Timer...43 Using Self-Collage...44 Setting the Flash Mode, Self-timer, Macro Mode, and Exposure Compensation.......... 46 Flash Mode...47 Self-timer...Suitable for Autofocus ...57 Focus Lock...58 Default Settings (Flash Mode, Self-timer, and Macro Mode 59 Functions That Cannot Be Used Simultaneously When Shooting 61 Playback Features...63 Playback Zoom ...64 Thumbnail Playback/Calendar Display 65 List by Date Mode...66 Viewing and Deleting...
Reference Manual
Page 12
......84 Extracting Only the Desired Portion of a Movie 84 Saving a Frame from a Movie as a Still Image 85 Connecting the Camera to a TV, Printer, or Computer 86 Utilizing Images...87 Viewing Images on a TV ...88 Printing Images Without a Computer 89 Connecting the... Camera to a Printer ...89 Printing Images One at a Time ...90 Printing Multiple Images ...91 Transferring Images to a Computer (ViewNX-i 93 Installing ViewNX-i...93 Transferring Images to a Computer ...93 Using the Menu...96 Menu Operations...97 The Image Selection Screen...
......84 Extracting Only the Desired Portion of a Movie 84 Saving a Frame from a Movie as a Still Image 85 Connecting the Camera to a TV, Printer, or Computer 86 Utilizing Images...87 Viewing Images on a TV ...88 Printing Images Without a Computer 89 Connecting the... Camera to a Printer ...89 Printing Images One at a Time ...90 Printing Multiple Images ...91 Transferring Images to a Computer (ViewNX-i 93 Installing ViewNX-i...93 Transferring Images to a Computer ...93 Using the Menu...96 Menu Operations...97 The Image Selection Screen...
Reference Manual
Page 14
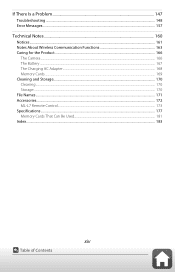
If There Is a Problem...147 Troubleshooting ...148 Error Messages...157 Technical Notes...160 Notices...161 Notes About Wireless Communication Functions 163 Caring for the Product ...166 The Camera...166 The Battery ...167 The Charging AC Adapter...168 Memory Cards...169 Cleaning and Storage...170 Cleaning...170 Storage...170 File Names...171 Accessories...172 ML-L7 Remote Control...173 Specifications ...177 Memory Cards That Can Be Used...181 Index...183 xiv Table of Contents
If There Is a Problem...147 Troubleshooting ...148 Error Messages...157 Technical Notes...160 Notices...161 Notes About Wireless Communication Functions 163 Caring for the Product ...166 The Camera...166 The Battery ...167 The Charging AC Adapter...168 Memory Cards...169 Cleaning and Storage...170 Cleaning...170 Storage...170 File Names...171 Accessories...172 ML-L7 Remote Control...173 Specifications ...177 Memory Cards That Can Be Used...181 Index...183 xiv Table of Contents
Reference Manual
Page 18
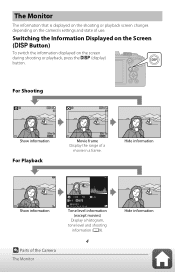
For Shooting 25m 0s 500 Show information For Playback 25m 0s 500 Movie frame Display the range of the Camera The Monitor 1 / 2 5 0 F 3.3 125 0.0 0004.JPG 15/11/2019 15:30 Tone level information (except movies) Display a histogram, tone level and ...frame. 4/4 4/4 Hide information 0004. Switching the Information Displayed on the Screen (s Button) To switch the information displayed on the camera's settings and state of use. The Monitor The information that is displayed on the shooting or playback screen changes depending on the screen during shooting or playback, press...
For Shooting 25m 0s 500 Show information For Playback 25m 0s 500 Movie frame Display the range of the Camera The Monitor 1 / 2 5 0 F 3.3 125 0.0 0004.JPG 15/11/2019 15:30 Tone level information (except movies) Display a histogram, tone level and ...frame. 4/4 4/4 Hide information 0004. Switching the Information Displayed on the Screen (s Button) To switch the information displayed on the camera's settings and state of use. The Monitor The information that is displayed on the shooting or playback screen changes depending on the screen during shooting or playback, press...
Reference Manual
Page 25
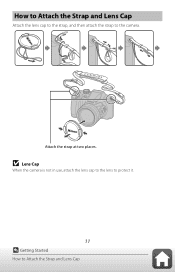
How to Attach the Strap and Lens Cap Attach the lens cap to the strap, and then attach the strap to Attach the Strap and Lens Cap B Lens Cap When the camera is not in use, attach the lens cap to the lens to protect it. 11 Getting Started How to the camera. Attach the strap at two places.
How to Attach the Strap and Lens Cap Attach the lens cap to the strap, and then attach the strap to Attach the Strap and Lens Cap B Lens Cap When the camera is not in use, attach the lens cap to the lens to protect it. 11 Getting Started How to the camera. Attach the strap at two places.
Reference Manual
Page 26
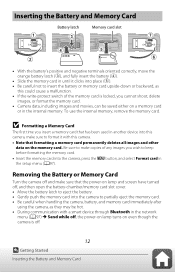
...; Gently push the memory card into the camera to partially eject the memory card. • Be careful when handling the camera, battery, and memory card immediately after using the camera, as this camera. • Note that has been used in another device into this camera, make sure to format it clicks into place... card. • Camera data, including images and movies, can be hot. • During communication with this could cause a malfunction. • If the write-protect switch of the memory card is off , the power-on lamp turns on the memory card. To use the internal memory, remove...
...; Gently push the memory card into the camera to partially eject the memory card. • Be careful when handling the camera, battery, and memory card immediately after using the camera, as this camera. • Note that has been used in another device into this camera, make sure to format it clicks into place... card. • Camera data, including images and movies, can be hot. • During communication with this could cause a malfunction. • If the write-protect switch of the memory card is off , the power-on lamp turns on the memory card. To use the internal memory, remove...
Reference Manual
Page 27
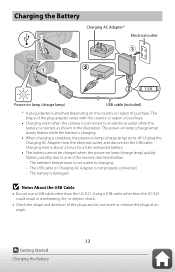
... country or region of purchase. The shape of the plug adapter varies with the country or region of purchase. • Charging starts when the camera is connected to an electrical outlet while the battery is not properly connected. - The USB cable or Charging AC Adapter is inserted, as shown ... Check the shape and direction of the plugs and do not insert or remove the plugs at an angle. 13 Getting Started Charging the Battery Using a USB cable other than the UC-E21 could result in the illustration. Charging the Battery Charging AC Adapter* Electrical outlet Power-on lamp (...
... country or region of purchase. The shape of the plug adapter varies with the country or region of purchase. • Charging starts when the camera is connected to an electrical outlet while the battery is not properly connected. - The USB cable or Charging AC Adapter is inserted, as shown ... Check the shape and direction of the plugs and do not insert or remove the plugs at an angle. 13 Getting Started Charging the Battery Using a USB cable other than the UC-E21 could result in the illustration. Charging the Battery Charging AC Adapter* Electrical outlet Power-on lamp (...

Reference Manual
Page 28
...but the charging time increases. Cancel Choose time zone and set the display language and camera clock are displayed. 1 Turn on for a mobile phone. Camera Setup When the camera is turned on the camera. • Use the multi selector to set date and time? Multi selector Up Left Right k ...time, screens to select and adjust settings. Use the multi selector HI to highlight a language and press the k button to the camera. Language Power switch 2 Select Yes and press the k button. B Notes About Charging the Battery • The camera can be displayed. The power-on the ...
...but the charging time increases. Cancel Choose time zone and set the display language and camera clock are displayed. 1 Turn on for a mobile phone. Camera Setup When the camera is turned on the camera. • Use the multi selector to set date and time? Multi selector Up Left Right k ...time, screens to select and adjust settings. Use the multi selector HI to highlight a language and press the k button to the camera. Language Power switch 2 Select Yes and press the k button. B Notes About Charging the Battery • The camera can be displayed. The power-on the ...
Reference Manual
Page 31
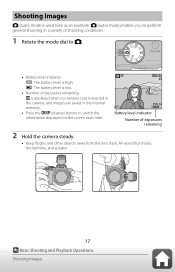
... each time. 25m 0s 500 Battery level indicator Number of exposures remaining C is displayed when no memory card is inserted in the camera, and images are saved in the internal memory. • Press the s (display) button to A. • Battery level indicator b: The battery... level is used here as an example. Shooting Images A (auto) mode is high. B: The battery level is low. • Number of exposures remaining 2 Hold the camera steady. • Keep fingers and other objects away from the lens, flash, AF-assist...
... each time. 25m 0s 500 Battery level indicator Number of exposures remaining C is displayed when no memory card is inserted in the camera, and images are saved in the internal memory. • Press the s (display) button to A. • Battery level indicator b: The battery... level is used here as an example. Shooting Images A (auto) mode is high. B: The battery level is low. • Number of exposures remaining 2 Hold the camera steady. • Keep fingers and other objects away from the lens, flash, AF-assist...
Reference Manual
Page 32
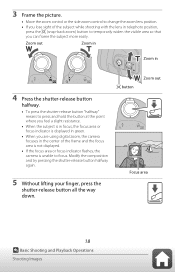
... of the frame and the focus area is not displayed. • If the focus area or focus indicator flashes, the camera is displayed in green. • When you are using digital zoom, the camera focuses in telephoto position, press the q (snap-back zoom) button to temporarily widen the visible area so that you...
... of the frame and the focus area is not displayed. • If the focus area or focus indicator flashes, the camera is displayed in green. • When you are using digital zoom, the camera focuses in telephoto position, press the q (snap-back zoom) button to temporarily widen the visible area so that you...
Reference Manual
Page 33
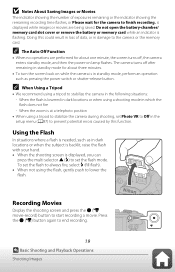
... are performed for about three minutes. • To turn the screen back on lamp flashes. Using the Flash In situations where a flash is at a telephoto position • When using a tripod to stabilize the camera during shooting, set the flash to always fire, select m (fill flash). • When ...battery-chamber/ memory card slot cover or remove the battery or memory card while an indicator is lowered in dark locations or when using a tripod to stabilize the camera in the setup menu (A97) to Off in the following situations: - C The Auto Off Function • When no operations...
... are performed for about three minutes. • To turn the screen back on lamp flashes. Using the Flash In situations where a flash is at a telephoto position • When using a tripod to stabilize the camera during shooting, set the flash to always fire, select m (fill flash). • When ...battery-chamber/ memory card slot cover or remove the battery or memory card while an indicator is lowered in dark locations or when using a tripod to stabilize the camera in the setup menu (A97) to Off in the following situations: - C The Auto Off Function • When no operations...
