Instruction Manual
Page 2
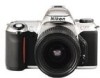
... for purchasing the Nikon N65/ N65QD-a camera that is sure to make photography a bigger part of the N65/N65QD: • Exposure mode dial makes operation simple and intuitive, so great pictures are a snap in every shooting situation. • The big , high-visibility LCD lets you check camera settings at a ' glance. • With 8 AUTO and Vari-Program modes, you don 't have to be sure to know your...
... for purchasing the Nikon N65/ N65QD-a camera that is sure to make photography a bigger part of the N65/N65QD: • Exposure mode dial makes operation simple and intuitive, so great pictures are a snap in every shooting situation. • The big , high-visibility LCD lets you check camera settings at a ' glance. • With 8 AUTO and Vari-Program modes, you don 't have to be sure to know your...
Instruction Manual
Page 4
... 39 Self-Timer Operation 40-41 About Metering Systems and Exposure 42 4 Mount Lens 18-19 3. Set Exposure Mode to AF 26-27 2. Introduction ...2-3 Nomenclature 6-7 LCD PanelNiewfinder Display 8-9 Available Exposure Modes 10- 11 Start Shooting Immediately 12-13 PREPARATION 15-24 1. Load Film 20-21 4. Hold Camera and Focus 30-31 4. Set Focus Mode to 3 28-29 3. Set Date and Time (N65QD only 22-23 About Shutter Release Button 24 BASIC OPERATION 25-41 1. Install Batteries and Check Battery Power...
... 39 Self-Timer Operation 40-41 About Metering Systems and Exposure 42 4 Mount Lens 18-19 3. Set Exposure Mode to AF 26-27 2. Introduction ...2-3 Nomenclature 6-7 LCD PanelNiewfinder Display 8-9 Available Exposure Modes 10- 11 Start Shooting Immediately 12-13 PREPARATION 15-24 1. Load Film 20-21 4. Hold Camera and Focus 30-31 4. Set Focus Mode to 3 28-29 3. Set Date and Time (N65QD only 22-23 About Shutter Release Button 24 BASIC OPERATION 25-41 1. Install Batteries and Check Battery Power...

Instruction Manual
Page 16
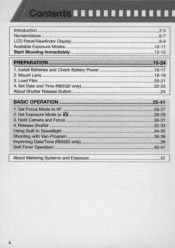
... use fresh batteries of children's reach. e • Incorrect positioning of film rolls that can be sure to turn the power switch off and replace both batteries at the same time. If swallowed, contact a doctor immediately. (For "Notes on Batteries", see page 98.) 2 e Insert batteries with fresh batteries, see .p.ag.e..9.4 1 Turn the power switch off and open the battery chamber cover by sliding the battery chamber cover lock lever toward indicated direction. • When replacing batteries, be shot...
... use fresh batteries of children's reach. e • Incorrect positioning of film rolls that can be sure to turn the power switch off and replace both batteries at the same time. If swallowed, contact a doctor immediately. (For "Notes on Batteries", see page 98.) 2 e Insert batteries with fresh batteries, see .p.ag.e..9.4 1 Turn the power switch off and open the battery chamber cover by sliding the battery chamber cover lock lever toward indicated direction. • When replacing batteries, be shot...
Instruction Manual
Page 17
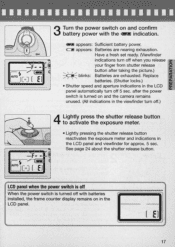
... 24 about the shutter release button. button after the power switch is turned off .) • 4 Lightly press the shutter release button to activate the exposure meter. Have a fresh set ready. (Viewfinder indications turn off 5 sec. LCD panel when the power switch is off When the power switch is turned on and the camera remains unused. (All indications in the viewfinder turn off when you release Z your finger from shutter release ..... ' /.-- Replace i 0 ~ batteries. (Shutter locks.) w If • Shutter speed and aperture indications in the LCD...
... 24 about the shutter release button. button after the power switch is turned off .) • 4 Lightly press the shutter release button to activate the exposure meter. Have a fresh set ready. (Viewfinder indications turn off 5 sec. LCD panel when the power switch is off When the power switch is turned on and the camera remains unused. (All indications in the viewfinder turn off when you release Z your finger from shutter release ..... ' /.-- Replace i 0 ~ batteries. (Shutter locks.) w If • Shutter speed and aperture indications in the LCD...
Instruction Manual
Page 18
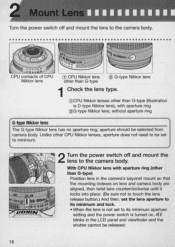
... lens counterclockwise until it locks into place. (Be sure not to touch the lens release button.) And then , set the lens aperture to its minimum aperture setting and the power switch is O-type Nikkor lens), with aperture ring (other than G-type) Position lens in the camera's bayonet mount so that the mounting indexes on , FEE blinks in the LCD panel and viewfinder and the shutter cannot be selected from camera body. i , ~ -- -.- - -- -- •• _- ... • Turn the power switch...
... lens counterclockwise until it locks into place. (Be sure not to touch the lens release button.) And then , set the lens aperture to its minimum aperture setting and the power switch is O-type Nikkor lens), with aperture ring (other than G-type) Position lens in the camera's bayonet mount so that the mounting indexes on , FEE blinks in the LCD panel and viewfinder and the shutter cannot be selected from camera body. i , ~ -- -.- - -- -- •• _- ... • Turn the power switch...

Instruction Manual
Page 19
... , F- - blinks in the LCD panel and viewfinder, and the shutter cannot be used.) NOTE: Non-CPU Nikkor lens When a non-CPU Nikkor lens is attached and the power switch is turned on lens and camera body are aligned, then twist lens counterclockwise until it locks into place. (Be sure not to detach the lens. -- --- - --~ With G-type Nikkor lens Position lens in Manual exposure mode). i~f w IE • Push and hold the lens release button , then turn the power...
... , F- - blinks in the LCD panel and viewfinder, and the shutter cannot be used.) NOTE: Non-CPU Nikkor lens When a non-CPU Nikkor lens is attached and the power switch is turned on lens and camera body are aligned, then twist lens counterclockwise until it locks into place. (Be sure not to detach the lens. -- --- - --~ With G-type Nikkor lens Position lens in Manual exposure mode). i~f w IE • Push and hold the lens release button , then turn the power...
Instruction Manual
Page 22
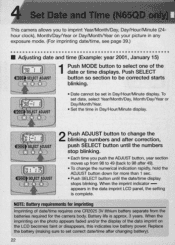
... button until the numbers stop blinking . • Each time you to imprint Year/Month/Day, Day/Hour/Minute (24hour clock), Month/Day/Year or Day/Month/Year on the LCD becomes faint or disappears, this indicates low battery power. NOTE: Battery requirements for the camera body. When the imprinting on the photo appears faded and/or the display of the date or time displays. Push SELECT button...
... button until the numbers stop blinking . • Each time you to imprint Year/Month/Day, Day/Hour/Minute (24hour clock), Month/Day/Year or Day/Month/Year on the LCD becomes faint or disappears, this indicates low battery power. NOTE: Battery requirements for the camera body. When the imprinting on the photo appears faded and/or the display of the date or time displays. Push SELECT button...
Instruction Manual
Page 25
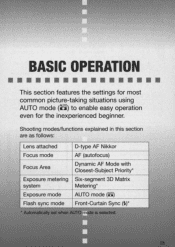
Shooting modes/functions explained in this section are as follows: Lens attached D-type AF Nikkor Focus mode AF (autofocus) Focus Area Dynamic AF Mode with Closest-Subject Priority* Exposure metering Six-segment 3D Matrix system Metering* Exposure mode AUTO mode (8 ) Flash sync mode Front-Curtain Sync (~)* '. ~ -"'~ . * Automatically set when AUTO m ,',.:._,./ " n." • ., . ,. BASIC OPERATION This section features the settings for most common picture-taking situations using AUTO mode (~) to enable easy operation even for the inexperienced beginner. I is selected. '...
Shooting modes/functions explained in this section are as follows: Lens attached D-type AF Nikkor Focus mode AF (autofocus) Focus Area Dynamic AF Mode with Closest-Subject Priority* Exposure metering Six-segment 3D Matrix system Metering* Exposure mode AUTO mode (8 ) Flash sync mode Front-Curtain Sync (~)* '. ~ -"'~ . * Automatically set when AUTO m ,',.:._,./ " n." • ., . ,. BASIC OPERATION This section features the settings for most common picture-taking situations using AUTO mode (~) to enable easy operation even for the inexperienced beginner. I is selected. '...
Instruction Manual
Page 28
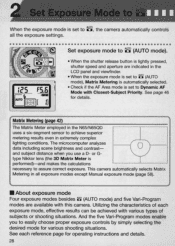
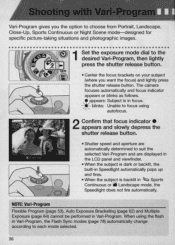
... Vari-Program modes enable you use a 0 - Matrix Metering (page 42) The Matrix Meter employed in the N65/ N65QD uses a six-segment sensor to achieve superior metering results even in all the exposure settings Set exposure mode to 8 (AUTO mode). -1ml:---" tcS FS.6 AUTO E::3 ( tl • When the shutter release button is lightly pressed, shutter speed and aperture are available with various types of each reference page for operating instructions and details. 28 See each exposure mode, effective...
... Vari-Program modes enable you use a 0 - Matrix Metering (page 42) The Matrix Meter employed in the N65/ N65QD uses a six-segment sensor to achieve superior metering results even in all the exposure settings Set exposure mode to 8 (AUTO mode). -1ml:---" tcS FS.6 AUTO E::3 ( tl • When the shutter release button is lightly pressed, shutter speed and aperture are available with various types of each reference page for operating instructions and details. 28 See each exposure mode, effective...
Instruction Manual
Page 36
When using I autofocus. 2 Confirm that focus indicator. The camera focuses automatically and focus indicator appears or blinks as follows . • appears: Subject is backlit in ~~ Sports Continuous or iii Landscape mode, the Speedlight does not fire automatically. appears and slowly depress the shutter release button . • Shutter speed and aperture are displayed in the LCD panel and viewfinder. • When the subject is dark or backlit, the built...
When using I autofocus. 2 Confirm that focus indicator. The camera focuses automatically and focus indicator appears or blinks as follows . • appears: Subject is backlit in ~~ Sports Continuous or iii Landscape mode, the Speedlight does not fire automatically. appears and slowly depress the shutter release button . • Shutter speed and aperture are displayed in the LCD panel and viewfinder. • When the subject is dark or backlit, the built...
Instruction Manual
Page 37
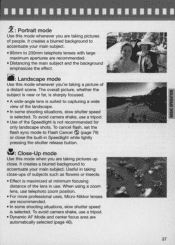
...). 37 When using a zoom lens, use a tripod. • Dynamic AF Mode and center focus area are recommended . • In some shooting situations, slow shutter speed is not recommended for only landscape shots. To cancel flash , set the flash sync mode to accentuate your main subject. It creates a blurred background to accentuate your main subject. • 85mm to capturing a wide view of people. The overall picture, whether the...
...). 37 When using a zoom lens, use a tripod. • Dynamic AF Mode and center focus area are recommended . • In some shooting situations, slow shutter speed is not recommended for only landscape shots. To cancel flash , set the flash sync mode to accentuate your main subject. It creates a blurred background to accentuate your main subject. • 85mm to capturing a wide view of people. The overall picture, whether the...
Instruction Manual
Page 38
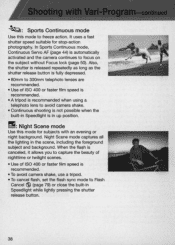
... while lightly pressing the shutter release button. 38 When the flash is canceled, it allows you to capture the beauty of nighttime or twilight scenes. • Use of ISO 400 or faster film speed is recommended. • A tripod is recommended when using a telephoto lens to focus on the subject without Focus lock (page 50). ~eQ.,jj: Sports Continuous mode Use this mode for stop-action photography. It uses a fast shutter speed...
... while lightly pressing the shutter release button. 38 When the flash is canceled, it allows you to capture the beauty of nighttime or twilight scenes. • Use of ISO 400 or faster film speed is recommended. • A tripod is recommended when using a telephoto lens to focus on the subject without Focus lock (page 50). ~eQ.,jj: Sports Continuous mode Use this mode for stop-action photography. It uses a fast shutter speed...

Instruction Manual
Page 58
... the viewfinder, you to maximum) manually. When the lens is attached , F- Long Time exposure (Time) can be set both shutter speed (30 sec . - 1/2000 sec.) and aperture (lens ' minimum to set in Manual exposure mode. • Non-CPU lenses (page 90) can produce various creative effects by adjusting the exposure. Center-Weighted Metering Center-Weighted Metering places special emphasis on a specific area of a CPU Nikkor lens (except G-type) to CenterWeighted from Matrix in Manual exposure mode...
... the viewfinder, you to maximum) manually. When the lens is attached , F- Long Time exposure (Time) can be set both shutter speed (30 sec . - 1/2000 sec.) and aperture (lens ' minimum to set in Manual exposure mode. • Non-CPU lenses (page 90) can produce various creative effects by adjusting the exposure. Center-Weighted Metering Center-Weighted Metering places special emphasis on a specific area of a CPU Nikkor lens (except G-type) to CenterWeighted from Matrix in Manual exposure mode...
Instruction Manual
Page 70
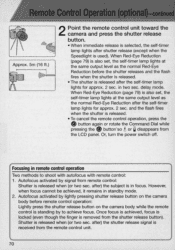
delay mode. Or, turn the power switch off. Autofocus activated by lightly pressing shutter release button on the camera body while the remote control is in remote control operation Two methods to achieve focus. after) the shutter release signal is also set , the self-timer lamp lights at the same output level as the normal Red-Eye Reduction after the self-timer lamp lights for approx. 2 sec. When Red-Eye Reduction (page 79...
delay mode. Or, turn the power switch off. Autofocus activated by lightly pressing shutter release button on the camera body while the remote control is in remote control operation Two methods to achieve focus. after) the shutter release signal is also set , the self-timer lamp lights at the same output level as the normal Red-Eye Reduction after the self-timer lamp lights for approx. 2 sec. When Red-Eye Reduction (page 79...
Instruction Manual
Page 89
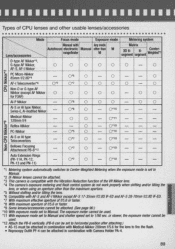
... flash. • Reprocopy Outfit PF-4 can be attached. Non-Oor G-type AF Nikkor (except AF Nikkor 0 0 0 0 0 - 0 0 for the lens to Manual. Auto Extension Rings (PK-11A, PK-12, - or slower, the exposure meter cannot be used . *11 With exposure mode set to Manual and shutter speed set to Manual. *2 IX-Nikkor lenses cannot be attached in combination with the Vibration Reduction function of f15. 6 or faster. *9 Some lenses/accessories...
... flash. • Reprocopy Outfit PF-4 can be attached. Non-Oor G-type AF Nikkor (except AF Nikkor 0 0 0 0 0 - 0 0 for the lens to Manual. Auto Extension Rings (PK-11A, PK-12, - or slower, the exposure meter cannot be used . *11 With exposure mode set to Manual and shutter speed set to Manual. *2 IX-Nikkor lenses cannot be attached in combination with the Vibration Reduction function of f15. 6 or faster. *9 Some lenses/accessories...

Instruction Manual
Page 94
... control releases the camera's shutter from manufacturers other than Nikon are used when you actually look through the viewfinder with setting on camera body). Compensate exposure +1 EV when using the N65/ N65QD's diopter adjustment lever. Nine optional eyepiece correction lenses provide viewfinder diopter settings of optional accessories, including power source and Speed light ·is available for the R60 filter. Lenses • A wide variety of a cable release to another. With the N65/N65QD, the filter factor need...
... control releases the camera's shutter from manufacturers other than Nikon are used when you actually look through the viewfinder with setting on camera body). Compensate exposure +1 EV when using the N65/ N65QD's diopter adjustment lever. Nine optional eyepiece correction lenses provide viewfinder diopter settings of optional accessories, including power source and Speed light ·is available for the R60 filter. Lenses • A wide variety of a cable release to another. With the N65/N65QD, the filter factor need...
Instruction Manual
Page 99
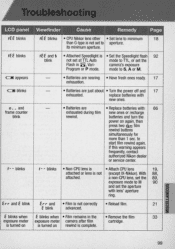
... exhaustion . batteries and turn the power on rewind is complete. 99 a non-CPU lens, set the Flash in the • Remove the film 33 exposure meter exposure meter camera after film cartridge. exposure mode to M and set to TIL, or set the 89 , E,.,. is turned on is turned on again, then press two ~ film rewind buttons simultaneously for more than G-type is • Set the Speedlight flash 92 blink not set at TIL Auto mode to aperture. blinks E,.,. With 88, attached. FEE blinks FEE and...
... exhaustion . batteries and turn the power on rewind is complete. 99 a non-CPU lens, set the Flash in the • Remove the film 33 exposure meter exposure meter camera after film cartridge. exposure mode to M and set to TIL, or set the 89 , E,.,. is turned on is turned on again, then press two ~ film rewind buttons simultaneously for more than G-type is • Set the Speedlight flash 92 blink not set at TIL Auto mode to aperture. blinks E,.,. With 88, attached. FEE blinks FEE and...

Instruction Manual
Page 103
... use faster shutter speeds in Auto-Multi Program. Close-up subjects will require lower (to minimum) output, while more distant subjects will require more light up to minimum duration . Flash synchronization Timing of the flash so it coincides with smaller maximum apertures (larger f-numbers) allow photographers to use ! Lenses with the aperture, film speed , etc. The flash shooting distance range varies with large maximum apertures (smaller f- The N65/N65QD's flash sync speed...
... use faster shutter speeds in Auto-Multi Program. Close-up subjects will require lower (to minimum) output, while more distant subjects will require more light up to minimum duration . Flash synchronization Timing of the flash so it coincides with smaller maximum apertures (larger f-numbers) allow photographers to use ! Lenses with the aperture, film speed , etc. The flash shooting distance range varies with large maximum apertures (smaller f- The N65/N65QD's flash sync speed...
Instruction Manual
Page 104
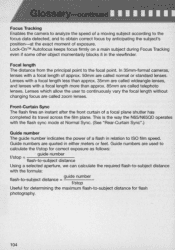
... the N65/ N65QD operates with the formula: =guide number flash-to-subject distance =---,:-:---f/stop flash-to-subject distance Using a selected aperture, we can calculate the required flash-to-subject distance with the flash sync mode at the exact moment of a focal plane shutter has completed its travel across the film plane. Focal length The distance from the principal point to ISO film speed. Lenses which allow the user to...
... the N65/ N65QD operates with the formula: =guide number flash-to-subject distance =---,:-:---f/stop flash-to-subject distance Using a selected aperture, we can calculate the required flash-to-subject distance with the flash sync mode at the exact moment of a focal plane shutter has completed its travel across the film plane. Focal length The distance from the principal point to ISO film speed. Lenses which allow the user to...
Instruction Manual
Page 109
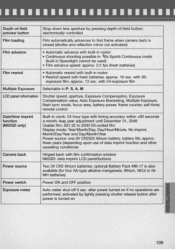
... information Shutter speed, aperture, Exposure Compensation, Exposure Compensation value, Auto Exposure Bracketing, Multiple Exposure, flash sync mode, focus area, battery power, frame counter, self-timer, remote control Date/time imprint function (N65QD only) Built-in motor • Rewind speed with 36- optional Battery Pack MB-17 is closed (shutter and reflection mirror not activated) Film advance • Automatic advance with built-in motor • Continuous shooting possible in ~'Q Sports Continuous mode (built-in Speed light cannot be used) • Film advance speed: approx...
... information Shutter speed, aperture, Exposure Compensation, Exposure Compensation value, Auto Exposure Bracketing, Multiple Exposure, flash sync mode, focus area, battery power, frame counter, self-timer, remote control Date/time imprint function (N65QD only) Built-in motor • Rewind speed with 36- optional Battery Pack MB-17 is closed (shutter and reflection mirror not activated) Film advance • Automatic advance with built-in motor • Continuous shooting possible in ~'Q Sports Continuous mode (built-in Speed light cannot be used) • Film advance speed: approx...


