
S620 User's Manual
Page 9
... Removing the Battery...17 Turning On and Off the Camera...17 Setting Display Language, Date and Time 18 Inserting Memory Cards...20 Removing Memory Cards...20 A Basic Photography and Playback : Auto Mode 22 Step 1 Turn the Camera On and Select A (Auto) Mode 22 Indicators Displayed in A (Auto) Mode 23 Step 2 Frame a Picture...24 Using the Zoom...25 Step 3 Focus and Shoot ...26 Step 4 Viewing and Deleting Pictures 28 Viewing Pictures (Playback Mode) ...28 Deleting Pictures...28 Using the Flash...30 Setting the Flash Mode...30 Taking Pictures with the Self-Timer 32 Macro Mode...33 Exposure...
... Removing the Battery...17 Turning On and Off the Camera...17 Setting Display Language, Date and Time 18 Inserting Memory Cards...20 Removing Memory Cards...20 A Basic Photography and Playback : Auto Mode 22 Step 1 Turn the Camera On and Select A (Auto) Mode 22 Indicators Displayed in A (Auto) Mode 23 Step 2 Frame a Picture...24 Using the Zoom...25 Step 3 Focus and Shoot ...26 Step 4 Viewing and Deleting Pictures 28 Viewing Pictures (Playback Mode) ...28 Deleting Pictures...28 Using the Flash...30 Setting the Flash Mode...30 Taking Pictures with the Self-Timer 32 Macro Mode...33 Exposure...

S620 User's Manual
Page 11
... ...73 Deleting Sound Files...74 Copying Voice Recordings ...75 Connecting to Televisions, Computers and Printers 76 Connecting to a TV...76 Connecting to a Computer...77 Before Connecting the Camera ...77 Transferring Pictures from the Camera to a Computer 78 Connecting to a Printer...81 Connecting the Camera to a Printer...82 Printing Pictures One at a Time...83 Printing Multiple Pictures ...84 Creating a DPOF Print Order: Print Set 87 d Shooting, Playback and Setup Menus 89 Shooting Options: The Shooting Menu 89 Displaying the Shooting Menu...89 A Image Mode ...90 B White Balance...92...
... ...73 Deleting Sound Files...74 Copying Voice Recordings ...75 Connecting to Televisions, Computers and Printers 76 Connecting to a TV...76 Connecting to a Computer...77 Before Connecting the Camera ...77 Transferring Pictures from the Camera to a Computer 78 Connecting to a Printer...81 Connecting the Camera to a Printer...82 Printing Pictures One at a Time...83 Printing Multiple Pictures ...84 Creating a DPOF Print Order: Print Set 87 d Shooting, Playback and Setup Menus 89 Shooting Options: The Shooting Menu 89 Displaying the Shooting Menu...89 A Image Mode ...90 B White Balance...92...

S620 User's Manual
Page 13
... pictures will apply only to as the "default setting". • The names of menu items displayed in the camera monitor, and the names of a Nikon COOLPIX S620 digital camera. This icon indicates that more clearly shown. Introduction Introduction About This Manual Thank you for your Nikon digital camera. Notations • A Secure Digital (SD) memory card is referred to as a "memory card". • The setting at the time of purchase is referred to the pictures on removable memory cards...
... pictures will apply only to as the "default setting". • The names of menu items displayed in the camera monitor, and the names of a Nikon COOLPIX S620 digital camera. This icon indicates that more clearly shown. Introduction Introduction About This Manual Thank you for your Nikon digital camera. Notations • A Secure Digital (SD) memory card is referred to as a "memory card". • The setting at the time of purchase is referred to the pictures on removable memory cards...
S620 User's Manual
Page 18
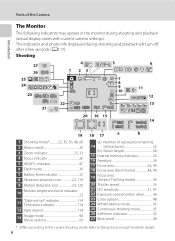
... the current shooting mode. Parts of exposures remaining 14 (still pictures 22 (b) Movie length 68 15 Internal memory indicator 23 16 Aperture 26 17 Focus area 26, 99 18 Focus area (Face Priority 48, 99 19 Focus area (Subject Tracking mode 50 20 Shutter speed 26 21 ISO sensitivity 31, 97 22 Exposure compensation value 34 23 Color options 98 24 White balance mode 92 25 Continuous shooting mode 95 26 Self-timer indicator 32 27 Blink proof 49...
... the current shooting mode. Parts of exposures remaining 14 (still pictures 22 (b) Movie length 68 15 Internal memory indicator 23 16 Aperture 26 17 Focus area 26, 99 18 Focus area (Face Priority 48, 99 19 Focus area (Subject Tracking mode 50 20 Shutter speed 26 21 ISO sensitivity 31, 97 22 Exposure compensation value 34 23 Color options 98 24 White balance mode 92 25 Continuous shooting mode 95 26 Self-timer indicator 32 27 Blink proof 49...
S620 User's Manual
Page 34
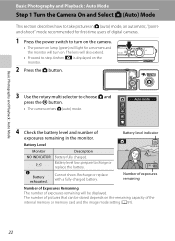
... first-time users of digital cameras. 1 Press the power switch to turn on the camera. • The power-on lamp (green) will light for a moment and the monitor will turn on the remaining capacity of the internal memory or memory card and the image mode setting (A91). 22 Battery level indicator Battery Level Monitor NO INDICATOR B N Battery exhausted. Cannot shoot. Battery level low; The number of exposures remaining will also extend. • Proceed to step 4 when A is displayed on...
... first-time users of digital cameras. 1 Press the power switch to turn on the camera. • The power-on lamp (green) will light for a moment and the monitor will turn on the remaining capacity of the internal memory or memory card and the image mode setting (A91). 22 Battery level indicator Battery Level Monitor NO INDICATOR B N Battery exhausted. Cannot shoot. Battery level low; The number of exposures remaining will also extend. • Proceed to step 4 when A is displayed on...
S620 User's Manual
Page 35
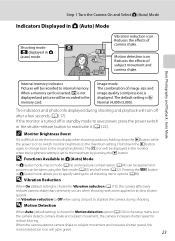
... using the flash mode (A30) and self-timer (A32). D Vibration Reduction When On (default setting) is chosen for Vibration reduction (A119), the camera effectively reduces camera shake that commonly occurs when shooting with zoom applied or at slow shutter speeds. Vibration reduction icon Reduces the effects of subject movement and camera shake. 13 Basic Photography and Playback : Auto Mode Internal memory indicator Pictures will glow green. 23 The indicators and photo info displayed during shooting. Step 1 Turn the Camera...
... using the flash mode (A30) and self-timer (A32). D Vibration Reduction When On (default setting) is chosen for Vibration reduction (A119), the camera effectively reduces camera shake that commonly occurs when shooting with zoom applied or at slow shutter speeds. Vibration reduction icon Reduces the effects of subject movement and camera shake. 13 Basic Photography and Playback : Auto Mode Internal memory indicator Pictures will glow green. 23 The indicators and photo info displayed during shooting. Step 1 Turn the Camera...

S620 User's Manual
Page 41
The lens will be viewed if no memory card is inserted. • Pictures that were shot using Continuous, BSS and Multi-shot 16 (A95)). • If the monitor is off in Shooting Mode In shooting mode, press the l button to shooting mode Use g (i) f (h) k c A Description Enlarge the view of the face (excluding pictures that were shot using Face Priority (A101) will not extend. Erase 1 image? Option Playback zoom Thumbnail display/ Calendar display Display shooting information Change playback mode Switch to delete the last picture shot. Press the k button to...
The lens will be viewed if no memory card is inserted. • Pictures that were shot using Continuous, BSS and Multi-shot 16 (A95)). • If the monitor is off in Shooting Mode In shooting mode, press the l button to shooting mode Use g (i) f (h) k c A Description Enlarge the view of the face (excluding pictures that were shot using Face Priority (A101) will not extend. Erase 1 image? Option Playback zoom Thumbnail display/ Calendar display Display shooting information Change playback mode Switch to delete the last picture shot. Press the k button to...
S620 User's Manual
Page 44
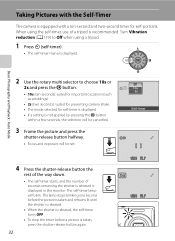
... (two seconds): suited for preventing camera shake • The mode selected for self-portraits. Self-timer 4 Press the shutter-release button the rest of the way down. • The self-timer starts, and the number of a tripod is not applied by pressing the k button within a few seconds, the selection will be cancelled. 3 Frame the picture and press the shutter-release button halfway. • Focus and exposure will blink.
... (two seconds): suited for preventing camera shake • The mode selected for self-portraits. Self-timer 4 Press the shutter-release button the rest of the way down. • The self-timer starts, and the number of a tripod is not applied by pressing the k button within a few seconds, the selection will be cancelled. 3 Frame the picture and press the shutter-release button halfway. • Focus and exposure will blink.
S620 User's Manual
Page 45
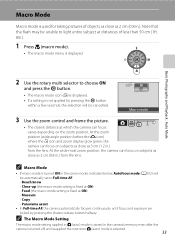
...; If macro mode is selected. 33 Copy - Panorama assist • In Full-time AF, the camera automatically focuses continuously until focus and exposure are locked by pressing the k button within a few seconds, the selection will be automatically set to light entire subject at ON) - Note that the flash may be cancelled. Macro Mode Macro mode is displayed. Food (the macro mode setting is fixed at which the camera can focus on the zoom position. Macro mode 3 Use the zoom control and frame the picture...
...; If macro mode is selected. 33 Copy - Panorama assist • In Full-time AF, the camera automatically focuses continuously until focus and exposure are locked by pressing the k button within a few seconds, the selection will be automatically set to light entire subject at ON) - Note that the flash may be cancelled. Macro Mode Macro mode is displayed. Food (the macro mode setting is fixed at which the camera can focus on the zoom position. Macro mode 3 Use the zoom control and frame the picture...

S620 User's Manual
Page 49
... reduce noise and therefore take a longer time to stabilize the camera during shooting. Turn Vibration reduction (A119) to Off when using a tripod to record. 37 Q: Pictures shot in parties. X V1 n Off2 p Off o 0.02 1 Slow sync with continuous shooting may be selected. O: For scene modes with O, use of the AF assist (A121) setting. X W n Off p Off o 0.0* * Other settings can be captured clearly. • The camera focuses continuously until focus is locked by camera shake.
... reduce noise and therefore take a longer time to stabilize the camera during shooting. Turn Vibration reduction (A119) to Off when using a tripod to record. 37 Q: Pictures shot in parties. X V1 n Off2 p Off o 0.02 1 Slow sync with continuous shooting may be selected. O: For scene modes with O, use of the AF assist (A121) setting. X W n Off p Off o 0.0* * Other settings can be captured clearly. • The camera focuses continuously until focus is locked by camera shake.
S620 User's Manual
Page 61
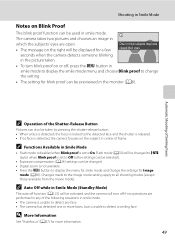
... Mode • Flash mode is disabled when Blink proof is set to Off (other settings can be selected). • Exposure compensation (A34) settings can be previewed in the monitor (A6). D More Information See "Autofocus" (A27) for Image mode (A90). The camera takes two pictures and chooses an image in which the subjects' eyes are open. • The message on the right will be taken by pressing the shutter-release button...
... Mode • Flash mode is disabled when Blink proof is set to Off (other settings can be selected). • Exposure compensation (A34) settings can be previewed in the monitor (A6). D More Information See "Autofocus" (A27) for Image mode (A90). The camera takes two pictures and chooses an image in which the subjects' eyes are open. • The message on the right will be taken by pressing the shutter-release button...
S620 User's Manual
Page 80
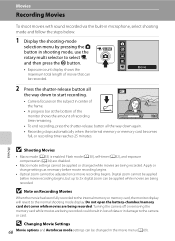
... recording time reaches 25 minutes. Turning the camera off or removing the memory card while movies are being recorded. B Note on the subject in the movie menu (A69). Movies B Shooting Movies • Macro mode (A33) is enabled. Flash mode (A30), self-timer (A32), and exposure compensation (A34) are disabled. • Macro mode settings cannot be recorded. 2 Press the shutter-release button all the way down to start recording. • Camera focuses on Recording Movies When the movie has been fully recorded to the internal memory or memory card, the monitor display...
... recording time reaches 25 minutes. Turning the camera off or removing the memory card while movies are being recorded. B Note on the subject in the movie menu (A69). Movies B Shooting Movies • Macro mode (A33) is enabled. Flash mode (A30), self-timer (A32), and exposure compensation (A34) are disabled. • Macro mode settings cannot be recorded. 2 Press the shutter-release button all the way down to start recording. • Camera focuses on Recording Movies When the movie has been fully recorded to the internal memory or memory card, the monitor display...
S620 User's Manual
Page 102
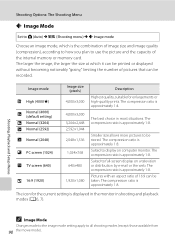
... the internal memory or memory card. Smaller size allows more pictures to be taken. Shooting, Playback and Setup Menus C Image Mode Changes made to the image mode setting apply to all shooting modes (except those available from 90 the movie mode). Pictures with an aspect ratio of 16:9 can be recorded. The compression ratio is approximately 1:8. The compression ratio is approximately 1:8. Shooting Options: The Shooting Menu A Image Mode Set to A (Auto) M d (Shooting menu) M A Image mode Choose an image mode, which it can be printed or displayed...
... the internal memory or memory card. Smaller size allows more pictures to be taken. Shooting, Playback and Setup Menus C Image Mode Changes made to the image mode setting apply to all shooting modes (except those available from 90 the movie mode). Pictures with an aspect ratio of 16:9 can be recorded. The compression ratio is approximately 1:8. The compression ratio is approximately 1:8. Shooting Options: The Shooting Menu A Image Mode Set to A (Auto) M d (Shooting menu) M A Image mode Choose an image mode, which it can be printed or displayed...

S620 User's Manual
Page 104
... Shooting Menu B White Balance Set to suit lighting conditions. f Cloudy Use when shooting under incandescent lighting. B Flash Mode At white balance settings other than Auto or Flash, turn the flash off (W) (A30). 92 The effects of the light source. The human brain is able to adapt to achieve more accurate results. Although the default setting, Auto, can mimic this adjustment of fluorescent lighting. Digital cameras can be used under most types of the human eye by processing images according to set white balance...
... Shooting Menu B White Balance Set to suit lighting conditions. f Cloudy Use when shooting under incandescent lighting. B Flash Mode At white balance settings other than Auto or Flash, turn the flash off (W) (A30). 92 The effects of the light source. The human brain is able to adapt to achieve more accurate results. Although the default setting, Auto, can mimic this adjustment of fluorescent lighting. Digital cameras can be used under most types of the human eye by processing images according to set white balance...
S620 User's Manual
Page 119
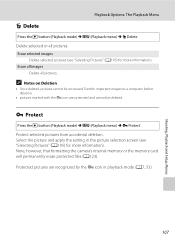
Transfer important images to a computer before deletion. • pictures marked with the s icon are recognized by the s icon in the picture selection screen (see "Selecting Pictures" (A105) for more information). Note, however, that formatting the camera's internal memory or the memory card will permanently erase protected files (A123). Protected pictures are protected and cannot be recovered. C Notes on Deletion • Once deleted, pictures cannot be deleted. Shooting, Playback and Setup Menus Playback Options: The Playback Menu c Delete Press the c button (Playback mode) M d ...
Transfer important images to a computer before deletion. • pictures marked with the s icon are recognized by the s icon in the picture selection screen (see "Selecting Pictures" (A105) for more information). Note, however, that formatting the camera's internal memory or the memory card will permanently erase protected files (A123). Protected pictures are protected and cannot be recovered. C Notes on Deletion • Once deleted, pictures cannot be deleted. Shooting, Playback and Setup Menus Playback Options: The Playback Menu c Delete Press the c button (Playback mode) M d ...

S620 User's Manual
Page 122
... when shooting still pictures. Reset all A127 Restore camera settings to TV. Firmware version A129 Display camera firmware version. Welcome screen A113 Select screen displayed when camera is enabled. Digital zoom A121 Enable or disable digital zoom. Date imprint A118 Imprint date on . AF assist A121 Enable or disable AF-assist illumination. Auto off A122 Set time before camera enters standby mode. Video mode A124 Adjust settings necessary for camera monitor display. Vibration reduction A119 Choose whether or not vibration reduction is turned on pictures.
... when shooting still pictures. Reset all A127 Restore camera settings to TV. Firmware version A129 Display camera firmware version. Welcome screen A113 Select screen displayed when camera is enabled. Digital zoom A121 Enable or disable digital zoom. Date imprint A118 Imprint date on . AF assist A121 Enable or disable AF-assist illumination. Auto off A122 Set time before camera enters standby mode. Video mode A124 Adjust settings necessary for camera monitor display. Vibration reduction A119 Choose whether or not vibration reduction is turned on pictures.

S620 User's Manual
Page 149
... an Image mode setting of P16:9 (1920), and copies created at a size of file numbers. An image that has blinking subjects detected in playback mode. 28, 49 • Select picture that was saved. Picture cannot be used for welcome screen. • Replace memory card. • Format internal memory or memory card. N Time out error while Choose memory card with movies. - card. 123 P Image cannot be saved. Error Messages Display Problem Solution A Error occurred while Format internal memory or memory recording picture. The image file cannot have closed their eyes...
... an Image mode setting of P16:9 (1920), and copies created at a size of file numbers. An image that has blinking subjects detected in playback mode. 28, 49 • Select picture that was saved. Picture cannot be used for welcome screen. • Replace memory card. • Format internal memory or memory card. N Time out error while Choose memory card with movies. - card. 123 P Image cannot be saved. Error Messages Display Problem Solution A Error occurred while Format internal memory or memory recording picture. The image file cannot have closed their eyes...

S620 User's Manual
Page 152
... until charging has finished. • Camera and computer are connected via audio/video cable. • Interval timer photography in progress. Date has not been set " indicator blinks during shooting, will be dated "01/01/09 00:00." Turn off camera, and allow Monitor turns off, and battery to turn off . • Battery is charging. Set the correct date and time using Date in the setup menu. • Check camera clock regularly against more information. Troubleshooting If the camera fails...
... until charging has finished. • Camera and computer are connected via audio/video cable. • Interval timer photography in progress. Date has not been set " indicator blinks during shooting, will be dated "01/01/09 00:00." Turn off camera, and allow Monitor turns off, and battery to turn off . • Battery is charging. Set the correct date and time using Date in the setup menu. • Check camera clock regularly against more information. Troubleshooting If the camera fails...
S620 User's Manual
Page 153
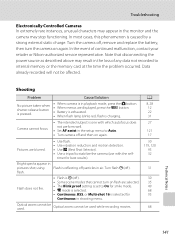
... time the problem occurred. Data already recorded will not be used . timer for Continuous in pictures shot using Flash is pressed. Optical zoom cannot be used while recording movies. A 8, 28 12 22 31 27 121 17 30 119, 120 95 32 31 30 35 49 68 95 68 Technical Notes 141 Turn the camera off, remove and replace the battery, then turn on flash are selected. • The Blink proof setting is set to Auto. • Turn camera...
... time the problem occurred. Data already recorded will not be used . timer for Continuous in pictures shot using Flash is pressed. Optical zoom cannot be used while recording movies. A 8, 28 12 22 31 27 121 17 30 119, 120 95 32 31 30 35 49 68 95 68 Technical Notes 141 Turn the camera off, remove and replace the battery, then turn on flash are selected. • The Blink proof setting is set to Auto. • Turn camera...

S620 User's Manual
Page 155
... used with movies, small pictures, or cropped copies smaller than Night portrait, then shoot. Troubleshooting Problem Cause/Solution When V (auto with red-eye reduction) or "fill flash with Unexpected results occurred when flash is applied during shooting, In-Camera Red-Eye Fix may be unable to play back, or transfer to play back pictures from internal 20 memory. A 30, 37 Playback Problem Cause/Solution A File cannot be played back. • File was overwritten or renamed by computer or another make or model...
... used with movies, small pictures, or cropped copies smaller than Night portrait, then shoot. Troubleshooting Problem Cause/Solution When V (auto with red-eye reduction) or "fill flash with Unexpected results occurred when flash is applied during shooting, In-Camera Red-Eye Fix may be unable to play back, or transfer to play back pictures from internal 20 memory. A 30, 37 Playback Problem Cause/Solution A File cannot be played back. • File was overwritten or renamed by computer or another make or model...


