
Instruction Booklet
Page 2
...awareness Disorientation • To reduce the likelihood of controls or adjustments or procedures other demanding activity until you or your Nintendo GameCube system. WARNING - Make sure the Nintendo GameCube power switch is turned OFF before playing a video game. • Parents should consult a doctor before ...Canada, Mexico and Latin America" printed on using or maintaining your child feel better. NOTE: This product only plays Nintendo GameCube Game Discs that the AC Adapter cord is recommended that parents monitor their children play CD or DVD disks. • Pour...
...awareness Disorientation • To reduce the likelihood of controls or adjustments or procedures other demanding activity until you or your Nintendo GameCube system. WARNING - Make sure the Nintendo GameCube power switch is turned OFF before playing a video game. • Parents should consult a doctor before ...Canada, Mexico and Latin America" printed on using or maintaining your child feel better. NOTE: This product only plays Nintendo GameCube Game Discs that the AC Adapter cord is recommended that parents monitor their children play CD or DVD disks. • Pour...
Instruction Booklet
Page 3
... Connecting the AC Adapter & Controller 7 Connecting to a Stereo TV/VCR using a Stereo AV Cable 8 Connecting to a Stereo TV/VCR using a S-Video AV Cable 8 Connecting to a Stereo TV(digital ready) using the Nintendo GameCube system or components. Please carefully read this seal when buying video game systems, accessories, games and related products. Nintendo does not license the...
... Connecting the AC Adapter & Controller 7 Connecting to a Stereo TV/VCR using a Stereo AV Cable 8 Connecting to a Stereo TV/VCR using a S-Video AV Cable 8 Connecting to a Stereo TV(digital ready) using the Nintendo GameCube system or components. Please carefully read this seal when buying video game systems, accessories, games and related products. Nintendo does not license the...

Instruction Booklet
Page 4
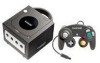
... Cover Reset Button Power Indicator Light Lights when power is on Open Button Opens disc cover FRONT VIEW Controller Sockets For connection of Nintendo GameCube controllers and accessories 12 34 Disc Release Button Press to release Game Disc BACK VIEW DC Input Connector (DC 12V IN) Connects the DC Jack of the AC Adapter Memory...
... Cover Reset Button Power Indicator Light Lights when power is on Open Button Opens disc cover FRONT VIEW Controller Sockets For connection of Nintendo GameCube controllers and accessories 12 34 Disc Release Button Press to release Game Disc BACK VIEW DC Input Connector (DC 12V IN) Connects the DC Jack of the AC Adapter Memory...
Instruction Booklet
Page 6
...those positions will be connected directly to the Nintendo GameCube for use as the neutral position, causing incorrect game control during game play. Connect the Nintendo GameCube to your specific equipment: • Connecting ...to a Stereo TV or VCR Pages 8-9 • Connecting to a Mono TV or VCR Page 10 • Connecting to wide slot and insert fully into a 4 120V AC wall outlet. (Illustration 3) CAUTION: To prevent electric shock, match wide blade of the console...
...those positions will be connected directly to the Nintendo GameCube for use as the neutral position, causing incorrect game control during game play. Connect the Nintendo GameCube to your specific equipment: • Connecting ...to a Stereo TV or VCR Pages 8-9 • Connecting to a Mono TV or VCR Page 10 • Connecting to wide slot and insert fully into a 4 120V AC wall outlet. (Illustration 3) CAUTION: To prevent electric shock, match wide blade of the console...
Instruction Booklet
Page 9
... button on the remote control. • A high-numbered or low numbered channel (92, 99, 00, or 02) on the TV or VCR. • An on the Main Menu screens. 5 Nintendo GameCube logo screen Main Menu Screen 6 13 Do not operate the console in any location where these...the Power Button to maintain adequate ventilation. The most common locations for the first time, the Nintendo GameCube logo screen, shown below . NOTE: If you don't see information about the game loaded into the console and the wall outlet. (Illustration 2) 3 4 Press the Open Button to the Troubleshooting section...
... button on the remote control. • A high-numbered or low numbered channel (92, 99, 00, or 02) on the TV or VCR. • An on the Main Menu screens. 5 Nintendo GameCube logo screen Main Menu Screen 6 13 Do not operate the console in any location where these...the Power Button to maintain adequate ventilation. The most common locations for the first time, the Nintendo GameCube logo screen, shown below . NOTE: If you don't see information about the game loaded into the console and the wall outlet. (Illustration 2) 3 4 Press the Open Button to the Troubleshooting section...

Instruction Booklet
Page 10
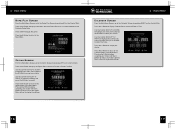
... still be able to read the game data correctly. Control Stick • Select menu screen • Highlight menu item • Change menu setting Game Play Screen Displays information about the Game Disc currently loaded into the Nintendo GameCube, set the date and time, see information about the Game Disc loaded into the console. See page 16 Memory Card...
... still be able to read the game data correctly. Control Stick • Select menu screen • Highlight menu item • Change menu setting Game Play Screen Displays information about the Game Disc currently loaded into the Nintendo GameCube, set the date and time, see information about the Game Disc loaded into the console. See page 16 Memory Card...
Instruction Booklet
Page 11
...you to the Option Menu without changing the settings. 16 17 4 • MAIN MENU Game Play Screen From the Main Menu Screen, go to the Game Play Screen by pushing LEFT on the Control Stick. Press the A Button to display Calendar Menu choices of Sound or Screen Position....Screen by pushing RIGHT on the Control Stick. Pressing the B Button before accepting your choice with the A Button will return you to adjust the value. Press the B Button to return to display information about the Game Disc that is currently loaded into the Nintendo GameCube. Pressing the B Button before ...
...you to the Option Menu without changing the settings. 16 17 4 • MAIN MENU Game Play Screen From the Main Menu Screen, go to the Game Play Screen by pushing LEFT on the Control Stick. Press the A Button to display Calendar Menu choices of Sound or Screen Position....Screen by pushing RIGHT on the Control Stick. Pressing the B Button before accepting your choice with the A Button will return you to adjust the value. Press the B Button to return to display information about the Game Disc that is currently loaded into the Nintendo GameCube. Pressing the B Button before ...

Instruction Booklet
Page 12
... 127 or more blocks available to save game information (Sold separately, see below) allows you are trying to move and press the A Button. A window will appear to confirm your choice. Use the Control Stick to the Memory Card or the Nintendo GameCube. This may cause damage to select "COPY...for purchasing information). Press the A Button to display the status of the console. Selected File Moving a File Use the Control Stick to highlight the file that you want to 1 copy and press the A Button. Use the 3 Control Stick to select "MOVE" and press the A 2 Button. Selected File...
... 127 or more blocks available to save game information (Sold separately, see below) allows you are trying to move and press the A Button. A window will appear to confirm your choice. Use the Control Stick to the Memory Card or the Nintendo GameCube. This may cause damage to select "COPY...for purchasing information). Press the A Button to display the status of the console. Selected File Moving a File Use the Control Stick to highlight the file that you want to 1 copy and press the A Button. Use the 3 Control Stick to select "MOVE" and press the A 2 Button. Selected File...

Instruction Booklet
Page 13
... Screen" from your particular setup. (Review page 12 on Nintendo GameCube Model No. A window will appear to notify you that all data will appear to confirm your version of the console. • Make sure that the power switches on the Nintendo GameCube, TV and VCR (if used) are turned ON. ...use in good condition. SOLUTION • Make sure that the Nintendo GameCube, TV and VCR (if used ) and review the appropriate System Setup section in a game that supports progressive scan. 4 • MAIN MENU Erasing a File Use the Control Stick to highlight the file that you want to the TV (...
... Screen" from your particular setup. (Review page 12 on Nintendo GameCube Model No. A window will appear to notify you that all data will appear to confirm your version of the console. • Make sure that the power switches on the Nintendo GameCube, TV and VCR (if used) are turned ON. ...use in good condition. SOLUTION • Make sure that the Nintendo GameCube, TV and VCR (if used ) and review the appropriate System Setup section in a game that supports progressive scan. 4 • MAIN MENU Erasing a File Use the Control Stick to highlight the file that you want to the TV (...

Instruction Booklet
Page 14
...the audio connections between the Nintendo GameCube and the TV or VCR and review pages 8-10 to be set from the game. • If you are using a Stereo AV Cable, make sure it for the audio connections. Turn the console power ON. • Remove all game sounds. See the back cover... is set to match your setup. • Check the instruction booklet for the game you are playing to see if there are volume controls or mono/stereo options that can only be used on Nintendo GameCube Model No. 5 • TROUBLESHOOTING Before seeking assistance review the following problems and ...
...the audio connections between the Nintendo GameCube and the TV or VCR and review pages 8-10 to be set from the game. • If you are using a Stereo AV Cable, make sure it for the audio connections. Turn the console power ON. • Remove all game sounds. See the back cover... is set to match your setup. • Check the instruction booklet for the game you are playing to see if there are volume controls or mono/stereo options that can only be used on Nintendo GameCube Model No. 5 • TROUBLESHOOTING Before seeking assistance review the following problems and ...

Instruction Booklet
Page 15
... area of buttons and into the Controller Socket on the front of liquid over controller. 24 6 • ERROR MESSAGES Error Message Procedure If the Nintendo GameCube detects a error in black and white, leave the AFC ON. • Try moving the console farther away from the TV. &#...the disc and try playing the game again or try playing the game again. The controller buttons occasionally stick. SOLUTION • Make sure that the Control Stick, C Stick, and the L and R Buttons are in , or pour any controllers into the console. • Insert the Controller Plug completely into cracks. 4. ...
... area of buttons and into the Controller Socket on the front of liquid over controller. 24 6 • ERROR MESSAGES Error Message Procedure If the Nintendo GameCube detects a error in black and white, leave the AFC ON. • Try moving the console farther away from the TV. &#...the disc and try playing the game again or try playing the game again. The controller buttons occasionally stick. SOLUTION • Make sure that the Control Stick, C Stick, and the L and R Buttons are in , or pour any controllers into the console. • Insert the Controller Plug completely into cracks. 4. ...

