
User Guide
Page 5
Basic functions 32 Making a call ...32 Speed dialling a phone number ...33 Making a conference call ...33 Answering or rejecting an incoming call 34 Call waiting...34 Options during a call ...34 Loudspeaker...35 4. Using the menu ... Writing and sending a SMS e-mail 50 Reading and replying to a message or a SMS e-mail 52 Inbox and outbox folders ...53 Templates...53 Copyright © 2004 Nokia. Keypad lock (Keyguard) ...28 Changing the front and back...
Basic functions 32 Making a call ...32 Speed dialling a phone number ...33 Making a conference call ...33 Answering or rejecting an incoming call 34 Call waiting...34 Options during a call ...34 Loudspeaker...35 4. Using the menu ... Writing and sending a SMS e-mail 50 Reading and replying to a message or a SMS e-mail 52 Inbox and outbox folders ...53 Templates...53 Copyright © 2004 Nokia. Keypad lock (Keyguard) ...28 Changing the front and back...

User Guide
Page 16
... sounds are used for polyphonic sounds but the phone can be used in the phone The Nokia 3120 phone provides many more. The phone supports the Scalable Polyphonic MIDI (SP-MIDI) format. You can save the pictures and sounds for personalising your phone. Overview of Xpress-onTM covers are practical for daily use, such as Calendar, Clock...
... sounds are used for polyphonic sounds but the phone can be used in the phone The Nokia 3120 phone provides many more. The phone supports the Scalable Polyphonic MIDI (SP-MIDI) format. You can save the pictures and sounds for personalising your phone. Overview of Xpress-onTM covers are practical for daily use, such as Calendar, Clock...

User Guide
Page 24
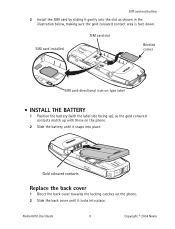
... battery Keep all miniature SIM cards out of the reach of the phone facing you, push the back cover release button (1) and slide the back cover off and disconnected from any enhancement. 1. To remove the back cover from the phone: With the back of small children. • The SIM card ...and its contacts can easily be careful when handling, inserting or removing the card. • Before installing the SIM card, always make sure that the phone is switched off (2). Copyright © 2004 Nokia. All rights...
... battery Keep all miniature SIM cards out of the reach of the phone facing you, push the back cover release button (1) and slide the back cover off and disconnected from any enhancement. 1. To remove the back cover from the phone: With the back of small children. • The SIM card ...and its contacts can easily be careful when handling, inserting or removing the card. • Before installing the SIM card, always make sure that the phone is switched off (2). Copyright © 2004 Nokia. All rights...

User Guide
Page 26
... empty, it may take a few minutes before the charging indicator appears on the bottom of your phone. 2. The charging time depends on . Copyright © 2004 Nokia. All rights reserved. 26 Insert the battery (8). 6. Slide the back cover into its place (9). ■ Charging the battery 1. Connect the lead from the charger to an AC...-5C battery with the ACP-7 charger takes up to 3 hours in standby mode. You can be made. The text Charging is displayed briefly if the phone is switched on the charger and the battery used. 5.
... empty, it may take a few minutes before the charging indicator appears on the bottom of your phone. 2. The charging time depends on . Copyright © 2004 Nokia. All rights reserved. 26 Insert the battery (8). 6. Slide the back cover into its place (9). ■ Charging the battery 1. Connect the lead from the charger to an AC...-5C battery with the ACP-7 charger takes up to 3 hours in standby mode. You can be made. The text Charging is displayed briefly if the phone is switched on the charger and the battery used. 5.

User Guide
Page 30
... device. Always store and use the phone with the covers attached. 1. All rights reserved. 30 Copyright © 2004 Nokia. ■ Changing the front and back cover Before changing the front cover, always switch off (2). 2. Avoid touching electronic components while changing covers. Remove the back cover of the phone facing you, push the back cover release button (1) and slide the...
... device. Always store and use the phone with the covers attached. 1. All rights reserved. 30 Copyright © 2004 Nokia. ■ Changing the front and back cover Before changing the front cover, always switch off (2). 2. Avoid touching electronic components while changing covers. Remove the back cover of the phone facing you, push the back cover release button (1) and slide the...

User Guide
Page 31
4. All rights reserved. 31 Place the back cover and the phone properly together (1) and slide the back cover into its place (2) until the catch is properly locked. Copyright © 2004 Nokia. To attach the front cover, first place the phone and the front cover properly together and then gently push on t the top of the phone until the back cover release button is locked properly. 5.
4. All rights reserved. 31 Place the back cover and the phone properly together (1) and slide the back cover into its place (2) until the catch is properly locked. Copyright © 2004 Nokia. To attach the front cover, first place the phone and the front cover properly together and then gently push on t the top of the phone until the back cover release button is locked properly. 5.

User Guide
Page 46
...Select application 2. App. downloads 3. Access codes 10.Restore factory settings 6. Go to a compatible headset, handsfree unit, Gaming cover or loopset available for the phone. Game downloads 3. 8. PIN code request 2. Fixed dialling 4. Alarm clock 1. Images 2. Tones 2. Settings 1. Handsfree 3.... Alarm time 2. Delete folder 4. Select game 2. This menu is shown only if the phone is or has been connected to date 4. View folders 1. Add folder 3. Memory 4. Game sounds 2. Shakes 10.Applications 1. Security ...
...Select application 2. App. downloads 3. Access codes 10.Restore factory settings 6. Go to a compatible headset, handsfree unit, Gaming cover or loopset available for the phone. Game downloads 3. 8. PIN code request 2. Fixed dialling 4. Alarm clock 1. Images 2. Tones 2. Settings 1. Handsfree 3.... Alarm time 2. Delete folder 4. Select game 2. This menu is shown only if the phone is or has been connected to date 4. View folders 1. Add folder 3. Memory 4. Game sounds 2. Shakes 10.Applications 1. Security ...
User Guide
Page 87
... can select Headset, Handsfree, Loopset or Gaming cover if the corresponding enhancement is or has been connected to the caller group you connect the selected enhancement. The Lights option is available only when Handsfree is connected. • Automatic answer to set the phone to a selected caller group. Enhancement settings This menu is... via OTA or by downloading, you want or All calls and press Mark. You can save the ringing tone in the Gallery. Copyright © 2004 Nokia. All rights reserved. 87
... can select Headset, Handsfree, Loopset or Gaming cover if the corresponding enhancement is or has been connected to the caller group you connect the selected enhancement. The Lights option is available only when Handsfree is connected. • Automatic answer to set the phone to a selected caller group. Enhancement settings This menu is... via OTA or by downloading, you want or All calls and press Mark. You can save the ringing tone in the Gallery. Copyright © 2004 Nokia. All rights reserved. 87
User Guide
Page 88
...Security settings Note: When security features that activation of the cover lights may cause distraction. When the fixed dialling is supported by your phone. Copyright © 2004 Nokia. Select • PIN code request to set the phone to activate and deactivate the lights when using a Xpress-...onTM Gaming cover. In this function is on . Press Menu, and select ...
...Security settings Note: When security features that activation of the cover lights may cause distraction. When the fixed dialling is supported by your phone. Copyright © 2004 Nokia. Select • PIN code request to set the phone to activate and deactivate the lights when using a Xpress-...onTM Gaming cover. In this function is on . Press Menu, and select ...

User Guide
Page 6
Phone security 62 Lock the keypad (keyguard 62 Security codes 62 PIN codes 63 PUK codes 64 Security code 64 Fixed dialing 65 Restrict calls 65 ... 79 Browser options 79 Navigate 79 Bookmarks 80 Security issues 81 GPRS 82 Disconnect 83 Nokia 6010 User Guide v Copyright © 2004 Nokia Gallery 55 Display settings 56 Caller groups 57 Restore factory settings 58 Xpress-on™ coloUr covers 58 13. Mobile messages 67 Message settings 67 Text messages 68 E-mail messages 71...
Phone security 62 Lock the keypad (keyguard 62 Security codes 62 PIN codes 63 PUK codes 64 Security code 64 Fixed dialing 65 Restrict calls 65 ... 79 Browser options 79 Navigate 79 Bookmarks 80 Security issues 81 GPRS 82 Disconnect 83 Nokia 6010 User Guide v Copyright © 2004 Nokia Gallery 55 Display settings 56 Caller groups 57 Restore factory settings 58 Xpress-on™ coloUr covers 58 13. Mobile messages 67 Message settings 67 Text messages 68 E-mail messages 71...

User Guide
Page 16
...Remove the back cover and battery" on page 8 for quick reference. If a Nokia representative asks a specific question about the enhancement, you will have the equipment with you when you are calling about your phone. Find information about your phone This information is on the back of the phone (under the...249-9619 For TTY users: 1-800-24-NOKIA (1-800-246-6542) Customer Care, Canada Nokia Products Ltd. 601 Westney Rd. South Ajax, Ontario L1S 4N7 Tel: 1-905-427-1373 1-888-22-NOKIA (1-888-226-6542) Fax: 1-905-619-4360 Web site: www.nokia.ca Nokia 6010 User Guide 7 Copyright © 2004...
...Remove the back cover and battery" on page 8 for quick reference. If a Nokia representative asks a specific question about the enhancement, you will have the equipment with you when you are calling about your phone. Find information about your phone This information is on the back of the phone (under the...249-9619 For TTY users: 1-800-24-NOKIA (1-800-246-6542) Customer Care, Canada Nokia Products Ltd. 601 Westney Rd. South Ajax, Ontario L1S 4N7 Tel: 1-905-427-1373 1-888-22-NOKIA (1-888-226-6542) Fax: 1-905-619-4360 Web site: www.nokia.ca Nokia 6010 User Guide 7 Copyright © 2004...

User Guide
Page 17
... Warning: Keep all SIM cards out of the reach of the phone facing you need to attach the optional headset. This chapter covers these topics, as well as shown in the illustration below, locate the SIM card slot. 8 Copyright © 2004 Nokia For availability and information on how to prepare your SIM card...
... Warning: Keep all SIM cards out of the reach of the phone facing you need to attach the optional headset. This chapter covers these topics, as well as shown in the illustration below, locate the SIM card slot. 8 Copyright © 2004 Nokia For availability and information on how to prepare your SIM card...
User Guide
Page 18
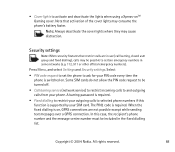
... the gold coloured contact area is face down. SIM card and battery 2 Install the SIM card by sliding it snaps into place. Nokia 6010 User Guide 9 Copyright © 2004 Nokia Gold coloured contacts Replace the back cover 1 Direct the back cover towards the locking catches on the phone. 2 Slide the battery until it locks into place.
... the gold coloured contact area is face down. SIM card and battery 2 Install the SIM card by sliding it snaps into place. Nokia 6010 User Guide 9 Copyright © 2004 Nokia Gold coloured contacts Replace the back cover 1 Direct the back cover towards the locking catches on the phone. 2 Slide the battery until it locks into place.
User Guide
Page 19
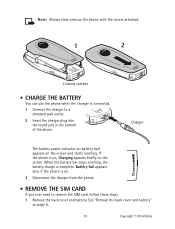
... charger plug into the round jack in the bottom of the phone. Charger The battery power indicator (or battery bar) appears on page 8. 10 Copyright © 2004 Nokia If the phone is on the screen. See "Remove the back cover and battery" on the screen and starts scrolling. Note: Always... store and use the phone with the covers attached. 1 2 Locking catches • CHARGE THE BATTERY You can ...
... charger plug into the round jack in the bottom of the phone. Charger The battery power indicator (or battery bar) appears on page 8. 10 Copyright © 2004 Nokia If the phone is on the screen. See "Remove the back cover and battery" on the screen and starts scrolling. Note: Always... store and use the phone with the covers attached. 1 2 Locking catches • CHARGE THE BATTERY You can ...

User Guide
Page 21
...the phone asks for a personal identity number (PIN) code, enter the PIN code (displayed as ****) and select OK. 3 See the information about PIN codes on changing the display language. See "Change the security code" on page 65 for at least three seconds. Back cover release 12 Copyright © 2004 Nokia Back cover ...Antenna area On the back of the phone for more information.
...the phone asks for a personal identity number (PIN) code, enter the PIN code (displayed as ****) and select OK. 3 See the information about PIN codes on changing the display language. See "Change the security code" on page 65 for at least three seconds. Back cover release 12 Copyright © 2004 Nokia Back cover ...Antenna area On the back of the phone for more information.

User Guide
Page 47
...name, number, or address. Hold-Holds or releases a call . New call Enter the second phone number or recall it from Contacts and press the Talk key. 10 Advanced calling features This chapter covers advanced calling features, including: • In-call options and swapping between calls • Call ...touch tones. Touch tones are available in -call menu. With either method, the first call on hold . 38 Copyright © 2004 Nokia New call-Allows you can be used for availability of options may vary. Contacts-Switches you to Contacts, so that are described are the...
...name, number, or address. Hold-Holds or releases a call . New call Enter the second phone number or recall it from Contacts and press the Talk key. 10 Advanced calling features This chapter covers advanced calling features, including: • In-call options and swapping between calls • Call ...touch tones. Touch tones are available in -call menu. With either method, the first call on hold . 38 Copyright © 2004 Nokia New call-Allows you can be used for availability of options may vary. Contacts-Switches you to Contacts, so that are described are the...

User Guide
Page 67
... > Caller groups, the group you want to see "Security code" on page 64. • XPRESS-ON™ COLOUR COVERS To personalize your Nokia 6010 mobile phone, you may be purchased from someone in Contacts. However, it does delete all customized settings you can use the device with it... . • RESTORE FACTORY SETTINGS You can change the front and back covers. Nokia Xpress-on the screen. When you to...
... > Caller groups, the group you want to see "Security code" on page 64. • XPRESS-ON™ COLOUR COVERS To personalize your Nokia 6010 mobile phone, you may be purchased from someone in Contacts. However, it does delete all customized settings you can use the device with it... . • RESTORE FACTORY SETTINGS You can change the front and back covers. Nokia Xpress-on the screen. When you to...

User Guide
Page 68
Personalize your phone Remove the back cover 1 With the back of the phone facing you, press and hold the back cover release button. 2 Slide the cover up. 3 Lift the cover off the phone. 3 2 1 Remove the phone from the front cover With the back of the phone facing you, gently separate the cover from inside the old front cover. Nokia 6010 User Guide 59 Copyright © 2004 Nokia Change the keypad 1 Lift the keypad from the phone, starting at the bottom.
Personalize your phone Remove the back cover 1 With the back of the phone facing you, press and hold the back cover release button. 2 Slide the cover up. 3 Lift the cover off the phone. 3 2 1 Remove the phone from the front cover With the back of the phone facing you, gently separate the cover from inside the old front cover. Nokia 6010 User Guide 59 Copyright © 2004 Nokia Change the keypad 1 Lift the keypad from the phone, starting at the bottom.
User Guide
Page 69
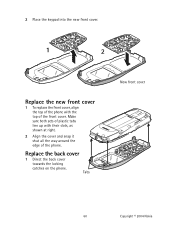
Replace the back cover 1 Direct the back cover towards the locking catches on the phone. Tabs New front cover 60 Copyright © 2004 Nokia 2 Place the keypad into the new front cover. 1 2 Replace the new front cover 1 To replace the front cover, align the top of the phone with their slots, as shown at right. 2 Align the cover and snap it shut all the way around the edge of the front cover. Make sure both sets of plastic tabs line up with the top of the phone.
Replace the back cover 1 Direct the back cover towards the locking catches on the phone. Tabs New front cover 60 Copyright © 2004 Nokia 2 Place the keypad into the new front cover. 1 2 Replace the new front cover 1 To replace the front cover, align the top of the phone with their slots, as shown at right. 2 Align the cover and snap it shut all the way around the edge of the front cover. Make sure both sets of plastic tabs line up with the top of the phone.

User Guide
Page 124
... is not in material and workmanship. During the warranty period, Nokia will void the warranty. Nokia 6010 User Guide 115 Copyright © 2004 Nokia However, if Nokia determines that the Nokia wireless phone and enhancements are not covered by Nokia, will , at its wireless phone; 5 This warranty does not cover defects or damages caused by improper or defective function of the...
... is not in material and workmanship. During the warranty period, Nokia will void the warranty. Nokia 6010 User Guide 115 Copyright © 2004 Nokia However, if Nokia determines that the Nokia wireless phone and enhancements are not covered by Nokia, will , at its wireless phone; 5 This warranty does not cover defects or damages caused by improper or defective function of the...


