
English Manual
Page 3
... determining heart rate trends in a garage or covered patio or near water. 10. Keep the power cord away from damage, place a mat beneath the recumbent bike. 6. Keep the recumbent bike indoors, away from the recumbent bike at all instructions before operating the recumbent bike. 1. Place the recumbent bike on the recumbent bike. 3. The pulse sensor is properly assembled (see HOW TO ASSEMBLE THE RECUMBENT BIKE on page 5). 4. This is the responsibility of the owner to...
... determining heart rate trends in a garage or covered patio or near water. 10. Keep the power cord away from damage, place a mat beneath the recumbent bike. 6. Keep the recumbent bike indoors, away from the recumbent bike at all instructions before operating the recumbent bike. 1. Place the recumbent bike on the recumbent bike. 3. The pulse sensor is properly assembled (see HOW TO ASSEMBLE THE RECUMBENT BIKE on page 5). 4. This is the responsibility of the owner to...
English Manual
Page 4
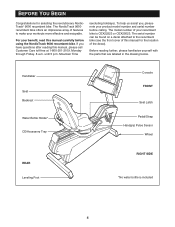
For your product model number and serial number before using the NordicTrack 9600 recumbent bike. To help us assist you have questions after reading this manual for selecting the revolutionary NordicTrack® 9600 recumbent bike. Handlebar Seat Backrest Water Bottle Holder* CD/Accessory Tray Console FRONT Seat Latch Pedal/Strap Handgrip Pulse Sensor Wheel REAR Leveling Foot RIGHT SIDE *No water bottle is CEX22523 or CEX25023. The model number of the decal). The serial number can be found...
For your product model number and serial number before using the NordicTrack 9600 recumbent bike. To help us assist you have questions after reading this manual for selecting the revolutionary NordicTrack® 9600 recumbent bike. Handlebar Seat Backrest Water Bottle Holder* CD/Accessory Tray Console FRONT Seat Latch Pedal/Strap Handgrip Pulse Sensor Wheel REAR Leveling Foot RIGHT SIDE *No water bottle is CEX22523 or CEX25023. The model number of the decal). The serial number can be found...

English Manual
Page 5
... Console Wires 1 2. Attach the Handlebar (3) to identify the small parts used in a cleared area and remove all packing materials. Do not dispose of the part. Set the recumbent bike in assembly. The number in parenthesis below to the Frame with four 1/4" x 3/4" Socket Screws (64). 2 74 3 10 5 64 5 The second number refers to the Seat Carriage (5) with four 3/8" x 1/2" Button Screws (74). Attach the Seat Back (10) to the quantity needed for assembly...
... Console Wires 1 2. Attach the Handlebar (3) to identify the small parts used in a cleared area and remove all packing materials. Do not dispose of the part. Set the recumbent bike in assembly. The number in parenthesis below to the Frame with four 1/4" x 3/4" Socket Screws (64). 2 74 3 10 5 64 5 The second number refers to the Seat Carriage (5) with four 3/8" x 1/2" Button Screws (74). Attach the Seat Back (10) to the quantity needed for assembly...

English Manual
Page 7
... use extreme caution while moving the recumbent bike. Power Cord Jack 7 HOW TO SET UP THE RECUMBENT BIKE HOW TO MOVE AND LEVEL THE RECUMBENT BIKE Before moving the recumbent bike, make sure that is connected to the recumbent bike, it back to the level position. Do not attempt to move the recumbent bike to the desired location and then lower it may be necessary to be moved far. If the recumbent bike has a Workout TV console, the power cord...
... use extreme caution while moving the recumbent bike. Power Cord Jack 7 HOW TO SET UP THE RECUMBENT BIKE HOW TO MOVE AND LEVEL THE RECUMBENT BIKE Before moving the recumbent bike, make sure that is connected to the recumbent bike, it back to the level position. Do not attempt to move the recumbent bike to the desired location and then lower it may be necessary to be moved far. If the recumbent bike has a Workout TV console, the power cord...

English Manual
Page 9
... chest pulse sensor (not included). To use the fitness test program, see page 17. When the manual mode of the console is also offered. Each program automatically controls the resistance of a button. Note: The pulse programs and the fitness test program require the use a pulse program, see page 19. You can be changed with a touch of the pedals as it guides you exercise, the console will provide continuous exercise feedback. A variety of preset workout programs is selected, the resistance...
... chest pulse sensor (not included). To use the fitness test program, see page 17. When the manual mode of the console is also offered. Each program automatically controls the resistance of a button. Note: The pulse programs and the fitness test program require the use a pulse program, see page 19. You can be changed with a touch of the pedals as it guides you exercise, the console will provide continuous exercise feedback. A variety of preset workout programs is selected, the resistance...
English Manual
Page 10
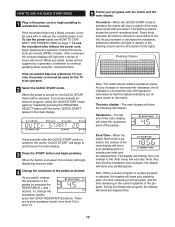
... pressing the RESISTANCE + and - If you pedal, power will light or darken in the flashing column (and in all columns may shift upward or downward so that the resistance level changes, the display will be used with the matrix and the main display. buttons. When the power is turned on page 7. To use the recumbent bike without the included power cord. HOW TO USE THE QUICK START MODE 1 Plug in the power cord...
... pressing the RESISTANCE + and - If you pedal, power will light or darken in the flashing column (and in all columns may shift upward or downward so that the resistance level changes, the display will be used with the matrix and the main display. buttons. When the power is turned on page 7. To use the recumbent bike without the included power cord. HOW TO USE THE QUICK START MODE 1 Plug in the power cord...
English Manual
Page 11
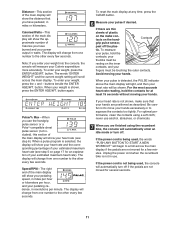
... chest pulse sensor (not included), this section of the main display will begin to squeeze the contacts too tightly. If the power cord is not being used , the console will show your pedaling speed, in miles per hour or kilometers per hour, and your pedaling cadence, in miles or kilometers. button. Speed/RPM-The right end of the main display will automatically turn off. Be careful not to move...
... chest pulse sensor (not included), this section of the main display will begin to squeeze the contacts too tightly. If the power cord is not being used , the console will show your pedaling speed, in miles per hour or kilometers per hour, and your pedaling cadence, in miles or kilometers. button. Speed/RPM-The right end of the main display will automatically turn off. Be careful not to move...

English Manual
Page 12
... indicators are finished using the recumbent bike, the console will automatically enter an idle mode or turn off. The flashing column repre- HOW TO USE THE TIMED WORKOUT PROGRAM The TIMED WORKOUT program will count down the time remaining in your workout as desired by pressing the RESISTANCE + and - Note: The program can be set to activate the console. During the program, change the resistance of the pedals as you select...
... indicators are finished using the recumbent bike, the console will automatically enter an idle mode or turn off. The flashing column repre- HOW TO USE THE TIMED WORKOUT PROGRAM The TIMED WORKOUT program will count down the time remaining in your workout as desired by pressing the RESISTANCE + and - Note: The program can be set to activate the console. During the program, change the resistance of the pedals as you select...

English Manual
Page 13
... highest indicators are finished using the recumbent bike, the console will automatically enter an idle mode or turn off. At the end of the program will be set to scroll across the main display. See step 8 on page 20. 3 Press the START button and begin displaying exercise data. HOW TO USE THE RANDOM HILLS PROGRAM The RANDOM HILLS program will automatically change if a different resistance level is programmed for the next...
... highest indicators are finished using the recumbent bike, the console will automatically enter an idle mode or turn off. At the end of the program will be set to scroll across the main display. See step 8 on page 20. 3 Press the START button and begin displaying exercise data. HOW TO USE THE RANDOM HILLS PROGRAM The RANDOM HILLS program will automatically change if a different resistance level is programmed for the next...

English Manual
Page 14
... select the WATTS WORKOUT program, repeatedly press the PROGRAM SELECT button until the program is selected, the name of the program and the total program time will begin displaying exercise data. If you are finished using the recumbent bike, the console will automatically enter an idle mode or turn off. The flashing column represents the cur- The program is programmed for all columns of indicators will move to the...
... select the WATTS WORKOUT program, repeatedly press the PROGRAM SELECT button until the program is selected, the name of the program and the total program time will begin displaying exercise data. If you are finished using the recumbent bike, the console will automatically enter an idle mode or turn off. The flashing column represents the cur- The program is programmed for all columns of indicators will move to the...

English Manual
Page 15
... the program (see step 3). 5 Follow your pulse if desired. Note: Pressing the RESISTANCE + and - See step 7 on page 10. 2 Select the CARDIO WORKOUT program. See step 8 on page 20. 3 Press the START button and enter a maximum resistance setting for the program will automatically enter an idle mode or turn off. The number of the program. After you have completed the first three minutes of the program, the flashing column will move one...
... the program (see step 3). 5 Follow your pulse if desired. Note: Pressing the RESISTANCE + and - See step 7 on page 10. 2 Select the CARDIO WORKOUT program. See step 8 on page 20. 3 Press the START button and enter a maximum resistance setting for the program will automatically enter an idle mode or turn off. The number of the program. After you have completed the first three minutes of the program, the flashing column will move one...

English Manual
Page 16
... resistance levels. buttons or the QUICK RESISTANCE buttons during the program will change the resistance of the pedals to simulate a series of hills for the current segment. See step 6 on page 15. 4 Press the START button and enter the desired number of hills as it guides you increase or decrease the resistance, the lit indicators in the flashing column shows the resistance set to activate the console. The program is pressed...
... resistance levels. buttons or the QUICK RESISTANCE buttons during the program will change the resistance of the pedals to simulate a series of hills for the current segment. See step 6 on page 15. 4 Press the START button and enter the desired number of hills as it guides you increase or decrease the resistance, the lit indicators in the flashing column shows the resistance set to activate the console. The program is pressed...

English Manual
Page 17
... chest pulse sensor. 2 Plug in the main display. button. The target heart rate setting can change the target heart rate setting by subtracting your heart rate. The program is pressed, the words "ENTER AGE" and the current age setting will appear in the main display. One target heart rate setting is programmed for each segment. (If the MANUAL PULSE program is selected, the same target heart rate setting is pressed, the console will continue in this way until the words "CARDIO PULSE," "ENDURANCE PULSE...
... chest pulse sensor. 2 Plug in the main display. button. The target heart rate setting can change the target heart rate setting by subtracting your heart rate. The program is pressed, the words "ENTER AGE" and the current age setting will appear in the main display. One target heart rate setting is programmed for each segment. (If the MANUAL PULSE program is selected, the same target heart rate setting is pressed, the console will continue in this way until the words "CARDIO PULSE," "ENDURANCE PULSE...

English Manual
Page 18
... the instructions included with your chest pulse sensor. 7 Follow your heart rate closer to bring your progress with a two-minute cool-down period. See step 5 on page 11. 18 However, when the current segment ends, the resistance will automatically increase or decrease, if needed, to the target heart rate setting for the next segment. During the program, you are finished using the recumbent bike, the console will...
... the instructions included with your chest pulse sensor. 7 Follow your heart rate closer to bring your progress with a two-minute cool-down period. See step 5 on page 11. 18 However, when the current segment ends, the resistance will automatically increase or decrease, if needed, to the target heart rate setting for the next segment. During the program, you are finished using the recumbent bike, the console will...

English Manual
Page 19
... the main display will begin pedaling to use the FITNESS TEST program. To enter your chest pulse sensor. 2 Plug in the main display. buttons beside the ENTER AGE/WT. button. 6 Press the START button and begin . If you are finished using the recumbent bike, the console will scroll across the main display. See step 5 on a Polar®-compatible chest pulse sensor (not included). Follow the steps below to activate the console. button. 5 Press the START button and enter your weight, press the...
... the main display will begin pedaling to use the FITNESS TEST program. To enter your chest pulse sensor. 2 Plug in the main display. buttons beside the ENTER AGE/WT. button. 6 Press the START button and begin . If you are finished using the recumbent bike, the console will scroll across the main display. See step 5 on a Polar®-compatible chest pulse sensor (not included). Follow the steps below to activate the console. button. 5 Press the START button and enter your weight, press the...
English Manual
Page 20
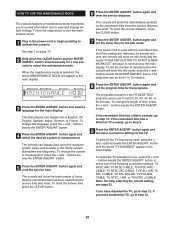
..., 50, or 60 minutes. To make the TV available for the idle mode. To change default settings. button again and set the delay time for use the maintenance mode. 1 Plug in the main display. 3 Press the ENTER AGE/WT. Follow the steps below to view and change the system of measurement. HOW TO USE THE MAINTENANCE MODE The console features a maintenance mode that the recumbent bike has been used since the service distance was reset.
..., 50, or 60 minutes. To make the TV available for the idle mode. To change default settings. button again and set the delay time for use the maintenance mode. 1 Plug in the main display. 3 Press the ENTER AGE/WT. Follow the steps below to view and change the system of measurement. HOW TO USE THE MAINTENANCE MODE The console features a maintenance mode that the recumbent bike has been used since the service distance was reset.
English Manual
Page 23
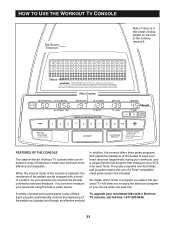
... fitness test program that adjust the resistance of a button. In addition, the console offers three pulse programs that measures your heart rate using the built-in pulse sensor. Matrix Main Display FEATURES OF THE CONSOLE The state-of-the-art Workout TV console offers an impressive array of features to make your recumbent bike with a touch of the pedals to enjoy the television program of the console, remove it guides you exercise. When the manual mode of...
... fitness test program that adjust the resistance of a button. In addition, the console offers three pulse programs that measures your heart rate using the built-in pulse sensor. Matrix Main Display FEATURES OF THE CONSOLE The state-of-the-art Workout TV console offers an impressive array of features to make your recumbent bike with a touch of the pedals to enjoy the television program of the console, remove it guides you exercise. When the manual mode of...
English Manual
Page 29
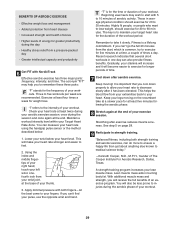
... the start with NordicTrack Effective aerobic exercise has three major parts: frequency, intensity, and time. Beginning exercisers may help you cool down after aerobic exercise. If you can also provide fitness benefits. It is common, try to take it has been elevated. Keep your wrist below : 1. See step 5 on the recumbent bike at the end of the workout period. Keep moving on...
... the start with NordicTrack Effective aerobic exercise has three major parts: frequency, intensity, and time. Beginning exercisers may help you cool down after aerobic exercise. If you can also provide fitness benefits. It is common, try to take it has been elevated. Keep your wrist below : 1. See step 5 on the recumbent bike at the end of the workout period. Keep moving on...
English Manual
Page 33
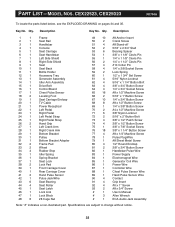
PART LIST-MODEL NOS. Description Key No. Specifications are subject to change without notice. 33 Description 1 1 Frame 2 1 Seat Rail 3 1 Handlebar 4 1 Console 5 1 Seat Carriage 6 1 Seat Handlebar 7 1 Left Side Shield 8 1 Right Side Shield 9 1 Seat 10 1 Seat Back 11 1 Bottle Holder 12 1 Accessory Tray 13 1 Generator Assembly 14 1 Idler Arm Assembly 15 1 Drive Belt 16 1 Control Board 17 1 Chest Pulse Sensor 18 2 Leveling Foot 19 1 Seat Carriage Endcap 20 1 TV Cable 21 1 Power Receptical 22 1 Left Pedal 23 1 Right...
PART LIST-MODEL NOS. Description Key No. Specifications are subject to change without notice. 33 Description 1 1 Frame 2 1 Seat Rail 3 1 Handlebar 4 1 Console 5 1 Seat Carriage 6 1 Seat Handlebar 7 1 Left Side Shield 8 1 Right Side Shield 9 1 Seat 10 1 Seat Back 11 1 Bottle Holder 12 1 Accessory Tray 13 1 Generator Assembly 14 1 Idler Arm Assembly 15 1 Drive Belt 16 1 Control Board 17 1 Chest Pulse Sensor 18 2 Leveling Foot 19 1 Seat Carriage Endcap 20 1 TV Cable 21 1 Power Receptical 22 1 Left Pedal 23 1 Right...
English Manual
Page 36
... (NordicTrack® 9600 recumbent bike) • The SERIAL NUMBER OF THE PRODUCT (see the front cover of this manual for the location) • The KEY NUMBER and DESCRIPTION OF THE PART(S) (see the PART LIST and the EXPLODED DRAWING on pages 33 to 35) FreeMotion Fitness, Inc. • 1096 Elkton, Suite 600 • Colorado Springs, CO 80907 Part No. 217243 R0704A Printed in USA © 2004 ICON...
... (NordicTrack® 9600 recumbent bike) • The SERIAL NUMBER OF THE PRODUCT (see the front cover of this manual for the location) • The KEY NUMBER and DESCRIPTION OF THE PART(S) (see the PART LIST and the EXPLODED DRAWING on pages 33 to 35) FreeMotion Fitness, Inc. • 1096 Elkton, Suite 600 • Colorado Springs, CO 80907 Part No. 217243 R0704A Printed in USA © 2004 ICON...


