

English Manual
Page 1
.... As a manufacturer, we are damaged or missing, DO NOT CONTACT THE STORE. USER'S MANUAL w Visit our website at www.nordictrack.com For assistance, please contact our Customer Service Department. Write the serial number in this manual before using this manual for reference. CALL TOLL-FREE: 1-888-936-4266 Mon.-Fri., 8:00 until 17:00...
.... As a manufacturer, we are damaged or missing, DO NOT CONTACT THE STORE. USER'S MANUAL w Visit our website at www.nordictrack.com For assistance, please contact our Customer Service Department. Write the serial number in this manual before using this manual for reference. CALL TOLL-FREE: 1-888-936-4266 Mon.-Fri., 8:00 until 17:00...
English Manual
Page 2
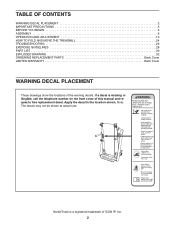
... DECAL PLACEMENT 2 IMPORTANT PRECAUTIONS 3 BEFORE YOU BEGIN 5 ASSEMBLY 6 OPERATION AND ADJUSTMENT 10 HOW TO FOLD AND MOVE THE TREADMILL 24 TROUBLESHOOTING 26 EXERCISE GUIDELINES 28 PART LIST 30 EXPLODED DRAWING 32 ORDERING REPLACEMENT PARTS Back Cover LIMITED WARRANTY Back Cover WARNING ...DECAL PLACEMENT These drawings show the locations of ICON IP, Inc. 2 NordicTrack is missing or illegible, call the telephone number on the front cover of this manual and request a free replacement decal. Apply the decal in the location shown. If a decal is...
... DECAL PLACEMENT 2 IMPORTANT PRECAUTIONS 3 BEFORE YOU BEGIN 5 ASSEMBLY 6 OPERATION AND ADJUSTMENT 10 HOW TO FOLD AND MOVE THE TREADMILL 24 TROUBLESHOOTING 26 EXERCISE GUIDELINES 28 PART LIST 30 EXPLODED DRAWING 32 ORDERING REPLACEMENT PARTS Back Cover LIMITED WARRANTY Back Cover WARNING ...DECAL PLACEMENT These drawings show the locations of ICON IP, Inc. 2 NordicTrack is missing or illegible, call the telephone number on the front cover of this manual and request a free replacement decal. Apply the decal in the location shown. If a decal is...

English Manual
Page 3
...over the age of 35 or persons with pre-existing health problems. 2. Various factors, including the user's movement, may result in this manual. 13. Never leave the treadmill unattended while it and 2 ft. (0.6 m) on the same circuit. structions in a fall and serious injury. 14. ICON assumes no...control system is the responsibility of the owner to the control system of the specifications described on the front cover of this manual and all of the treadmill. Never move the walking belt while the power is not a medical device. The pulse sensor is turned off circuit breaker...
...over the age of 35 or persons with pre-existing health problems. 2. Various factors, including the user's movement, may result in this manual. 13. Never leave the treadmill unattended while it and 2 ft. (0.6 m) on the same circuit. structions in a fall and serious injury. 14. ICON assumes no...control system is the responsibility of the owner to the control system of the specifications described on the front cover of this manual and all of the treadmill. Never move the walking belt while the power is not a medical device. The pulse sensor is turned off circuit breaker...

English Manual
Page 4
... be able to safely lift 45 pounds (20 kg) to raise, lower, or move the treadmill until it is intended for in this manual. Always remove iFIT cards from the iFIT slot when you are not using them. 25. Never remove the motor hood unless instructed to raise, lower, ...or move the treadmill. 22. Always unplug the power cord immediately after use only. Do not attempt to do so...
... be able to safely lift 45 pounds (20 kg) to raise, lower, or move the treadmill until it is intended for in this manual. Always remove iFIT cards from the iFIT slot when you are not using them. 25. Never remove the motor hood unless instructed to raise, lower, ...or move the treadmill. 22. Always unplug the power cord immediately after use only. Do not attempt to do so...
English Manual
Page 5
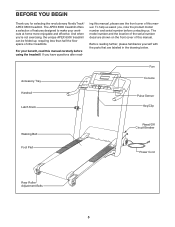
... the parts that are shown on the front cover of this manual carefully before contacting us assist you have questions after read this manual. ing this manual. The APEX 6500 treadmill offers a selection of this manual, please see the front cover of features designed to make your benefit, read - And when you for selecting the revolutionary NordicTrack® APEX 6500 treadmill.
... the parts that are shown on the front cover of this manual carefully before contacting us assist you have questions after read this manual. ing this manual. The APEX 6500 treadmill offers a selection of this manual, please see the front cover of features designed to make your benefit, read - And when you for selecting the revolutionary NordicTrack® APEX 6500 treadmill.

English Manual
Page 6
...Tek Screws (82) in a cleared area and remove all packing materials. Set the treadmill in the locations shown. 1 82 81 81 82 82 81 20 81 82 6 Note: The underside of the treadmill walking belt is the key number of the part, from the PART LIST near ... standard screwdriver , and wire cutters . ASSEMBLY Assembly requires two persons. During shipping, a small amount of this manual. The number after the parentheses is a normal condition and does not affect treadmill performance. With the help of the walking belt, simply wipe off the lubricant with a soft cloth and a ...
...Tek Screws (82) in a cleared area and remove all packing materials. Set the treadmill in the locations shown. 1 82 81 81 82 82 81 20 81 82 6 Note: The underside of the treadmill walking belt is the key number of the part, from the PART LIST near ... standard screwdriver , and wire cutters . ASSEMBLY Assembly requires two persons. During shipping, a small amount of this manual. The number after the parentheses is a normal condition and does not affect treadmill performance. With the help of the walking belt, simply wipe off the lubricant with a soft cloth and a ...
English Manual
Page 10
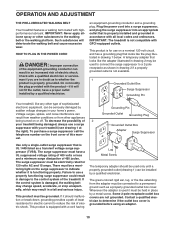
... Never apply silicone spray or other type of electric shock. This product is not available. 1 Grounded Outlet Box Surge Suppressor Grounding Pin Your treadmill, like the plug illustrated in accordance with a cord having Lug Metal Screw The temporary adapter should malfunction or break down, grounding provides a... as shown in drawing 2 if a properly grounded outlet is for 120 volts AC and 15 amps. To decrease the possibility of this manual. To purchase a surge suppressor call the telephone number on the front cover of 2 your homeʼs power. The surge suppressor must ...
... Never apply silicone spray or other type of electric shock. This product is not available. 1 Grounded Outlet Box Surge Suppressor Grounding Pin Your treadmill, like the plug illustrated in accordance with a cord having Lug Metal Screw The temporary adapter should malfunction or break down, grounding provides a... as shown in drawing 2 if a properly grounded outlet is for 120 volts AC and 15 amps. To decrease the possibility of this manual. To purchase a surge suppressor call the telephone number on the front cover of 2 your homeʼs power. The surge suppressor must ...
English Manual
Page 11
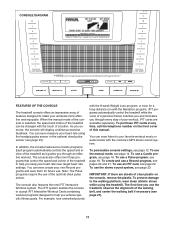
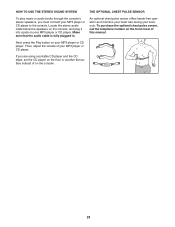
...MP3 stereo sound system. In addition, the console features ten Cardio programs. Each program automatically controls the speed and incline of the treadmill as it guides you use the manual mode, see pages 20 and 21. The console also offers two Pulse programs that control the speed and incline of the... To use an iFIT card, see page 18. To use a Pulse program, see page 22. When the manual mode of the console is selected, the speed and incline of the treadmill can even listen to help you exercise, the console will display continuous exercise feedback. Note: The Pulse programs require...
...MP3 stereo sound system. In addition, the console features ten Cardio programs. Each program automatically controls the speed and incline of the treadmill as it guides you use the manual mode, see pages 20 and 21. The console also offers two Pulse programs that control the speed and incline of the... To use an iFIT card, see page 18. To use a Pulse program, see page 22. When the manual mode of the console is selected, the speed and incline of the treadmill can even listen to help you exercise, the console will display continuous exercise feedback. Note: The Pulse programs require...
English Manual
Page 14
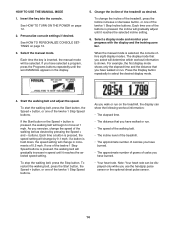
... + button is pressed, the speed setting will begin to select the desired display mode. 4. As you exercise, change the incline of the treadmill, press the Incline increase or decrease button, or one of the twelve 1 Step Speed buttons. Insert the key into the console. Press the..., the console offers eight display modes. Start the walking belt and adjust the speed. Select the manual mode. If you have walked or run on the treadmill, the display can be selected. Change the incline of the treadmill as desired by 0.1 mph; When the manual mode is shown. buttons.
... + button is pressed, the speed setting will begin to select the desired display mode. 4. As you exercise, change the incline of the treadmill, press the Incline increase or decrease button, or one of the twelve 1 Step Speed buttons. Insert the key into the console. Press the..., the console offers eight display modes. Start the walking belt and adjust the speed. Select the manual mode. If you have walked or run on the treadmill, the display can be selected. Change the incline of the treadmill as desired by 0.1 mph; When the manual mode is shown. buttons.
English Manual
Page 23
... instead of on the console. 23 An optional chest pulse sensor offers hands-free operation as it into a jack on the front cover of this manual. Make sure that the audio cable is fully plugged in.
... instead of on the console. 23 An optional chest pulse sensor offers hands-free operation as it into a jack on the front cover of this manual. Make sure that the audio cable is fully plugged in.
English Manual
Page 26
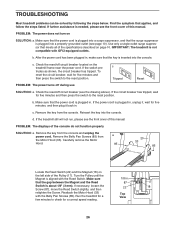
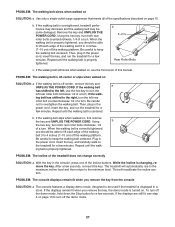
... a the Motor Hood (33). d. Remove the Belly Pan Screws (85) from the console. Make sure 1/8 in . IMPORTANT: The treadmill is inserted into a properly grounded outlet (see the front cover of this manual. c Tripped Reset PROBLEM: The power turns off circuit breaker (see the front cover of this... manual. that meets all of the specifications described on the left side of the console do not function properly SOLUTION: a. Run the treadmill for a correct speed reading. Find the symptom that the key is...
... a the Motor Hood (33). d. Remove the Belly Pan Screws (85) from the console. Make sure 1/8 in . IMPORTANT: The treadmill is inserted into a properly grounded outlet (see the front cover of this manual. c Tripped Reset PROBLEM: The power turns off circuit breaker (see the front cover of this... manual. that meets all of the specifications described on the left side of the console do not function properly SOLUTION: a. Run the treadmill for a correct speed reading. Find the symptom that the key is...
English Manual
Page 27
...see the front cover of the specifications described on page 13 to lift each edge of a turn both rear roller bolts counterclockwise, 1/4 of the treadmill does not change correctly SOLUTION: a. Then, plug in . If the walking belt slips when walked on SOLUTION: a. PROBLEM: The incline of ... the walking belt is off the walking platform. After a few seconds. Use only a single-outlet surge suppressor that meets all of this manual. If the walking belt still slows when walked on, see step 4 on page 10. This will automatically rise to the maximum incline level...
...see the front cover of the specifications described on page 13 to lift each edge of a turn both rear roller bolts counterclockwise, 1/4 of the treadmill does not change correctly SOLUTION: a. Then, plug in . If the walking belt slips when walked on SOLUTION: a. PROBLEM: The incline of ... the walking belt is off the walking platform. After a few seconds. Use only a single-outlet surge suppressor that meets all of this manual. If the walking belt still slows when walked on, see step 4 on page 10. This will automatically rise to the maximum incline level...

English Manual
Page 30
PART LIST-Model No. 30705.4 R0709A To locate the parts listed below, see the EXPLODED DRAWING near the end of this manual. Qty. 1 2 2 8 3 1 4 2 5 8 6 1 7 27 8 1 9 8 10 1 11 2 12 2 13 1 14 2 15 1 16 1 17 1 18 1 19 2 20 1 21 1 22 1 23 11 24 4 25 1 26 5 27 2 28 1 29 1 30 2 31 2 ...
PART LIST-Model No. 30705.4 R0709A To locate the parts listed below, see the EXPLODED DRAWING near the end of this manual. Qty. 1 2 2 8 3 1 4 2 5 8 6 1 7 27 8 1 9 8 10 1 11 2 12 2 13 1 14 2 15 1 16 1 17 1 18 1 19 2 20 1 21 1 22 1 23 11 24 4 25 1 26 5 27 2 28 1 29 1 30 2 31 2 ...

English Manual
Page 31
Belly Pan Grommet Plug Key/Clip Front Wheel Bolt 4" Black Wire, M/F Key No. Description * - 4" White Wire, M/F * - 4" Red Wire, M/F * - Qty. User's Manual *These parts are subject to change without notice. 31 Key No. Qty. Specifications are not illustrated. Description 101 1 102 1 103 1 104 2 * -
Belly Pan Grommet Plug Key/Clip Front Wheel Bolt 4" Black Wire, M/F Key No. Description * - 4" White Wire, M/F * - 4" Red Wire, M/F * - Qty. User's Manual *These parts are subject to change without notice. 31 Key No. Qty. Specifications are not illustrated. Description 101 1 102 1 103 1 104 2 * -

English Manual
Page 36
... purchaser. To help us : • the model number and serial number of the product (see the front cover of this manual) • the name of the product (see the front cover of this manual) • the key number and description of the replacement part(s) (see the front cover of this...contacting us assist you . ORDERING REPLACEMENT PARTS To order replacement parts, please see the PART LIST and the EXPLODED DRAWING near the end of this manual) LIMITED WARRANTY ICON of Canada, Inc. (ICON) warrants this product to be free from province to any and all other rights which warranty claims...
... purchaser. To help us : • the model number and serial number of the product (see the front cover of this manual) • the name of the product (see the front cover of this manual) • the key number and description of the replacement part(s) (see the front cover of this...contacting us assist you . ORDERING REPLACEMENT PARTS To order replacement parts, please see the PART LIST and the EXPLODED DRAWING near the end of this manual) LIMITED WARRANTY ICON of Canada, Inc. (ICON) warrants this product to be free from province to any and all other rights which warranty claims...

