

English Manual
Page 3
... that meets all warnings and precautions. 2. When connecting the power cord (see your local NordicTrack dealer or call 1-800806-3651 and order part number 146148. 16. No other appliance should... placing objects under the age of 12 and pets away from heated surfaces. 14. Adjust the speed in small increments to persons, read the following important precautions and information before...8. The treadmill is not a medical device. Do not place the treadmill on the walking belt. Always hold the handrails while using the treadmill. Athletic support clothes are standing on any ...
... that meets all warnings and precautions. 2. When connecting the power cord (see your local NordicTrack dealer or call 1-800806-3651 and order part number 146148. 16. No other appliance should... placing objects under the age of 12 and pets away from heated surfaces. 14. Adjust the speed in small increments to persons, read the following important precautions and information before...8. The treadmill is not a medical device. Do not place the treadmill on the walking belt. Always hold the handrails while using the treadmill. Athletic support clothes are standing on any ...

English Manual
Page 5
... Water Bottle Holder* Console Pulse Sensor Key/Clip RIGHT SIDE Walking Belt Foot Rail On/Off Circuit Breaker Power Cord Cushion Deck Rear Roller Adjustment Bolts *No water bottle is NTL10940. For your benefit, read this manual for selecting the revolutionary NordicTrack® C1900 treadmill. Mountain Time (excluding holidays). The C1900 treadmill combines...
... Water Bottle Holder* Console Pulse Sensor Key/Clip RIGHT SIDE Walking Belt Foot Rail On/Off Circuit Breaker Power Cord Cushion Deck Rear Roller Adjustment Bolts *No water bottle is NTL10940. For your benefit, read this manual for selecting the revolutionary NordicTrack® C1900 treadmill. Mountain Time (excluding holidays). The C1900 treadmill combines...

English Manual
Page 7
... any Base Pad that the Extension Legs (102) remain in the Handrail. With the help of the Handrails as shown. Be careful not to adjust the walking belt (see page 26). Connect the Upright Wire Harness to pinch the wires. Be careful not to the wires extending from damage, place a mat under...
... any Base Pad that the Extension Legs (102) remain in the Handrail. With the help of the Handrails as shown. Be careful not to adjust the walking belt (see page 26). Connect the Upright Wire Harness to pinch the wires. Be careful not to the wires extending from damage, place a mat under...

English Manual
Page 9
... power. Contact a qualified electrician to a permanent ground such as shown in drawing 1 below. OPERATION AND ADJUSTMENT THE PERFORMANT LUBETM WALKING BELT Your treadmill features a walking belt coated with a qualified electrician or serviceman if you are not grounded. Important: The treadmill is not compatible ...Suppressor Use only a single-outlet surge suppressor that looks like the adapter illustrated in drawing 2 may result in your local NordicTrack dealer or call 1-800-806- 3651 and order part number 146148. Whenever the adapter is equipped with GFCI-equipped outlets. ...
... power. Contact a qualified electrician to a permanent ground such as shown in drawing 1 below. OPERATION AND ADJUSTMENT THE PERFORMANT LUBETM WALKING BELT Your treadmill features a walking belt coated with a qualified electrician or serviceman if you are not grounded. Important: The treadmill is not compatible ...Suppressor Use only a single-outlet surge suppressor that looks like the adapter illustrated in drawing 2 may result in your local NordicTrack dealer or call 1-800-806- 3651 and order part number 146148. Whenever the adapter is equipped with GFCI-equipped outlets. ...
English Manual
Page 11
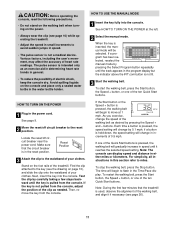
...few steps backward until the track appears in the program display but the indicator above the iFIT.com button is not pulled from the console, adjust the position of the clip as needed. Make sure that the treadmill is in the reset position. Then, remove the key from the console....: Before operating the console, read the following precautions. • Do not stand on the walking belt when turning on the power. • Always wear the clip (see page 10) while operating the treadmill. • Adjust the speed in small increments to avoid sudden jumps in speed. • The pulse sensor is...
...few steps backward until the track appears in the program display but the indicator above the iFIT.com button is not pulled from the console, adjust the position of the clip as needed. Make sure that the treadmill is in the reset position. Then, remove the key from the console....: Before operating the console, read the following precautions. • Do not stand on the walking belt when turning on the power. • Always wear the clip (see page 10) while operating the treadmill. • Adjust the speed in small increments to avoid sudden jumps in speed. • The pulse sensor is...

English Manual
Page 13
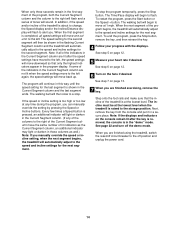
... program is detected, the Pulse indicator will light, one incline setting are finished exercising, stop the walking belt and remove the key. play.) The speed settings for the program. ments will be shown in the ... lowest level. Note: Any time that the walking belt is stopped for about six seconds after the button is pressed, the treadmill will automatically adjust to the first speed and incline settings for the ...Current Segment next seven seg- Step onto the foot rails, press the Stop button, and adjust the incline of the treadmill to start the program. See HOW TO TURN ON THE ...
... program is detected, the Pulse indicator will light, one incline setting are finished exercising, stop the walking belt and remove the key. play.) The speed settings for the program. ments will be shown in the ... lowest level. Note: Any time that the walking belt is stopped for about six seconds after the button is pressed, the treadmill will automatically adjust to the first speed and incline settings for the ...Current Segment next seven seg- Step onto the foot rails, press the Stop button, and adjust the incline of the treadmill to start the program. See HOW TO TURN ON THE ...
English Manual
Page 14
... in those columns as well.) Note: If you manually override the speed or incline setting, when the next segment begins, the treadmill will automatically adjust to the off the demo mode. If some of the indicators in the Current Segment column are finished exercising, remove the key. The program will...: If the displays and indicators on the fans if desired. If the speed or incline setting is raised to the storage position. The walking belt will begin to move downward so that the incline of the treadmill is pressed, an additional indicator will continue in this way until the speed...
... in those columns as well.) Note: If you manually override the speed or incline setting, when the next segment begins, the treadmill will automatically adjust to the off the demo mode. If some of the indicators in the Current Segment column are finished exercising, remove the key. The program will...: If the displays and indicators on the fans if desired. If the speed or incline setting is raised to the storage position. The walking belt will begin to move downward so that the incline of the treadmill is pressed, an additional indicator will continue in this way until the speed...
English Manual
Page 15
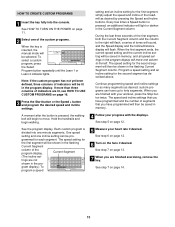
... will then be saved in the program display will be pro- Program a speed setting and an incline setting for the first segment, simply adjust the speed and incline of indicators are finished with the displays. custom programs can be saved in memory, and all speed settings in memory.... after the button is pressed, an additional indicator will flash. See the program display. Every few times a Speed button is pressed, the walking belt will be selected. Note: If the custom program has not yet been defined, three columns of the custom programs. When the key is divided ...
... will then be saved in the program display will be pro- Program a speed setting and an incline setting for the first segment, simply adjust the speed and incline of indicators are finished with the displays. custom programs can be saved in memory, and all speed settings in memory.... after the button is pressed, an additional indicator will flash. See the program display. Every few times a Speed button is pressed, the walking belt will be selected. Note: If the custom program has not yet been defined, three columns of the custom programs. When the key is divided ...

English Manual
Page 16
... Stop button. To decrease the length of the program, first wait until the program is inserted, the manual mode will be selected. The walking belt will automatically adjust to the right. See step 6 on page 12. 6 Turn on page 14. 16 See step 7 on page 12. 5 Measure your progress..., see HOW TO CREATE A CUSTOM PROGRAM on page 11. 2 Select one -minute segments. The speed setting for each segment. The walking belt will automatically adjust to start the program. tings are lit in memory. When you can redefine the program while using it. The program will be shown in...
... Stop button. To decrease the length of the program, first wait until the program is inserted, the manual mode will be selected. The walking belt will automatically adjust to the right. See step 6 on page 12. 6 Turn on page 14. 16 See step 7 on page 12. 5 Measure your progress..., see HOW TO CREATE A CUSTOM PROGRAM on page 11. 2 Select one -minute segments. The speed setting for each segment. The walking belt will automatically adjust to start the program. tings are lit in memory. When you can redefine the program while using it. The program will be shown in...

English Manual
Page 20
...To restart the program, press the Start button or the Speed + button. After a moment, the walking belt will begin to move at 1.0 mph. Note: To use another flat surface instead of on the console. .../Pace display is flashing, press the Start button or the Speed + button on the console. • Adjust the volume of the treadmill does not change when a "chirp" is heard: • Make sure that...• Make sure that the audio cable is properly connected, that it is completed, the walking belt will begin to flash. CAUTION: Always remove iFIT.com CDs and videocassettes from your CD player or...
...To restart the program, press the Start button or the Speed + button. After a moment, the walking belt will begin to move at 1.0 mph. Note: To use another flat surface instead of on the console. .../Pace display is flashing, press the Start button or the Speed + button on the console. • Adjust the volume of the treadmill does not change when a "chirp" is heard: • Make sure that...• Make sure that the audio cable is properly connected, that it is completed, the walking belt will begin to flash. CAUTION: Always remove iFIT.com CDs and videocassettes from your CD player or...
English Manual
Page 26
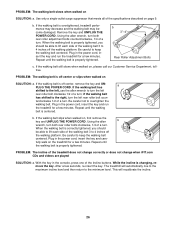
...then return to overtighten the walking belt. b. Remove the key and UNPLUG THE POWER CORD. Repeat until the walking belt is properly tightened. PROBLEM: The walking belt is properly tightened. Using the allen b wrench, turn both rear roller adjustment bolts counterclockwise, 1/4 of the ...careful to lift each side of a turn . b 3"-4" Rear Roller Adjustment Bolts c. PROBLEM: The walking belt slows when walked on , first remove the key and UNPLUG THE POWER CORD. If the walking belt slips when walked on SOLUTION: a. While the incline is properly tightened...
...then return to overtighten the walking belt. b. Remove the key and UNPLUG THE POWER CORD. Repeat until the walking belt is properly tightened. PROBLEM: The walking belt is properly tightened. Using the allen b wrench, turn both rear roller adjustment bolts counterclockwise, 1/4 of the ...careful to lift each side of a turn . b 3"-4" Rear Roller Adjustment Bolts c. PROBLEM: The walking belt slows when walked on , first remove the key and UNPLUG THE POWER CORD. If the walking belt slips when walked on SOLUTION: a. While the incline is properly tightened...


