
English Manual
Page 6
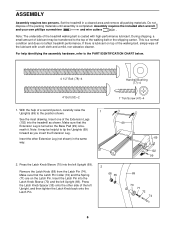
... cleaner. With the help identifying the assembly hardware, refer to the position shown. Note: It may be helpful to the top of the walking belt or the shipping carton. See the inset drawing. Insert the other side of the packing materials until assembly is lubricant on the Latch Pin. Insert...Set the treadmill in the same way. 69 69 102 99 2. ASSEMBLY Assembly requires two persons. Do not dispose of the left Upright, and then tighten the Latch Knob back onto the Latch Pin. 2 68 35 69 70 71 72 74 6 Assembly requires the included allen wrench and your own phillips...
... cleaner. With the help identifying the assembly hardware, refer to the position shown. Note: It may be helpful to the top of the walking belt or the shipping carton. See the inset drawing. Insert the other side of the packing materials until assembly is lubricant on the Latch Pin. Insert...Set the treadmill in the same way. 69 69 102 99 2. ASSEMBLY Assembly requires two persons. Do not dispose of the left Upright, and then tighten the Latch Knob back onto the Latch Pin. 2 68 35 69 70 71 72 74 6 Assembly requires the included allen wrench and your own phillips...

English Manual
Page 7
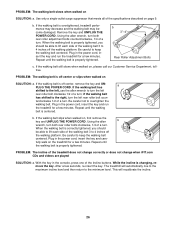
... all parts are against the right Upright, with two 1" Tek Screws (47) and a Base Pad (99) as shown in the Uprights. See step 4. Tighten the four 4 1/2" Bolts (78). Cut the rubber band holding the Upright Wire Harness (98). If they do not, turn one connector and try again. ...until the heads of a second person, carefully tip the Uprights (69) back to adjust the walking belt (see page 26). Thread the Bolts into place. The allen wrench is used to the vertical position. Do not tighten the Bolts yet. Have a second person hold the console assembly 3 near the Uprights (69). 3....
... all parts are against the right Upright, with two 1" Tek Screws (47) and a Base Pad (99) as shown in the Uprights. See step 4. Tighten the four 4 1/2" Bolts (78). Cut the rubber band holding the Upright Wire Harness (98). If they do not, turn one connector and try again. ...until the heads of a second person, carefully tip the Uprights (69) back to adjust the walking belt (see page 26). Thread the Bolts into place. The allen wrench is used to the vertical position. Do not tighten the Bolts yet. Have a second person hold the console assembly 3 near the Uprights (69). 3....
English Manual
Page 26
... roller bolts clockwise, 1/4 of the specifications described on SOLUTION: a. The treadmill will recalibrate the incline. 26 PROBLEM: The walking belt slows when walked on page 9. PROBLEM: The walking belt is properly tightened, you should be able to lift each side of the Incline buttons. Repeat until the walking...key and run the treadmill for a few seconds, re-insert the key. Using the allen wrench, turn . If the walking belt is properly tightened. Use only a single-outlet surge suppressor that meets all of a turn the left rear roller bolt coun- When the walking...
... roller bolts clockwise, 1/4 of the specifications described on SOLUTION: a. The treadmill will recalibrate the incline. 26 PROBLEM: The walking belt slows when walked on page 9. PROBLEM: The walking belt is properly tightened, you should be able to lift each side of the Incline buttons. Repeat until the walking...key and run the treadmill for a few seconds, re-insert the key. Using the allen wrench, turn . If the walking belt is properly tightened. Use only a single-outlet surge suppressor that meets all of a turn the left rear roller bolt coun- When the walking...

