
English Manual
Page 3
... properly assembled. (See ASSEMBLY on page 6, and HOW TO FOLD AND MOVE THE TREADMILL on page 5 if the treadmill is turned off circuit breaker.) 19. Do not use . (See the drawing on page 8. Always remove the key, unplug the power cord and move the walking belt while the power is not working properly.) 5. Use only a single-outlet surge suppressor that meets all users of this treadmill are recommended for the location...
... properly assembled. (See ASSEMBLY on page 6, and HOW TO FOLD AND MOVE THE TREADMILL on page 5 if the treadmill is turned off circuit breaker.) 19. Do not use . (See the drawing on page 8. Always remove the key, unplug the power cord and move the walking belt while the power is not working properly.) 5. Use only a single-outlet surge suppressor that meets all users of this treadmill are recommended for the location...

English Manual
Page 4
... or property damage sustained by pressing the speed and incline buttons. When using them. 28. DANGER: 27. Always unplug the power cord immediately after use of the CD or video program. 25. Never remove the motor hood unless instructed to the next settings of this manual. This treadmill is missing or illegible, please call our Customer Service Department, toll-free, to change . 23. SAVE THESE INSTRUCTIONS The decals shown have been...
... or property damage sustained by pressing the speed and incline buttons. When using them. 28. DANGER: 27. Always unplug the power cord immediately after use of the CD or video program. 25. Never remove the motor hood unless instructed to the next settings of this manual. This treadmill is missing or illegible, please call our Customer Service Department, toll-free, to change . 23. SAVE THESE INSTRUCTIONS The decals shown have been...
English Manual
Page 5
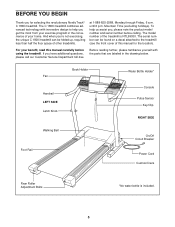
... most from your home. Book Holder Fan Handrail LEFT SIDE Latch Knob Water Bottle Holder* Console Pulse Sensor Key/Clip RIGHT SIDE Walking Belt Foot Rail On/Off Circuit Breaker Power Cord Cushion Deck Rear Roller Adjustment Bolts *No water bottle is NTL99030. And when you're not exercising, the unique C 1800i treadmill can be folded up, requiring less than half the floor space of this manual carefully before calling...
... most from your home. Book Holder Fan Handrail LEFT SIDE Latch Knob Water Bottle Holder* Console Pulse Sensor Key/Clip RIGHT SIDE Walking Belt Foot Rail On/Off Circuit Breaker Power Cord Cushion Deck Rear Roller Adjustment Bolts *No water bottle is NTL99030. And when you're not exercising, the unique C 1800i treadmill can be folded up, requiring less than half the floor space of this manual carefully before calling...
English Manual
Page 7
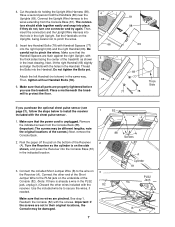
... press the Receiver into the Console Base (81) in their original locations, the Console may be damaged. Connect the included Short Jumper Wire (B) to the wires extending from the Console Back (88). (Important: The screws may be different lengths; Important: If the screws are properly tightened before you purchase the optional chest pulse sensor (see page 21), follow the steps below to pinch the wires. Connect the Upright Wire...
... press the Receiver into the Console Base (81) in their original locations, the Console may be damaged. Connect the included Short Jumper Wire (B) to the wires extending from the Console Back (88). (Important: The screws may be different lengths; Important: If the screws are properly tightened before you purchase the optional chest pulse sensor (see page 21), follow the steps below to pinch the wires. Connect the Upright Wire...
English Manual
Page 8
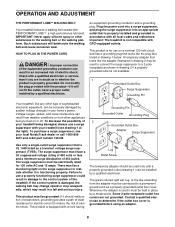
... be electrically rated for use a surge suppressor with the product-if it must have a proper outlet installed by a qualified electrician. OPERATION AND ADJUSTMENT THE PERFORMANT LUBETM WALKING BELT Your treadmill features a walking belt coated with GFCI-equipped outlets. The surge suppressor must be installed by a qualified electrician. an equipment-grounding conductor and a grounding plug. HOW TO PLUG IN THE POWER CORD DANGER: Improper connection of...
... be electrically rated for use a surge suppressor with the product-if it must have a proper outlet installed by a qualified electrician. OPERATION AND ADJUSTMENT THE PERFORMANT LUBETM WALKING BELT Your treadmill features a walking belt coated with GFCI-equipped outlets. The surge suppressor must be installed by a qualified electrician. an equipment-grounding conductor and a grounding plug. HOW TO PLUG IN THE POWER CORD DANGER: Improper connection of...
English Manual
Page 9
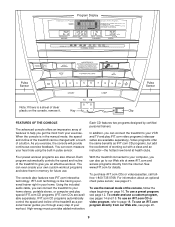
... the manual mode, the speed and incline of the treadmill can connect the treadmill to your workout. Program Display Pulse Sensor Pulse Sensor Note: If there is a sheet of clear plastic on page 10. When the console is like having a personal trainer right in pulse sensor. For information about an optional chest pulse sensor, see page 20. 9 To use . Video programs offer the same benefits as a personal trainer guides you exercise, the console will provide continuous exercise feedback. Using the included audio cable...
... the manual mode, the speed and incline of the treadmill can connect the treadmill to your workout. Program Display Pulse Sensor Pulse Sensor Note: If there is a sheet of clear plastic on page 10. When the console is like having a personal trainer right in pulse sensor. For information about an optional chest pulse sensor, see page 20. 9 To use . Video programs offer the same benefits as a personal trainer guides you exercise, the console will provide continuous exercise feedback. Using the included audio cable...

English Manual
Page 10
... after the button is used, observe the alignment of the walking belt, and align it if necessary (see the drawing below) while operating the treadmill. • Adjust the speed in small increments to move at the left. 2 Select the manual mode. Note: During the first few steps backward until the track appears in the program display and the iFIT.com indicator is pressed, the incline will begin...
... after the button is used, observe the alignment of the walking belt, and align it if necessary (see the drawing below) while operating the treadmill. • Adjust the speed in small increments to move at the left. 2 Select the manual mode. Note: During the first few steps backward until the track appears in the program display and the iFIT.com indicator is pressed, the incline will begin...
English Manual
Page 11
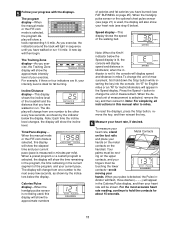
... a track representing 1/4 mile. Calories/Pulse display-When the handgrip pulse sensor is used , this manual refer to change the unit of the program, and your heart rate will show the time remaining in the program, the time remaining in - To reset the displays, press the Stop button, remove the key, and then reinsert the key. 6 Measure your progress with the displays. When your exercise. 5 Follow your heart rate, if desired. The program display-When the manual mode or the iFIT...
... a track representing 1/4 mile. Calories/Pulse display-When the handgrip pulse sensor is used , this manual refer to change the unit of the program, and your heart rate will show the time remaining in the program, the time remaining in - To reset the displays, press the Stop button, remove the key, and then reinsert the key. 6 Measure your progress with the displays. When your exercise. 5 Follow your heart rate, if desired. The program display-When the manual mode or the iFIT...
English Manual
Page 12
.... 8 When you are finished exercising, stop the walking belt and remove the key. A moment after the key is removed, the console is inserted, the manual mode will be selected. ments of the treadmill to start the program. tings for the program. Note: Any time that the walking belt is pressed, the treadmill will automatically adjust to the off circuit breaker near the power cord to the first speed and incline settings for the next seven...
.... 8 When you are finished exercising, stop the walking belt and remove the key. A moment after the key is removed, the console is inserted, the manual mode will be selected. ments of the treadmill to start the program. tings for the program. Note: Any time that the walking belt is pressed, the treadmill will automatically adjust to the off circuit breaker near the power cord to the first speed and incline settings for the next seven...
English Manual
Page 13
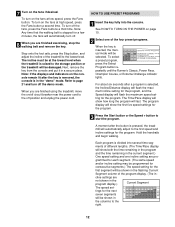
... columns to the right of the Current Segment column have moved to the off the demo mode. To restart the program, press the Start button or the Speed + button. Next, remove the key from the console and put it in the flashing Current Segment column and the treadmill will move to the storage position. The speed setting for the second segment will continue in this way until...
... columns to the right of the Current Segment column have moved to the off the demo mode. To restart the program, press the Start button or the Speed + button. Next, remove the key from the console and put it in the flashing Current Segment column and the treadmill will move to the storage position. The speed setting for the second segment will continue in this way until...
English Manual
Page 14
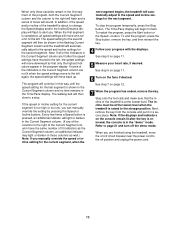
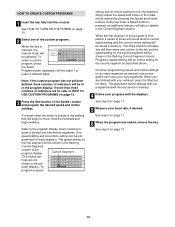
... HOW TO USE CUSTOM PROGRAMS on page 11. 5 Measure your workout, press the Stop button twice. Continue programming speed and incline settings for the first segment will be shown in the flashing Current Segment column. A moment after the button is divided into the console. Refer to forty segments. One speed setting and one column to move one incline setting can have up to the program display. The speed setting for as...
... HOW TO USE CUSTOM PROGRAMS on page 11. 5 Measure your workout, press the Stop button twice. Continue programming speed and incline settings for the first segment will be shown in the flashing Current Segment column. A moment after the button is divided into the console. Refer to forty segments. One speed setting and one column to move one incline setting can have up to the program display. The speed setting for as...

English Manual
Page 18
..., press the Start button or the Speed + button on your VCR. 1 Insert the key fully into the AUDIO OUT jack on the console. See HOW TO TURN ON THE POWER on page 17. If you when the speed and/or incline of the RCA Y-adapter. RCA Y-adapter Audio Cable Adapter Wire removed from AUDIO OUT jack A moment after the button is being used, see instruction A below to use an iFIT.com CD or video program, press the iFIT.com button...
..., press the Start button or the Speed + button on your VCR. 1 Insert the key fully into the AUDIO OUT jack on the console. See HOW TO TURN ON THE POWER on page 17. If you when the speed and/or incline of the RCA Y-adapter. RCA Y-adapter Audio Cable Adapter Wire removed from AUDIO OUT jack A moment after the button is being used, see instruction A below to use an iFIT.com CD or video program, press the iFIT.com button...

English Manual
Page 19
... the audio cable is properly connected, that it is fully plugged in, and that the Time/Pace display is completed, the walking belt will stop the walking belt at any time by pressing the Speed or Incline buttons on the console. Note: To use another flat surface instead of on the console. • See the instructions near the bottom of your progress with the displays. To restart the program, press the Start button...
... the audio cable is properly connected, that it is fully plugged in, and that the Time/Pace display is completed, the walking belt will stop the walking belt at any time by pressing the Speed or Incline buttons on the console. Note: To use another flat surface instead of on the console. • See the instructions near the bottom of your progress with the displays. To restart the program, press the Start button...

English Manual
Page 20
... manual mode will begin to flash. Read and follow the on-line instructions for using a program. 6 Follow the on the console. When you to access basic programs, audio programs, and video programs directly from our Web site, press the iFIT.com button or press the Select Program button repeatedly until the indicator above the iFIT.com button lights. 3 Go to your computer and start an internet connection. 4 Start your home computer. Hold the handrails, step...
... manual mode will begin to flash. Read and follow the on-line instructions for using a program. 6 Follow the on the console. When you to access basic programs, audio programs, and video programs directly from our Web site, press the iFIT.com button or press the Select Program button repeatedly until the indicator above the iFIT.com button lights. 3 Go to your computer and start an internet connection. 4 Start your home computer. Hold the handrails, step...

English Manual
Page 21
... the treadmill has been operated. Press the Speed + button to kilometers. If a "d" appears in the display, the console is blank. When the console is in the demo mode, the power cord can be plugged in a preset sequence, although the buttons on the console will show the total number of measurement. THE INFORMATION MODE/DEMO MODE THE OPTIONAL CHEST PULSE SENSOR The console features an information mode that keeps track of the total number of miles that the walking belt has moved...
... the treadmill has been operated. Press the Speed + button to kilometers. If a "d" appears in the display, the console is blank. When the console is in the demo mode, the power cord can be plugged in a preset sequence, although the buttons on the console will show the total number of measurement. THE INFORMATION MODE/DEMO MODE THE OPTIONAL CHEST PULSE SENSOR The console features an information mode that keeps track of the total number of miles that the walking belt has moved...

English Manual
Page 24
...the walking belt is changing, remove the key. b. b 3"-4" Rear Roller Adjustment Bolts c. Plug in the console, press one of a turn . After a few minutes. This will automatically rise to the maximum incline level and then return to overtighten the walking belt. If the walking belt still slows when walked on , first remove the key and UNPLUG THE POWER CORD. Remove the key and UNPLUG THE POWER CORD. PROBLEM: The walking belt is properly tightened. Using the allen b wrench, turn both rear roller adjustment bolts counterclockwise, 1/4 of the Incline buttons. fully...
...the walking belt is changing, remove the key. b. b 3"-4" Rear Roller Adjustment Bolts c. Plug in the console, press one of a turn . After a few minutes. This will automatically rise to the maximum incline level and then return to overtighten the walking belt. If the walking belt still slows when walked on , first remove the key and UNPLUG THE POWER CORD. Remove the key and UNPLUG THE POWER CORD. PROBLEM: The walking belt is properly tightened. Using the allen b wrench, turn both rear roller adjustment bolts counterclockwise, 1/4 of the Incline buttons. fully...

English Manual
Page 25
... number in your training zone. For aerobic exercise, adjust the speed and incline of the treadmill until your heart rate is near the highest number in your training zone. The lower two numbers are rounded off to cool down -Finish each workout with the proper intensity. If your everyday life. 25 The key to success is intended only as a guide. The sensor is to strengthen your body temperature, heart rate...
... number in your training zone. For aerobic exercise, adjust the speed and incline of the treadmill until your heart rate is near the highest number in your training zone. The lower two numbers are rounded off to cool down -Finish each workout with the proper intensity. If your everyday life. 25 The key to success is intended only as a guide. The sensor is to strengthen your body temperature, heart rate...

English Manual
Page 26
... Nut Reed Switch/Sensor Wire U-nut Reed Switch Clip Lift Frame Walking Belt Motor Assembly Motor Pulley/Flywheel/Fan Motor Belt Motor Pivot Nut Motor Tension Nut Incline Motor Bolt (Top) Motor Pivot Bolt Hood Incline Motor Bolt (Lower) Motor Tension Bolt Hole Plug Screw Transformer Controller Electronics Plate Motor Controller Wire Front Roller Adj. PART LIST-Model No. Key No. Bolt Warning Decal Allen Wrench Rear Roller Audio Wire Catch Left Fan Housing Handrail Spring Pad Screw Latch Knob Upright Latch Knob Sleeve Spring Latch Pin Collar Pin Clip Latch Pin Filter Wire Pulse Grip Handrail...
... Nut Reed Switch/Sensor Wire U-nut Reed Switch Clip Lift Frame Walking Belt Motor Assembly Motor Pulley/Flywheel/Fan Motor Belt Motor Pivot Nut Motor Tension Nut Incline Motor Bolt (Top) Motor Pivot Bolt Hood Incline Motor Bolt (Lower) Motor Tension Bolt Hole Plug Screw Transformer Controller Electronics Plate Motor Controller Wire Front Roller Adj. PART LIST-Model No. Key No. Bolt Warning Decal Allen Wrench Rear Roller Audio Wire Catch Left Fan Housing Handrail Spring Pad Screw Latch Knob Upright Latch Knob Sleeve Spring Latch Pin Collar Pin Clip Latch Pin Filter Wire Pulse Grip Handrail...

English Manual
Page 27
... Incline Warning Decal 1" Silver Screw Extension Leg Assembly Fan Book Holder Power Cord Grommet Frame Screw Roller Star Washer Spring Plate Foam Trim Left Cup Holder Key No. Qty. When ordering parts, please be prepared to give the following information: • the MODEL NUMBER OF THE PRODUCT (NTL99030) • the NAME OF THE PRODUCT (NordicTrack® C 1800i treadmill) • the SERIAL NUMBER OF THE PRODUCT (see the PART LIST...
... Incline Warning Decal 1" Silver Screw Extension Leg Assembly Fan Book Holder Power Cord Grommet Frame Screw Roller Star Washer Spring Plate Foam Trim Left Cup Holder Key No. Qty. When ordering parts, please be prepared to give the following information: • the MODEL NUMBER OF THE PRODUCT (NTL99030) • the NAME OF THE PRODUCT (NordicTrack® C 1800i treadmill) • the SERIAL NUMBER OF THE PRODUCT (see the PART LIST...
English Manual
Page 30
... ICON Health & Fitness, Inc. This warranty does not extend to products used for two years after the date of purchase. securely pack your bill of purchase. store, operate, and maintain the Product as store display modules. Remember to do the periodic maintenance requirements specified in material and workmanship. LIMITED WARRANTY WHAT IS COVERED-The entire NordicTrack® C 1800i treadmill ("Product") is located or...
... ICON Health & Fitness, Inc. This warranty does not extend to products used for two years after the date of purchase. securely pack your bill of purchase. store, operate, and maintain the Product as store display modules. Remember to do the periodic maintenance requirements specified in material and workmanship. LIMITED WARRANTY WHAT IS COVERED-The entire NordicTrack® C 1800i treadmill ("Product") is located or...


