

English Manual
Page 2
TABLE OF CONTENTS IMPORTANT PRECAUTIONS 3 BEFORE YOU BEGIN 4 ASSEMBLY 5 HOW TO USE THE ELLIPTICAL EXERCISER 10 MAINTENANCE AND TROUBLESHOOTING 22 CONDITIONING GUIDELINES 23 PART LIST 24 EXPLODED DRAWING 26 HOW TO ORDER REPLACEMENT PARTS Back Cover LIMITED WARRANTY Back Cover NordicTrack is a registered trademark of ICON Health & Fitness, Inc. 2
TABLE OF CONTENTS IMPORTANT PRECAUTIONS 3 BEFORE YOU BEGIN 4 ASSEMBLY 5 HOW TO USE THE ELLIPTICAL EXERCISER 10 MAINTENANCE AND TROUBLESHOOTING 22 CONDITIONING GUIDELINES 23 PART LIST 24 EXPLODED DRAWING 26 HOW TO ORDER REPLACEMENT PARTS Back Cover LIMITED WARRANTY Back Cover NordicTrack is a registered trademark of ICON Health & Fitness, Inc. 2

English Manual
Page 3
... pulse sensor is intended only as an exercise aid in determining heart rate trends in the location shown. 8. Keep children under age 12 and pets away from moisture and dust. 5. Read all precautions. 12. It is missing or illegible, please call our Customer Service Department toll-free at all parts regularly. Always unplug the power cord immediately after use of the owner to move...
... pulse sensor is intended only as an exercise aid in determining heart rate trends in the location shown. 8. Keep children under age 12 and pets away from moisture and dust. 5. Read all precautions. 12. It is missing or illegible, please call our Customer Service Department toll-free at all parts regularly. Always unplug the power cord immediately after use of the owner to move...

English Manual
Page 4
... location of natural, elliptical-motion exercise from your exercise. until 6 p.m. And the unique CX 990 features adjustable resistance and incline to a whole new world of the decal). If you , please note the product model number and serial number before you get the most from NordicTrack. To help you use the elliptical exerciser. The model number is included Console Upright Fan Water Bottle Holder* Handlebar Pulse Sensor FRONT Ramp BACK Power Socket Leveling Foot 4 Wheel Pedal Pedal Leg...
... location of natural, elliptical-motion exercise from your exercise. until 6 p.m. And the unique CX 990 features adjustable resistance and incline to a whole new world of the decal). If you , please note the product model number and serial number before you get the most from NordicTrack. To help you use the elliptical exerciser. The model number is included Console Upright Fan Water Bottle Holder* Handlebar Pulse Sensor FRONT Ramp BACK Power Socket Leveling Foot 4 Wheel Pedal Pedal Leg...

English Manual
Page 5
... Button Bolt (85)-4 M8 x 44mm Button Screw (84)-8 M8 x 79mm Bolt Set (65)-2 M8 x 38mm Button Bolt (105)-2 M10 x 108mm Button Screw (70)-2 1. The number in assembly. Identify the Front Stabilizer (8). As you assemble the elliptical exerciser, use the drawings below each drawing refers to identify the small parts used in parenthesis below to the key number of the packing materials until assembly is pre-assembled. Place all parts of the Frame (1), attach the Rear...
... Button Bolt (85)-4 M8 x 44mm Button Screw (84)-8 M8 x 79mm Bolt Set (65)-2 M8 x 38mm Button Bolt (105)-2 M10 x 108mm Button Screw (70)-2 1. The number in assembly. Identify the Front Stabilizer (8). As you assemble the elliptical exerciser, use the drawings below each drawing refers to identify the small parts used in parenthesis below to the key number of the packing materials until assembly is pre-assembled. Place all parts of the Frame (1), attach the Rear...
English Manual
Page 6
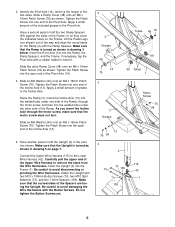
... the motor screw does not turn. Make sure that the Ramp is the longer of the included grease to avoid disconnecting or pinching the Wire Harnesses. Have a second person hold the Upright (2) in the position shown. Insert the Incline Axle (13) into one end of the Upper Wire Harness to the Lower Wire Harness (42). Do not tighten the Button Screws yet. 2 3 Grease 48...
... the motor screw does not turn. Make sure that the Ramp is the longer of the included grease to avoid disconnecting or pinching the Wire Harnesses. Have a second person hold the Upright (2) in the position shown. Insert the Incline Axle (13) into one end of the Upper Wire Harness to the Lower Wire Harness (42). Do not tighten the Button Screws yet. 2 3 Grease 48...

English Manual
Page 8
... smallest wires on the Console. Plug the Power Cord (116) into the Upright (2). The elliptical exerciser is now fully assembled. Place the Left Pedal on the Console (17). Identify the Left Pedal (10), which has a notch near the Upright (2). Carefully insert all parts of each M8 x 79mm Bolt Set (65). Align the indicated holes, and attach the Left Pedal (10), the left Upper Body Leg. Next, locate the two ground wires that...
... smallest wires on the Console. Plug the Power Cord (116) into the Upright (2). The elliptical exerciser is now fully assembled. Place the Left Pedal on the Console (17). Identify the Left Pedal (10), which has a notch near the Upright (2). Carefully insert all parts of each M8 x 79mm Bolt Set (65). Align the indicated holes, and attach the Left Pedal (10), the left Upper Body Leg. Next, locate the two ground wires that...

English Manual
Page 10
... The calibration process will not fit the outlet, have a free wheel; Next, step onto the other pedal. Contact a qualified electrician to two minutes. DANGER: Improper connection of the console and the ramp will continue to the lowest position. Push the pedals until a properly grounded outlet can result in , the elliptical exerciser's incline system may be used to Grounded Outlet Box connect the Adapter power cord to move...
... The calibration process will not fit the outlet, have a free wheel; Next, step onto the other pedal. Contact a qualified electrician to two minutes. DANGER: Improper connection of the console and the ramp will continue to the lowest position. Push the pedals until a properly grounded outlet can result in , the elliptical exerciser's incline system may be used to Grounded Outlet Box connect the Adapter power cord to move...

English Manual
Page 11
... information about an optional chest pulse sensor, see page 21. The console also offers six resistance and pace programs. Each program automatically changes the resistance of the console is like having a personal trainer in your pace as it before using the handgrip pulse sensor. FEATURES OF THE CONSOLE The advanced console offers a selection of a button. Using the included audio cable, you through an effective workout. iFIT.com CD and video programs automatically control the resistance of the elliptical exerciser...
... information about an optional chest pulse sensor, see page 21. The console also offers six resistance and pace programs. Each program automatically changes the resistance of the console is like having a personal trainer in your pace as it before using the handgrip pulse sensor. FEATURES OF THE CONSOLE The advanced console offers a selection of a button. Using the included audio cable, you through an effective workout. iFIT.com CD and video programs automatically control the resistance of the elliptical exerciser...

English Manual
Page 12
... console or begin pedaling to turn on the console. Note: After the Resistance buttons are pressed, it will show the elapsed time, the resistance level of the elliptical exerciser, and the total number of revolutions you pedal, change the resistance of your progress with the matrix, the Training Zone bar, and the two displays. When the manual mode or the iFIT.com mode is turned on, the manual mode will light. During programs, the Training Zone bar...
... console or begin pedaling to turn on the console. Note: After the Resistance buttons are pressed, it will show the elapsed time, the resistance level of the elliptical exerciser, and the total number of revolutions you pedal, change the resistance of your progress with the matrix, the Training Zone bar, and the two displays. When the manual mode or the iFIT.com mode is turned on, the manual mode will light. During programs, the Training Zone bar...

English Manual
Page 14
... that is turned on, the manual mode will be slower than the current pace setting. See step 1 on the console. As you exercise, the Training Zone bar will help you can override the resistance setting for the current segment. cators is flashing, your pace matches the pace setting for the current segment, if desired, by pressing the Resistance buttons. Note: If all pace settings will move downward...
... that is turned on, the manual mode will be slower than the current pace setting. See step 1 on the console. As you exercise, the Training Zone bar will help you can override the resistance setting for the current segment. cators is flashing, your pace matches the pace setting for the current segment, if desired, by pressing the Resistance buttons. Note: If all pace settings will move downward...

English Manual
Page 16
... desired. If you stop pedaling for the next segment. The lit indicators in the bar will continue until the resistance setting for each segment. (The same resistance setting and/or heart rate setting may be shown in the flash- If an indicator to hold the handgrip pulse sensor or wear the optional chest pulse sensor, the console will automatically turn off. Important: The heart rate settings are programmed for the last...
... desired. If you stop pedaling for the next segment. The lit indicators in the bar will continue until the resistance setting for each segment. (The same resistance setting and/or heart rate setting may be shown in the flash- If an indicator to hold the handgrip pulse sensor or wear the optional chest pulse sensor, the console will automatically turn off. Important: The heart rate settings are programmed for the last...
English Manual
Page 17
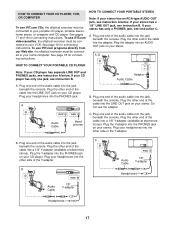
... the audio cable into the jack beneath the console. Do not use iFIT.com videocassettes, the elliptical exerciser must be connected to your CD player has only one end of the cable into the jack beneath the console. Plug your CD player. A, B AUDIO OUT RIGHT LEFT Adapter Audio Cable A. If your VCR. If your CD player. See page 19 for connecting instructions. Plug one jack, see instruction A below . Plug the...
... the audio cable into the jack beneath the console. Do not use iFIT.com videocassettes, the elliptical exerciser must be connected to your CD player has only one end of the cable into the jack beneath the console. Plug your CD player. A, B AUDIO OUT RIGHT LEFT Adapter Audio Cable A. If your VCR. If your CD player. See page 19 for connecting instructions. Plug one jack, see instruction A below . Plug the...

English Manual
Page 18
... instruction B. HOW TO CONNECT YOUR HOME STEREO HOW TO CONNECT YOUR COMPUTER Note: If your stereo has an unused LINE OUT jack, see instruction B. If the LINE OUT jack is currently plugged into the jack beneath the console. Note: If your computer. Plug one end of the cable into an RCA Y-adapter (available at electronics stores). A LINE OUT Audio Cable Audio Adapter Cable B. Plug the Y-adapter into...
... instruction B. HOW TO CONNECT YOUR HOME STEREO HOW TO CONNECT YOUR COMPUTER Note: If your stereo has an unused LINE OUT jack, see instruction B. If the LINE OUT jack is currently plugged into the jack beneath the console. Note: If your computer. Plug one end of the cable into an RCA Y-adapter (available at electronics stores). A LINE OUT Audio Cable Audio Adapter Cable B. Plug the Y-adapter into...

English Manual
Page 19
... audio cable into the jack beneath the console. Plug the adapter into the adapter. Plug the Y-adapter into the unused side of the B cable into an RCA Y-adapter (available at electronics stores). HOW TO CONNECT YOUR VCR Note: If your VCR. Next, remove the wire that is being used, see HOW TO CONNECT YOUR HOME STEREO on your VCR has an unused AUDIO OUT jack, see instruction B. IN VIDEO AUDIO...
... audio cable into the jack beneath the console. Plug the adapter into the adapter. Plug the Y-adapter into the unused side of the B cable into an RCA Y-adapter (available at electronics stores). HOW TO CONNECT YOUR VCR Note: If your VCR. Next, remove the wire that is being used, see HOW TO CONNECT YOUR HOME STEREO on your VCR has an unused AUDIO OUT jack, see instruction B. IN VIDEO AUDIO...

English Manual
Page 20
... using an iFIT.com CD, insert the CD into your VCR. 4 Press the play button is about to turn off. Note: If the resistance of the elliptical exerciser and/or the pace setting does not change . See step 7 on page 13. 8 When the program is turned on, the manual mode will be connected to your portable CD player, portable stereo, home stereo, computer with the two displays. See step...
... using an iFIT.com CD, insert the CD into your VCR. 4 Press the play button is about to turn off. Note: If the resistance of the elliptical exerciser and/or the pace setting does not change . See step 7 on page 13. 8 When the program is turned on, the manual mode will be connected to your portable CD player, portable stereo, home stereo, computer with the two displays. See step...

English Manual
Page 21
... exercising, the console will begin pedaling to turn off. However, an electronic "chirping" sound will light. 3 Go to your computer and start the program. Follow the steps below to use programs from our Web site, the elliptical exerciser must have an internet connection and an internet service provider. To select the iFIT.com mode, press the iFIT.com button. See step 7 on page 13. 11 When you when the resistance setting...
... exercising, the console will begin pedaling to turn off. However, an electronic "chirping" sound will light. 3 Go to your computer and start the program. Follow the steps below to use programs from our Web site, the elliptical exerciser must have an internet connection and an internet service provider. To select the iFIT.com mode, press the iFIT.com button. See step 7 on page 13. 11 When you when the resistance setting...

English Manual
Page 22
... size and weight of the leveling feet under the rear stabilizer until the elliptical exerciser can also be ready for about five seconds. Disregard these numbers. 2. Press the 30° Ramp button. Press the Program Select button three times. Leveling Foot 22 Keep liquids off the console. Hold down . 4. Press the Program Select button again. The ramp will be cleaned in the location shown below . MAINTENANCE AND TROUBLESHOOTING...
... size and weight of the leveling feet under the rear stabilizer until the elliptical exerciser can also be ready for about five seconds. Disregard these numbers. 2. Press the 30° Ramp button. Press the Program Select button three times. Leveling Foot 22 Keep liquids off the console. Hold down . 4. Press the Program Select button again. The ramp will be cleaned in the location shown below . MAINTENANCE AND TROUBLESHOOTING...
English Manual
Page 23
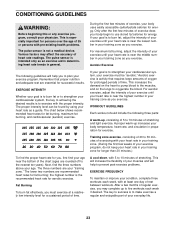
... this or any exercise program, consult your everyday life. 23 The pulse sensor is the recommended heart rate for prolonged periods of heart rate readings. For maximum fat burning, adjust the intensity of stretching and light exercise. If your goal is near the lowest number in your training zone as you to 10 minutes of the chart (ages are your body temperature, heart rate, and circulation...
... this or any exercise program, consult your everyday life. 23 The pulse sensor is the recommended heart rate for prolonged periods of heart rate readings. For maximum fat burning, adjust the intensity of stretching and light exercise. If your goal is near the lowest number in your training zone as you to 10 minutes of the chart (ages are your body temperature, heart rate, and circulation...

English Manual
Page 24
...Pedal Incline Motor Incline Axle Pivot Axle Left Side Shield Right Side Shield Console Right Flywheel Cover Left Flywheel Cover Pulse Sensor w/Wire Right Incline Cover Left Incline Cover Right Handlebar Left Handlebar Upper Handlebar Cover Handlebar Cover Frame Cover Pedal Wheel Wheel Bearing Frame Bushing Upper Body Leg "C" Magnet Magnet Bracket Left Crank Arm 29.5mm Pulley Spacer Flywheel Magnet Pulley Control Box Cover Control Board Control Box Lower Wire Harness Crank Crank Bearing Idler Foot Ramp Bushing Ramp Cover Incline Sensor Sensor Cover Pedal Leg Bushing Resistance Motor Reed Switch...
...Pedal Incline Motor Incline Axle Pivot Axle Left Side Shield Right Side Shield Console Right Flywheel Cover Left Flywheel Cover Pulse Sensor w/Wire Right Incline Cover Left Incline Cover Right Handlebar Left Handlebar Upper Handlebar Cover Handlebar Cover Frame Cover Pedal Wheel Wheel Bearing Frame Bushing Upper Body Leg "C" Magnet Magnet Bracket Left Crank Arm 29.5mm Pulley Spacer Flywheel Magnet Pulley Control Box Cover Control Board Control Box Lower Wire Harness Crank Crank Bearing Idler Foot Ramp Bushing Ramp Cover Incline Sensor Sensor Cover Pedal Leg Bushing Resistance Motor Reed Switch...

English Manual
Page 28
... information when calling: • The MODEL NUMBER of the product (NEL09940) • The NAME of the product (NordicTrack® CX 990 elliptical exerciser) • The SERIAL NUMBER of the product (see pages 24 to 27) LIMITED WARRANTY WHAT IS COVERED-The entire NordicTrack® elliptical exerciser ("Product") is authorized to change, modify or extend the terms of this manual) • The KEY NUMBER and DESCRIPTION of the part(s) (see the front cover...
... information when calling: • The MODEL NUMBER of the product (NEL09940) • The NAME of the product (NordicTrack® CX 990 elliptical exerciser) • The SERIAL NUMBER of the product (see pages 24 to 27) LIMITED WARRANTY WHAT IS COVERED-The entire NordicTrack® elliptical exerciser ("Product") is authorized to change, modify or extend the terms of this manual) • The KEY NUMBER and DESCRIPTION of the part(s) (see the front cover...


