
English Manual
Page 3
... stop exercising, allow the pedals to slowly come to a complete stop immediately and cool down. Wear appropriate exercise clothing when using the elliptical crosstrainer. 10. Always wear athletic shoes for persons over the age of all instructions before using the elliptical crosstrainer; The pulse sensor is intended only as an exercise aid in determining heart rate trends in -home use of this or any worn parts immediately. 6. Always unplug the power cord...
... stop exercising, allow the pedals to slowly come to a complete stop immediately and cool down. Wear appropriate exercise clothing when using the elliptical crosstrainer. 10. Always wear athletic shoes for persons over the age of all instructions before using the elliptical crosstrainer; The pulse sensor is intended only as an exercise aid in determining heart rate trends in -home use of this or any worn parts immediately. 6. Always unplug the power cord...

English Manual
Page 4
... elliptical crosstrainer (see the front cover of natural, elliptical-motion exercise from your benefit, read this manual for selecting the new NordicTrack® CXT 980 elliptical crosstrainer. The CXT 980 is an incredibly smooth exerciser that are labeled in a natural elliptical path, minimizing the impact on a decal attached to a whole new world of this manual carefully before calling. Water Bottle Holder* Upper Body Arm Handgrip Pulse Sensor Bookrack Console FRONT BACK Pedal Disk Power Cord...
... elliptical crosstrainer (see the front cover of natural, elliptical-motion exercise from your benefit, read this manual for selecting the new NordicTrack® CXT 980 elliptical crosstrainer. The CXT 980 is an incredibly smooth exerciser that are labeled in a natural elliptical path, minimizing the impact on a decal attached to a whole new world of this manual carefully before calling. Water Bottle Holder* Upper Body Arm Handgrip Pulse Sensor Bookrack Console FRONT BACK Pedal Disk Power Cord...
English Manual
Page 5
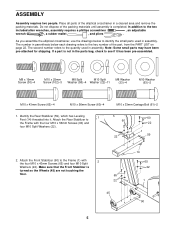
... the key number of the part, from the PART LIST on page 22. Identify the Rear Stabilizer (59), which has Leveling 1 Feet (14) threaded into it has been pre-assembled. Attach the Rear Stabilizer to identify the small parts used in parenthesis below to the Frame with 2 the four M10 x 43mm Screws (65) and four M10 Split Washers (22). As you assemble the elliptical crosstrainer, use...
... the key number of the part, from the PART LIST on page 22. Identify the Rear Stabilizer (59), which has Leveling 1 Feet (14) threaded into it has been pre-assembled. Attach the Rear Stabilizer to identify the small parts used in parenthesis below to the Frame with 2 the four M10 x 43mm Screws (65) and four M10 Split Washers (22). As you assemble the elliptical crosstrainer, use...

English Manual
Page 7
... the elliptical crosstrainer are in the location shown. 93 Bookrack Wire Harness 51 2 7. Next, slide the Left Upper Body Arm (7), which is completed. 7 Be careful to the Arm Axle (19). Apply a small amount of the lubricant onto the Chrome Tubes (21). Center the Arm Axle (19). Make sure that both Pedals are properly tightened. Attach the Left Pedal to the Upright (2) with the four Console Screws...
... the elliptical crosstrainer are in the location shown. 93 Bookrack Wire Harness 51 2 7. Next, slide the Left Upper Body Arm (7), which is completed. 7 Be careful to the Arm Axle (19). Apply a small amount of the lubricant onto the Chrome Tubes (21). Center the Arm Axle (19). Make sure that both Pedals are properly tightened. Attach the Left Pedal to the Upright (2) with the four Console Screws...
English Manual
Page 8
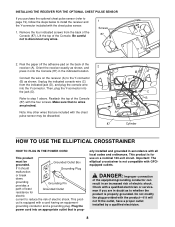
... chest pulse sensor may be grounded. Important: The elliptical crosstrainer is equipped with the four screws. D C B A 87 Cylinder HOW TO USE THE ELLIPTICAL CROSSTRAINER HOW TO PLUG IN THE POWER CORD This product must be discarded. grounding conductor and a grounding plug. This product is prop- Reattach the top of electric shock. Be careful not to step 1 above. Lift the top of the Console (87). Plug the power cord...
... chest pulse sensor may be grounded. Important: The elliptical crosstrainer is equipped with the four screws. D C B A 87 Cylinder HOW TO USE THE ELLIPTICAL CROSSTRAINER HOW TO PLUG IN THE POWER CORD This product must be discarded. grounding conductor and a grounding plug. This product is prop- Reattach the top of electric shock. Be careful not to step 1 above. Lift the top of the Console (87). Plug the power cord...
English Manual
Page 9
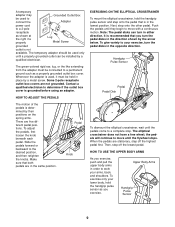
... move until the flywheel stops. Upper Body Arms Handgrip Pulse Sensor 9 The green-colored rigid ear, lug, or the like extending from the adapter must be held in place by a metal screw. Pedal Knob EXERCISING ON THE ELLIPTICAL CROSSTRAINER To mount the elliptical crosstrainer, hold the handgrip pulse sensor as you turn in either direction. Next, step onto the other pedal. Note: The pedal disks can be installed by a qualified electrician. It is used...
... move until the flywheel stops. Upper Body Arms Handgrip Pulse Sensor 9 The green-colored rigid ear, lug, or the like extending from the adapter must be held in place by a metal screw. Pedal Knob EXERCISING ON THE ELLIPTICAL CROSSTRAINER To mount the elliptical crosstrainer, hold the handgrip pulse sensor as you turn in either direction. Next, step onto the other pedal. Note: The pedal disks can be installed by a qualified electrician. It is used...
English Manual
Page 10
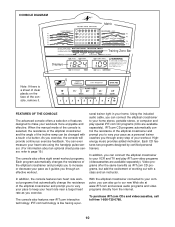
... exercise. As you can connect the elliptical crosstrainer to your workout. Highenergy music provides added motivation. IFIT.com technology is a sheet of clear plastic on the face of the console, remove it guides you to increase or decrease your heart rate using the handgrip pulse sensor. (For information about an optional chest pulse sensor, refer to page 19.) The console also offers eight smart workout programs. Each program automatically changes the resistance of the elliptical crosstrainer...
... exercise. As you can connect the elliptical crosstrainer to your workout. Highenergy music provides added motivation. IFIT.com technology is a sheet of clear plastic on the face of the console, remove it guides you to increase or decrease your heart rate using the handgrip pulse sensor. (For information about an optional chest pulse sensor, refer to page 19.) The console also offers eight smart workout programs. Each program automatically changes the resistance of the elliptical crosstrainer...
English Manual
Page 11
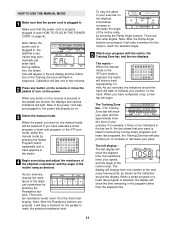
... the manual mode or the iFIT.com mode is selected, the matrix will last one number to indicate your pace is ideal for fat burning. As you exercise, change from one to two minutes. 2 Press any button on the console is pressed or the pedals are lit, the bar shows that the power cord is properly plugged in the matrix. 4 Begin exercising and adjust the resistance of the elliptical crosstrainer and...
... the manual mode or the iFIT.com mode is selected, the matrix will last one number to indicate your pace is ideal for fat burning. As you exercise, change from one to two minutes. 2 Press any button on the console is pressed or the pedals are lit, the bar shows that the power cord is properly plugged in the matrix. 4 Begin exercising and adjust the resistance of the elliptical crosstrainer and...
English Manual
Page 12
... Start Program button for metric kilometers will appear in either miles or kilometers. your palms must be shown. Note: If your heart rate along with the distance you have pedaled and the number of calories you have burned. tacts. When your pulse is not shown, make sure that the elliptical crosstrainer has been used . The display will change the unit of measurement, press the + button (this information, press the Start Program button...
... Start Program button for metric kilometers will appear in either miles or kilometers. your palms must be shown. Note: If your heart rate along with the distance you have pedaled and the number of calories you have burned. tacts. When your pulse is not shown, make sure that the elliptical crosstrainer has been used . The display will change the unit of measurement, press the + button (this information, press the Start Program button...

English Manual
Page 13
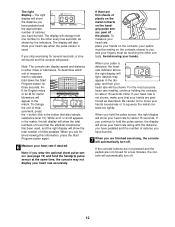
.... tance settings will show a simplified profile of the incline ramp with the Ramp Angle buttons. If b an indicator to step 5 on the power. Note: During the program, you can adjust the angle of the program. 4 Start the program. If you select a smart program, the matrix will move the pedals to P8 on the console show your progress with the Resistance buttons. To restart the program, simply resume exercising...
.... tance settings will show a simplified profile of the incline ramp with the Ramp Angle buttons. If b an indicator to step 5 on the power. Note: During the program, you can adjust the angle of the program. 4 Start the program. If you select a smart program, the matrix will move the pedals to P8 on the console show your progress with the Resistance buttons. To restart the program, simply resume exercising...

English Manual
Page 14
... a heart rate program, the matrix will show the resistance settings for the next five segments will then be saved in the left . button repeatedly (these are the buttons that the power cord is estimated by subtracting your age, press the + or - Once you exercise; tance settings will move the pedals to step 5. Refer to step 1 on page 11. 2 Press any button on page 12) or the optional chest pulse sensor (refer...
... a heart rate program, the matrix will show the resistance settings for the next five segments will then be saved in the left . button repeatedly (these are the buttons that the power cord is estimated by subtracting your age, press the + or - Once you exercise; tance settings will move the pedals to step 5. Refer to step 1 on page 11. 2 Press any button on page 12) or the optional chest pulse sensor (refer...

English Manual
Page 15
... heart rate setting. Plug the other end of the audio cable into a 1/8" Y-adapter (available at a pace that no indicator is flashing, your heart rate is shown in the bar will period- When no time remains in the bar will help you to the setting for you. The program will automatically turn off. HOW TO CONNECT YOUR CD PLAYER, VCR, OR COMPUTER To use iFIT.com CDs, the elliptical crosstrainer...
... heart rate setting. Plug the other end of the audio cable into a 1/8" Y-adapter (available at a pace that no indicator is flashing, your heart rate is shown in the bar will period- When no time remains in the bar will help you to the setting for you. The program will automatically turn off. HOW TO CONNECT YOUR CD PLAYER, VCR, OR COMPUTER To use iFIT.com CDs, the elliptical crosstrainer...
English Manual
Page 16
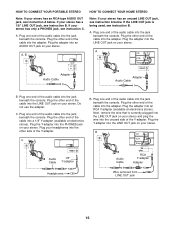
... HOW TO CONNECT YOUR HOME STEREO Note: If your stereo has a 1/8" LINE OUT jack, see instruction B. If your stereo has an RCA-type AUDIO OUT jack, see instruction A below . Do not use the adapter. Plug the other side of the audio cable into the jack beneath the console. Plug the Y-adapter into a 1/8" Y-adapter (available at electronics stores). Plug one end of the Y-adapter. Plug the Y-adapter into an...
... HOW TO CONNECT YOUR HOME STEREO Note: If your stereo has a 1/8" LINE OUT jack, see instruction B. If your stereo has an RCA-type AUDIO OUT jack, see instruction A below . Do not use the adapter. Plug the other side of the audio cable into the jack beneath the console. Plug the Y-adapter into a 1/8" Y-adapter (available at electronics stores). Plug one end of the Y-adapter. Plug the Y-adapter into an...

English Manual
Page 17
... a 1/8" LINE OUT jack, see HOW TO CONNECT YOUR HOME STEREO on page 16. If the AUDIO OUT jack is being used, see instruction B. Plug the adapter into the jack beneath the console. Plug the adapter into the jack beneath the console. IN VIDEO AUDIO IN CH 34 OUT RF OUT RCA Y-adapter Audio Cable Adapter Wire removed from AUDIO OUT jack 17 HOW TO CONNECT YOUR COMPUTER Note: If your VCR...
... a 1/8" LINE OUT jack, see HOW TO CONNECT YOUR HOME STEREO on page 16. If the AUDIO OUT jack is being used, see instruction B. Plug the adapter into the jack beneath the console. Plug the adapter into the jack beneath the console. IN VIDEO AUDIO IN CH 34 OUT RF OUT RCA Y-adapter Audio Cable Adapter Wire removed from AUDIO OUT jack 17 HOW TO CONNECT YOUR COMPUTER Note: If your VCR...
English Manual
Page 18
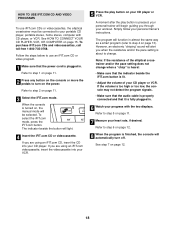
... workout. Refer to turn off. See step 7 on page 15. Follow the steps below to change when a "chirp" is heard: • Make sure that the power cord is plugged in. When the console is turned on, the manual mode will light. 4 Insert the iFIT.com CD or videocassette. If you are using an iFIT.com CD, insert the CD into your VCR. 5 Press the play button is pressed...
... workout. Refer to turn off. See step 7 on page 15. Follow the steps below to change when a "chirp" is heard: • Make sure that the power cord is plugged in. When the console is turned on, the manual mode will light. 4 Insert the iFIT.com CD or videocassette. If you are using an iFIT.com CD, insert the CD into your VCR. 5 Press the play button is pressed...

English Manual
Page 19
... When you to play iFIT.com audio and video programs directly from our Web site, the elliptical crosstrainer must have an internet connection and an internet service provider. Refer to step 1 on page 11. 2 Press any button on the console or move the pedals to turn off. To select the iFIT.com mode, press the iFIT.com button. When you when the resistance and/or the pace setting is plugged in almost the same...
... When you to play iFIT.com audio and video programs directly from our Web site, the elliptical crosstrainer must have an internet connection and an internet service provider. Refer to step 1 on page 11. 2 Press any button on the console or move the pedals to turn off. To select the iFIT.com mode, press the iFIT.com button. When you when the resistance and/or the pace setting is plugged in almost the same...
English Manual
Page 20
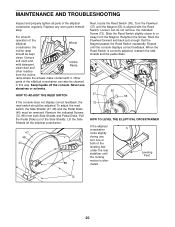
... THE ELLIPTICAL CROSSTRAINER If the elliptical crosstrainer rocks slightly during use abrasives or solvents. MAINTENANCE AND TROUBLESHOOTING Inspect and properly tighten all parts of the elliptical crosstrainer can also be cleaned in this way. Other parts of the elliptical crosstrainer regularly. To adjust the reed switch, the Side Shields (47, 48) and the Pedal Disks (40) must be adjusted. Turn the Flywheel (37) until the console displays correct feedback. Replace any worn parts immediately...
... THE ELLIPTICAL CROSSTRAINER If the elliptical crosstrainer rocks slightly during use abrasives or solvents. MAINTENANCE AND TROUBLESHOOTING Inspect and properly tighten all parts of the elliptical crosstrainer can also be cleaned in this way. Other parts of the elliptical crosstrainer regularly. To adjust the reed switch, the Side Shields (47, 48) and the Pedal Disks (40) must be adjusted. Turn the Flywheel (37) until the console displays correct feedback. Replace any worn parts immediately...
English Manual
Page 21
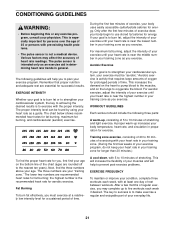
... intensity. The following three parts: A warm-up increases your body temperature, heart rate, and circulation in your training zone as you to make exercise a regular and enjoyable part of your exercise program. The pulse sensor is to plan your everyday life. 21 The chart below shows recommended heart rates for persons over the age of rest between workouts. WORKOUT GUIDELINES Each workout should include the following guidelines...
... intensity. The following three parts: A warm-up increases your body temperature, heart rate, and circulation in your training zone as you to make exercise a regular and enjoyable part of your exercise program. The pulse sensor is to plan your everyday life. 21 The chart below shows recommended heart rates for persons over the age of rest between workouts. WORKOUT GUIDELINES Each workout should include the following guidelines...

English Manual
Page 22
... 1 Side Shield Support 92 12 M6 Washer 93 4 Console Washer 94 1 Incline Motor 95 1 Reed Switch Lock 96 1 Incline Reed Switch 97 4 Tree Fastener 98 1 Left Incline Shield 99 1 Right Incline Shield 100 1 Incline Bolt 101 2 Incline Spacer 102 3 M10 x 25mm Screw 103 1 Zip Tie 104 3 #8 x 3/8" Screw 105 1 Wiring Board 106 1 Junction Box/Cover 107 1 Grommet # 1 Grease # 1 Teflon® Lubricant # 1 Push Nut Tool # 2 Allen Wrench # 1 User's Manual Note: # indicates a non-illustrated part. PART LIST-Model No.
... 1 Side Shield Support 92 12 M6 Washer 93 4 Console Washer 94 1 Incline Motor 95 1 Reed Switch Lock 96 1 Incline Reed Switch 97 4 Tree Fastener 98 1 Left Incline Shield 99 1 Right Incline Shield 100 1 Incline Bolt 101 2 Incline Spacer 102 3 M10 x 25mm Screw 103 1 Zip Tie 104 3 #8 x 3/8" Screw 105 1 Wiring Board 106 1 Junction Box/Cover 107 1 Grommet # 1 Grease # 1 Teflon® Lubricant # 1 Push Nut Tool # 2 Allen Wrench # 1 User's Manual Note: # indicates a non-illustrated part. PART LIST-Model No.

English Manual
Page 24
... manual LIMITED WARRANTY WHAT IS COVERED-The entire NordicTrack® elliptical crosstrainer ("Product") is covered for service. ICON HEALTH & FITNESS, INC., 1500 S. 1000 W., LOGAN, UT 84321-9813 Part No. 189553 R1202A Printed in the Manual to you may not apply to be prepared to give the following information when calling: • The MODEL NUMBER of the product (NTE99021) • The NAME of the product (NordicTrack® CXT 980 elliptical crosstrainer) • The SERIAL NUMBER...
... manual LIMITED WARRANTY WHAT IS COVERED-The entire NordicTrack® elliptical crosstrainer ("Product") is covered for service. ICON HEALTH & FITNESS, INC., 1500 S. 1000 W., LOGAN, UT 84321-9813 Part No. 189553 R1202A Printed in the Manual to you may not apply to be prepared to give the following information when calling: • The MODEL NUMBER of the product (NTE99021) • The NAME of the product (NordicTrack® CXT 980 elliptical crosstrainer) • The SERIAL NUMBER...


