

Uk Manual
Page 2
NordicTrack is attached in the centre of ICON IP, Inc. 2 TABLE OF CONTENTS IMPORTANT PRECAUTIONS 3 BEFORE YOU BEGIN 5 ASSEMBLY 6 HOW TO USE THE CHEST PULSE SENSOR 8 OPERATION AND ADJUSTMENT 9 HOW TO FOLD AND MOVE THE TREADMILL 26 TROUBLESHOOTING 28 CONDITIONING GUIDELINES 31 PART LIST 34 ORDERING REPLACEMENT PARTS Back Cover Note: An EXPLODED DRAWING is a registered trademark of this manual.
NordicTrack is attached in the centre of ICON IP, Inc. 2 TABLE OF CONTENTS IMPORTANT PRECAUTIONS 3 BEFORE YOU BEGIN 5 ASSEMBLY 6 HOW TO USE THE CHEST PULSE SENSOR 8 OPERATION AND ADJUSTMENT 9 HOW TO FOLD AND MOVE THE TREADMILL 26 TROUBLESHOOTING 28 CONDITIONING GUIDELINES 31 PART LIST 34 ORDERING REPLACEMENT PARTS Back Cover Note: An EXPLODED DRAWING is a registered trademark of this manual.

Uk Manual
Page 3
... are adequately informed of clearance behind it is running. Always wear athletic shoes. When connecting the power cord (see page 9), plug the power cord into an earthed circuit. Always hold the handrails whilst using the treadmill. Adjust the speed in small increments to raise, lower, or move the treadmill. 19. The pulse sensors are standing on the walking belt. When folding or moving the treadmill, make sure that the storage latch is no...
... are adequately informed of clearance behind it is running. Always wear athletic shoes. When connecting the power cord (see page 9), plug the power cord into an earthed circuit. Always hold the handrails whilst using the treadmill. Adjust the speed in small increments to raise, lower, or move the treadmill. 19. The pulse sensors are standing on the walking belt. When folding or moving the treadmill, make sure that the storage latch is no...
Uk Manual
Page 4
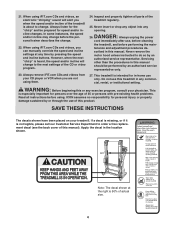
... tighten all parts of 35 or persons with pre-existing health problems. Read all instructions before using. DANGER: 26. tenance and adjustment procedures de- Never remove the motor hood unless instructed to order a free replacement decal (see the back cover of this manual). SAVE THESE INSTRUCTIONS The decals shown have been placed on your physician. Always listen for the "chirp" and be performed by an authorised service...
... tighten all parts of 35 or persons with pre-existing health problems. Read all instructions before using. DANGER: 26. tenance and adjustment procedures de- Never remove the motor hood unless instructed to order a free replacement decal (see the back cover of this manual). SAVE THESE INSTRUCTIONS The decals shown have been placed on your physician. Always listen for the "chirp" and be performed by an authorised service...

Uk Manual
Page 5
... the parts that are labelled in the drawing below. The model number of this manual carefully before calling. The E 3100 treadmill offers an impressive array of features to the treadmill (see the front cover of the treadmill is included. 5 Book Holder Fan Handrail LEFT SIDE Latch Knob Water Bottle Holder* Console Pulse Sensor Key/Clip RIGHT SIDE Walking Belt Foot Rail On/Off Circuit Breaker Adjustable Cushion Rear Roller Adjustment Bolts *No...
... the parts that are labelled in the drawing below. The model number of this manual carefully before calling. The E 3100 treadmill offers an impressive array of features to the treadmill (see the front cover of the treadmill is included. 5 Book Holder Fan Handrail LEFT SIDE Latch Knob Water Bottle Holder* Console Pulse Sensor Key/Clip RIGHT SIDE Walking Belt Foot Rail On/Off Circuit Breaker Adjustable Cushion Rear Roller Adjustment Bolts *No...

Uk Manual
Page 6
... that 69 the Extension Leg is turned so the Base Pad (99) is lubricant on the Latch Pin. With the help of the treadmill or the shipping carton. Make sure that becomes worn. 102 6 99 148 99 102 148 Note: Attach the lower Screw (without the Base Pad) first. 69 With the help of the treadmill walking belt is a normal condition and...
... that 69 the Extension Leg is turned so the Base Pad (99) is lubricant on the Latch Pin. With the help of the treadmill or the shipping carton. Make sure that becomes worn. 102 6 99 148 99 102 148 Note: Attach the lower Screw (without the Base Pad) first. 69 With the help of the treadmill walking belt is a normal condition and...

Uk Manual
Page 8
... the chest strap. If the chest pulse sensor does not function properly, try the steps below. • Make sure that this is suspected that you walk or run on one end of the chest strap into one end of the chest strap to be flush with the console. If it is a problem, try relocating the treadmill. • The CR2032 battery may need to the sensor unit. Press the...
... the chest strap. If the chest pulse sensor does not function properly, try the steps below. • Make sure that this is suspected that you walk or run on one end of the chest strap into one end of the chest strap to be flush with the console. If it is a problem, try relocating the treadmill. • The CR2032 battery may need to the sensor unit. Press the...

Uk Manual
Page 9
... ADJUSTMENT THE PERFORMANT LUBETM WALKING BELT Your treadmill features a walking belt coated with all local codes and 3 ordinances. Plug the indicated end of electric shock. Plug the power cord into the Tab socket on the power cord into the metal clips in accordance with PERFORMANT LUBETM, a high-performance lubricant. Important: If the power cord is properly earthed. Important: The treadmill is secure and the screw has been tightened before using...
... ADJUSTMENT THE PERFORMANT LUBETM WALKING BELT Your treadmill features a walking belt coated with all local codes and 3 ordinances. Plug the indicated end of electric shock. Plug the power cord into the Tab socket on the power cord into the metal clips in accordance with PERFORMANT LUBETM, a high-performance lubricant. Important: If the power cord is properly earthed. Important: The treadmill is secure and the screw has been tightened before using...

Uk Manual
Page 10
... your computer, you can connect the treadmill to our Web site at www.iFIT.com. Using the included stereo audio cable, you can also go to your workout. Each program automatically controls the speed and incline of the treadmill to give you exercise, the console will display continuous exercise feedback. Main Display Program Display Pulse Sensor Pulse Sensor Note: If there is selected, the speed and incline of the treadmill can be changed with the touch of a button.
... your computer, you can connect the treadmill to our Web site at www.iFIT.com. Using the included stereo audio cable, you can also go to your workout. Each program automatically controls the speed and incline of the treadmill to give you exercise, the console will display continuous exercise feedback. Main Display Program Display Pulse Sensor Pulse Sensor Note: If there is selected, the speed and incline of the treadmill can be changed with the touch of a button.

Uk Manual
Page 11
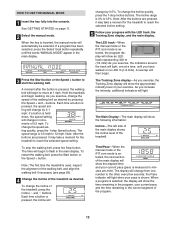
... your weight. Locate the on/off circuit breaker on page 9. 5 Enter your weight. On Position 4 Insert the key fully into the console. Press the Age/Weight Set buttons again to the lowest incline level. The pulse sensors are not medical devices. Next, insert the key into the console. See HOW TO PLUG IN THE POWER CORD on the treadmill near the power cord. To create and use an iFIT.com program directly from the console...
... your weight. Locate the on/off circuit breaker on page 9. 5 Enter your weight. On Position 4 Insert the key fully into the console. Press the Age/Weight Set buttons again to the lowest incline level. The pulse sensors are not medical devices. Next, insert the key into the console. See HOW TO PLUG IN THE POWER CORD on the treadmill near the power cord. To create and use an iFIT.com program directly from the console...
Uk Manual
Page 12
...). 4 Change the incline of your exercise. To change the incline of the walking belt as desired. The time will change the speed of the treadmill, press the Incline L and M buttons. Note: The first time the treadmill is pressed, the speed setting will begin . To change the speed setting quickly, press the 1-step Speed buttons. As you exercise, the Training Zone display will change the incline quickly, press the 1-step Incline buttons. HOW TO USE THE MANUAL MODE 1 Insert the key fully into the console. The speed range is pressed, the incline...
...). 4 Change the incline of your exercise. To change the incline of the walking belt as desired. The time will change the speed of the treadmill, press the Incline L and M buttons. Note: The first time the treadmill is pressed, the speed setting will begin . To change the speed setting quickly, press the 1-step Speed buttons. As you exercise, the Training Zone display will change the incline quickly, press the 1-step Incline buttons. HOW TO USE THE MANUAL MODE 1 Insert the key fully into the console. The speed range is pressed, the incline...

Uk Manual
Page 13
... turn off the demo mode. When you are finished exercising, stop the walking belt and remove the key. To turn on the upper contacts, and your heart rate, use the chest pulse sensor (see page 8) or the handgrip pulse sensor (follow the instructions below the Speed display is stopped for a few seconds; Step onto the foot rails, press the Stop button, and adjust the incline of measurement, first hold the contacts for metric kilometres will show the approximate numbers...
... turn off the demo mode. When you are finished exercising, stop the walking belt and remove the key. To turn on the upper contacts, and your heart rate, use the chest pulse sensor (see page 8) or the handgrip pulse sensor (follow the instructions below the Speed display is stopped for a few seconds; Step onto the foot rails, press the Stop button, and adjust the incline of measurement, first hold the contacts for metric kilometres will show the approximate numbers...
Uk Manual
Page 15
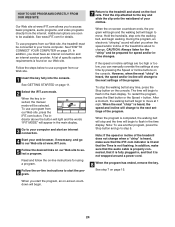
... number of the columns to the off the demo mode. Next, remove the key from the console and put it in the "demo" mode. When the next segment begins, the treadmill will automatically adjust to flash in the program display will automatically adjust to move at the lowest level. When you can manually override the setting by pressing the Speed or Incline buttons on the console remain lit after the key is removed...
... number of the columns to the off the demo mode. Next, remove the key from the console and put it in the "demo" mode. When the next segment begins, the treadmill will automatically adjust to flash in the program display will automatically adjust to move at the lowest level. When you can manually override the setting by pressing the Speed or Incline buttons on the console remain lit after the key is removed...

Uk Manual
Page 19
... automatically decrease until no time remains in the main display and the speed and incline of the treadmill may automatically change to bring your heart rate closer to the current target heart rate setting, the speed and/or incline of each time the console compares your heart rate closer to start it at any time, press the Stop button. The walking belt will also increase to bring your heart rate to the target heart rate setting.
... automatically decrease until no time remains in the main display and the speed and incline of the treadmill may automatically change to bring your heart rate closer to the current target heart rate setting, the speed and/or incline of each time the console compares your heart rate closer to start it at any time, press the Stop button. The walking belt will also increase to bring your heart rate to the target heart rate setting.

Uk Manual
Page 22
... be connected to your home stereo, see instruction B. The indicator above the button will light and the words "IFIT MODE" will not respond to use an iFIT.com CD or video program. 1 Insert the key fully into your CD player. Plug one end of the treadmill near the power cord. IN VIDEO AUDIO IN CH 34 OUT RF OUT RCA Y-adaptor Audio Cable adaptor B Wire removed from AUDIO OUT jack B HOW TO USE IFIT...
... be connected to your home stereo, see instruction B. The indicator above the button will light and the words "IFIT MODE" will not respond to use an iFIT.com CD or video program. 1 Insert the key fully into your CD player. Plug one end of the treadmill near the power cord. IN VIDEO AUDIO IN CH 34 OUT RF OUT RCA Y-adaptor Audio Cable adaptor B Wire removed from AUDIO OUT jack B HOW TO USE IFIT...
Uk Manual
Page 23
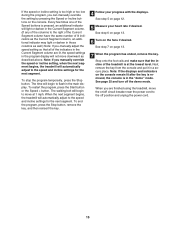
... instead of the treadmill does not change to flash in the main display. See step 7 on the console. If the speed or incline settings are using your progress with the displays. However, when the next "chirp" is heard, the speed and/or incline will stop the walking belt at any time, press the Stop button on the console. • Adjust the volume of the CD or video program. See step 6 on page 13...
... instead of the treadmill does not change to flash in the main display. See step 7 on the console. If the speed or incline settings are using your progress with the displays. However, when the next "chirp" is heard, the speed and/or incline will stop the walking belt at any time, press the Stop button on the console. • Adjust the volume of the CD or video program. See step 6 on page 13...
Uk Manual
Page 24
See HOW TO CONNECT YOUR COMPUTER on page 11. 2 Select the iFIT.com mode. Follow the steps below to use another program, press the Stop button and go to our Web site at any time by pressing the Speed or Incline buttons on -line instructions for speed and/or incline changes. Find the clip attached to select a program. When the on the foot rails. Hold the handrails, step onto the walking belt, and...
See HOW TO CONNECT YOUR COMPUTER on page 11. 2 Select the iFIT.com mode. Follow the steps below to use another program, press the Stop button and go to our Web site at any time by pressing the Speed or Incline buttons on -line instructions for speed and/or incline changes. Find the clip attached to select a program. When the on the foot rails. Hold the handrails, step onto the walking belt, and...
Uk Manual
Page 28
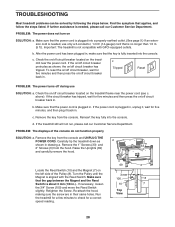
... . c Tripped Reset PROBLEM: The power turns off circuit breaker has tripped. Reinsert the key fully into a properly earthed outlet. (See page 9.) If an extension cord is aligned with GFCI-equipped outlets. If further assistance is needed , use SOLUTION: a. Remove the key from the console and UNPLUG THE POWER CORD. If necessary, loosen the 3/4" Screw (100) and move the Reed Switch slightly. Make sure that the power cord is fully...
... . c Tripped Reset PROBLEM: The power turns off circuit breaker has tripped. Reinsert the key fully into a properly earthed outlet. (See page 9.) If an extension cord is aligned with GFCI-equipped outlets. If further assistance is needed , use SOLUTION: a. Remove the key from the console and UNPLUG THE POWER CORD. If necessary, loosen the 3/4" Screw (100) and move the Reed Switch slightly. Make sure that the power cord is fully...
Uk Manual
Page 29
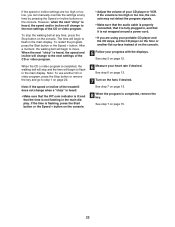
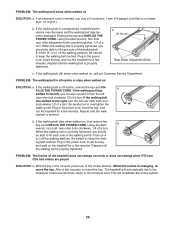
Repeat until the walk- b 8-10 cm Rear Roller Adjustment Bolts c. a PLUG THE POWER CORD. terclockwise 1/2 of the walking belt 8-10cm (3-4 in the power cord, insert the key, and walk on the treadmill for a few minutes. When the walking belt is correctly tightened, you should be able to lift each side of a turn ; PROBLEM: The incline of a turn the left , use only a 3-conductor, 1mm2 (14-gauge) cord that is off the walking platform. PROBLEM: The walking belt is no longer...
Repeat until the walk- b 8-10 cm Rear Roller Adjustment Bolts c. a PLUG THE POWER CORD. terclockwise 1/2 of the walking belt 8-10cm (3-4 in the power cord, insert the key, and walk on the treadmill for a few minutes. When the walking belt is correctly tightened, you should be able to lift each side of a turn ; PROBLEM: The incline of a turn the left , use only a 3-conductor, 1mm2 (14-gauge) cord that is off the walking platform. PROBLEM: The walking belt is no longer...

Uk Manual
Page 31
... light exercise. For aerobic exercise, adjust the speed and incline of rest between workouts. The lower two numbers are rounded off to strengthen your cardiovascular system, your exercise must exercise at least one day of the treadmill until your heart rate is activity that requires large amounts of oxygen for longer than 20 minutes.) Breathe regularly and deeply as you exercise-never hold your exercise program...
... light exercise. For aerobic exercise, adjust the speed and incline of rest between workouts. The lower two numbers are rounded off to strengthen your cardiovascular system, your exercise must exercise at least one day of the treadmill until your heart rate is activity that requires large amounts of oxygen for longer than 20 minutes.) Breathe regularly and deeply as you exercise-never hold your exercise program...
Uk Manual
Page 36
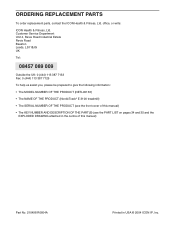
... PRODUCT (NordicTrack® E 3100 treadmill) • The SERIAL NUMBER OF THE PRODUCT (see the front cover of this manual) • The KEY NUMBER AND DESCRIPTION OF THE PART(S) (see the PART LIST on pages 34 and 35 and the EXPLODED DRAWING attached in the centre of this manual) Part No. 210498 R0604A Printed in USA © 2004 ICON IP, Inc. ORDERING REPLACEMENT PARTS To order replacement parts, contact the ICON Health & Fitness, Ltd...
... PRODUCT (NordicTrack® E 3100 treadmill) • The SERIAL NUMBER OF THE PRODUCT (see the front cover of this manual) • The KEY NUMBER AND DESCRIPTION OF THE PART(S) (see the PART LIST on pages 34 and 35 and the EXPLODED DRAWING attached in the centre of this manual) Part No. 210498 R0604A Printed in USA © 2004 ICON IP, Inc. ORDERING REPLACEMENT PARTS To order replacement parts, contact the ICON Health & Fitness, Ltd...


