
English Manual
Page 6
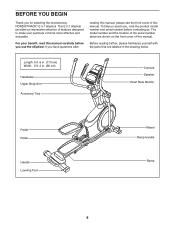
... this manual. The E 5.7 elliptical provides an impressive selection of this manual, please see the front cover of features designed to make your benefit, read this manual. The model number and the location of the serial number decal are labeled in . (66 cm) Handlebar Upper Body Arm Accessory Tray Console Speaker Heart Rate... front cover of this manual carefully before contacting us assist you, note the product model number and serial number before you for selecting the revolutionary NORDICTRACK® E 5.7 elliptical.
... this manual. The E 5.7 elliptical provides an impressive selection of this manual, please see the front cover of features designed to make your benefit, read this manual. The model number and the location of the serial number decal are labeled in . (66 cm) Handlebar Upper Body Arm Accessory Tray Console Speaker Heart Rate... front cover of this manual carefully before contacting us assist you, note the product model number and serial number before you for selecting the revolutionary NORDICTRACK® E 5.7 elliptical.

English Manual
Page 12
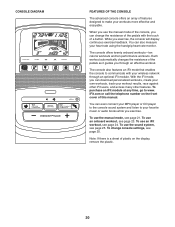
Attach the Console (7) to the Pulse Sensor Wires (63). 9 7 Insert the excess wire into the Upright (4) or into the Console (7). 63 110 4 10. 9. Untie and discard the wire tie on the Console to the Upper Wire (110) and to the Upright (4) with four M4 x 10 16mm Screws (101). 7 Avoid pinching the wires 101 4 101 12 While a second person holds the Console (7) near the Upright (4), connect the wires on the Upper Wire (110). Tip: Avoid pinching the wires.
Attach the Console (7) to the Pulse Sensor Wires (63). 9 7 Insert the excess wire into the Upright (4) or into the Console (7). 63 110 4 10. 9. Untie and discard the wire tie on the Console to the Upper Wire (110) and to the Upright (4) with four M4 x 10 16mm Screws (101). 7 Avoid pinching the wires 101 4 101 12 While a second person holds the Console (7) near the Upright (4), connect the wires on the Upper Wire (110). Tip: Avoid pinching the wires.

English Manual
Page 16
...75) as shown. First, press the tabs on the Front Console Cover. 18 80 79 101 4 16 Attach the Rear Console Cover (80) to the Upright (4) with two M4 x 16mm Screws (101). Orient the Rear Console Cover (80) as shown. Attach the Front Console Cover (79) around the Upright (4) by pressing the hooks... on the Rear Console Cover (80) onto the tabs on the Shield Cover Cap (118) into the Left and Right ...
...75) as shown. First, press the tabs on the Front Console Cover. 18 80 79 101 4 16 Attach the Rear Console Cover (80) to the Upright (4) with two M4 x 16mm Screws (101). Orient the Rear Console Cover (80) as shown. Attach the Front Console Cover (79) around the Upright (4) by pressing the hooks... on the Rear Console Cover (80) onto the tabs on the Shield Cover Cap (118) into the Left and Right ...

English Manual
Page 18
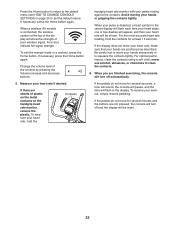
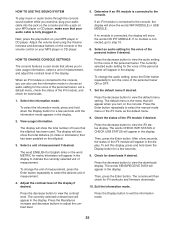
... pin into the receptacle on your floor during use, turn one or both of the leveling feet beneath the rear of the frame until the elliptical will roll on the upright Place your foot here To lower the ramp, press the latch button, pull the ramp handle, and lower the ... To vary the motion of the pedals, you may damage the console displays or other electronic components. Plug the power adapter into one of the adjustment holes in the frame. Power Adapter If the elliptical rocks slightly on the front of the elliptical. Stand in the power adapter. To raise the ramp, simply...
... pin into the receptacle on your floor during use, turn one or both of the leveling feet beneath the rear of the frame until the elliptical will roll on the upright Place your foot here To lower the ramp, press the latch button, pull the ramp handle, and lower the ... To vary the motion of the pedals, you may damage the console displays or other electronic components. Plug the power adapter into one of the adjustment holes in the frame. Power Adapter If the elliptical rocks slightly on the front of the elliptical. Stand in the power adapter. To raise the ramp, simply...
English Manual
Page 20
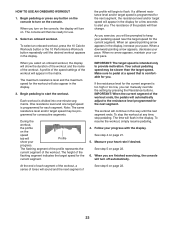
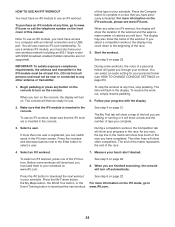
... workouts, track your workout results, race against other iFit users, and access many other features. The console also features an iFit mode that enables the console to www. The console offers twenty onboard workouts—-ten calorie workouts and ten performance workouts. iFit.com or call the telephone...Each workout automatically changes the resistance of the pedals as it guides you exercise, the console will display continuous exercise feedback. To use the manual mode, see page 24. You can change console settings, see page 23. When you use the sound system, see page 25. To...
... workouts, track your workout results, race against other iFit users, and access many other features. The console also features an iFit mode that enables the console to www. The console offers twenty onboard workouts—-ten calorie workouts and ten performance workouts. iFit.com or call the telephone...Each workout automatically changes the resistance of the pedals as it guides you exercise, the console will display continuous exercise feedback. To use the manual mode, see page 24. You can change console settings, see page 23. When you use the sound system, see page 25. To...

English Manual
Page 21
... workout is selected, this display mode will turn on . Press the Display button until the desired tab is not inserted into the console and connected to select the manual mode. As you pedal, change the resistance of the pedals as desired. The height of each segment...display mode will show the approximate number of each time the resistance level changes. A new segment will then be selected automatically. 3. The console will appear at the end of calories you have burned. Calorie—-This tab will show your exercise. 21 As you exercise, the workout...
... workout is selected, this display mode will turn on . Press the Display button until the desired tab is not inserted into the console and connected to select the manual mode. As you pedal, change the resistance of the pedals as desired. The height of each segment...display mode will show the approximate number of each time the resistance level changes. A new segment will then be selected automatically. 3. The console will appear at the end of calories you have burned. Calorie—-This tab will show your exercise. 21 As you exercise, the workout...
English Manual
Page 22
... in the calorie display will flash each time your heart beats, one or two dashes will appear, and then your hands are finished exercising, the console will be reset. 22 Avoid moving your wireless signal. If necessary, press the Home button again. To exit the manual mode or a workout,... connected, the wireless symbol at least 15 seconds. If the pedals do not move for several minutes and the buttons are sheets of the console by pressing the Volume increase and decrease buttons. 5. When you are positioned as described. Press the Home button to return to the default menu...
... in the calorie display will flash each time your heart beats, one or two dashes will appear, and then your hands are finished exercising, the console will be reset. 22 Avoid moving your wireless signal. If necessary, press the Home button again. To exit the manual mode or a workout,... connected, the wireless symbol at least 15 seconds. If the pedals do not move for several minutes and the buttons are sheets of the console by pressing the Volume increase and decrease buttons. 5. When you are positioned as described. Press the Home button to return to the default menu...
English Manual
Page 23
... or press any time, stop the workout at a speed that is programmed for consecutive segments. the profile will turn on the console. When you turn on the console, the display will begin to start the workout. Your actual pedaling speed may be slower than the target speed. HOW TO USE...for the workout will show your pedaling speed near the target speed for use. 2. IMPORTANT: When the current segment of See step 6 on the console to pedal at any button on page 22. 23 To resume the workout, simply resume pedaling. 4. When an upward-pointing arrow appears in the ...
... or press any time, stop the workout at a speed that is programmed for consecutive segments. the profile will turn on the console. When you turn on the console, the display will begin to start the workout. Your actual pedaling speed may be slower than the target speed. HOW TO USE...for the workout will show your pedaling speed near the target speed for use. 2. IMPORTANT: When the current segment of See step 6 on the console to pedal at any button on page 22. 23 To resume the workout, simply resume pedaling. 4. When an upward-pointing arrow appears in the ...
English Manual
Page 24
... module, you through your schedule. Note: To use an iFit workout. When you have an iFit module to download the next workout in the console. The console will also need an iFit.com membership. To stop the workout at least 8 in the display. Make sure that you turn on page 25... network including an 802.11b/g/n router with SSID broadcast enabled (hidden networks are not supported). The time will download, you are finished exercising, the console will burn. The end of the matrix represents the end of the trail you must add them to any time, stop pedaling. To select an...
... module, you through your schedule. Note: To use an iFit workout. When you have an iFit module to download the next workout in the console. The console will also need an iFit.com membership. To stop the workout at least 8 in the display. Make sure that you turn on page 25... network including an 802.11b/g/n router with SSID broadcast enabled (hidden networks are not supported). The time will download, you are finished exercising, the console will burn. The end of the matrix represents the end of the trail you must add them to any time, stop pedaling. To select an...
English Manual
Page 25
... in the display. The words SEND/RECEIVE DATA will appear in the display. Next, press the play music or audio books through the console sound system while you to view the audio setting for the voice of the personal trainer will appear in the display. Adjust the contrast...button on your MP3 player or CD player. 5. The display will show the total distance (in . make sure that has been pedaled on the elliptical. 3. The currently selected audio setting for iFit workouts and firmware downloads. 10. When an iFit module is fully plugged in miles or kilometers) ...
... in the display. The words SEND/RECEIVE DATA will appear in the display. Next, press the play music or audio books through the console sound system while you to view the audio setting for the voice of the personal trainer will appear in the display. Adjust the contrast...button on your MP3 player or CD player. 5. The display will show the total distance (in . make sure that has been pedaled on the elliptical. 3. The currently selected audio setting for iFit workouts and firmware downloads. 10. When an iFit module is fully plugged in miles or kilometers) ...
English Manual
Page 27
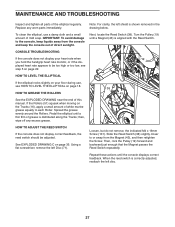
... marine grease equally to the console, keep the console out of mild soap. IMPORTANT: To avoid damage to each Roller. CONSOLE TROUBLESHOOTING If the console does not display your floor during use a damp cloth and a small amount of direct sunlight. HOW TO LEVEL THE ELLIPTICAL If the elliptical rocks slightly on your heart...any excess grease. 38 43 101 HOW TO ADJUST THE REED SWITCH If the console does not display correct feedback, the reed switch should be too high or too low, see HOW TO LEVEL THE ELLIPTICAL on page 22. HOW TO GREASE THE ROLLERS See the EXPLODED DRAWING near the ...
... marine grease equally to the console, keep the console out of mild soap. IMPORTANT: To avoid damage to each Roller. CONSOLE TROUBLESHOOTING If the console does not display your floor during use a damp cloth and a small amount of direct sunlight. HOW TO LEVEL THE ELLIPTICAL If the elliptical rocks slightly on your heart...any excess grease. 38 43 101 HOW TO ADJUST THE REED SWITCH If the console does not display correct feedback, the reed switch should be too high or too low, see HOW TO LEVEL THE ELLIPTICAL on page 22. HOW TO GREASE THE ROLLERS See the EXPLODED DRAWING near the ...
English Manual
Page 31
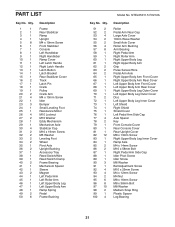
...39 1 40 2 41 1 42 1 43 2 44 1 45 1 46 1 47 1 48 1 49 2 50 6 Description Frame Rear Stabilizer Ramp Upright M4 x 19mm Screw Front Stabilizer Console Left Handlebar Right Handlebar Ramp Cover Left Latch Handle Right Latch Handle Latch Button Latch Bracket Rear Stabilizer Cover Track Latch Pin Crank Pulley Crank... Cover Disc Left Upper Body Leg Inner Cover Left Shield Right Shield Shield Cover Left Pedal Arm Side Cap Axle Spacer Key Front Console Cover Rear Console Cover Rear Upright Cover M8 x 13mm Screw Right Upper Body Leg Inner Cover Ramp Axle M4 x 14mm Screw M10 x 58mm...
...39 1 40 2 41 1 42 1 43 2 44 1 45 1 46 1 47 1 48 1 49 2 50 6 Description Frame Rear Stabilizer Ramp Upright M4 x 19mm Screw Front Stabilizer Console Left Handlebar Right Handlebar Ramp Cover Left Latch Handle Right Latch Handle Latch Button Latch Bracket Rear Stabilizer Cover Track Latch Pin Crank Pulley Crank... Cover Disc Left Upper Body Leg Inner Cover Left Shield Right Shield Shield Cover Left Pedal Arm Side Cap Axle Spacer Key Front Console Cover Rear Console Cover Rear Upright Cover M8 x 13mm Screw Right Upper Body Leg Inner Cover Ramp Axle M4 x 14mm Screw M10 x 58mm...

