NordicTrack Grt380 Support and Manuals
Get Help and Manuals for this NordicTrack item

View All Support Options Below
Free NordicTrack Grt380 manuals!
Problems with NordicTrack Grt380?
Ask a Question
Free NordicTrack Grt380 manuals!
Problems with NordicTrack Grt380?
Ask a Question
Popular NordicTrack Grt380 Manual Pages
English Manual - Page 1

... missing parts, we are committed to you complete satisfaction through direct assistance from our factory. MST
CAUTION
Read all precautions and instructions in...manual before using this manual for reference. CUSTOMER HOT LINE:
1-888-825-2588
Mon.-Fri., 6 a.m.-6 p.m. USER'S MANUAL
Patent Pending
Visit our website at www.nordictrack.com
new products, prizes, fitness tips, and much more!
Model...
English Manual - Page 2

NordicTrack is attached in the center of ICON Health & Fitness, Inc.
2 Table of Contents
Important Precautions 3 Before You Begin 4 Part Identification Chart 5 Assembly 6 Adjusting the Weight System 11 Ordering Replacement Parts Back Cover Limited Warranty Back Cover Note: A Part List/Exploded Drawing is a registered trademark of this manual. Remove the Part List/Exploded Drawing ...
English Manual - Page 3
...-existing health problems.
Read all precautions.
3. Keep hands and feet away from the weight rack at 1-888-825-2588 to ensure that there is the responsibility of all instructions before using. If the decal is missing or illegible, please call our Customer Service Department toll-free at all parts each side of this manual before...
English Manual - Page 4

Whether your benefit, read this manual carefully before calling. have additional questions, please call 1-888-825-2588.
To order the NordicTrack® GRT340, call our Customer Service Department toll-free at 1-888-825-2588 Monday through Friday, 6 a.m. until 6 p.m.
To help you achieve the specific results you the parts that are determined relative to a person sitting on...
English Manual - Page 6

... large hole is designed to ensure that you have the following tools: A socket set, a set of open-end or closed-end wrenches or a set of the packing materials until assembly is completed.
• Tighten all parts as you assemble them, unless instructed to make the task enjoyable, assembly will be assembled successfully by deciding to...
English Manual - Page 7

...the
3
Uprights (1).
Attach the Upright (1) to the Right Base (4) with two Lower Support Plates (15), four M10 x 70mm Bolts (29), and four M10 Nylon Locknuts (7). Attach the Upright (1)...8
7
15
7
1
26 3 2 7
Bracket 7
15
7
29
4
15
29
Note: The Lower Support Plates (15) has a wider edge than the Upper Support Plate (37).
1
7 3 2 3 26
Bracket
29 Wide
7
Edge
29
29 15
4. Do not ...
English Manual - Page 8

...Crossbar (6)
7
between the Uprights (1). Attach the Top Crossbar (6) to the right Upright (1) with two Upper Support Plates (37), four M10 x 90mm Bolts (9), and four M10 Nylon Locknuts (7).
Do not tighten the ...-up
bar is on the Weight Storage Tube
5
(13), the left Upright (1) with two Upper Support Plates (37), four M10 x 90mm Bolts (9), and four M10 Nylon Locknuts (7). Thread an M10 ...
English Manual - Page 9

...Glider must be turned as shown in the Locking Bar.
31
20
21 31
9.
Insert a Weight Guide (11) into the Left Weight
Glider.
21
Slide the Left Weight Glider (18) onto the left end. Note: ... an M10 x 65mm Bolt (26), two M10 Washers (3), and an M10 Nylon Locknut (7).
Attach the Weight Guide (11) to make sure that the Left Weight Glider (18) rests on top of the round tube on the Left ...
English Manual - Page 10

...
Hook 21
11
1 20 Handle
4 Hole
7
19 30 28 27
22 35
1 Note: Tilt the Weight Guide away from the Upright (1) as you do not need them in the direction shown. Insert a 50mm Bushing (30... 20mm Screws used in steps 1 to the other Upright (1) in the same manner.
14. Make sure that all parts are not planning to use Olympic weights with a Large Washer (28) and an M10 x 25mm Bolt (27).
...
English Manual - Page 11

...1
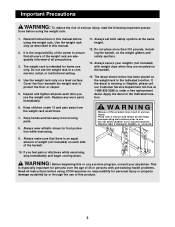
the Safety Spotters (14) in the Uprights (1). WARNING: Always set both hands.
Attach weights to which it engages one side of the...how the weight rack is adjusted. Inspect and tighten all parts each end of exercises and how to perform a variety... the greatest benefit from the Barbell (21). bell. Replace any worn parts immediately.
Note: To use the Barbell (21), slide...
English Manual - Page 12

... original purchaser or any defected part for replacement or, if necessary, the entire product, for one is covered by unauthorized service, misuse, accident, negligence, improper assembly or installation, alterations, modifications without charge, any and all defects in the Manual; Labor is covered for repair.
Include a letter explaining the product or problem and a copy of your proof...
English Manual - Page 13

REMOVE THIS PART LIST/EXPLODED DRAWING FROM THE MANUAL
SAVE THIS PART LIST/EXPLODED DRAWING AND THE USER'S MANUAL FOR FUTURE REFERENCE
81
English Manual - Page 14
... Bushing
31
2
25mm Bushing
32
8
45mm x 45mm Bushing
33
2
M8 x 20mm Screw
34
2
50mm Round Cap
35
2
M8 Washer
36
2
Large Weight Clip
37
4
Upper Support Plate
#
1
User's Manual
#
1
Exercise Guide
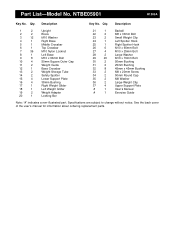
Note: "#" indicates a non-illustrated part. Specifications are subject to change without notice. Qty. Part List-Model No. Description
Key No.
English Manual - Page 15

NTBE05901 30 27
28
19
36
23
35
22
32 33
16 17
7 32
14
16 32
25
32 27 11
7 7
15
7 3
31
10
20 21
37 37
34 9
29 9
26 29 13 3
7 7
6
37 2
1
9
7
5 7
10
22 35
7
37 37
11
7
29 4
29
7
32 18
12 33
3
26
15
31
29 19
16 24 7
32 16 32
14
27 32
28 27 30
29 29
15 26 3
10
1 73 2
3 26
29 13
34
29 8
37
7 7 10
29 15 7
R1200A
Exploded Drawing-Model No.
NordicTrack Grt380 Reviews
We have not received any reviews for NordicTrack yet.