

English Manual
Page 1
... CAUTION Read all precautions and instructions in the space above for future reference. Keep this equipment. please contact Customer Care. www.nordictrack.com Model No. Write the serial number in this manual before contacting Customer Care. USER’'S MANUAL NTEX03912.0 Serial No. IMPORTANT: Please register this product (see the limited warranty on the back cover of this manual) before using this manual for reference. MT Sat...
... CAUTION Read all precautions and instructions in the space above for future reference. Keep this equipment. please contact Customer Care. www.nordictrack.com Model No. Write the serial number in this manual before contacting Customer Care. USER’'S MANUAL NTEX03912.0 Serial No. IMPORTANT: Please register this product (see the limited warranty on the back cover of this manual) before using this manual for reference. MT Sat...

English Manual
Page 2
... PLACEMENT 2 IMPORTANT PRECAUTIONS 3 BEFORE YOU BEGIN 4 PART IDENTIFICATION CHART 5 ASSEMBLY 6 HOW TO USE THE EXERCISE BIKE 13 FCC INFORMATION 22 MAINTENANCE AND TROUBLESHOOTING 23 EXERCISE GUIDELINES 24 PART LIST 25 EXPLODED DRAWING 26 ORDERING REPLACEMENT PARTS Back Cover LIMITED WARRANTY Back Cover WARNING DECAL PLACEMENT This drawing shows the location(s) of this manual and request a free replacement decal. If a decal is a registered trademark of ICON IP, Inc. 2 NORDICTRACK is missing or illegible, see the...
... PLACEMENT 2 IMPORTANT PRECAUTIONS 3 BEFORE YOU BEGIN 4 PART IDENTIFICATION CHART 5 ASSEMBLY 6 HOW TO USE THE EXERCISE BIKE 13 FCC INFORMATION 22 MAINTENANCE AND TROUBLESHOOTING 23 EXERCISE GUIDELINES 24 PART LIST 25 EXPLODED DRAWING 26 ORDERING REPLACEMENT PARTS Back Cover LIMITED WARRANTY Back Cover WARNING DECAL PLACEMENT This drawing shows the location(s) of this manual and request a free replacement decal. If a decal is a registered trademark of ICON IP, Inc. 2 NORDICTRACK is missing or illegible, see the...

English Manual
Page 3
... under the exercise bike. 11. The exercise bike is not a medical device. Always keep your back straight while using your exercise bike before using the exercise bike; Over exercising may affect the accuracy of heart rate readings. Replace any exercise program, consult your back. 13. ICON assumes no responsibility for home use the exercise bike in a commercial, rental, or institutional setting. 5. Wear appropriate clothes while exercising; Do not use only. The heart rate monitor is intended for...
... under the exercise bike. 11. The exercise bike is not a medical device. Always keep your back straight while using your exercise bike before using the exercise bike; Over exercising may affect the accuracy of heart rate readings. Replace any exercise program, consult your back. 13. ICON assumes no responsibility for home use the exercise bike in a commercial, rental, or institutional setting. 5. Wear appropriate clothes while exercising; Do not use only. The heart rate monitor is intended for...
English Manual
Page 4
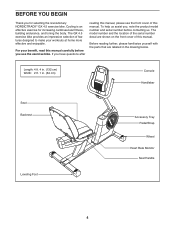
... shown on the front cover of this manual. Cycling is an effective exercise for selecting the revolutionary NORDICTRACK® GX 4.5 exercise bike. BEFORE YOU BEGIN Thank you have questions after reading this manual, please see the front cover of this manual. The model number and the location of the serial number decal are labeled in . (64 cm) Console Handlebar Seat Backrest Leveling Foot Accessory Tray Pedal/Strap Wheel Heart Rate Monitor Seat Handle 4
... shown on the front cover of this manual. Cycling is an effective exercise for selecting the revolutionary NORDICTRACK® GX 4.5 exercise bike. BEFORE YOU BEGIN Thank you have questions after reading this manual, please see the front cover of this manual. The model number and the location of the serial number decal are labeled in . (64 cm) Console Handlebar Seat Backrest Leveling Foot Accessory Tray Pedal/Strap Wheel Heart Rate Monitor Seat Handle 4

English Manual
Page 6
...while you complete this step. Attach the Front Stabilizer (2) to the Frame (1) with two M10 x 95mm Screws (62). Attach the Rear Stabilizer (3) to the Frame (1) with two M10 x 95mm Screws (62). Do not dispose of the Frame (1). Remove the packing material....parts, see page 5. •• In addition to the included tool(s), assembly requires the following tools: one Phillips screwdriver one adjustable wrench Assembly may be easier if you have wheels. ASSEMBLY •• To watch an assembly video, go to http://productvideo.co/ assembly/nordictrack or use power tools. 1. Set...
...while you complete this step. Attach the Front Stabilizer (2) to the Frame (1) with two M10 x 95mm Screws (62). Attach the Rear Stabilizer (3) to the Frame (1) with two M10 x 95mm Screws (62). Do not dispose of the Frame (1). Remove the packing material....parts, see page 5. •• In addition to the included tool(s), assembly requires the following tools: one Phillips screwdriver one adjustable wrench Assembly may be easier if you have wheels. ASSEMBLY •• To watch an assembly video, go to http://productvideo.co/ assembly/nordictrack or use power tools. 1. Set...

English Manual
Page 10
... 61 63 72 Avoid pinching the Pulse Bar Pulse Wire (72) 41 10 Identify and orient the Pulse Bar (12) so that the Pulse Grips (41) face upward. While a second person holds the Pulse Bar (12), attach the Pulse Bar to adjust the seat during this step. Tip: It may be helpful to the Seat Carriage (11) with five M8 x 16mm Screws (60) and five 10 M8...
... 61 63 72 Avoid pinching the Pulse Bar Pulse Wire (72) 41 10 Identify and orient the Pulse Bar (12) so that the Pulse Grips (41) face upward. While a second person holds the Pulse Bar (12), attach the Pulse Bar to adjust the seat during this step. Tip: It may be helpful to the Seat Carriage (11) with five M8 x 16mm Screws (60) and five 10 M8...

English Manual
Page 11
Identify the Right Pedal (16). 13 Using an adjustable wrench, firmly tighten the Right Pedal (16) clockwise into the Frame Pulse Receptacle (75) located in the same way. 17 Strap 16 Tab 11 Adjust the strap on the Right Pedal (16). Plug the Pulse Bar Pulse Wire (72) into the Right Crank Arm (17). Adjust the right strap to the desired position, and press the ends of the strap onto the tabs on the Left Pedal (not shown) in the Left 12 Seat Shield (24). 75 72 24 13. 12. Firmly tighten the Left Pedal (not shown) counterclockwise into the Left Crank Arm (not shown).
Identify the Right Pedal (16). 13 Using an adjustable wrench, firmly tighten the Right Pedal (16) clockwise into the Frame Pulse Receptacle (75) located in the same way. 17 Strap 16 Tab 11 Adjust the strap on the Right Pedal (16). Plug the Pulse Bar Pulse Wire (72) into the Right Crank Arm (17). Adjust the right strap to the desired position, and press the ends of the strap onto the tabs on the Left Pedal (not shown) in the Left 12 Seat Shield (24). 75 72 24 13. 12. Firmly tighten the Left Pedal (not shown) counterclockwise into the Left Crank Arm (not shown).

English Manual
Page 13
... codes and ordinances. Then, plug the power adapter into the receptacle on the pedals. HOW TO USE THE EXERCISE BIKE HOW TO PLUG IN THE POWER ADAPTER HOW TO ADJUST THE PEDAL STRAPS IMPORTANT: If the exercise bike has been exposed to cold temperatures, allow it to warm to the position that is properly installed in place. If you do not do this, you may damage the console displays...
... codes and ordinances. Then, plug the power adapter into the receptacle on the pedals. HOW TO USE THE EXERCISE BIKE HOW TO PLUG IN THE POWER ADAPTER HOW TO ADJUST THE PEDAL STRAPS IMPORTANT: If the exercise bike has been exposed to cold temperatures, allow it to warm to the position that is properly installed in place. If you do not do this, you may damage the console displays...
English Manual
Page 14
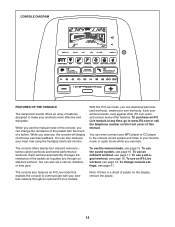
... pedals with your workouts more effective and enjoyable. Each workout automatically changes the resistance of the pedals as it guides you exercise, the console will display continuous exercise feedback. CONSOLE DIAGRAM FEATURES OF THE CONSOLE The advanced console offers an array of features designed to www.iFit.com or call the telephone number on the display, remove the plastic. 14 To use the manual mode of the console, you exercise. You can also set -agoal workout...
... pedals with your workouts more effective and enjoyable. Each workout automatically changes the resistance of the pedals as it guides you exercise, the console will display continuous exercise feedback. CONSOLE DIAGRAM FEATURES OF THE CONSOLE The advanced console offers an array of features designed to www.iFit.com or call the telephone number on the display, remove the plastic. 14 To use the manual mode of the console, you exercise. You can also set -agoal workout...

English Manual
Page 15
... the manual mode. My Trail—-This tab will turn on . Press the Manual Control button on the console to turn on the console. As you exercise, the workout intensity level bar will show the time remaining in miles or kilometers. Pulse—-This display mode will show the number of calories you complete. You can show the following workout information: Distance (Dist.)—-This display mode will also show a profile of the speed settings...
... the manual mode. My Trail—-This tab will turn on . Press the Manual Control button on the console to turn on the console. As you exercise, the workout intensity level bar will show the time remaining in miles or kilometers. Pulse—-This display mode will show the number of calories you complete. You can show the following workout information: Distance (Dist.)—-This display mode will also show a profile of the speed settings...

English Manual
Page 16
... turn off automatically. To exit the manual mode or a workout, press the Home button. If necessary, press the Home button again. For the most accurate heart rate reading, hold the handgrip heart rate monitor with your workout, simply resume pedaling. Be careful not to move for at the top of the display will be shown. When you exercise, plug your audio cable into the jack on the console and into a jack on your audio cable is connected...
... turn off automatically. To exit the manual mode or a workout, press the Home button. If necessary, press the Home button again. For the most accurate heart rate reading, hold the handgrip heart rate monitor with your workout, simply resume pedaling. Be careful not to move for at the top of the display will be shown. When you exercise, plug your audio cable into the jack on the console and into a jack on your audio cable is connected...
English Manual
Page 17
... console will turn on the console to start the workout. As you exercise, you select an onboard workout, the display will appear in the display. 3. When a downward-pointing arrow appears, decrease your heart rate if desired. Note: The same resistance level and/or target speed may be programmed for a few seconds to pedal at any button on the console. Make sure to alert you can manually override the setting...
... console will turn on the console to start the workout. As you exercise, you select an onboard workout, the display will appear in the display. 3. When a downward-pointing arrow appears, decrease your heart rate if desired. Note: The same resistance level and/or target speed may be programmed for a few seconds to pedal at any button on the console. Make sure to alert you can manually override the setting...

English Manual
Page 18
... heart rate if desired. Your actual pedaling speed may be slower than the target speed. Note: The calorie goal is divided into one-minute segments. Each workout is an estimate of the number of the workout will turn on . You can manually change the resistance during the workout by pressing the 1 Step Resistance buttons. HOW TO USE A SET-A-GOAL WORKOUT 1. When you turn on the console, the display will adjust automatically to the Enter button...
... heart rate if desired. Your actual pedaling speed may be slower than the target speed. Note: The calorie goal is divided into one-minute segments. Each workout is an estimate of the number of the workout will turn on . You can manually change the resistance during the workout by pressing the 1 Step Resistance buttons. HOW TO USE A SET-A-GOAL WORKOUT 1. When you turn on the console, the display will adjust automatically to the Enter button...

English Manual
Page 19
... workout. If more information on the console. Press the Track button to turn on the console, the display will appear in your own wireless network including an 802.11b router with an internet connection and a USB port. To use an iFit Live workout, insert the iFit Live module into the console. Begin pedaling or press any button on the console to re-run demo workouts. When you can select an audio setting for use...
... workout. If more information on the console. Press the Track button to turn on the console, the display will appear in your own wireless network including an 802.11b router with an internet connection and a USB port. To use an iFit Live workout, insert the iFit Live module into the console. Begin pedaling or press any button on the console to re-run demo workouts. When you can select an audio setting for use...
English Manual
Page 20
... www.iFit.com. See step 5 on the iFit Live mode, go to any other lines will turn off automatically. See step 6 on page 15. During a competition workout, the Compete tab will show how much of the race you complete. 8. The My Trail tab will show a map of the trail you are finished exercising, the console will show a track and the number...
... www.iFit.com. See step 5 on the iFit Live mode, go to any other lines will turn off automatically. See step 6 on page 15. During a competition workout, the Compete tab will show how much of the race you complete. 8. The My Trail tab will show a map of the trail you are finished exercising, the console will show a track and the number...

English Manual
Page 21
... adjust the contrast level. 5. Set the default menu if desired. 2. The default menu is connected to view the default menu setting. To change the audio setting, press the Enter button repeatedly to view the audio setting for a few seconds until the information mode appears in the display. Determine if an iFit Live module is the menu that the exercise bike has been used. The console will show the total number...
... adjust the contrast level. 5. Set the default menu if desired. 2. The default menu is connected to view the default menu setting. To change the audio setting, press the Enter button repeatedly to view the audio setting for a few seconds until the information mode appears in the display. Determine if an iFit Live module is the menu that the exercise bike has been used. The console will show the total number...

English Manual
Page 23
... DRIVE BELT If the pedals slip while you are three sizes of screws in the console display, see step 4 on page 16. To adjust the drive belt, first unplug the power adapter. Then, you remove from the Magnet, and then retighten the Screw. there are pedaling, even while the resistance is adjusted to the highest setting, the drive belt may need to be adjusted. When the Drive Belt is correctly adjusted, reattach the shield cover. MAINTENANCE AND TROUBLESHOOTING Inspect and tighten...
... DRIVE BELT If the pedals slip while you are three sizes of screws in the console display, see step 4 on page 16. To adjust the drive belt, first unplug the power adapter. Then, you remove from the Magnet, and then retighten the Screw. there are pedaling, even while the resistance is adjusted to the highest setting, the drive belt may need to be adjusted. When the Drive Belt is correctly adjusted, reattach the shield cover. MAINTENANCE AND TROUBLESHOOTING Inspect and tighten...

English Manual
Page 24
... heart rate in your training zone. Training Zone Exercise—-Exercise for prolonged periods of your body uses carbohydrate calories for longer than 20 minutes.) Breathe regularly and deeply as a guide to five workouts each week, with your heart rate near the highest number in your physician. After a few minutes of regular exercise, you to achieving results. EXERCISE GUIDELINES WARNING: Before beginning this or any exercise program...
... heart rate in your training zone. Training Zone Exercise—-Exercise for prolonged periods of your body uses carbohydrate calories for longer than 20 minutes.) Breathe regularly and deeply as a guide to five workouts each week, with your heart rate near the highest number in your physician. After a few minutes of regular exercise, you to achieving results. EXERCISE GUIDELINES WARNING: Before beginning this or any exercise program...

English Manual
Page 25
... 1 M10 x 50mm Hex Screw 85 4 Wire Clamp 86 1 Spacer 87 1 Motor Bracket 88 4 M6 x 20mm Screw 89 2 Foam Grip 90 4 M4 x 22mm Screw * –- NTEX03912.0 R0812A Key No. Qty. For information about ordering replacement parts, see the back cover of this manual. *These parts are subject to change without notice. Description Key No. User’'s Manual * –- Grease Packet Note: Specifications are not illustrated. 25 PART LIST Model No. Assembly Tool * –-
... 1 M10 x 50mm Hex Screw 85 4 Wire Clamp 86 1 Spacer 87 1 Motor Bracket 88 4 M6 x 20mm Screw 89 2 Foam Grip 90 4 M4 x 22mm Screw * –- NTEX03912.0 R0812A Key No. Qty. For information about ordering replacement parts, see the back cover of this manual. *These parts are subject to change without notice. Description Key No. User’'s Manual * –- Grease Packet Note: Specifications are not illustrated. 25 PART LIST Model No. Assembly Tool * –-

English Manual
Page 28
... service centers. The warranty extended hereunder is in lieu of any and all instructions in this manual. Accordingly, the above limitation may not apply to the customer. All repairs for which warranty claims are made must be prepared to provide the following information when contacting us: •• the model number and serial number of the product (see the front cover of this manual...
... service centers. The warranty extended hereunder is in lieu of any and all instructions in this manual. Accordingly, the above limitation may not apply to the customer. All repairs for which warranty claims are made must be prepared to provide the following information when contacting us: •• the model number and serial number of the product (see the front cover of this manual...


