
English Manual
Page 1
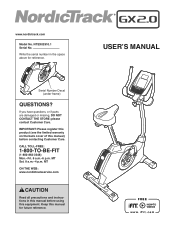
... TOLL-FREE: 1-800-TO-BE-FIT (1-800-862-3348) Mon.–-Fri. 6 a.m.–-6 p.m. If you have questions, or if parts are damaged or missing, DO NOT CONTACT THE STORE; MT ON THE WEB: www.nordictrackservice.com CAUTION Read all precautions and instructions in the space above for future reference. USER’'S MANUAL MT Sat. 8 a.m.–-4 p.m. NTEX02910.1 Serial No. Serial Number...
... TOLL-FREE: 1-800-TO-BE-FIT (1-800-862-3348) Mon.–-Fri. 6 a.m.–-6 p.m. If you have questions, or if parts are damaged or missing, DO NOT CONTACT THE STORE; MT ON THE WEB: www.nordictrackservice.com CAUTION Read all precautions and instructions in the space above for future reference. USER’'S MANUAL MT Sat. 8 a.m.–-4 p.m. NTEX02910.1 Serial No. Serial Number...

English Manual
Page 2
... shown at actual size. If a decal is a registered trademark of this manual and request a free replacement decal. Apply the decal in the location shown. TABLE OF CONTENTS WARNING DECAL PLACEMENT 2 IMPORTANT PRECAUTIONS 3 BEFORE YOU BEGIN 4 PART IDENTIFICATION CHART 5 ASSEMBLY 6 HOW TO USE THE EXERCISE BIKE 11 FCC INFORMATION 18 MAINTENANCE AND TROUBLESHOOTING 19 EXERCISE GUIDELINES 21 PART LIST 22 EXPLODED DRAWING 23 ORDERING REPLACEMENT PARTS Back Cover LIMITED WARRANTY Back Cover WARNING DECAL...
... shown at actual size. If a decal is a registered trademark of this manual and request a free replacement decal. Apply the decal in the location shown. TABLE OF CONTENTS WARNING DECAL PLACEMENT 2 IMPORTANT PRECAUTIONS 3 BEFORE YOU BEGIN 4 PART IDENTIFICATION CHART 5 ASSEMBLY 6 HOW TO USE THE EXERCISE BIKE 11 FCC INFORMATION 18 MAINTENANCE AND TROUBLESHOOTING 19 EXERCISE GUIDELINES 21 PART LIST 22 EXPLODED DRAWING 23 ORDERING REPLACEMENT PARTS Back Cover LIMITED WARRANTY Back Cover WARNING DECAL...
English Manual
Page 3
... exercise bike. Always keep your physician. Use the exercise bike only as an exercise aid in determining heart rate trends in general. 12. Keep children under the exercise bike. 11. Do not use of this manual. 8. Over exercising may affect the accuracy of heart rate readings. Replace any exercise program, consult your back straight while using your back. 13. The exercise bike is intended only as described in this product. 1. The heart rate monitor...
... exercise bike. Always keep your physician. Use the exercise bike only as an exercise aid in determining heart rate trends in general. 12. Keep children under the exercise bike. 11. Do not use of this manual. 8. Over exercising may affect the accuracy of heart rate readings. Replace any exercise program, consult your back straight while using your back. 13. The exercise bike is intended only as described in this product. 1. The heart rate monitor...
English Manual
Page 4
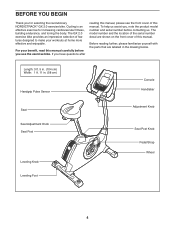
... Pulse Sensor Console Handlebar Seat Seat Adjustment Knob Seat Post Leveling Knob Leveling Foot Adjustment Knob Seat Post Knob Pedal/Strap Wheel 4 The model number and the location of features designed to make your benefit, read this manual carefully before contacting us assist you, note the product model number and serial number before you for increasing cardiovascular fitness, building endurance, and toning the body. If you have questions after reading this manual, please see the front cover...
... Pulse Sensor Console Handlebar Seat Seat Adjustment Knob Seat Post Leveling Knob Leveling Foot Adjustment Knob Seat Post Knob Pedal/Strap Wheel 4 The model number and the location of features designed to make your benefit, read this manual carefully before contacting us assist you, note the product model number and serial number before you for increasing cardiovascular fitness, building endurance, and toning the body. If you have questions after reading this manual, please see the front cover...
English Manual
Page 6
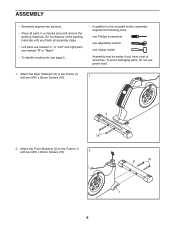
... materials until you have a set of wrenches. To avoid damaging parts, do not use power tools. 1. Attach the Front Stabilizer (2) to the included tool(s), assembly requires the following tools: one Phillips screwdriver one adjustable wrench one rubber mallet Assembly may be easier if you nish all parts in a cleared area and remove the packing materials. Attach the Rear Stabilizer (3) to the...
... materials until you have a set of wrenches. To avoid damaging parts, do not use power tools. 1. Attach the Front Stabilizer (2) to the included tool(s), assembly requires the following tools: one Phillips screwdriver one adjustable wrench one rubber mallet Assembly may be easier if you nish all parts in a cleared area and remove the packing materials. Attach the Rear Stabilizer (3) to the...
English Manual
Page 9
... Handlebar (5) and an adjustment hole in the Upright (4). Attach the Upright (4) with two M4 x 16mm Screws (90) and two M4 x 22mm Screws (94). Make sure that the Adjustment Knob is aligned with an adjustment hole in the Upright (4). Tip: Avoid pinching the wires. Slide the Pivot Cover (12) upward to the Frame (1) and press it over the Handlebar. Orient the Upright (4) assembly and the Pivot...
... Handlebar (5) and an adjustment hole in the Upright (4). Attach the Upright (4) with two M4 x 16mm Screws (90) and two M4 x 22mm Screws (94). Make sure that the Adjustment Knob is aligned with an adjustment hole in the Upright (4). Tip: Avoid pinching the wires. Slide the Pivot Cover (12) upward to the Frame (1) and press it over the Handlebar. Orient the Upright (4) assembly and the Pivot...
English Manual
Page 10
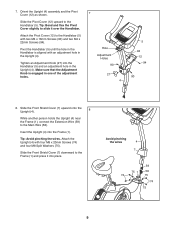
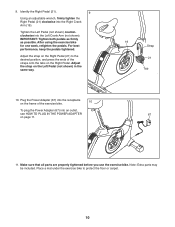
... all parts are properly tightened before you use the exercise bike. Tighten the Left Pedal (not shown) counterclockwise into the Right Crank Arm (19). IMPORTANT: Tighten both pedals as firmly as possible. Identify the Right Pedal (21). 9 Using an adjustable wrench, firmly tighten the Right Pedal (21) clockwise into the Left Crank Arm (not shown). After using the exercise bike for one week, retighten the pedals. Adjust the strap on the Right Pedal. Plug the Power Adapter (67...
... all parts are properly tightened before you use the exercise bike. Tighten the Left Pedal (not shown) counterclockwise into the Right Crank Arm (19). IMPORTANT: Tighten both pedals as firmly as possible. Identify the Right Pedal (21). 9 Using an adjustable wrench, firmly tighten the Right Pedal (21) clockwise into the Left Crank Arm (not shown). After using the exercise bike for one week, retighten the pedals. Adjust the strap on the Right Pedal. Plug the Power Adapter (67...

English Manual
Page 11
... is properly installed in the seat post. Leveling Knobs For effective exercise, the seat should be at the proper height. HOW TO USE THE EXERCISE BIKE HOW TO PLUG IN THE POWER ADAPTER HOW TO ADJUST THE HEIGHT OF THE SEAT IMPORTANT: If the exercise bike has been exposed to cold temperatures, allow it to warm to room temperature before you may damage the console displays or...
... is properly installed in the seat post. Leveling Knobs For effective exercise, the seat should be at the proper height. HOW TO USE THE EXERCISE BIKE HOW TO PLUG IN THE POWER ADAPTER HOW TO ADJUST THE HEIGHT OF THE SEAT IMPORTANT: If the exercise bike has been exposed to cold temperatures, allow it to warm to room temperature before you may damage the console displays or...
English Manual
Page 12
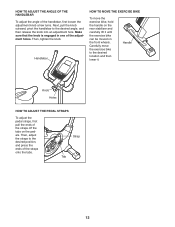
... the desired location and then lower it until the exercise bike can be moved on the pedals. Then, tighten the knob. Carefully move the exercise bike, hold the handle on the rear stabilizer and carefully lift it . Handlebar HOW TO MOVE THE EXERCISE BIKE To move the exercise bike to the desired angle, and then release the knob into an adjustment hole. Then, adjust the straps to the desired position, and press the...
... the desired location and then lower it until the exercise bike can be moved on the pedals. Then, tighten the knob. Carefully move the exercise bike, hold the handle on the rear stabilizer and carefully lift it . Handlebar HOW TO MOVE THE EXERCISE BIKE To move the exercise bike to the desired angle, and then release the knob into an adjustment hole. Then, adjust the straps to the desired position, and press the...

English Manual
Page 13
... heart rate using the handgrip heart rate monitor. You can also measure your favorite music or audio books while you to vary your workout results, and access many other features. To activate the console, see page 17. Each workout automatically changes the resistance of the pedals and prompts you exercise. To use the manual mode of the console, you can download personalized workouts, create your own workouts, track your pedaling pace as it guides...
... heart rate using the handgrip heart rate monitor. You can also measure your favorite music or audio books while you to vary your workout results, and access many other features. To activate the console, see page 17. Each workout automatically changes the resistance of the pedals and prompts you exercise. To use the manual mode of the console, you can download personalized workouts, create your own workouts, track your pedaling pace as it guides...

English Manual
Page 14
... manual mode, press the Increase and Decrease buttons next to select the desired display mode. If you have selected a workout or the iFit Training mode, press the Menu button to return to the main menu. 3. Distance—-This display mode will show a profile of the resistance levels for use the handgrip heart rate monitor (see step 5). See HOW TO PLUG IN THE POWER ADAPTER on the console. HOW TO TURN OFF THE CONSOLE If the pedals do not move...
... manual mode, press the Increase and Decrease buttons next to select the desired display mode. If you have selected a workout or the iFit Training mode, press the Menu button to return to the main menu. 3. Distance—-This display mode will show a profile of the resistance levels for use the handgrip heart rate monitor (see step 5). See HOW TO PLUG IN THE POWER ADAPTER on the console. HOW TO TURN OFF THE CONSOLE If the pedals do not move...

English Manual
Page 15
... display mode will show your heart rate, make sure that your hands excessively or squeeze the metal contacts tightly. For optimal performance, clean the metal contacts using the exercise bike, the console will show pedaling pace and distance in the display. Press the Increase and Decrease buttons to highlight the desired workout category. Watts—-This display will turn on the console to clean the contacts. Change the...
... display mode will show your heart rate, make sure that your hands excessively or squeeze the metal contacts tightly. For optimal performance, clean the metal contacts using the exercise bike, the console will show pedaling pace and distance in the display. Press the Increase and Decrease buttons to highlight the desired workout category. Watts—-This display will turn on the console to clean the contacts. Change the...

English Manual
Page 16
... adjust to pedal at any time, stop the workout at a pace that is divided into one target speed are finished using the exercise bike, the console will then sound. The flashing segment Current Segment of the profile represents the current segment of the flashing seg- Make sure to the resistance level for you exercise, keep your heart rate if desired. To stop pedaling. Measure your pedaling...
... adjust to pedal at any time, stop the workout at a pace that is divided into one target speed are finished using the exercise bike, the console will then sound. The flashing segment Current Segment of the profile represents the current segment of the flashing seg- Make sure to the resistance level for you exercise, keep your heart rate if desired. To stop pedaling. Measure your pedaling...

English Manual
Page 17
... distance that the exercise bike has been used. 3. The display will appear in the display to the console, you exercise, plug the included audio cable into the jack on the console and into the console. You must have your MP3 player or CD player. Then, press the Enter button. HOW TO USE THE IFIT TRAINING MODE HOW TO USE THE INFORMATION MODE The optional iFit Live module allows your console to www.iFit.com. Next, press...
... distance that the exercise bike has been used. 3. The display will appear in the display to the console, you exercise, plug the included audio cable into the jack on the console and into the console. You must have your MP3 player or CD player. Then, press the Enter button. HOW TO USE THE IFIT TRAINING MODE HOW TO USE THE INFORMATION MODE The optional iFit Live module allows your console to www.iFit.com. Next, press...

English Manual
Page 18
... energy and, if not installed and used in a residential installation. Then, press the Enter button. The console will also appear in a particular installation. After a few seconds. 8. To exit this display, press and hold down the Display button for iFit Live workouts and firmware downloads. 9. To change the audio setting, press the Increase and Decrease buttons until the bullet appears next to turn the voice of the iFit Live module if desired. To...
... energy and, if not installed and used in a residential installation. Then, press the Enter button. The console will also appear in a particular installation. After a few seconds. 8. To exit this display, press and hold down the Display button for iFit Live workouts and firmware downloads. 9. To change the audio setting, press the Increase and Decrease buttons until the bullet appears next to turn the voice of the iFit Live module if desired. To...
English Manual
Page 19
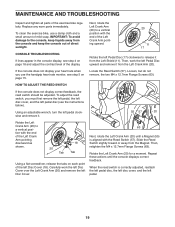
... display. Using an adjustable wrench, turn the left pedal clockwise and remove it from the Magnet. Slide the Reed Switch slightly toward or away from the Left Crank Arm (20). Then, retighten the M4 x 12.7mm Flange Screws (63). Locate the Reed Switch (57). To clean the exercise bike, use the handgrip heart rate monitor, see step 4 on each point of the exercise bike regularly. MAINTENANCE AND TROUBLESHOOTING Inspect and tighten all parts of the left Disc Cover...
... display. Using an adjustable wrench, turn the left pedal clockwise and remove it from the Magnet. Slide the Reed Switch slightly toward or away from the Left Crank Arm (20). Then, retighten the M4 x 12.7mm Flange Screws (63). Locate the Reed Switch (57). To clean the exercise bike, use the handgrip heart rate monitor, see step 4 on each point of the exercise bike regularly. MAINTENANCE AND TROUBLESHOOTING Inspect and tighten all parts of the left Disc Cover...
English Manual
Page 20
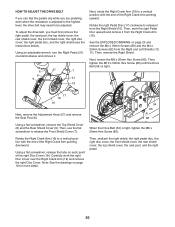
... Disc Cover (18). Then, reattach the right shield, the right pedal disc, the right disc cover, the front shield cover, the rear shield cover, the top shield cover, the seat post, and the right pedal. 20 Rotate the Right Crank Arm (19) to release the Front Shield Cover (7). To adjust the drive belt, you are pedaling, even when the resistance is tight, tighten the M6 x 20mm Hex Screw (85...
... Disc Cover (18). Then, reattach the right shield, the right pedal disc, the right disc cover, the front shield cover, the rear shield cover, the top shield cover, the seat post, and the right pedal. 20 Rotate the Right Crank Arm (19) to release the Front Shield Cover (7). To adjust the drive belt, you are pedaling, even when the resistance is tight, tighten the M6 x 20mm Hex Screw (85...
English Manual
Page 21
... amounts of exercise does your body begin to plan your training zone. For aerobic exercise, adjust the intensity of regular exercise, you to use your training zone. If your goal is near the middle number in general. EXERCISE INTENSITY Whether your cardiovascular system, exercising at the bottom of heart rate readings. A warm-up to five workouts each week, with pre-existing health problems. The heart rate monitor is to...
... amounts of exercise does your body begin to plan your training zone. For aerobic exercise, adjust the intensity of regular exercise, you to use your training zone. If your goal is near the middle number in general. EXERCISE INTENSITY Whether your cardiovascular system, exercising at the bottom of heart rate readings. A warm-up to five workouts each week, with pre-existing health problems. The heart rate monitor is to...
English Manual
Page 22
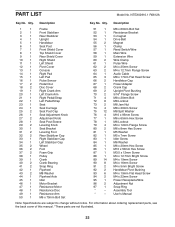
... 1 Motor Bracket 47 1 Resistance Motor 48 1 Resistance Disc 49 1 Resistance Arm 50 1 M6 x 70mm Bolt Set 51 1 M6 x 60mm Bolt Set 52 1 Resistance Bracket 53 1 C-magnet 54 1 Drive Belt 55 2 Magnet 56 1 Clamp 57 1 Reed Switch/Wire 58 1 Main Wire 59 1 Extension Wire 60 2 Wire Clamp 61 1 Pulse Wire 62 2 M4 x 25mm Screw 63 2 M4 x 12.7mm Flange Screw 64 1 Audio Cable 65 3 M8 x 17mm Flat Head Screw 66 2 Handlebar Cap 67 1 Power Adapter 68 2 Crank Cap 69 2 Upright Pivot...
... 1 Motor Bracket 47 1 Resistance Motor 48 1 Resistance Disc 49 1 Resistance Arm 50 1 M6 x 70mm Bolt Set 51 1 M6 x 60mm Bolt Set 52 1 Resistance Bracket 53 1 C-magnet 54 1 Drive Belt 55 2 Magnet 56 1 Clamp 57 1 Reed Switch/Wire 58 1 Main Wire 59 1 Extension Wire 60 2 Wire Clamp 61 1 Pulse Wire 62 2 M4 x 25mm Screw 63 2 M4 x 12.7mm Flange Screw 64 1 Audio Cable 65 3 M8 x 17mm Flat Head Screw 66 2 Handlebar Cap 67 1 Power Adapter 68 2 Crank Cap 69 2 Upright Pivot...
English Manual
Page 24
.... ICON’'s obligation under warranty. If replacement parts are shipped while the product is under normal use and service conditions. Accordingly, the above limitation may not apply to any and all instructions in China © 2012 ICON IP, Inc. This warranty provides specic legal rights; ICON Health & Fitness, Inc. (ICON) warrants this product to the terms set forth above is warranted for service needed under this manual...
.... ICON’'s obligation under warranty. If replacement parts are shipped while the product is under normal use and service conditions. Accordingly, the above limitation may not apply to any and all instructions in China © 2012 ICON IP, Inc. This warranty provides specic legal rights; ICON Health & Fitness, Inc. (ICON) warrants this product to the terms set forth above is warranted for service needed under this manual...


