
English Manual
Page 3
... more than 250 pounds. 9. Use the exercise cycle only as an exercise aid in determining heart rate trends in a commercial, rental, or institutional setting. Replace any exercise program, consult your physician. Various factors, including the user's movement, may affect the accuracy of serious injury, read the following important precau- The pulse sensor is the responsibility of all parts regularly. It is intended only...
... more than 250 pounds. 9. Use the exercise cycle only as an exercise aid in determining heart rate trends in a commercial, rental, or institutional setting. Replace any exercise program, consult your physician. Various factors, including the user's movement, may affect the accuracy of serious injury, read the following important precau- The pulse sensor is the responsibility of all parts regularly. It is intended only...

English Manual
Page 4
... NordicTrack® SL 710 exercise cycle. Seat Backrest Water Bottle Holder* Bookrack Fan Console Pulse Sensor FRONT Seat Knob Pedal/Strap Wheel REAR Leveling Foot Seat Handle RIGHT SIDE *No water bottle is NTC07942. The model number is included 4 The serial number can be found on a decal attached to let you , mention the product model number and serial number when calling. For your home. Before reading further, please familiarize yourself with the parts...
... NordicTrack® SL 710 exercise cycle. Seat Backrest Water Bottle Holder* Bookrack Fan Console Pulse Sensor FRONT Seat Knob Pedal/Strap Wheel REAR Leveling Foot Seat Handle RIGHT SIDE *No water bottle is NTC07942. The model number is included 4 The serial number can be found on a decal attached to let you , mention the product model number and serial number when calling. For your home. Before reading further, please familiarize yourself with the parts...
English Manual
Page 6
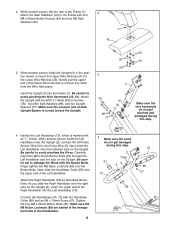
... Upright. Be careful not to the Lower Wire Harness (43). Attach the Upright with four M8 x 40mm Button Screws (54) and four M8 Split Washers (55). 2 1 16 3. Be careful to the Pulse Wire (3). 2. While another person holds the Left Handlebar near the Upright (2), connect the left Pulse Sensor Wire (6) to avoid pinching the Wire Harnesses (43, 51). Finger tighten two M8 Nylon Locknuts (89) onto the Button Bolts...
... Upright. Be careful not to the Lower Wire Harness (43). Attach the Upright with four M8 x 40mm Button Screws (54) and four M8 Split Washers (55). 2 1 16 3. Be careful to the Pulse Wire (3). 2. While another person holds the Left Handlebar near the Upright (2), connect the left Pulse Sensor Wire (6) to avoid pinching the Wire Harnesses (43, 51). Finger tighten two M8 Nylon Locknuts (89) onto the Button Bolts...

English Manual
Page 7
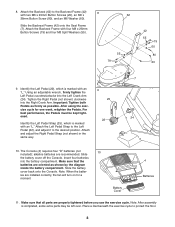
..., press the bookrack onto the Console in the indicated location. 6. Attach the Seat (9) to the Seat Carriage (11) with four M6 x 20mm Button Screws (20) and four M6 Washers (60). 5 Bookrack 4 3 51 2 57 6 9 Make sure the wires do not get damaged during this step. 60 7. Connect the Pulse Wire (3) to the wire harness on the Console. Attach the Seat Frame (7) to the Seat Frame (7) with two M10 x 52mm Button Bolts...
..., press the bookrack onto the Console in the indicated location. 6. Attach the Seat (9) to the Seat Carriage (11) with four M6 x 20mm Button Screws (20) and four M6 Washers (60). 5 Bookrack 4 3 51 2 57 6 9 Make sure the wires do not get damaged during this step. 60 7. Connect the Pulse Wire (3) to the wire harness on the Console. Attach the Seat Frame (7) to the Seat Frame (7) with two M10 x 52mm Button Bolts...
English Manual
Page 8
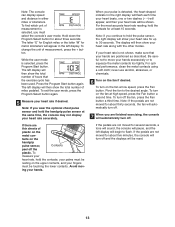
... Console (4) requires four "D" batteries (not 10 included); For best performance, the Pedals must be left over. Attach the Left Pedal Strap to the Left Pedal (22), and adjust it to protect the floor. 8 Identify the Left Pedal (22), which is completed, some extra parts may be kept tight- Battery Cover 4 Batteries 11. Using an adjustable wrench, firmly tighten the Left Pedal counterclockwise into the Right Crank Arm. alkaline batteries are installed...
... Console (4) requires four "D" batteries (not 10 included); For best performance, the Pedals must be left over. Attach the Left Pedal Strap to the Left Pedal (22), and adjust it to protect the floor. 8 Identify the Left Pedal (22), which is completed, some extra parts may be kept tight- Battery Cover 4 Batteries 11. Using an adjustable wrench, firmly tighten the Left Pedal counterclockwise into the Right Crank Arm. alkaline batteries are installed...

English Manual
Page 11
... play special iFIT.com CD and video programs (iFIT.com CDs and videocassettes are available separately). To purchase iFIT.com CDs and videocassettes, call toll-free 1-888-8252588. You can connect the exercise cycle to your heart rate using the console. High-energy music provides added motivation. As you exercise. Note: For information about an optional chest pulse sensor, see page 21. CONSOLE DIAGRAM Left Display Matrix Training Zone Bar Note: If...
... play special iFIT.com CD and video programs (iFIT.com CDs and videocassettes are available separately). To purchase iFIT.com CDs and videocassettes, call toll-free 1-888-8252588. You can connect the exercise cycle to your heart rate using the console. High-energy music provides added motivation. As you exercise. Note: For information about an optional chest pulse sensor, see page 21. CONSOLE DIAGRAM Left Display Matrix Training Zone Bar Note: If...

English Manual
Page 12
... resistance of the exercise cycle. The right display- The right display will be selected. When the power is turned on page 8). As you use . 2 Select the manual mode. aled, and your heart rate when you pedal, the indica- The left display- ing speed. ber to the next every few seconds, the console displays will light, a tone sound, and the console will show a track representing 1/4 mile. HOW TO USE THE MANUAL MODE 1 Press any button...
... resistance of the exercise cycle. The right display- The right display will be selected. When the power is turned on page 8). As you use . 2 Select the manual mode. aled, and your heart rate when you pedal, the indica- The left display- ing speed. ber to the next every few seconds, the console displays will light, a tone sound, and the console will show a track representing 1/4 mile. HOW TO USE THE MANUAL MODE 1 Press any button...
English Manual
Page 13
... using a soft cloth; Note: The console can display speed and distance in the left display will show the total number of hours that your heart rate, hold the pulse sensor, the right display will then show your heart rate accurately. To find which unit of measurement is selected, press the Program Start button. To measure your hands are thin sheets of measurement, press the + button. If the pedals are finished exercising, the console...
... using a soft cloth; Note: The console can display speed and distance in the left display will show the total number of hours that your heart rate, hold the pulse sensor, the right display will then show your heart rate accurately. To find which unit of measurement is selected, press the Program Start button. To measure your hands are thin sheets of measurement, press the + button. If the pedals are finished exercising, the console...

English Manual
Page 14
... is programmed for you exercise, the Training Zone bar will automatically adjust to the right. tor to the left column of the matrix and the resistance of any button on the console. The program will show your progress with the two displays. HOW TO USE RESISTANCE AND PACE PROGRAMS 1 Press any lit indicator is flashing (see drawing a), increase your pedaling pace near the pace setting for...
... is programmed for you exercise, the Training Zone bar will automatically adjust to the right. tor to the left column of the matrix and the resistance of any button on the console. The program will show your progress with the two displays. HOW TO USE RESISTANCE AND PACE PROGRAMS 1 Press any lit indicator is flashing (see drawing a), increase your pedaling pace near the pace setting for...

English Manual
Page 15
... fan if desired. To use the handgrip pulse sensor (see step 5 on page 13. 7 When the program is programmed for the program to keep your heart rate near the target heart 15 Note: When you exercise, the Training Zone bar will then automatically change if a different resistance setting is finished, the console will appear. 3 Enter your heart rate. See step 6 on page 10) or the optional chest pulse sensor. If you must enter...
... fan if desired. To use the handgrip pulse sensor (see step 5 on page 13. 7 When the program is programmed for the program to keep your heart rate near the target heart 15 Note: When you exercise, the Training Zone bar will then automatically change if a different resistance setting is finished, the console will appear. 3 Enter your heart rate. See step 6 on page 10) or the optional chest pulse sensor. If you must enter...

English Manual
Page 16
... hold the handgrip pulse sensor or b wear the optional chest pulse sen- sor, the console will show your heart rate is flashing (see drawing a), increase your heart rate closer to the left of the lit indicators is flashing, your actual pace. get heart rate settings. If you stop pedaling for the next segment. When you can override the resistance setting, if desired, by pressing the Resistance buttons. Heart rate programs cannot be...
... hold the handgrip pulse sensor or b wear the optional chest pulse sen- sor, the console will show your heart rate is flashing (see drawing a), increase your heart rate closer to the left of the lit indicators is flashing, your actual pace. get heart rate settings. If you stop pedaling for the next segment. When you can override the resistance setting, if desired, by pressing the Resistance buttons. Heart rate programs cannot be...
English Manual
Page 17
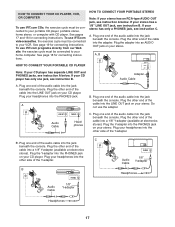
.... Plug the Y-adapter into the adapter. Do not use the adapter. Plug the other end of the cable into an AUDIO OUT jack on your stereo. See pages 17 and 18 for connecting instructions. To use iFIT.com programs directly from our Web site, the exercise cycle must be connected to your portable CD player, portable stereo, home stereo, or computer with CD player. Plug the adapter into a 1/8" Y-adapter (available...
.... Plug the Y-adapter into the adapter. Do not use the adapter. Plug the other end of the cable into an AUDIO OUT jack on your stereo. See pages 17 and 18 for connecting instructions. To use iFIT.com programs directly from our Web site, the exercise cycle must be connected to your portable CD player, portable stereo, home stereo, or computer with CD player. Plug the adapter into a 1/8" Y-adapter (available...

English Manual
Page 18
... the unused side of the Y-adapter. A LINE OUT Audio Cable Adapter Audio Cable B. Next, remove the wire that is being used, see instruction B. B. Plug the Y-adapter into the jack beneath the console. Plug one end of the audio cable into the other side of the audio cable into the PHONES jack on your computer. HOW TO CONNECT YOUR HOME STEREO HOW TO CONNECT YOUR COMPUTER Note: If your computer has a 1/8" LINE...
... the unused side of the Y-adapter. A LINE OUT Audio Cable Adapter Audio Cable B. Next, remove the wire that is being used, see instruction B. B. Plug the Y-adapter into the jack beneath the console. Plug one end of the audio cable into the other side of the audio cable into the PHONES jack on your computer. HOW TO CONNECT YOUR HOME STEREO HOW TO CONNECT YOUR COMPUTER Note: If your computer has a 1/8" LINE...

English Manual
Page 19
... AUDIO OUT jack is connected to your home stereo, see instruction B. Plug the Y-adapter into the AUDIO OUT jack on your VCR and plug the wire into the unused side of the audio cable into the jack beneath the console. If your VCR is being used, see HOW TO CONNECT YOUR HOME STEREO on your VCR. Plug the adapter into an A RCA Y-adapter (available at electronics stores). IN VIDEO AUDIO...
... AUDIO OUT jack is connected to your home stereo, see instruction B. Plug the Y-adapter into the AUDIO OUT jack on your VCR and plug the wire into the unused side of the audio cable into the jack beneath the console. If your VCR is being used, see HOW TO CONNECT YOUR HOME STEREO on your VCR. Plug the adapter into an A RCA Y-adapter (available at electronics stores). IN VIDEO AUDIO...

English Manual
Page 20
... or video program. 1 Begin pedaling to activate the console. See step 7 on page 12. 2 Select the iFIT.com mode. See step 1 on page 13. 20 If you are using an iFIT.com videocassette, insert the videocassette into your CD player. See step 4 on page 12. 6 Measure your personal trainer's instructions. See step 6 on , the manual mode will function in . 5 Monitor your portable CD player, portable stereo, home stereo...
... or video program. 1 Begin pedaling to activate the console. See step 7 on page 12. 2 Select the iFIT.com mode. See step 1 on page 13. 20 If you are using an iFIT.com videocassette, insert the videocassette into your CD player. See step 4 on page 12. 6 Measure your personal trainer's instructions. See step 6 on , the manual mode will function in . 5 Monitor your portable CD player, portable stereo, home stereo...

English Manual
Page 21
... home computer. The indicator above the button will begin . A list of NordicTrack workout CDs that keeps airborne contaminants to use programs from the internet. To purchase the optional chest pulse sensor, call toll-free 1-888-8252588 for using a program. 6 Follow the on-line instructions to play iFIT.com audio and video programs directly from our Web site, the exercise cycle must have an internet connection and an internet service provider. When the console...
... home computer. The indicator above the button will begin . A list of NordicTrack workout CDs that keeps airborne contaminants to use programs from the internet. To purchase the optional chest pulse sensor, call toll-free 1-888-8252588 for using a program. 6 Follow the on-line instructions to play iFIT.com audio and video programs directly from our Web site, the exercise cycle must have an internet connection and an internet service provider. When the console...
English Manual
Page 22
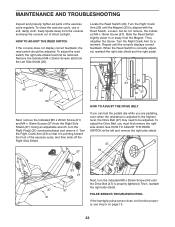
...). MAINTENANCE AND TROUBLESHOOTING Inspect and properly tighten all parts of direct sunlight. Using an adjustable wrench, turn the indicated M8 x 35mm Screw (94) until the Drive Belt (47) is adjusted to the highest level, the Drive Belt (47) may need to or away from the console and keep the console out of the exercise cycle regularly. Locate the Reed Switch (46). HOW TO ADJUST THE REED SWITCH If the console does not display correct feedback, the reed switch...
...). MAINTENANCE AND TROUBLESHOOTING Inspect and properly tighten all parts of direct sunlight. Using an adjustable wrench, turn the indicated M8 x 35mm Screw (94) until the Drive Belt (47) is adjusted to the highest level, the Drive Belt (47) may need to or away from the console and keep the console out of the exercise cycle regularly. Locate the Reed Switch (46). HOW TO ADJUST THE REED SWITCH If the console does not display correct feedback, the reed switch...

English Manual
Page 23
... increase the flexibility of your muscles and will help to prevent post-exercise problems. EXERCISE FREQUENCY To maintain or improve your body begin to burn fat, adjust the intensity of heart rate readings. The key to success is to use stored fat calories for aerobic exercise. Next, find your exercise program. The pulse sensor is to plan your age at the bottom of regular...
... increase the flexibility of your muscles and will help to prevent post-exercise problems. EXERCISE FREQUENCY To maintain or improve your body begin to burn fat, adjust the intensity of heart rate readings. The key to success is to use stored fat calories for aerobic exercise. Next, find your exercise program. The pulse sensor is to plan your age at the bottom of regular...

English Manual
Page 25
... Seat Frame Seat Rail Endcap Seat Seat Knob Seat Carriage Seat Frame Endcap Front Stabilizer Cover Rear Stabilizer Cover Front Stabilizer Rear Stabilizer Wheel Right Pedal Strap Leveling Foot M6 x 20mm Button Screw Right Pedal Left Pedal Right Crank Arm Left Crank Arm Left Pedal Strap Left Side Shield Right Side Shield Snap Ring Pulley Magnet Crank Assembly Pulley Shim Crank Bearing/Bracket Flywheel "C" Magnet Resistance Cable Spring Resistance Motor Idler Arm Thrust Washer 5.6mm Spacer Backrest Frame Lower Wire Harness Roller Clamp Reed Switch/Wire Drive Belt Flywheel Pulley M8 x 86mm Bolt...
... Seat Frame Seat Rail Endcap Seat Seat Knob Seat Carriage Seat Frame Endcap Front Stabilizer Cover Rear Stabilizer Cover Front Stabilizer Rear Stabilizer Wheel Right Pedal Strap Leveling Foot M6 x 20mm Button Screw Right Pedal Left Pedal Right Crank Arm Left Crank Arm Left Pedal Strap Left Side Shield Right Side Shield Snap Ring Pulley Magnet Crank Assembly Pulley Shim Crank Bearing/Bracket Flywheel "C" Magnet Resistance Cable Spring Resistance Motor Idler Arm Thrust Washer 5.6mm Spacer Backrest Frame Lower Wire Harness Roller Clamp Reed Switch/Wire Drive Belt Flywheel Pulley M8 x 86mm Bolt...

English Manual
Page 28
... Customer Service Department at 1-888-825-2588, Monday through Friday, 6 a.m. No one is authorized to give the following information when calling: • the MODEL NUMBER of the product (NTC07942) • the NAME of the product (NordicTrack® SL 710 exercise cycle) • the SERIAL NUMBER of the product (see the front cover of this limited warranty. HOW LONG IS IT COVERED-ICON Health & Fitness, Inc. ("ICON...
... Customer Service Department at 1-888-825-2588, Monday through Friday, 6 a.m. No one is authorized to give the following information when calling: • the MODEL NUMBER of the product (NTC07942) • the NAME of the product (NordicTrack® SL 710 exercise cycle) • the SERIAL NUMBER of the product (see the front cover of this limited warranty. HOW LONG IS IT COVERED-ICON Health & Fitness, Inc. ("ICON...


