

English Manual
Page 3
... specifications described on the front cover of this manual and all important precautions and in speed. 19. Athletic support clothes are adequately informed of all times. 15. Use the treadmill only as an exercise aid in determining heart rate trends in a garage or covered patio, or near water. 5. Do not put the treadmill in general. 3 To purchase a surge suppressor, see page 14), plug the power cord...
... specifications described on the front cover of this manual and all important precautions and in speed. 19. Athletic support clothes are adequately informed of all times. 15. Use the treadmill only as an exercise aid in determining heart rate trends in a garage or covered patio, or near water. 5. Do not put the treadmill in general. 3 To purchase a surge suppressor, see page 14), plug the power cord...

English Manual
Page 4
... the location of the treadmill regularly. If you feel faint or if you experience pain while exercising, stop immediately and cool down. Always remove the key, unplug the power cord, and press the power switch into any opening on page 21.) You must be performed by an authorized ser- DANGER: 25. When folding or moving the treadmill, make sure that the storage latch is not in use only. Servicing...
... the location of the treadmill regularly. If you feel faint or if you experience pain while exercising, stop immediately and cool down. Always remove the key, unplug the power cord, and press the power switch into any opening on page 21.) You must be performed by an authorized ser- DANGER: 25. When folding or moving the treadmill, make sure that the storage latch is not in use only. Servicing...

English Manual
Page 5
... with the labeled parts. To help us . ing this manual, please see the front cover of features designed to make your benefit, read - The model number and the location of the serial number decal are shown on the front cover of other treadmills. And when you for selecting the revolutionary NordicTrack® T5.3 treadmill. Tray Handrail Upright Console Pulse Sensor Key/Clip Walking Belt Foot Rail Idler Roller Adjustment Bolts Power Switch Power Cord Platform Cushion...
... with the labeled parts. To help us . ing this manual, please see the front cover of features designed to make your benefit, read - The model number and the location of the serial number decal are shown on the front cover of other treadmills. And when you for selecting the revolutionary NordicTrack® T5.3 treadmill. Tray Handrail Upright Console Pulse Sensor Key/Clip Walking Belt Foot Rail Idler Roller Adjustment Bolts Power Switch Power Cord Platform Cushion...
English Manual
Page 6
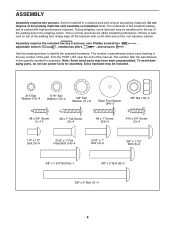
... top of the walking belt, simply wipe off the lubricant with high-performance lubricant. Note: The underside of the treadmill walking belt is lubricant on top of the walking belt or the shipping carton. Assembly requires the included hex key and your own Phillips screwdriver , adjustable wrench , needlenose pliers , and scissors . Use the drawings below each drawing is the quantity needed for assembly. ASSEMBLY Assembly requires two persons...
... top of the walking belt, simply wipe off the lubricant with high-performance lubricant. Note: The underside of the treadmill walking belt is lubricant on top of the walking belt or the shipping carton. Assembly requires the included hex key and your own Phillips screwdriver , adjustable wrench , needlenose pliers , and scissors . Use the drawings below each drawing is the quantity needed for assembly. ASSEMBLY Assembly requires two persons...
English Manual
Page 10
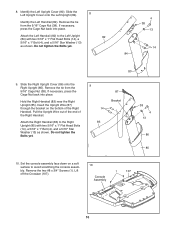
... Washer (13) as shown. Attach the Right Handrail (83) to avoid scratching the console assembly. Remove the two #8 x 3/4" Screws (1). Remove the tie from the 5/16" Cage Nut (38). If necessary, press the Cage Nut back into place. Pull the Upright Wire out of the end of the Right Handrail. Identify the Left Upright Cover (80). Do not tighten the Bolts yet. 4 38 13...
... Washer (13) as shown. Attach the Right Handrail (83) to avoid scratching the console assembly. Remove the two #8 x 3/4" Screws (1). Remove the tie from the 5/16" Cage Nut (38). If necessary, press the Cage Nut back into place. Pull the Upright Wire out of the end of the Right Handrail. Identify the Left Upright Cover (80). Do not tighten the Bolts yet. 4 38 13...

English Manual
Page 11
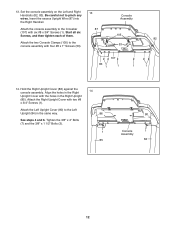
... x 3/4" Screws (2). 11. Connect the Upright Wire (87) to pinch the Upright Wire (87). Attach the Console Frame with four #10 12 x 3/4" Screws (2) and four #10 Star Washers (12); Connect the ground wire from the Upright Wire. IMPORTANT: To avoid damaging the Crossbar (107), do not use power tools and 11 do not, turn one connector and try again. See the inset drawing. do not tighten the Bolts yet. Tighten...
... x 3/4" Screws (2). 11. Connect the Upright Wire (87) to pinch the Upright Wire (87). Attach the Console Frame with four #10 12 x 3/4" Screws (2) and four #10 Star Washers (12); Connect the ground wire from the Upright Wire. IMPORTANT: To avoid damaging the Crossbar (107), do not use power tools and 11 do not, turn one connector and try again. See the inset drawing. do not tighten the Bolts yet. Tighten...
English Manual
Page 12
... Upright Wire (87) into the Right Handrail. Set the console assembly on the Left and Right Handrails (82, 83). Attach the two Console Clamps (105) to the Left Upright (84) in the same way. Tighten the 3/8" x 4" Bolts (7) and the 3/8" x 1 1/2" Bolts (3). 14 86 1 85 80 Console 1 Assembly 84 12 13. Align the holes in the Right Upright (85). Attach the Left Upright Cover (80) to the console assembly with six #8 x 3/4" Screws...
... Upright Wire (87) into the Right Handrail. Set the console assembly on the Left and Right Handrails (82, 83). Attach the two Console Clamps (105) to the Left Upright (84) in the same way. Tighten the 3/8" x 4" Bolts (7) and the 3/8" x 1 1/2" Bolts (3). 14 86 1 85 80 Console 1 Assembly 84 12 13. Align the holes in the Right Upright (85). Attach the Left Upright Cover (80) to the console assembly with six #8 x 3/4" Screws...
English Manual
Page 14
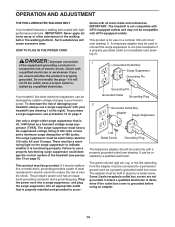
... POWER CORD dance with highperformance lubricant. This product is UL 1449 listed as a properly grounded outlet box cover. To decrease the risk of damaging your homeʼs power. Grounded Outlet Box Surge Suppressor Grounding Pin Grounding Pin Your treadmill, like extending from the adapter must have a proper outlet in- DANGER: Improper connection 1 of electric shock. The surge suppressor must be grounded. Plug the power cord...
... POWER CORD dance with highperformance lubricant. This product is UL 1449 listed as a properly grounded outlet box cover. To decrease the risk of damaging your homeʼs power. Grounded Outlet Box Surge Suppressor Grounding Pin Grounding Pin Your treadmill, like extending from the adapter must have a proper outlet in- DANGER: Improper connection 1 of electric shock. The surge suppressor must be grounded. Plug the power cord...

English Manual
Page 15
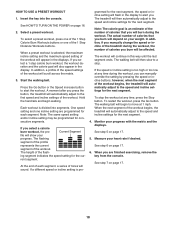
... accepts iFit cards with the 8-week Weight Loss workout. When the manual mode of the console is used, observe the alignment of the walking belt, and center the walking belt if necessary (see page 24). 15 Each workout automatically controls the speed and incline of the treadmill as it guides you exercise, the console will display instant exercise feedback. To turn on the power, see page 16. To use the manual mode, see page 16. To use a preset workout...
... accepts iFit cards with the 8-week Weight Loss workout. When the manual mode of the console is used, observe the alignment of the walking belt, and center the walking belt if necessary (see page 24). 15 Each workout automatically controls the speed and incline of the treadmill as it guides you exercise, the console will display instant exercise feedback. To turn on the power, see page 16. To use the manual mode, see page 16. To use a preset workout...

English Manual
Page 16
... TURN ON THE POWER at - If the displays light as soon as you exercise, change the unit of the walking belt as desired by pressing the Speed increase and decrease buttons. After a moment, the displays will change in the power cord and press the power switch into the console, the incline will change speed until it may damage the console displays or other electrical components. 1. If you insert the key into the reset position, the demo mode...
... TURN ON THE POWER at - If the displays light as soon as you exercise, change the unit of the walking belt as desired by pressing the Speed increase and decrease buttons. After a moment, the displays will change in the power cord and press the power switch into the console, the incline will change speed until it may damage the console displays or other electrical components. 1. If you insert the key into the reset position, the demo mode...

English Manual
Page 17
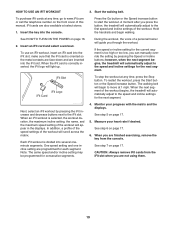
... sure that represents 1/4 mile (400 meters). 4. Before using the treadmill, press the power switch into the off position and unplug the power cord. Calories/Pulse display-This display shows the approximate number of the numbered incline buttons. When you press one of calories you exercise, the indicators around the track will again begin to the storage position. Speed display-This display shows the speed of the treadmill as desired. The track will then darken and...
... sure that represents 1/4 mile (400 meters). 4. Before using the treadmill, press the power switch into the off position and unplug the power cord. Calories/Pulse display-This display shows the approximate number of the numbered incline buttons. When you press one of calories you exercise, the indicators around the track will again begin to the storage position. Speed display-This display shows the speed of the treadmill as desired. The track will then darken and...
English Manual
Page 18
... exercising, remove the key from the console. See step 6 on page 17. 5. Press the Go button or the Speed increase button to the speed and incline settings for the cur- If you press the button, the treadmill will show your weight. To stop . Monitor your heart rate if desired. See HOW TO TURN ON THE POWER on page 17. 18 To select a preset workout, press one of the workout begins, the treadmill will appear in the display...
... exercising, remove the key from the console. See step 6 on page 17. 5. Press the Go button or the Speed increase button to the speed and incline settings for the cur- If you press the button, the treadmill will show your weight. To stop . Monitor your heart rate if desired. See HOW TO TURN ON THE POWER on page 17. 18 To select a preset workout, press one of the workout begins, the treadmill will appear in the display...
English Manual
Page 19
... exercising, remove the key from the iFit slot when you through the workout. Start the walking belt. make sure that the iFit card is selected, the workout duration, the maximum incline setting, the name, and the maximum speed setting of the workout will automatically adjust to www.iFit.com or call the telephone number on the front cover of the workout. Monitor your heart rate if desired. See step 6 on page 16. 2. HOW TO USE AN IFIT WORKOUT...
... exercising, remove the key from the iFit slot when you through the workout. Start the walking belt. make sure that the iFit card is selected, the workout duration, the maximum incline setting, the name, and the maximum speed setting of the workout will automatically adjust to www.iFit.com or call the telephone number on the front cover of the workout. Monitor your heart rate if desired. See step 6 on page 16. 2. HOW TO USE AN IFIT WORKOUT...

English Manual
Page 20
... iFit slot. When the information mode is fully plugged in. Press the Speed increase button to turn off the display demo mode, press the Speed decrease button. Then, plug the audio wire into the console. If you remove the key, the displays will remain lit, although the buttons will appear in the Speed display while the information mode is turned on the console. The Distance/Incline display will show the total number of miles (or kilometers) that the walking belt has moved. Make sure that the audio wire...
... iFit slot. When the information mode is fully plugged in. Press the Speed increase button to turn off the display demo mode, press the Speed decrease button. Then, plug the audio wire into the console. If you remove the key, the displays will remain lit, although the buttons will appear in the Speed display while the information mode is turned on the console. The Distance/Incline display will show the total number of miles (or kilometers) that the walking belt has moved. Make sure that the audio wire...
English Manual
Page 21
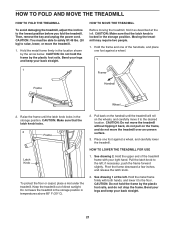
Then, remove the key and unplug the power cord. CAUTION: Make sure that the latch knob is locked in the location shown by the arrow below. CAUTION: Do not move the treadmill without tipping it back, do not pull on the wheels, and carefully move it to the desired location. Pull the latch knob to the lowest position before you fold the treadmill. Pivot the frame...
Then, remove the key and unplug the power cord. CAUTION: Make sure that the latch knob is locked in the location shown by the arrow below. CAUTION: Do not move the treadmill without tipping it back, do not pull on the wheels, and carefully move it to the desired location. Pull the latch knob to the lowest position before you fold the treadmill. Pivot the frame...

English Manual
Page 22
... Stop button for five minutes and then press the switch back in . Make sure that the power cord is plugged into a surge suppressor, and that the surge suppressor is inserted into the console. c. c Tripped Reset PROBLEM: The power turns off the demo mode, hold down the Uprights (84, 85). Check the power switch (see page 14). Make sure that meets all of the Belly Pan (75). Remove the key...
... Stop button for five minutes and then press the switch back in . Make sure that the power cord is plugged into a surge suppressor, and that the surge suppressor is inserted into the console. c. c Tripped Reset PROBLEM: The power turns off the demo mode, hold down the Uprights (84, 85). Check the power switch (see page 14). Make sure that meets all of the Belly Pan (75). Remove the key...
English Manual
Page 23
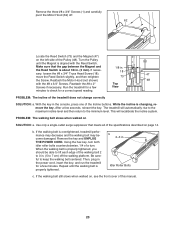
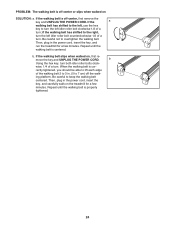
... the gap between the Magnet and 1/8 in the console, press one of the specifications described on , see the front cover of the Pulley (48). If the walking belt is properly tightened. When the walking belt is aligned with the #8 x 3/4" Screws. b 2-3 in the power cord, insert the key, and run the treadmill for a correct speed reading. Idler Roller Bolts c. After a few minutes. The treadmill will recalibrate the incline system. Then, plug in .
... the gap between the Magnet and 1/8 in the console, press one of the specifications described on , see the front cover of the Pulley (48). If the walking belt is properly tightened. When the walking belt is aligned with the #8 x 3/4" Screws. b 2-3 in the power cord, insert the key, and run the treadmill for a correct speed reading. Idler Roller Bolts c. After a few minutes. The treadmill will recalibrate the incline system. Then, plug in .
English Manual
Page 24
... the walking belt is properly tightened. 24 move the key and UNPLUG THE POWER CORD. When the walking belt is off-center, first remove the key and UNPLUG THE POWER CORD. Then, plug in the power cord, insert the key, and run the treadmill for a few minutes. Be careful not to keep the walking belt centered. Repeat until the walking belt is centered. PROBLEM: The walking belt is off the walk- ing platform. wise, 1/4 of a turn ; rectly tightened...
... the walking belt is properly tightened. 24 move the key and UNPLUG THE POWER CORD. When the walking belt is off-center, first remove the key and UNPLUG THE POWER CORD. Then, plug in the power cord, insert the key, and run the treadmill for a few minutes. Be careful not to keep the walking belt centered. Repeat until the walking belt is centered. PROBLEM: The walking belt is off the walk- ing platform. wise, 1/4 of a turn ; rectly tightened...
English Manual
Page 25
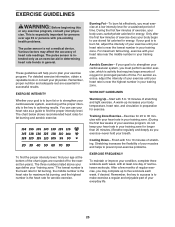
... enjoyable part of your exercise until your exercise program. For maximum fat burning, exercise with at the bottom of heart rate readings. For detailed exercise information, obtain a reputable book or consult your "training zone." The chart below shows recommended heart rates for a sustained period of your exercise program, do not keep your heart rate in your goal is to 30 minutes with pre-existing health problems. The pulse sensor is the heart rate...
... enjoyable part of your exercise until your exercise program. For maximum fat burning, exercise with at the bottom of heart rate readings. For detailed exercise information, obtain a reputable book or consult your "training zone." The chart below shows recommended heart rates for a sustained period of your exercise program, do not keep your heart rate in your goal is to 30 minutes with pre-existing health problems. The pulse sensor is the heart rate...

English Manual
Page 32
... to www.nordictrackservice.com/registration. This warranty extends only to products used for a minimal handling charge. No other rights that specifically set forth herein. ICON is in connection with respect to avoid added fees for service needed under warranty, the customer will be responsible for commercial or rental purposes or as store display models; Parts and labor are made must register this...
... to www.nordictrackservice.com/registration. This warranty extends only to products used for a minimal handling charge. No other rights that specifically set forth herein. ICON is in connection with respect to avoid added fees for service needed under warranty, the customer will be responsible for commercial or rental purposes or as store display models; Parts and labor are made must register this...


