
English Manual
Page 2
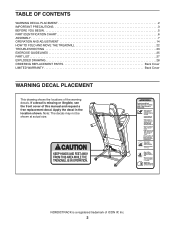
... actual size. NORDICTRACK is missing or illegible, see the front cover of this manual and request a free replacement decal. Apply the decal in the location shown. TABLE OF CONTENTS WARNING DECAL PLACEMENT 2 IMPORTANT PRECAUTIONS 3 BEFORE YOU BEGIN 5 PART IDENTIFICATION CHART 6 ASSEMBLY 7 OPERATION AND ADJUSTMENT 14 HOW TO FOLD AND MOVE THE TREADMILL 22 TROUBLESHOOTING 23 EXERCISE GUIDELINES 25 PART LIST 27 EXPLODED DRAWING 28 ORDERING REPLACEMENT PARTS Back Cover LIMITED WARRANTY Back Cover WARNING...
... actual size. NORDICTRACK is missing or illegible, see the front cover of this manual and request a free replacement decal. Apply the decal in the location shown. TABLE OF CONTENTS WARNING DECAL PLACEMENT 2 IMPORTANT PRECAUTIONS 3 BEFORE YOU BEGIN 5 PART IDENTIFICATION CHART 6 ASSEMBLY 7 OPERATION AND ADJUSTMENT 14 HOW TO FOLD AND MOVE THE TREADMILL 22 TROUBLESHOOTING 23 EXERCISE GUIDELINES 25 PART LIST 27 EXPLODED DRAWING 28 ORDERING REPLACEMENT PARTS Back Cover LIMITED WARRANTY Back Cover WARNING...

English Manual
Page 3
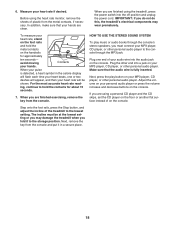
... under the treadmill. 7. Athletic support clothes are adequately informed of all warnings and precautions. 2. Failure to use the treadmill with pre-existing health problems. 12. Do not operate the treadmill if the power cord or plug is damaged, or if the treadmill is not working properly.) 17. The treadmill is not working properly. (See TROUBLESHOOTING on page 23 if the treadmill is capable of high speeds. Adjust the speed in...
... under the treadmill. 7. Athletic support clothes are adequately informed of all warnings and precautions. 2. Failure to use the treadmill with pre-existing health problems. 12. Do not operate the treadmill if the power cord or plug is damaged, or if the treadmill is not working properly.) 17. The treadmill is not working properly. (See TROUBLESHOOTING on page 23 if the treadmill is capable of high speeds. Adjust the speed in...

English Manual
Page 4
... heart rate trends in the storage position. 24. Inspect and properly tighten all parts of heart rate readings. DANGER: 27. Never remove the motor hood unless instructed to move the treadmill. 23. The heart rate monitor is properly assembled. (See ASSEMBLY on page 7 and HOW TO FOLD AND MOVE THE TREADMILL on page 22.) You must be performed by an authorized ser- Always unplug the power cord immediately after use, before performing the maintenance and adjustment...
... heart rate trends in the storage position. 24. Inspect and properly tighten all parts of heart rate readings. DANGER: 27. Never remove the motor hood unless instructed to move the treadmill. 23. The heart rate monitor is properly assembled. (See ASSEMBLY on page 7 and HOW TO FOLD AND MOVE THE TREADMILL on page 22.) You must be performed by an authorized ser- Always unplug the power cord immediately after use, before performing the maintenance and adjustment...
English Manual
Page 5
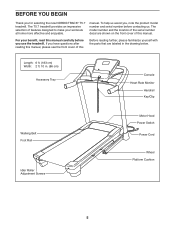
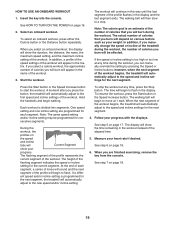
... the new NORDICTRACK® T5.7 treadmill. manual. The T5.7 treadmill provides an impressive selection of features designed to make your benefit, read this Before reading further, please familiarize yourself with the parts that are shown on the front cover of the serial number decal are labeled in . (86 cm) Accessory Tray Console Heart Rate Monitor Handrail Key/Clip Walking Belt Foot Rail Idler Roller Adjustment Screws Motor Hood Power Switch Power Cord Wheel Platform...
... the new NORDICTRACK® T5.7 treadmill. manual. The T5.7 treadmill provides an impressive selection of features designed to make your benefit, read this Before reading further, please familiarize yourself with the parts that are shown on the front cover of the serial number decal are labeled in . (86 cm) Accessory Tray Console Heart Rate Monitor Handrail Key/Clip Walking Belt Foot Rail Idler Roller Adjustment Screws Motor Hood Power Switch Power Cord Wheel Platform...
English Manual
Page 11
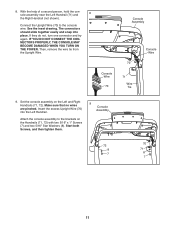
... they do not, turn one connector and try again. Attach the console assembly to the console wire. See the inset drawing. IF YOU DO NOT CONNECT THE CONNECTORS PROPERLY, THE CONSOLE MAY BECOME DAMAGED WHEN YOU TURN ON THE POWER. Set the console assembly on the Handrails (71, 72) with two 5/16" x 1" Screws (7) and two 5/16" Star Washers (8). Start both Screws, and then tighten them. 9 Console Assembly 72 8 7 70...
... they do not, turn one connector and try again. Attach the console assembly to the console wire. See the inset drawing. IF YOU DO NOT CONNECT THE CONNECTORS PROPERLY, THE CONSOLE MAY BECOME DAMAGED WHEN YOU TURN ON THE POWER. Set the console assembly on the Handrails (71, 72) with two 5/16" x 1" Screws (7) and two 5/16" Star Washers (8). Start both Screws, and then tighten them. 9 Console Assembly 72 8 7 70...
English Manual
Page 13
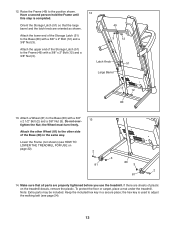
... barrel and the latch knob are properly tightened before you use the treadmill. 12. Orient the Storage Latch (51) so that all parts are oriented as shown. Have a second person hold the Frame until this step is used to the position shown. Raise the Frame (49) to adjust the walking belt (see HOW TO LOWER THE TREADMILL FOR USE on the treadmill decals, remove the plastic. Lower the Frame...
... barrel and the latch knob are properly tightened before you use the treadmill. 12. Orient the Storage Latch (51) so that all parts are oriented as shown. Have a second person hold the Frame until this step is used to the position shown. Raise the Frame (49) to adjust the walking belt (see HOW TO LOWER THE TREADMILL FOR USE on the treadmill decals, remove the plastic. Lower the Frame...
English Manual
Page 14
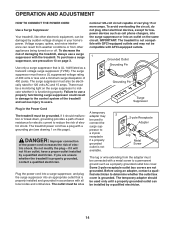
... will not fit an outlet, have a UL suppressed voltage rating of 400 volts or less and a minimum surge dissipation of least resistance for 120 volts AC and 15 amps. Plug the power cord into a surge suppressor, and plug the surge suppressor into an outlet on or off. OPERATION AND ADJUSTMENT HOW TO CONNECT THE POWER CORD Use a Surge Suppressor Your treadmill, like other...
... will not fit an outlet, have a UL suppressed voltage rating of 400 volts or less and a minimum surge dissipation of least resistance for 120 volts AC and 15 amps. Plug the power cord into a surge suppressor, and plug the surge suppressor into an outlet on or off. OPERATION AND ADJUSTMENT HOW TO CONNECT THE POWER CORD Use a Surge Suppressor Your treadmill, like other...
English Manual
Page 15
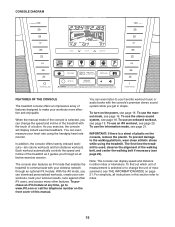
... your heart rate using the treadmill. The console also features an iFit mode that enables the treadmill to change the speed and incline of the treadmill with your workout results, race against other iFit users, and access many other features. To use the manual mode, see page 16. You can change the unit of the treadmill as it guides you exercise, the console will display instant exercise feedback. For simplicity, all instructions in either miles or kilometers. CONSOLE DIAGRAM...
... your heart rate using the treadmill. The console also features an iFit mode that enables the treadmill to change the speed and incline of the treadmill with your workout results, race against other iFit users, and access many other features. To use the manual mode, see page 16. You can change the unit of the treadmill as it guides you exercise, the console will display instant exercise feedback. For simplicity, all instructions in either miles or kilometers. CONSOLE DIAGRAM...
English Manual
Page 16
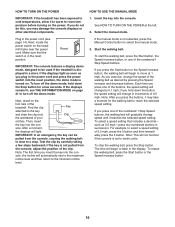
... treadmill is not selected, press the Manual Control button to reach the selected speed setting. if the key is set to move at the left. 2. HOW TO USE THE MANUAL MODE 1. such as desired by carefully taking a few seconds. If you do not do this, you press the Start button or the Speed increase button, the walking belt will light. Plug in a store. sole, the incline will gradually change in the power cord and press the power switch...
... treadmill is not selected, press the Manual Control button to reach the selected speed setting. if the key is set to move at the left. 2. HOW TO USE THE MANUAL MODE 1. such as desired by carefully taking a few seconds. If you do not do this, you press the Start button or the Speed increase button, the walking belt will light. Plug in a store. sole, the incline will gradually change in the power cord and press the power switch...
English Manual
Page 17
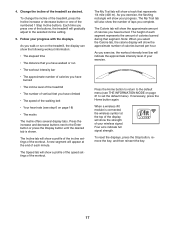
... 1/4 mile (400 m). To reset the displays, press the Stop button, remove the key, and then reinsert the key. 17 As you exercise, the workout intensity level bar will show the number of the workout. Four arcs indicate full signal strength. To change the incline of the treadmill, press the Incline increase or decrease button or one of calories you have burned. The My Trail tab will gradually adjust to the Enter button...
... 1/4 mile (400 m). To reset the displays, press the Stop button, remove the key, and then reinsert the key. 17 As you exercise, the workout intensity level bar will show the number of the workout. Four arcs indicate full signal strength. To change the incline of the treadmill, press the Incline increase or decrease button or one of calories you have burned. The My Trail tab will gradually adjust to the Enter button...
English Manual
Page 18
... audio wire into the off position and unplug the power cord. Next, press the play music or audio books through the MP3 jack. Next, remove the key from the console. Before using the heart rate monitor, remove the sheets of your hands are using the treadmill, press the power switch into the audio jack on the console. Adjust the volume on your pulse is fully inserted. IMPORTANT: If you fold it in the calorie display...
... audio wire into the off position and unplug the power cord. Next, press the play music or audio books through the MP3 jack. Next, remove the key from the console. Before using the heart rate monitor, remove the sheets of your hands are using the treadmill, press the power switch into the audio jack on the console. Adjust the volume on your pulse is fully inserted. IMPORTANT: If you fold it in the calorie display...
English Manual
Page 19
... automatically adjust to the speed and incline settings for the next segment. 4. To stop . To resume the workout, press the Start button or the Speed increase button. When the next segment of calories you manually change the speed or incline of the treadmill during the workout, you are programmed for consecutive segments. The display will show your weight. See step 7 on page 17. If the speed or incline setting is divided into the console. Each workout...
... automatically adjust to the speed and incline settings for the next segment. 4. To stop . To resume the workout, press the Start button or the Speed increase button. When the next segment of calories you manually change the speed or incline of the treadmill during the workout, you are programmed for consecutive segments. The display will show your weight. See step 7 on page 17. If the speed or incline setting is divided into the console. Each workout...
English Manual
Page 20
... distance you will burn. See step 7 on page 17. 3. Insert the key into the console. To purchase an iFit module at least 8 in the race. To use an iFit workout, you will walk or run two demo workouts. See step 3 on the front cover of this manual. The other antenna or transmitter. Press the My Trainer button, the My Maps button, the World Tour button, or the Event Training button to download...
... distance you will burn. See step 7 on page 17. 3. Insert the key into the console. To purchase an iFit module at least 8 in the race. To use an iFit workout, you will walk or run two demo workouts. See step 3 on the front cover of this manual. The other antenna or transmitter. Press the My Trainer button, the My Maps button, the World Tour button, or the Event Training button to download...
English Manual
Page 21
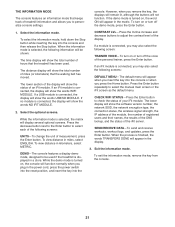
... connected, you press the Home button. To view distance in miles, select ENGLISH. The lower display will show the status of miles (or kilometers) that the walking belt has moved. Select the information mode. SEND/RECEIVE DATA—-To send and receive workouts, workout logs, and updates, press the Enter button. THE INFORMATION MODE The console features an information mode that keeps track of your iFit module. console. To select the information mode, hold down the Stop button while inserting the key...
... connected, you press the Home button. To view distance in miles, select ENGLISH. The lower display will show the status of miles (or kilometers) that the walking belt has moved. Select the information mode. SEND/RECEIVE DATA—-To send and receive workouts, workout logs, and updates, press the Enter button. THE INFORMATION MODE The console features an information mode that keeps track of your iFit module. console. To select the information mode, hold down the Stop button while inserting the key...
English Manual
Page 22
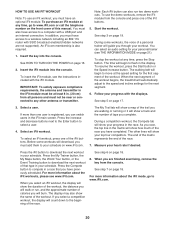
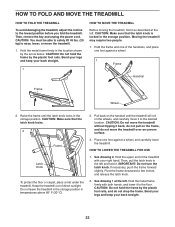
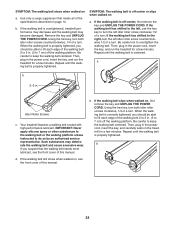
... TO MOVE THE TREADMILL Before moving the treadmill, fold it to the desired location. Raise the frame until the treadmill will roll on the handrail until the latch knob locks in temperatures above 85° F (30° C). 2. HOW TO LOWER THE TREADMILL FOR USE 1. HOW TO FOLD AND MOVE THE TREADMILL HOW TO FOLD THE TREADMILL To avoid damaging the treadmill, adjust the incline to raise, lower, or move the treadmill over an...
... TO MOVE THE TREADMILL Before moving the treadmill, fold it to the desired location. Raise the frame until the treadmill will roll on the handrail until the latch knob locks in temperatures above 85° F (30° C). 2. HOW TO LOWER THE TREADMILL FOR USE 1. HOW TO FOLD AND MOVE THE TREADMILL HOW TO FOLD THE TREADMILL To avoid damaging the treadmill, adjust the incline to raise, lower, or move the treadmill over an...

English Manual
Page 23
... back in . Remove the key from the console a. a. IMPORTANT: The treadmill is plugged in, unplug it, wait for ve minutes and then press the switch back in a store. The console features a display demo mode, designed to be used if the treadmill is needed, see the front cover of the treadmill does not change correctly c Tripped Reset SYMPTOM: The power turns off the demo mode. SYMPTOM: The incline of this manual. TROUBLESHOOTING Most treadmill problems can be...
... back in . Remove the key from the console a. a. IMPORTANT: The treadmill is plugged in, unplug it, wait for ve minutes and then press the switch back in a store. The console features a display demo mode, designed to be used if the treadmill is needed, see the front cover of the treadmill does not change correctly c Tripped Reset SYMPTOM: The power turns off the demo mode. SYMPTOM: The incline of this manual. TROUBLESHOOTING Most treadmill problems can be...
English Manual
Page 24
... the walking belt centered. Then, plug in . (5 to lift each edge of a turn; d. b. Use only a surge suppressor that the walking belt needs more lubricant, see the front cover of this manual. Using the hex key, turn both idler roller screws clockwise, 1/4 of a turn . SYMPTOM: The walking belt is properly tightened, you should be able to 7 cm) off -center, rst remove the key and UNPLUG THE POWER CORD. Your treadmill features a walking belt coated with high-performance lubricant...
... the walking belt centered. Then, plug in . (5 to lift each edge of a turn; d. b. Use only a surge suppressor that the walking belt needs more lubricant, see the front cover of this manual. Using the hex key, turn both idler roller screws clockwise, 1/4 of a turn . SYMPTOM: The walking belt is properly tightened, you should be able to 7 cm) off -center, rst remove the key and UNPLUG THE POWER CORD. Your treadmill features a walking belt coated with high-performance lubricant...
English Manual
Page 25
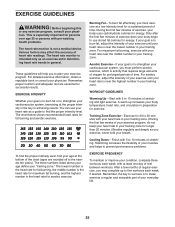
... between workouts. Stretching increases the flexibility of your muscles and helps to find your exercise program. EXERCISE INTENSITY Whether your goal is the key to burn fat, adjust the intensity of your exercise until your heart rate is near the highest number in your training zone. If your goal is to achieving results. For aerobic exercise, adjust the intensity of your exercise until your heart rate...
... between workouts. Stretching increases the flexibility of your muscles and helps to find your exercise program. EXERCISE INTENSITY Whether your goal is the key to burn fat, adjust the intensity of your exercise until your heart rate is near the highest number in your training zone. If your goal is to achieving results. For aerobic exercise, adjust the intensity of your exercise until your heart rate...
English Manual
Page 27
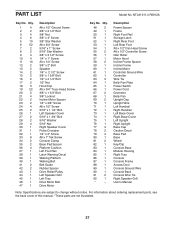
... Rail Storage Latch Right Rear Foot Left Rear Foot #8 x 1/2" Pan Head Screw #8 x 1/2" Controller Screw Idler Roller Motor Hood Incline Frame Spacer Incline Frame Incline Motor Controller Ground Wire Controller Wire Tie Belly Pan Plate Power Switch Power Cord Grommet Belly Pan Upright Cap Upright Wire Left Handrail Right Handrail Left Base Cover Right Base Cover Left Upright Right Upright Base Cap Caution Decal Base Pad Base Wheel Key/Clip Console Base Module Housing Right Tray Console Console Frame Access Door Console Ground Wire Console Back Console Wire Tie...
... Rail Storage Latch Right Rear Foot Left Rear Foot #8 x 1/2" Pan Head Screw #8 x 1/2" Controller Screw Idler Roller Motor Hood Incline Frame Spacer Incline Frame Incline Motor Controller Ground Wire Controller Wire Tie Belly Pan Plate Power Switch Power Cord Grommet Belly Pan Upright Cap Upright Wire Left Handrail Right Handrail Left Base Cover Right Base Cover Left Upright Right Upright Base Cap Caution Decal Base Pad Base Wheel Key/Clip Console Base Module Housing Right Tray Console Console Frame Access Door Console Ground Wire Console Back Console Wire Tie...

English Manual
Page 32
... us : •• the model number and serial number of the product (see the front cover of this manual) •• the name of the product (see the front cover of this manual) •• the key number and description of the replacement part(s) (see the front cover of this product to be free from defects in workmanship and material, under normal use and service conditions.
... us : •• the model number and serial number of the product (see the front cover of this manual) •• the name of the product (see the front cover of this manual) •• the key number and description of the replacement part(s) (see the front cover of this product to be free from defects in workmanship and material, under normal use and service conditions.


