
English Manual
Page 1
... CAUTION Read all precautions and instructions in this manual before using this manual for future reference. Model No. CUSTOMER HOT LINE: 1-888-825-2588 Mon.ÐFri., 6 a.m.Ð6 p.m. TO AVOID UNNECESSARY DELAYS, PLEASE CALL DIRECT TO OUR TOLL-FREE CUSTOMER HOT LINE. USERÕS MANUAL Visit our website at www.nordictrack.com new products, prizes, fitness tips, and much more! Keep...
... CAUTION Read all precautions and instructions in this manual before using this manual for future reference. Model No. CUSTOMER HOT LINE: 1-888-825-2588 Mon.ÐFri., 6 a.m.Ð6 p.m. TO AVOID UNNECESSARY DELAYS, PLEASE CALL DIRECT TO OUR TOLL-FREE CUSTOMER HOT LINE. USERÕS MANUAL Visit our website at www.nordictrack.com new products, prizes, fitness tips, and much more! Keep...

English Manual
Page 2
TABLE OF CONTENTS IMPORTANT PRECAUTIONS 3 BEFORE YOU BEGIN 4 ASSEMBLY 5 HOW TO USE THE ELLIPTICAL CROSSTRAINER 9 MAINTENANCE 19 CONDITIONING GUIDELINES 20 PART LIST 22 EXPLODED DRAWING 23 HOW TO ORDER REPLACEMENT PARTS Back Cover LIMITED WARRANTY Back Cover NordicTrack¨ is a registered trademark of ICON Health & Fitness, Inc. 2
TABLE OF CONTENTS IMPORTANT PRECAUTIONS 3 BEFORE YOU BEGIN 4 ASSEMBLY 5 HOW TO USE THE ELLIPTICAL CROSSTRAINER 9 MAINTENANCE 19 CONDITIONING GUIDELINES 20 PART LIST 22 EXPLODED DRAWING 23 HOW TO ORDER REPLACEMENT PARTS Back Cover LIMITED WARRANTY Back Cover NordicTrack¨ is a registered trademark of ICON Health & Fitness, Inc. 2

English Manual
Page 3
... institutional setting. 5. Apply the decal in this manual before using . ICON assumes no responsibility for foot protection. 9. Inspect and tighten all times. 6. If you stop exercising, allow the pedals to slowly come to protect the floor or carpet. Wear appropriate exercise clothing when using the elliptical crosstrainer. 8. The pulse sensor is intended only as an exercise aid in determining heart rate trends in -home use only. The elliptical crosstrainer is especially...
... institutional setting. 5. Apply the decal in this manual before using . ICON assumes no responsibility for foot protection. 9. Inspect and tighten all times. 6. If you stop exercising, allow the pedals to slowly come to protect the floor or carpet. Wear appropriate exercise clothing when using the elliptical crosstrainer. 8. The pulse sensor is intended only as an exercise aid in determining heart rate trends in -home use only. The elliptical crosstrainer is especially...
English Manual
Page 4
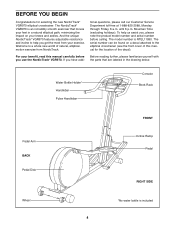
... smooth exerciser that are labeled in a natural elliptical path, minimizing the impact on a decal attached to the elliptical crosstrainer (see the front cover of this manual carefully before calling. Welcome to help us assist you, please note the product model number and serial number before you use the NordicTrack¨ VGR970. until 6 p.m. The model number is included 4 And the unique NordicTrack¨ VGR970 features adjustable resistance and incline to...
... smooth exerciser that are labeled in a natural elliptical path, minimizing the impact on a decal attached to the elliptical crosstrainer (see the front cover of this manual carefully before calling. Welcome to help us assist you, please note the product model number and serial number before you use the NordicTrack¨ VGR970. until 6 p.m. The model number is included 4 And the unique NordicTrack¨ VGR970 features adjustable resistance and incline to...

English Manual
Page 5
...;1 Incline Axle Screw (30)Ð4 M10 x 24mm Screw (90)Ð1 Console Screw (35)Ð4 Pedal Screw (43)Ð6 Rear Stabilizer Bolt (60)Ð2 Front Stabilizer Bolt (86)Ð2 56mm Spacer (22)Ð2 3/4Ó Axle Cap (61)Ð2 Plastic Pedal Spacer (85)Ð2 M10 Nylon Locknut (26)Ð4 5 The second number refers to the key number of the elliptical crosstrainer in assembly. Place all parts of the part, from the PART LIST...
...;1 Incline Axle Screw (30)Ð4 M10 x 24mm Screw (90)Ð1 Console Screw (35)Ð4 Pedal Screw (43)Ð6 Rear Stabilizer Bolt (60)Ð2 Front Stabilizer Bolt (86)Ð2 56mm Spacer (22)Ð2 3/4Ó Axle Cap (61)Ð2 Plastic Pedal Spacer (85)Ð2 M10 Nylon Locknut (26)Ð4 5 The second number refers to the key number of the elliptical crosstrainer in assembly. Place all parts of the part, from the PART LIST...

English Manual
Page 6
... the Incline Axle. Tighten the Incline Axle Screw into the open end of the other side of the Incline Axle (29). 6 1 26 3 V-shaped Groove 5 58 33 Grease 29 33 58 30 Tubes 30 4 1 Tubes 58 33 22 30 29 33 58 30 Motor Screw 5 Grease Make sure that the Incline Ramp is turned so ... (58) and an M8 Washer (33) onto another Incline Axle Screw (30). 1. Tighten the Incline Axle Screw into one end of the Incline Axle (29). 4. Next, apply a small amount of grease to the front of the Frame (1) with the two Rear Stabilizer Bolts (60) and two M10 Nylon Locknuts (26). Make ...
... the Incline Axle. Tighten the Incline Axle Screw into the open end of the other side of the Incline Axle (29). 6 1 26 3 V-shaped Groove 5 58 33 Grease 29 33 58 30 Tubes 30 4 1 Tubes 58 33 22 30 29 33 58 30 Motor Screw 5 Grease Make sure that the Incline Ramp is turned so ... (58) and an M8 Washer (33) onto another Incline Axle Screw (30). 1. Tighten the Incline Axle Screw into one end of the Incline Axle (29). 4. Next, apply a small amount of grease to the front of the Frame (1) with the two Rear Stabilizer Bolts (60) and two M10 Nylon Locknuts (26). Make ...
English Manual
Page 8
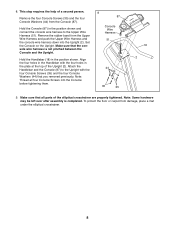
... a mat under the elliptical crosstrainer. 8 Make sure that all four Console Screws into the Upright (2). Note: Some hardware may be left over after assembly is not pinched between the Console and the Upright. Remove the rubber band from the Upper Wire Harness and push the Upper Wire Harness and the console wire harness down into the Console before tightening them. 8 87 Console Wire Harness 51 44 35...
... a mat under the elliptical crosstrainer. 8 Make sure that all four Console Screws into the Upright (2). Note: Some hardware may be left over after assembly is not pinched between the Console and the Upright. Remove the rubber band from the Upper Wire Harness and push the Upper Wire Harness and the console wire harness down into the Console before tightening them. 8 87 Console Wire Harness 51 44 35...

English Manual
Page 9
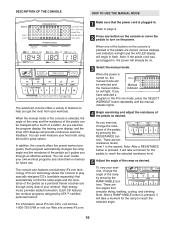
... USE THE ELLIPTICAL CROSSTRAINER HOW TO PLUG IN THE POWER CORD Locate the power cord on the elliptical crosstrainer. Plug the power cord into an electrical outlet. After the resistance system calibrates itself, the incline system may turn in the lowest position. Handlebar Pedals Pedal Disk Note: The pedal disks can turn the pedal disks in the direction shown by the arrow above; Note: The elliptical crosstrainer does not have a freewheel; Calibration will automatically calibrate itself . EXERCISING ON THE ELLIPTICAL CROSSTRAINER...
... USE THE ELLIPTICAL CROSSTRAINER HOW TO PLUG IN THE POWER CORD Locate the power cord on the elliptical crosstrainer. Plug the power cord into an electrical outlet. After the resistance system calibrates itself, the incline system may turn in the lowest position. Handlebar Pedals Pedal Disk Note: The pedal disks can turn the pedal disks in the direction shown by the arrow above; Note: The elliptical crosstrainer does not have a freewheel; Calibration will automatically calibrate itself . EXERCISING ON THE ELLIPTICAL CROSSTRAINER...
English Manual
Page 10
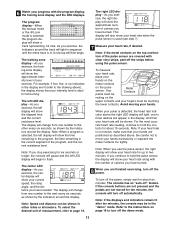
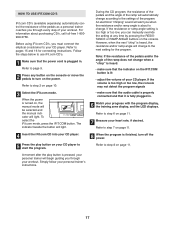
..., walking, cycling, and climbing. Refer to page 9. 2 Press any button on the console or move the pedals to help you exercise, change the angle of your exercise, change the resistance of the buttons on the power. As you get the most from your heart rate using the built-in . As you have selected a program or the iFit.com mode, press the SELECT WORKOUT button repeatedly until the manual indicator lights. 4 Begin exercising and adjust the resistance...
..., walking, cycling, and climbing. Refer to page 9. 2 Press any button on the console or move the pedals to help you exercise, change the angle of your exercise, change the resistance of the buttons on the power. As you get the most from your heart rate using the built-in . As you have selected a program or the iFit.com mode, press the SELECT WORKOUT button repeatedly until the manual indicator lights. 4 Begin exercising and adjust the resistance...
English Manual
Page 11
... displayÑAs you exercise, the training zone display will change from one number to hold the contacts for about 15 seconds. The display will show the elapsed time and the current resistance level. This display will show your heart rate when the pulse sensor is selected, the program display will also show a track representing 1/4 mile. The program displayÑWhen the manual mode or the iFit.com mode is used (see step 7). 7 Measure your heart rate...
... displayÑAs you exercise, the training zone display will change from one number to hold the contacts for about 15 seconds. The display will show the elapsed time and the current resistance level. This display will show your heart rate when the pulse sensor is selected, the program display will also show a track representing 1/4 mile. The program displayÑWhen the manual mode or the iFit.com mode is used (see step 7). 7 Measure your heart rate...

English Manual
Page 12
... of the program begins, the resistance of the pedals and the angle of the program display. Each program is plugged in the first seg- The resistance setting for the first segment will begin exercising. Refer to turn off the power. tor will also change during the programs; To restart the program, simply resume exercising. 5 Watch your heart rate, if desired. One resistance setting and one ramp angle setting are programmed for six...
... of the program begins, the resistance of the pedals and the angle of the program display. Each program is plugged in the first seg- The resistance setting for the first segment will begin exercising. Refer to turn off the power. tor will also change during the programs; To restart the program, simply resume exercising. 5 Watch your heart rate, if desired. One resistance setting and one ramp angle setting are programmed for six...
English Manual
Page 13
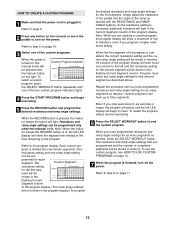
... you programmed and the number of the program display. All columns in the program display will then move the pedals to step 8 on the power. When the RECORD button is finished, turn on page 11. 13 The Current Segment resistance setting for each segment. Program resistance and ramp angle settings for the second segment will light. Refer to turn off the power. Refer to page 9. 2 Press any button on the console or move...
... you programmed and the number of the program display. All columns in the program display will then move the pedals to step 8 on the power. When the RECORD button is finished, turn on page 11. 13 The Current Segment resistance setting for each segment. Program resistance and ramp angle settings for the second segment will light. Refer to turn off the power. Refer to page 9. 2 Press any button on the console or move...
English Manual
Page 14
... and the manual indica- To select a custom program, press the SELECT WORKOUT button repeatedly until the resistance setting for the last segment is selected, the program display will automatically adjust to the right. (The ramp angle settings are programmed for the current segment, press the RECORD button. When the program is plugged in memory. HOW TO USE CUSTOM PROGRAMS 1 Make sure that the power cord is started, the resistance of the pedals and...
... and the manual indica- To select a custom program, press the SELECT WORKOUT button repeatedly until the resistance setting for the last segment is selected, the program display will automatically adjust to the right. (The ramp angle settings are programmed for the current segment, press the RECORD button. When the program is plugged in memory. HOW TO USE CUSTOM PROGRAMS 1 Make sure that the power cord is started, the resistance of the pedals and...

English Manual
Page 15
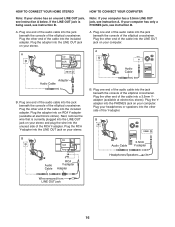
... instruction A below . A. Plug your CD player. C PHONES Audio 3.5mm Cable Y-adapter Headphones Headphones 15 Plug one end of the elliptical crosstrainer. B PHONES PHONES Audio Cable 3.5mm Y-adapter HOW TO CONNECT YOUR PORTABLE STEREO Note: If your portable CD player, portable stereo, home stereo, or computer with CD player. A/B AUDIO OUT RIGHT LEFT Adapter Audio Cable B. HOW TO CONNECT YOUR CD PLAYER TO THE ELLIPTICAL CROSSTRAINER To use the adapter. HOW TO CONNECT YOUR...
... instruction A below . A. Plug your CD player. C PHONES Audio 3.5mm Cable Y-adapter Headphones Headphones 15 Plug one end of the elliptical crosstrainer. B PHONES PHONES Audio Cable 3.5mm Y-adapter HOW TO CONNECT YOUR PORTABLE STEREO Note: If your portable CD player, portable stereo, home stereo, or computer with CD player. A/B AUDIO OUT RIGHT LEFT Adapter Audio Cable B. HOW TO CONNECT YOUR CD PLAYER TO THE ELLIPTICAL CROSSTRAINER To use the adapter. HOW TO CONNECT YOUR...
English Manual
Page 16
... Audio Cable Adapter Audio Cable B. Plug one end of the audio cable into the jack beneath the console of the elliptical crosstrainer. Plug the Yadapter into the PHONES jack on your computer. A CD VCR Amp LINE OUT LINE OUT A. Plug the other side of the Y-adapter. B PHONES Audio Cable 3.5mm Y-adapter Headphones/Speakers Wire removed from LINE OUT jack 16 If your computer has a 3.5mm LINE OUT jack, see instruction B. Plug...
... Audio Cable Adapter Audio Cable B. Plug one end of the audio cable into the jack beneath the console of the elliptical crosstrainer. Plug the Yadapter into the PHONES jack on your computer. A CD VCR Amp LINE OUT LINE OUT A. Plug the other side of the Y-adapter. B PHONES Audio Cable 3.5mm Y-adapter Headphones/Speakers Wire removed from LINE OUT jack 16 If your computer has a 3.5mm LINE OUT jack, see instruction B. Plug...
English Manual
Page 17
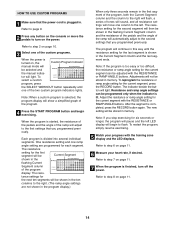
... audio cable is properly connected and that the power cord is too high or too low, you can manually override the setting at any button on the console or move the pedals to step 7 on the power. Refer to page 9. 2 Press any time by pressing the RESISTANCE or RAMP ANGLE buttons on , the manual mode will be selected and the manual indicator will change according to step 6 on page 10. 3 Select the iFit...
... audio cable is properly connected and that the power cord is too high or too low, you can manually override the setting at any button on the console or move the pedals to step 7 on the power. Refer to page 9. 2 Press any time by pressing the RESISTANCE or RAMP ANGLE buttons on , the manual mode will be selected and the manual indicator will change according to step 6 on page 10. 3 Select the iFit...
English Manual
Page 18
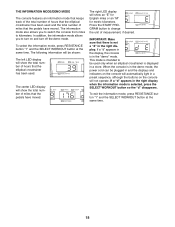
... display. The information mode also allows you to kilometers. If a ÒdÓ appears in the right display when the information mode is in the demo mode, the power cord can be plugged in and the displays and indicators on the console will show the total number of miles that the pedals have moved. To select the information mode, press RESISTANCE button Ò1Ó and the SELECT WORKOUT button at the same time. 18 Press the START PROGRAM button...
... display. The information mode also allows you to kilometers. If a ÒdÓ appears in the right display when the information mode is in the demo mode, the power cord can be plugged in and the displays and indicators on the console will show the total number of miles that the pedals have moved. To select the information mode, press RESISTANCE button Ò1Ó and the SELECT WORKOUT button at the same time. 18 Press the START PROGRAM button...
English Manual
Page 20
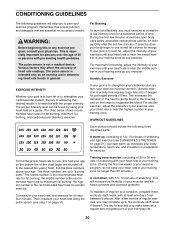
... week, with pre-existing health problems. The pulse sensor is near the lowest number in your training zone. (During the first few minutes of exercise does your exercise program. Fat Burning To burn fat effectively, you exercise. To measure your condition, complete three workouts each week if desired. WARNING: Before beginning this or any exercise program, consult your body temperature, heart rate, and circulation in preparation...
... week, with pre-existing health problems. The pulse sensor is near the lowest number in your training zone. (During the first few minutes of exercise does your exercise program. Fat Burning To burn fat effectively, you exercise. To measure your condition, complete three workouts each week if desired. WARNING: Before beginning this or any exercise program, consult your body temperature, heart rate, and circulation in preparation...

English Manual
Page 22
NTEL11990 R0100A Key No. Description 1 1 Frame 2 1 Upright 3 1 Left Pedal Arm 4 1 Right Pedal Arm 5 1 Incline Ramp 6 2 Crank Arm 7 1 Power Cord 8 1 Large Pulley 9 2 Frame Bearing 10 1 Plastic Crank Spacer 11 1 Flat Delrin Washer 12 1 Idler Bracket 13 4 Nut 14 1 Front Stabilizer 15 2 Upright Endcap 16 1 Idler Arm Screw 17 2 M10 Flat Washer 18 1 Handlebar 19 1 Arm Axle 20 2 Handlebar Endcap 21 1 Incline Motor 22 2 56mm Spacer 23 1 Incline Reed Switch 24 1 Side Shield Support 25 1 Wire Harness...
NTEL11990 R0100A Key No. Description 1 1 Frame 2 1 Upright 3 1 Left Pedal Arm 4 1 Right Pedal Arm 5 1 Incline Ramp 6 2 Crank Arm 7 1 Power Cord 8 1 Large Pulley 9 2 Frame Bearing 10 1 Plastic Crank Spacer 11 1 Flat Delrin Washer 12 1 Idler Bracket 13 4 Nut 14 1 Front Stabilizer 15 2 Upright Endcap 16 1 Idler Arm Screw 17 2 M10 Flat Washer 18 1 Handlebar 19 1 Arm Axle 20 2 Handlebar Endcap 21 1 Incline Motor 22 2 56mm Spacer 23 1 Incline Reed Switch 24 1 Side Shield Support 25 1 Wire Harness...
English Manual
Page 24
... merchantability or fitness for service. Include a letter explaining the product or problem and a copy of your part to give the following information when calling: ¥ The MODEL NUMBER of the product (NTEL11990) ¥ The NAME of the product (NordicTrack¨ VGR970 elliptical crosstrainer) ¥ The SERIAL NUMBER of the product (see the front cover of this manual) ¥ The KEY NUMBER and DESCRIPTION of the part(s) (see...
... merchantability or fitness for service. Include a letter explaining the product or problem and a copy of your part to give the following information when calling: ¥ The MODEL NUMBER of the product (NTEL11990) ¥ The NAME of the product (NordicTrack¨ VGR970 elliptical crosstrainer) ¥ The SERIAL NUMBER of the product (see the front cover of this manual) ¥ The KEY NUMBER and DESCRIPTION of the part(s) (see...


