

PrintSuperVision Configuration Guide
Page 4
...(Optional Link 55 Supplies Ordering Calendar 56 Reporting 57 Available Reports 57 Selecting Report Attributes 57 Toner Changes Report 58 Generating a Toner Changes Report 58 Scheduling a Toner Changes Report 59 Schedule Log Report 60 Supplies Usage Report 61 Printed Pages Report 62 Color/...69 Quickly Access a Group of Devices 69 Changing the Device Properties Displayed 70 Searching for a Device 72 Changing Languages 72 Downloading Oki Drivers 73 Print to Remote Locations 74 Creating a Maintenance Log / Managing Supplies Inventory 75 Viewing a Login Log 76 Clearing (Deleting...
...(Optional Link 55 Supplies Ordering Calendar 56 Reporting 57 Available Reports 57 Selecting Report Attributes 57 Toner Changes Report 58 Generating a Toner Changes Report 58 Scheduling a Toner Changes Report 59 Schedule Log Report 60 Supplies Usage Report 61 Printed Pages Report 62 Color/...69 Quickly Access a Group of Devices 69 Changing the Device Properties Displayed 70 Searching for a Device 72 Changing Languages 72 Downloading Oki Drivers 73 Print to Remote Locations 74 Creating a Maintenance Log / Managing Supplies Inventory 75 Viewing a Login Log 76 Clearing (Deleting...

PrintSuperVision Configuration Guide
Page 57
... depend on the PSV edition installed and user access rights. Select Reports from the drop down menu. 57 • Reporting Available Reports • Toner Changes Report (see page 58) • Schedule Log Report (see page 60) • Supplied Usage Report (see page 61) • ...the main menu. 2. Reports can be scheduled to add or delete the device attributes and properties that identify supplies use, predict toner replacement dates, indicate pages printed and export device properties. Reporting PSV can generate several reports that are available for reporting. To select reporting...
... depend on the PSV edition installed and user access rights. Select Reports from the drop down menu. 57 • Reporting Available Reports • Toner Changes Report (see page 58) • Schedule Log Report (see page 60) • Supplied Usage Report (see page 61) • ...the main menu. 2. Reports can be scheduled to add or delete the device attributes and properties that identify supplies use, predict toner replacement dates, indicate pages printed and export device properties. Reporting PSV can generate several reports that are available for reporting. To select reporting...
PrintSuperVision Configuration Guide
Page 58
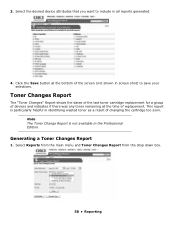
... Reports from the main menu and Toner Changes Report from the drop down box. 58 • Reporting This report is not available in all reports generated. 4. Toner Changes Report The "Toner Changes" Report shows the dates of the last toner cartridge replacement for a group of devices... and indicates if there was any toner remaining at the bottom of changing the cartridge too soon. 3. ...
... Reports from the main menu and Toner Changes Report from the drop down box. 58 • Reporting This report is not available in all reports generated. 4. Toner Changes Report The "Toner Changes" Report shows the dates of the last toner cartridge replacement for a group of devices... and indicates if there was any toner remaining at the bottom of changing the cartridge too soon. 3. ...

PrintSuperVision Configuration Guide
Page 59
...on. Click the Schedule button. 59 • Reporting Select a group of dates or click on a particular date. Scheduling a Toner Changes Report A Toner Changes report can help you pinpoint toner remaining at on the calendar icons to an individual or group. 1. 2. This presents a sub-report that can be scheduled ...to run periodically and configured to be sent via email to select dates. Additional details for toner replacement are available by various table sizes to display results; Enter a range of devices to generate the report.
...on. Click the Schedule button. 59 • Reporting Select a group of dates or click on a particular date. Scheduling a Toner Changes Report A Toner Changes report can help you pinpoint toner remaining at on the calendar icons to an individual or group. 1. 2. This presents a sub-report that can be scheduled ...to run periodically and configured to be sent via email to select dates. Additional details for toner replacement are available by various table sizes to display results; Enter a range of devices to generate the report.

PrintSuperVision Configuration Guide
Page 60
Select a starting date and time, select a recurring interval for the report to be generated and sent to the recipient on the dates and times indicated. Click Schedule Logs. 2. Enter a date range and select the desired activity. 60 • Reporting Schedule Log Report The Schedule Log Report provides an activity status log. 1. The toner changes report will be generated and sent, indicate email recipients and click Save. 2.
Select a starting date and time, select a recurring interval for the report to be generated and sent to the recipient on the dates and times indicated. Click Schedule Logs. 2. Enter a date range and select the desired activity. 60 • Reporting Schedule Log Report The Schedule Log Report provides an activity status log. 1. The toner changes report will be generated and sent, indicate email recipients and click Save. 2.

PrintSuperVision Configuration Guide
Page 61
.... 4. Click the Show button to activate those features. 2. Select Reports from the dropdown menu. 3. Supplies Usage Report The Supplies Usage report displays current levels of toner as well as drum, transfer belt and fuser usage. • The report can be created for a group of devices or a single device. • Report data...
.... 4. Click the Show button to activate those features. 2. Select Reports from the dropdown menu. 3. Supplies Usage Report The Supplies Usage report displays current levels of toner as well as drum, transfer belt and fuser usage. • The report can be created for a group of devices or a single device. • Report data...

PrintSuperVision Configuration Guide
Page 69
.... Viewing device status To view a list of devices that the device status is being refreshed. The information icon indicates an event has occurred, such as toner or drum replacement, cassette drawer is open or the device is selected from the main menu and click either Printers, My printers, or Near Me...
.... Viewing device status To view a list of devices that the device status is being refreshed. The information icon indicates an event has occurred, such as toner or drum replacement, cassette drawer is open or the device is selected from the main menu and click either Printers, My printers, or Near Me...

B6250 Setup Guide (E, Fr, Sp, BPort)
Page 3
... and box for future use if there is a possibility that the printer will be moved over long distances. • Printer • Drum-toner cartridge (for approximately 6,000 Letter pages at 5% coverage, i.e. 5% of the addressable print area is available in selecting the appropriate document or application... process of the printer. B6250 Series Setup Guide English - 3 Handling the printer • The printer is contained in the printer packaging. Oki has provided an interface, under MS Windows, to lift the printer alone. • To lift the printer, have two individuals facing each ...
... and box for future use if there is a possibility that the printer will be moved over long distances. • Printer • Drum-toner cartridge (for approximately 6,000 Letter pages at 5% coverage, i.e. 5% of the addressable print area is available in selecting the appropriate document or application... process of the printer. B6250 Series Setup Guide English - 3 Handling the printer • The printer is contained in the printer packaging. Oki has provided an interface, under MS Windows, to lift the printer alone. • To lift the printer, have two individuals facing each ...

B6250 Setup Guide (E, Fr, Sp, BPort)
Page 5
... can result in contact with it. • It is recommended to finish the installation within one year of air-conditioning or heating. Replacement drum-toner cartridges are in fire or electric shock. • Temperature range 10 - 32 °C (50 - 89 °F), humidity range 15 - 85...lever as this may damage the drum. • A drum shutter protects the photosensitive drum from its packaging. • Keep the drum-toner cartridge out of the reach of the following points: WARNING! Prolonged exposure to high humidity/ temperature can cause condensation inside the printer, ...
... can result in contact with it. • It is recommended to finish the installation within one year of air-conditioning or heating. Replacement drum-toner cartridges are in fire or electric shock. • Temperature range 10 - 32 °C (50 - 89 °F), humidity range 15 - 85...lever as this may damage the drum. • A drum shutter protects the photosensitive drum from its packaging. • Keep the drum-toner cartridge out of the reach of the following points: WARNING! Prolonged exposure to high humidity/ temperature can cause condensation inside the printer, ...

B6250 Setup Guide (E, Fr, Sp, BPort)
Page 6
...2. NOTE If the offset catch tray is pulled out diagonally. Do not touch any parts inside the printer. Ensure that the drum-toner cartridge is installed, fold the tray first before opening the cover. Close the cover securely. B6250 Series Setup Guide English - 6 Hold the ... or eight times as in the diagram. 3. After the seal has been pulled out, do not shake or bump the drum-toner cartridge. 1. Place the drum-toner cartridge on a flat surface and pull out the seal horizontally. CAUTION! CAUTION! Cables Connecting an interface cable Connect the interface cable...
...2. NOTE If the offset catch tray is pulled out diagonally. Do not touch any parts inside the printer. Ensure that the drum-toner cartridge is installed, fold the tray first before opening the cover. Close the cover securely. B6250 Series Setup Guide English - 6 Hold the ... or eight times as in the diagram. 3. After the seal has been pulled out, do not shake or bump the drum-toner cartridge. 1. Place the drum-toner cartridge on a flat surface and pull out the seal horizontally. CAUTION! CAUTION! Cables Connecting an interface cable Connect the interface cable...

B6250 Users Guide
Page 8
... 98 When the Print Quality is Poor 104 Message List 108 Network Related Troubles 112 Mail Related Troubles 117 Daily Care 118 Replacing the Drum/Toner Cartridge 118 Printing Reports/Lists 121 Checking/Managing the Printer Status on the Computer 123 Checking Printer Status via E-mail 126 Checking Printed Pages 129...
... 98 When the Print Quality is Poor 104 Message List 108 Network Related Troubles 112 Mail Related Troubles 117 Daily Care 118 Replacing the Drum/Toner Cartridge 118 Printing Reports/Lists 121 Checking/Managing the Printer Status on the Computer 123 Checking Printer Status via E-mail 126 Checking Printed Pages 129...

B6250 Users Guide
Page 11
... disk and additional memory. Open this when removing jammed paper. Contains the toner and the photosensitive drum. Fixes the toner on paper larger than A4 size. Open this when replacing the drum/toner cartridge and removing jammed paper. Name 1 Paper stopper 2 Drum/toner cartridge 3 Cover A 4 Fuser unit 5 Transfer roll cartridge 6 Cover B Description Raise this...
... disk and additional memory. Open this when removing jammed paper. Contains the toner and the photosensitive drum. Fixes the toner on paper larger than A4 size. Open this when replacing the drum/toner cartridge and removing jammed paper. Name 1 Paper stopper 2 Drum/toner cartridge 3 Cover A 4 Fuser unit 5 Transfer roll cartridge 6 Cover B Description Raise this...

B6250 Users Guide
Page 44
... settings must match those of paper loaded in trays 1 to the following table and set the paper types on page 36 B6250 User's Guide> 44 Toner may not fuse properly on the paper, resulting in dirty and poor quality printouts. • Changes in paper type settings on the control panel are...
... settings must match those of paper loaded in trays 1 to the following table and set the paper types on page 36 B6250 User's Guide> 44 Toner may not fuse properly on the paper, resulting in dirty and poor quality printouts. • Changes in paper type settings on the control panel are...

B6250 Users Guide
Page 56
Press to increase of decrease the setting. Press < > or < > buttons to save this setting. Press to scroll through the available trays. Toner Save OFF Mode This submenu allows you to select the tray. B6250 User's Guide> 56 Press < > or < > buttons to save this setting. Off Tray 1 Tray 2 ...
Press to increase of decrease the setting. Press < > or < > buttons to save this setting. Press to scroll through the available trays. Toner Save OFF Mode This submenu allows you to select the tray. B6250 User's Guide> 56 Press < > or < > buttons to save this setting. Off Tray 1 Tray 2 ...

B6250 Users Guide
Page 64
... < > or < > buttons to increase or decrease the digit in the waiting state-a job is no more data to process. 00020 Toner Low This submenu sets the printer to save this setting. B6250 User's Guide> 64 English Available Settings 0 - 99999 Procedure for the display...or < > buttons to save this setting. Press to scroll through the options. Press to either stop or continue printing when it goes into a low toner condition. Continue Jam Recovery On Language This submenu sets the default language for Changing Setting Press < > or < > buttons to toggle between On and...
... < > or < > buttons to increase or decrease the digit in the waiting state-a job is no more data to process. 00020 Toner Low This submenu sets the printer to save this setting. B6250 User's Guide> 64 English Available Settings 0 - 99999 Procedure for the display...or < > buttons to save this setting. Press to scroll through the options. Press to either stop or continue printing when it goes into a low toner condition. Continue Jam Recovery On Language This submenu sets the default language for Changing Setting Press < > or < > buttons to toggle between On and...

B6250 Users Guide
Page 84
Use the following table to display the Usage Menu settings: Submenus Example Page Count Toner 123456 97% Tray1 Level OK Tray2 Level OK Tray3 Level OK Tray4 Level OK Available Settings OK Low Empty OK Low Empty OK Low Empty ... < > button to the printer status. Usage Menu The Usage Menu provides access to enter the submenu. Press the MENU button on the first line of toner remaining. B6250 User's Guide> 84
Use the following table to display the Usage Menu settings: Submenus Example Page Count Toner 123456 97% Tray1 Level OK Tray2 Level OK Tray3 Level OK Tray4 Level OK Available Settings OK Low Empty OK Low Empty OK Low Empty ... < > button to the printer status. Usage Menu The Usage Menu provides access to enter the submenu. Press the MENU button on the first line of toner remaining. B6250 User's Guide> 84

B6250 Users Guide
Page 94
... that is difficult or impossible to see, do not try to remove it by yourself. Inside Cover A Follow the procedure below to remove the drum/toner cartridge is torn, check for any jammed paper when the control panel displays the following messages: "Paper Jam Open Cover A" or "Remove cartridge Clear .... Doing so can cause fire. Switch off the machine immediately, and contact your dealer or service. Open Cover A when a message to remove the drum/toner cartridge is installed, fold the tray first before opening cover A. Cover A When the optional offset catch tray is displayed.
... that is difficult or impossible to see, do not try to remove it by yourself. Inside Cover A Follow the procedure below to remove the drum/toner cartridge is torn, check for any jammed paper when the control panel displays the following messages: "Paper Jam Open Cover A" or "Remove cartridge Clear .... Doing so can cause fire. Switch off the machine immediately, and contact your dealer or service. Open Cover A when a message to remove the drum/toner cartridge is installed, fold the tray first before opening cover A. Cover A When the optional offset catch tray is displayed.

B6250 Users Guide
Page 95
Return the drum/toner cartridge and cover A to remove paper. Always use the printer with the offset catch tray folded, this may cause a paper jam. Clear jam and close ...cover A first before returning the tray to its original position. > If you continue to remove any jammed paper inside (2). 3. Open cover A, and holding the drum/toner cartridge by the grip, remove it from the printer (1). 2. NOTE > When the optional offset catch tray is installed, close Covers. Pull out all trays. B6250...
Return the drum/toner cartridge and cover A to remove paper. Always use the printer with the offset catch tray folded, this may cause a paper jam. Clear jam and close ...cover A first before returning the tray to its original position. > If you continue to remove any jammed paper inside (2). 3. Open cover A, and holding the drum/toner cartridge by the grip, remove it from the printer (1). 2. NOTE > When the optional offset catch tray is installed, close Covers. Pull out all trays. B6250...

B6250 Users Guide
Page 104
... paper from the following table to rectify the problem. Replace with a new drum/toner cartridge. Uncheck the [Toner Saving] checkbox on . The drum/toner cartridge is damp. " Replacing the Drum/Toner Cartridge" (P. 118) The Toner Saving feature is on the [Graphics] tab of the printer driver. The paper ... service. Online Help for the printer driver Levers on both ends of the fuser unit are printed. Replace with a new drum/ toner cartridge. Black spots or streaks are raised. When the Print Quality is Poor When the print quality is poor, select the closest symptom...
... paper from the following table to rectify the problem. Replace with a new drum/toner cartridge. Uncheck the [Toner Saving] checkbox on . The drum/toner cartridge is damp. " Replacing the Drum/Toner Cartridge" (P. 118) The Toner Saving feature is on the [Graphics] tab of the printer driver. The paper ... service. Online Help for the printer driver Levers on both ends of the fuser unit are printed. Replace with a new drum/ toner cartridge. Black spots or streaks are raised. When the Print Quality is Poor When the print quality is poor, select the closest symptom...

B6250 Users Guide
Page 105
...Types" (P. 44) The paper is defective or damaged. " Replacing the Drum/Toner Cartridge" (P. 118) This may be due to remove the stains. The drum/toner cartridge is damp. " Usable Paper" (P. 36) The drum/toner cartridge is not suitable. " Loading Paper" (P. 40) The paper used is...to breakdown of the paper is smeared with a new drum/toner cartridge. Replace with a new drum/toner cartridge. Paper is stained. Reason/Action The feed route of high voltage power. Replace with toner. " Replacing the Drum/Toner Cartridge" (P. 118) The paper loaded in black filled ...
...Types" (P. 44) The paper is defective or damaged. " Replacing the Drum/Toner Cartridge" (P. 118) This may be due to remove the stains. The drum/toner cartridge is damp. " Usable Paper" (P. 36) The drum/toner cartridge is not suitable. " Loading Paper" (P. 40) The paper used is...to breakdown of the paper is smeared with a new drum/toner cartridge. Replace with a new drum/toner cartridge. Paper is stained. Reason/Action The feed route of high voltage power. Replace with toner. " Replacing the Drum/Toner Cartridge" (P. 118) The paper loaded in black filled ...


