
ML8810/8810n Setup Guide
Page 7
... Sheets • Size - The self test is complete. 8810 MODE + LF.jpg Step 4: Load Paper Individual Sheets/Forms ("MANUAL") The printer is ejected back out onto the platform. Minimum Width: 3.9" (100 mm) - This prints out a list of the display. 3. The test prints and the page is set at the factory for • single sheets/forms (Manual Feed) • Auto Align mode • automatic printhead gap (Auto Gap) Paper Specifications, for Use with Auto Align Mode Minimum Print Margins 1/4-inch (6.4 mm) on the second line of available fonts. 1. Up to insert paper...
... Sheets • Size - The self test is complete. 8810 MODE + LF.jpg Step 4: Load Paper Individual Sheets/Forms ("MANUAL") The printer is ejected back out onto the platform. Minimum Width: 3.9" (100 mm) - This prints out a list of the display. 3. The test prints and the page is set at the factory for • single sheets/forms (Manual Feed) • Auto Align mode • automatic printhead gap (Auto Gap) Paper Specifications, for Use with Auto Align Mode Minimum Print Margins 1/4-inch (6.4 mm) on the second line of available fonts. 1. Up to insert paper...

ML8810 Safety, Warranty, and Regulatory Information
Page 1
... setup and operating instructions. • Save all provided documentation for having your local power company. • Do not connect this printer in any adjustments other than the extension's rating. Removing the cover may be damaged. If anything happens that indicates that your printer near water. You may be walked on a firm, solid surface. Here are some of direct sunlight. • Always use an adapter...
... setup and operating instructions. • Save all provided documentation for having your local power company. • Do not connect this printer in any adjustments other than the extension's rating. Removing the cover may be damaged. If anything happens that indicates that your printer near water. You may be walked on a firm, solid surface. Here are some of direct sunlight. • Always use an adapter...

ML8810 Safety, Warranty, and Regulatory Information
Page 4
... right while you have the model number and serial number for your software user's manual for the location of the nearest Authorized Oki Data Service Dealer. • Prices and minimum charges may vary. • Proof of your machine • Error message interpretation/solutions • Parts and supplies identification • Consumer relations Note: Customer Support Representatives are calling from a telephone close to provide assistance with the use...
... right while you have the model number and serial number for your software user's manual for the location of the nearest Authorized Oki Data Service Dealer. • Prices and minimum charges may vary. • Proof of your machine • Error message interpretation/solutions • Parts and supplies identification • Consumer relations Note: Customer Support Representatives are calling from a telephone close to provide assistance with the use...

ML8810 User's Guide - English
Page 3
... (2 7 Rear View 8 Control Panel 9 Quick Reference: Control Panel Functions 15 Print Modes 16 Change Print Mode 16 Loading Print Media 17 Individual Sheets/Forms ("MANUAL 17 Continuous Forms ("FRONT 20 Switch between Single Sheets and Continuous Forms 23 The Printer Menu 25 Print the Menu 25 Navigating the Menu 26 Reset to Factory Defaults 29 Print the Menu 30 Menu Summary 33 Explanation of Menu Items 49 Auto Align 69 Disabling Auto Align 69 Set Top of Form (TOF 70 General Information 70 Use the Printer Menu 70 Use 1Chr Set Pos 71 Manual Feed (Single Sheets/Forms...
... (2 7 Rear View 8 Control Panel 9 Quick Reference: Control Panel Functions 15 Print Modes 16 Change Print Mode 16 Loading Print Media 17 Individual Sheets/Forms ("MANUAL 17 Continuous Forms ("FRONT 20 Switch between Single Sheets and Continuous Forms 23 The Printer Menu 25 Print the Menu 25 Navigating the Menu 26 Reset to Factory Defaults 29 Print the Menu 30 Menu Summary 33 Explanation of Menu Items 49 Auto Align 69 Disabling Auto Align 69 Set Top of Form (TOF 70 General Information 70 Use the Printer Menu 70 Use 1Chr Set Pos 71 Manual Feed (Single Sheets/Forms...

ML8810 User's Guide - English
Page 4
...Mode 77 Setting the Printhead Gap 78 General Information 78 Printhead Gap Settings 79 Change to a Manual Printhead Gap Setting 80 Troubleshooting 82 Paper Jams, Individual Sheets/Forms 82 Paper Jams, Continuous Forms 84 Paper Jams, Repetitive 85 Error Messages 88 Maintenance 91 Replace the Ribbon 91 Clean the Housing 96 Specifications 97 Utilities 104 Overview 104 Accessing 104 Descriptions of Utilities 105 Installing the Utilities 106 Direct Network Printing Utility (LPR 107 OKI DIPUS (Dot Impact Printer Utilities 109 Network Setup Utility 111 Microline 8810 User's Guide...
...Mode 77 Setting the Printhead Gap 78 General Information 78 Printhead Gap Settings 79 Change to a Manual Printhead Gap Setting 80 Troubleshooting 82 Paper Jams, Individual Sheets/Forms 82 Paper Jams, Continuous Forms 84 Paper Jams, Repetitive 85 Error Messages 88 Maintenance 91 Replace the Ribbon 91 Clean the Housing 96 Specifications 97 Utilities 104 Overview 104 Accessing 104 Descriptions of Utilities 105 Installing the Utilities 106 Direct Network Printing Utility (LPR 107 OKI DIPUS (Dot Impact Printer Utilities 109 Network Setup Utility 111 Microline 8810 User's Guide...

ML8810 User's Guide - English
Page 15
...: Control Panel Functions Note Unless otherwise specified, these instructions assume that the printer is selected (on line: 1. Press SEL. 2. Print the Menu 1. Press and hold SELECT and MODE while turning the printer on the platform. When prompted, load a sheet of paper (minimum letter or A4) on . 3. Press and hold the SHIFT switch, then press the LOAD switch repeatedly to engage the Normal print mode. Press FF to select Align 1, Align 2, Align 3, or Align 4 Microline 8810 User's Guide 15 Change the Printhead Gap...
...: Control Panel Functions Note Unless otherwise specified, these instructions assume that the printer is selected (on line: 1. Press SEL. 2. Print the Menu 1. Press and hold SELECT and MODE while turning the printer on the platform. When prompted, load a sheet of paper (minimum letter or A4) on . 3. Press and hold the SHIFT switch, then press the LOAD switch repeatedly to engage the Normal print mode. Press FF to select Align 1, Align 2, Align 3, or Align 4 Microline 8810 User's Guide 15 Change the Printhead Gap...

ML8810 User's Guide - English
Page 17
Loading Print Media Individual Sheets/Forms ("MANUAL") The printer is set at the factory for Use with Auto Align Mode Microline 8810 User's Guide 17 Press MODE + SHIFT simultaneously. 3. Press LOAD to deselect the printer. 2. Specifications Individual Sheets/Forms, for • single sheets/forms • Auto Align mode • Normal print mode • automatic printhead gap IMPORTANT! Press and hold SHIFT, then press FF repeatedly until you see Manual Feed on the display. 5. Press FF repeatedly until you are installed) group to Rear: 1. Press MODE to...
Loading Print Media Individual Sheets/Forms ("MANUAL") The printer is set at the factory for Use with Auto Align Mode Microline 8810 User's Guide 17 Press MODE + SHIFT simultaneously. 3. Press LOAD to deselect the printer. 2. Specifications Individual Sheets/Forms, for • single sheets/forms • Auto Align mode • Normal print mode • automatic printhead gap IMPORTANT! Press and hold SHIFT, then press FF repeatedly until you see Manual Feed on the display. 5. Press FF repeatedly until you are installed) group to Rear: 1. Press MODE to...

ML8810 User's Guide - English
Page 54
... printhead when an I -Prime signal is used/selected first. Data Word ML emulation only. Sets the character code and graphics data for paper curl when feeding in a form manually through the platform. Diagnostic Test Applies only when the optional RS-232C Serial Interface is received, change the setting to Invalid. To run the diagnostic test, enter the menu and select Yes. DSR Signal Applies only when the optional RS-232C Serial Interface is installed...
... printhead when an I -Prime signal is used/selected first. Data Word ML emulation only. Sets the character code and graphics data for paper curl when feeding in a form manually through the platform. Diagnostic Test Applies only when the optional RS-232C Serial Interface is received, change the setting to Invalid. To run the diagnostic test, enter the menu and select Yes. DSR Signal Applies only when the optional RS-232C Serial Interface is installed...
ML8810 User's Guide - English
Page 55
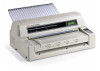
... printer emulation: IBM PPR [the default], , Epson FX, or ML (Oki Microline). ESC SI Pitch IBM emulation only. FF Function Applies to the manual feed from the platform or the optional CSF(s): Front [the default] or Rear. The Forms Tear-Off feature allows a printed continuous form page to On. Front Load Adj. Choose where the paper is installed. Settable from -40 to eject a cut sheet when it receives the FF command. Sets...
... printer emulation: IBM PPR [the default], , Epson FX, or ML (Oki Microline). ESC SI Pitch IBM emulation only. FF Function Applies to the manual feed from the platform or the optional CSF(s): Front [the default] or Rear. The Forms Tear-Off feature allows a printed continuous form page to On. Front Load Adj. Choose where the paper is installed. Settable from -40 to eject a cut sheet when it receives the FF command. Sets...
ML8810 User's Guide - English
Page 58
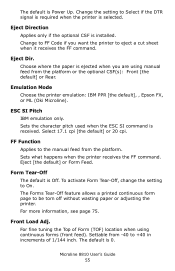
Changing to print 7 Bits [the default] or 8 Bits. Host Interface Choose the interface mode: Auto Interface [the default], Parallel, USB, or Option I -Prime signal is waiting for more. Choose the amount of the form the gap detection begins: 2 inches (51 mm) [the default] or 4 inches (102 mm). If your software spends a long time processing between portions of data it is received. When Auto Gap detection is enabled, this setting to Auto Interface [the default]. Graphics Data Sets graphics data to Uni...
Changing to print 7 Bits [the default] or 8 Bits. Host Interface Choose the interface mode: Auto Interface [the default], Parallel, USB, or Option I -Prime signal is waiting for more. Choose the amount of the form the gap detection begins: 2 inches (51 mm) [the default] or 4 inches (102 mm). If your software spends a long time processing between portions of data it is received. When Auto Gap detection is enabled, this setting to Auto Interface [the default]. Graphics Data Sets graphics data to Uni...

ML8810 User's Guide - English
Page 65
.... Size The default is being used with Microline 8810 User's Guide 65 Choose Double for 10 cpi and the SI command is No. Sets the pitch to load into the printer when using preprinted forms with Auto Align disabled. Available settings: Valid Level 1, Valid Level 2 [the default], or Invalid. Change this to Yes to be engaged when the printer control panel is set for double width and height printing. Skew Detect Detects and corrects paper skew when manual feed...
.... Size The default is being used with Microline 8810 User's Guide 65 Choose Double for 10 cpi and the SI command is No. Sets the pitch to load into the printer when using preprinted forms with Auto Align disabled. Available settings: Valid Level 1, Valid Level 2 [the default], or Invalid. Change this to Yes to be engaged when the printer control panel is set for double width and height printing. Skew Detect Detects and corrects paper skew when manual feed...

ML8810 User's Guide - English
Page 72
.... Note If you use this procedure to change the setting. SET MODE INSERT PAPER. 4. The sheet/form advances to the on-line state. Microline 8810 User's Guide 72 Set Pos setting, press the SEL switch. Press SEL to return the printer to the printer's default TOF (1/4-inch [6.4 mm]) and the display reads 1CHR. Use 1Chr Set Pos Manual Feed (Single Sheets/Forms) 8810_3_crop.jpg 1. Make sure the printer is turned off or it receives an I-Prime signal, press the LOAD switch. 6. SET POS. b. In...
.... Note If you use this procedure to change the setting. SET MODE INSERT PAPER. 4. The sheet/form advances to the on-line state. Microline 8810 User's Guide 72 Set Pos setting, press the SEL switch. Press SEL to return the printer to the printer's default TOF (1/4-inch [6.4 mm]) and the display reads 1CHR. Use 1Chr Set Pos Manual Feed (Single Sheets/Forms) 8810_3_crop.jpg 1. Make sure the printer is turned off or it receives an I-Prime signal, press the LOAD switch. 6. SET POS. b. In...

ML8810 User's Guide - English
Page 77
... a Hex Dump Test To run the test, send data to the printer while it always uses a left margin of the paper. Microline 8810 User's Guide 77 Turn the printer off , then on , until RELEASE SW displays. When the printer is running a test, it is loaded. 2. Note In the ASCII format, all data received, including text and printer commands, will be printed in the Hex Dump Mode. Simultaneously press and hold the MODE + LF + SHIFT switches while turning the printer...
... a Hex Dump Test To run the test, send data to the printer while it always uses a left margin of the paper. Microline 8810 User's Guide 77 Turn the printer off , then on , until RELEASE SW displays. When the printer is running a test, it is loaded. 2. Note In the ASCII format, all data received, including text and printer commands, will be printed in the Hex Dump Mode. Simultaneously press and hold the MODE + LF + SHIFT switches while turning the printer...
OkiLAN 7120e Installation Instructions Directives d' installation Instrucciones de Instalaci?n Instru败s de in
Page 1
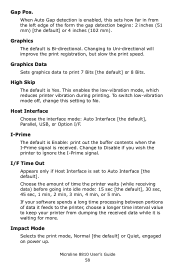
OkiLAN® 7120e Installation Instructions Notes: This print server is supplied. Use an Ethernet cable with two twisted wire pairs and an RJ45 plug. 1. Slide the bracket out of the print server plug into place. 3. Push in firmly. The test pages print. 10. Make sure you hear it click into the printer. 8. Reinstall the screws on the print server. 5. Remove the snap-out plastic piece (1) from the mounting...
OkiLAN® 7120e Installation Instructions Notes: This print server is supplied. Use an Ethernet cable with two twisted wire pairs and an RJ45 plug. 1. Slide the bracket out of the print server plug into place. 3. Push in firmly. The test pages print. 10. Make sure you hear it click into the printer. 8. Reinstall the screws on the print server. 5. Remove the snap-out plastic piece (1) from the mounting...
OkiLAN 7120e User Guide
Page 14
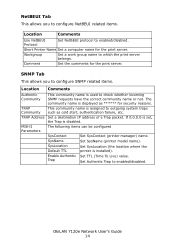
... name is disabled. The following items can be configured SysContact SysName SysLocation Default TTL Enable Authentic Trap Set SysContact (printer manager) name. Set SysName (printer model name). Set TTL (Time To Live) value. OkiLAN 7120e Network User's Guide 14 NetBEUI Tab This allows you to configure SNMP related items. Location Comments Authentic Community TRAP Community TRAP Address MIB-II Parameters This community name is used to check whether...
... name is disabled. The following items can be configured SysContact SysName SysLocation Default TTL Enable Authentic Trap Set SysContact (printer manager) name. Set SysName (printer model name). Set TTL (Time To Live) value. OkiLAN 7120e Network User's Guide 14 NetBEUI Tab This allows you to configure SNMP related items. Location Comments Authentic Community TRAP Community TRAP Address MIB-II Parameters This community name is used to check whether...
OkiLAN 7120e User Guide
Page 25
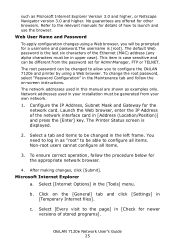
... users cannot configure all items. 3. Microsoft Internet Explorer a. After making changes, click [Submit]. The default Web password is case sensitive and can be in [Temporary Internet files]. Configure the IP Address, Subnet Mask and Gateway for details of the network interface card in [Check for AdminManager, FTP or TELNET. You need to log in this manual are offered for a username and password.The username is displayed. 2. The network addresses used...
... users cannot configure all items. 3. Microsoft Internet Explorer a. After making changes, click [Submit]. The default Web password is case sensitive and can be in [Temporary Internet files]. Configure the IP Address, Subnet Mask and Gateway for details of the network interface card in [Check for AdminManager, FTP or TELNET. You need to log in this manual are offered for a username and password.The username is displayed. 2. The network addresses used...
OkiLAN 7120e User Guide
Page 34
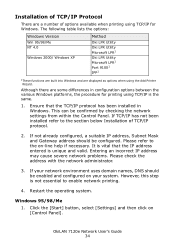
... checking the network settings from within the Control Panel. If your system. If TCP/IP has not been installed refer to enable network printing. 4. Entering an incorrect IP address may cause severe network problems. Please check the address with the network administrator. 3. Restart the operating system. This can be configured. Windows 95/98/Me 1. The following table lists the options: Windows Version Win 95/98/Me NT 4.0 Windows 2000/ Windows XP Method Oki LPR Utility Oki...
... checking the network settings from within the Control Panel. If your system. If TCP/IP has not been installed refer to enable network printing. 4. Entering an incorrect IP address may cause severe network problems. Please check the address with the network administrator. 3. Restart the operating system. This can be configured. Windows 95/98/Me 1. The following table lists the options: Windows Version Win 95/98/Me NT 4.0 Windows 2000/ Windows XP Method Oki LPR Utility Oki...

OkiLAN 7120e User Guide
Page 45
... or LANs. It provides a simple method of this manual for printing using the standard set-up utility described earlier. Typically it is used with Novell NetWare. Select [Next]. 6. Select [Next]. 8. Network Printer Settings There are some differences in configuration options between computers. 4. Within Windows, NetBEUI is recommended that was designed for use on a home or office network] and type printer URL in small or home networks. OkiLAN 7120e Network User's Guide 45 Install printer driver...
... or LANs. It provides a simple method of this manual for printing using the standard set-up utility described earlier. Typically it is used with Novell NetWare. Select [Next]. 6. Select [Next]. 8. Network Printer Settings There are some differences in configuration options between computers. 4. Within Windows, NetBEUI is recommended that was designed for use on a home or office network] and type printer URL in small or home networks. OkiLAN 7120e Network User's Guide 45 Install printer driver...
OkiLAN 7120e User Guide
Page 64
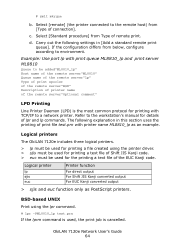
... lpr and lp commands. OkiLAN 7120e Network User's Guide 64 Select [remote] (the printer connected to a network printer. BSD-based UNIX Print using the printer driver. > sjis must be used , the print job is the most common protocol for details of the remote server"Optional comment" LPD Printing Line Printer Daemon (LPD) is cancelled. Example: Use port lp with TCP/IP to the remote host) from Type of print file test.prn with printer name ML8810_lp as...
... lpr and lp commands. OkiLAN 7120e Network User's Guide 64 Select [remote] (the printer connected to a network printer. BSD-based UNIX Print using the printer driver. > sjis must be used , the print job is the most common protocol for details of the remote server"Optional comment" LPD Printing Line Printer Daemon (LPD) is cancelled. Example: Use port lp with TCP/IP to the remote host) from Type of print file test.prn with printer name ML8810_lp as...
OkiLAN 7120e User Guide
Page 65
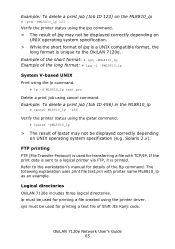
... -PML8810_lp 123 Verify the printer status using the lpq command. > The result of lpq may not be displayed correctly depending on UNIX operating system specification. > While the short format of lpq is a UNIX compatible format, the long format is unique to the OkiLAN 7120e. The following explanation uses print file test.prn with TCP/IP. OkiLAN 7120e Network User's Guide 65 FTP printing FTP (File Transfer...
... -PML8810_lp 123 Verify the printer status using the lpq command. > The result of lpq may not be displayed correctly depending on UNIX operating system specification. > While the short format of lpq is a UNIX compatible format, the long format is unique to the OkiLAN 7120e. The following explanation uses print file test.prn with TCP/IP. OkiLAN 7120e Network User's Guide 65 FTP printing FTP (File Transfer...


