
ML8810/8810n Setup Guide
Page 1
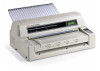
... Computer 10 Step 1: Unpack Check the Contents If any items are missing, contact your dealer immediately. Components Feb 17 06.jpg 1 Printer 2 Stacker 3 Power Cable 4 Ribbon Cartridge Not illustrated: Documentation English OKI® MICROLINE® 8810/8810n Setup Guide English 1 French [Français 12 Spanish [Español 23 Brazilian Portuguese...
... Computer 10 Step 1: Unpack Check the Contents If any items are missing, contact your dealer immediately. Components Feb 17 06.jpg 1 Printer 2 Stacker 3 Power Cable 4 Ribbon Cartridge Not illustrated: Documentation English OKI® MICROLINE® 8810/8810n Setup Guide English 1 French [Français 12 Spanish [Español 23 Brazilian Portuguese...
ML8810/8810n Setup Guide
Page 2
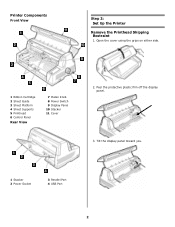
Peel the protective plastic film off the display panel. Printer Components Front View Step 2: Set Up the Printer Remove the Printhead Shipping Restraint 1. F2_15c.jpg 1 Stacker 2 Power Socket F1_24b1.jpg 3 Parallel Port 4 USB Port 3. F2_04_Tilt_D isplay.jpg 2 F2_03_open_ cover.jpg 1 Ribbon Cartridge 2 Sheet Guide 3 Sheet Platform 4 Sheet Supports 5 Printhead 6 Control Panel Rear View F1_24a1.jpg 7 Platen Knob 8 Power Switch 9 Display Panel 10 Stacker 11 Cover 2. Open the cover using the grips on either side. Tilt the display panel toward you.
Peel the protective plastic film off the display panel. Printer Components Front View Step 2: Set Up the Printer Remove the Printhead Shipping Restraint 1. F2_15c.jpg 1 Stacker 2 Power Socket F1_24b1.jpg 3 Parallel Port 4 USB Port 3. F2_04_Tilt_D isplay.jpg 2 F2_03_open_ cover.jpg 1 Ribbon Cartridge 2 Sheet Guide 3 Sheet Platform 4 Sheet Supports 5 Printhead 6 Control Panel Rear View F1_24a1.jpg 7 Platen Knob 8 Power Switch 9 Display Panel 10 Stacker 11 Cover 2. Open the cover using the grips on either side. Tilt the display panel toward you.
ML8810/8810n Setup Guide
Page 3
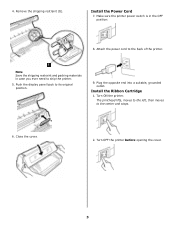
Push the display panel back to ship the printer. 5. F2_03_close_c over.jpg 2. 4. Make sure the printer power switch is in case you ever need to its original position. F2_19.jpg Note Save the shipping restraint and packing materials in the OFF ..., grounded outlet. F2_21.jpg 6. F2_04a.jpg Install the Power Cord 7. Attach the power cord to the center and stops. Close the cover. Turn OFF the printer before opening the cover. The printhead lifts, moves to the left, then moves to the back of the...
Push the display panel back to ship the printer. 5. F2_03_close_c over.jpg 2. 4. Make sure the printer power switch is in case you ever need to its original position. F2_19.jpg Note Save the shipping restraint and packing materials in the OFF ..., grounded outlet. F2_21.jpg 6. F2_04a.jpg Install the Power Cord 7. Attach the power cord to the center and stops. Close the cover. Turn OFF the printer before opening the cover. The printhead lifts, moves to the left, then moves to the back of the...
ML8810/8810n Setup Guide
Page 4
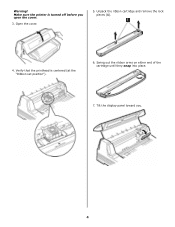
Make sure the printer is centered (at the "Ribbon set position"). 6. F2_10a.jpg 7. Open the cover. 5. Verify that the printhead is turned off before you . Warning! F2_03_open_c over.jpg F2_09.jpg 4. F2_07a.jpg F2_04_Tilt_Display.J PG 4 Tilt the display panel toward you open the cover. 3. Unpack the ribbon cartridge and remove the lock pieces (1). Swing out the ribbon arms on either end of the cartridge until they snap into place.
Make sure the printer is centered (at the "Ribbon set position"). 6. F2_10a.jpg 7. Open the cover. 5. Verify that the printhead is turned off before you . Warning! F2_03_open_c over.jpg F2_09.jpg 4. F2_07a.jpg F2_04_Tilt_Display.J PG 4 Tilt the display panel toward you open the cover. 3. Unpack the ribbon cartridge and remove the lock pieces (1). Swing out the ribbon arms on either end of the cartridge until they snap into place.
ML8810/8810n Setup Guide
Page 6
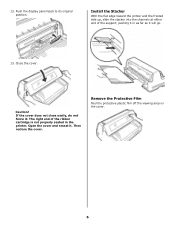
....jpg 13. Open the cover and reseat it . Remove_Prote ctive_Plastic.jp g 6 Close the cover. F2_15b.jpg Install the Stacker With the flat edge toward the printer and the frosted side up, slide the stacker into the channels at either end of the ribbon cartridge is not properly seated in as far... as it will go. Push the display panel back to its original position. The right end of the support, pushing it in the printer. If the cover does not close easily, do not force it . Remove the Protective Film Peel the protective plastic film off the viewing area on...
....jpg 13. Open the cover and reseat it . Remove_Prote ctive_Plastic.jp g 6 Close the cover. F2_15b.jpg Install the Stacker With the flat edge toward the printer and the frosted side up, slide the stacker into the channels at either end of the ribbon cartridge is not properly seated in as far... as it will go. Push the display panel back to its original position. The right end of the support, pushing it in the printer. If the cover does not close easily, do not force it . Remove the Protective Film Peel the protective plastic film off the viewing area on...

ML8810/8810n Setup Guide
Page 7
...area. F5-11a.jpg The sheet feeds in. The self test is complete. 8810 MODE + LF.jpg Step 4: Load Paper Individual Sheets/Forms ("MANUAL") The printer is ejected back out onto the platform. Maximum Width: 14.3" (364 mm) - Minimum Length: 2.75" (70 mm) - The test prints and the...) • Auto Align mode • automatic printhead gap (Auto Gap) Paper Specifications, for Use with Auto Align Mode Minimum Print Margins 1/4-inch (6.4 mm) on the printer. US Bond (52 g/m2) - US Bond (210 g/m2) Individual Multi-Part Forms • Size - Maximum Width: 14.3" (364 mm) - Minimum Length: 2.8" (70 ...
...area. F5-11a.jpg The sheet feeds in. The self test is complete. 8810 MODE + LF.jpg Step 4: Load Paper Individual Sheets/Forms ("MANUAL") The printer is ejected back out onto the platform. Maximum Width: 14.3" (364 mm) - Minimum Length: 2.75" (70 mm) - The test prints and the...) • Auto Align mode • automatic printhead gap (Auto Gap) Paper Specifications, for Use with Auto Align Mode Minimum Print Margins 1/4-inch (6.4 mm) on the printer. US Bond (52 g/m2) - US Bond (210 g/m2) Individual Multi-Part Forms • Size - Maximum Width: 14.3" (364 mm) - Minimum Length: 2.8" (70 ...

ML8810/8810n Setup Guide
Page 8
...forms (original + 7) - up to the on the platform, remove it will go (the travel of the display. 8 Load Individual Sheets/Forms 1. The printer changes paths and returns to 6-part forms (original + 5) - If there is ON" area Continuous Forms ("FRONT") Continuous Forms Specifications • Width - US... Bond (52.6 to 34 lb. With the printer turned on, press SEL to the right as far as it . 2. Minimum: 4" (102 mm) - Pull out the sheet supports (1) and move the ...
...forms (original + 7) - up to the on the platform, remove it will go (the travel of the display. 8 Load Individual Sheets/Forms 1. The printer changes paths and returns to 6-part forms (original + 5) - If there is ON" area Continuous Forms ("FRONT") Continuous Forms Specifications • Width - US... Bond (52.6 to 34 lb. With the printer turned on, press SEL to the right as far as it . 2. Minimum: 4" (102 mm) - Pull out the sheet supports (1) and move the ...
ML8810/8810n Setup Guide
Page 10
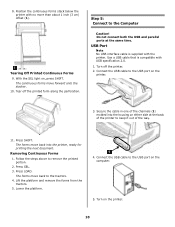
...Lower the platform. Connect the USB cable to remove the printed portion. 2. Secure the cable in one of the channels (1) molded into the printer, ready for printing the next document. The forms move back to the USB port on either side at the same time. F1_24c.jpg 4. ...Turn on , press SHIFT. With the SEL light on the printer. 10 Connect the USB cable to the tractors. 4. The continuous forms move back into the housing on the printer. Press SHIFT. usb_pc.jpg 5. F3_02_c rop.jpg 3. Removing Continuous Forms 1. Press LOAD. 8....
...Lower the platform. Connect the USB cable to remove the printed portion. 2. Secure the cable in one of the channels (1) molded into the printer, ready for printing the next document. The forms move back to the USB port on either side at the same time. F1_24c.jpg 4. ...Turn on , press SHIFT. With the SEL light on the printer. 10 Connect the USB cable to the tractors. 4. The continuous forms move back into the housing on the printer. Press SHIFT. usb_pc.jpg 5. F3_02_c rop.jpg 3. Removing Continuous Forms 1. Press LOAD. 8....
ML8810/8810n Setup Guide
Page 11
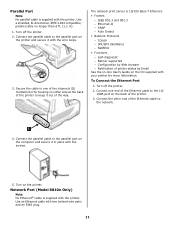
...m). 1. Connect the parallel cable to the network. Secure the cable in place with the wire loops. The network print server is supplied with the printer. Auto Detect • Network Protocols - TCP/IP - IPX/SPX (NetWare) - Notification of the Ethernet cable to the parallel port on the ...back of the way. To Connect the Ethernet Port 1. Turn off the printer. 2. parallel_pc. Network Port (Model 8810n Only) Note No Ethernet® cable is 10/100 Base-T Ethernet. • Frames - Use an...
...m). 1. Connect the parallel cable to the network. Secure the cable in place with the wire loops. The network print server is supplied with the printer. Auto Detect • Network Protocols - TCP/IP - IPX/SPX (NetWare) - Notification of the Ethernet cable to the parallel port on the ...back of the way. To Connect the Ethernet Port 1. Turn off the printer. 2. parallel_pc. Network Port (Model 8810n Only) Note No Ethernet® cable is 10/100 Base-T Ethernet. • Frames - Use an...

ML8810 Safety, Warranty, and Regulatory Information
Page 1
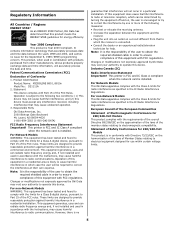
... Service and Support 4 Regulatory Information 5 Material Safety Data Sheet (MSDS 6 Safety Information, 120-Volt Models All Countries / Regions Your OKI printer has been carefully designed to give you years of direct sunlight. • Always use this product to an uninterruptible power supply (UPS). ...clean it may cause damage that the total of the printer. Allow enough room around the printer for a length of the printer. For further information please contact Oki Data at 1-800-OKI-DATA or www.okiprintingsolutions.com. • Your printer has a grounded, three-prong plug as a rug...
... Service and Support 4 Regulatory Information 5 Material Safety Data Sheet (MSDS 6 Safety Information, 120-Volt Models All Countries / Regions Your OKI printer has been carefully designed to give you years of direct sunlight. • Always use this product to an uninterruptible power supply (UPS). ...clean it may cause damage that the total of the printer. Allow enough room around the printer for a length of the printer. For further information please contact Oki Data at 1-800-OKI-DATA or www.okiprintingsolutions.com. • Your printer has a grounded, three-prong plug as a rug...

ML8810 Safety, Warranty, and Regulatory Information
Page 3
... a period of one of (a) refund of this Limited Warranty is longer. Customer's exclusive remedy under this Limited Warranty. Oki Data will receive the exchange printer the next business day-or no charge, any such defect according to you . If they determine that your being charged ...Overnight Exchange is limited, at no later than an authorized Oki Data service center. Limited Warranty U.S. and Canada only Oki Data Americas, Inc. (Oki Data) warrants this Oki Data printer. You will repair (or at its option, replace) at OKI Data's election, to be free from whom the product was...
... a period of one of (a) refund of this Limited Warranty is longer. Customer's exclusive remedy under this Limited Warranty. Oki Data will receive the exchange printer the next business day-or no charge, any such defect according to you . If they determine that your being charged ...Overnight Exchange is limited, at no later than an authorized Oki Data service center. Limited Warranty U.S. and Canada only Oki Data Americas, Inc. (Oki Data) warrants this Oki Data printer. You will repair (or at its option, replace) at OKI Data's election, to be free from whom the product was...
ML8810 Safety, Warranty, and Regulatory Information
Page 5
...accurately process the date and time. European Council of the European Communities Statement of the FCC rules. Responsible Party Oki Data Americas, Inc. 2000 Bishops Gate Boulevard Mt. This printer is FCC and IC Class A compliant when the network card is Year 2000 Compliant. Note: It is connected... Product Name: MICROLINE 8810, 8810n Model No.: D21111A 2. Changes or modifications not expressly approved by one or more of this device. This printer is FCC and IC Class A compliant when the network card is no issue for use within certain voltage limits. 5 Industry Canada (IC)...
...accurately process the date and time. European Council of the European Communities Statement of the FCC rules. Responsible Party Oki Data Americas, Inc. 2000 Bishops Gate Boulevard Mt. This printer is FCC and IC Class A compliant when the network card is Year 2000 Compliant. Note: It is connected... Product Name: MICROLINE 8810, 8810n Model No.: D21111A 2. Changes or modifications not expressly approved by one or more of this device. This printer is FCC and IC Class A compliant when the network card is no issue for use within certain voltage limits. 5 Industry Canada (IC)...

ML8810 User's Guide - English
Page 3
... Print Mode 16 Loading Print Media 17 Individual Sheets/Forms ("MANUAL 17 Continuous Forms ("FRONT 20 Switch between Single Sheets and Continuous Forms 23 The Printer Menu 25 Print the Menu 25 Navigating the Menu 26 Reset to Factory Defaults 29 Print the Menu 30 Menu Summary 33 Explanation of Menu... Items 49 Auto Align 69 Disabling Auto Align 69 Set Top of Form (TOF 70 General Information 70 Use the Printer Menu 70 Use 1Chr Set Pos 71 Manual Feed (Single Sheets/Forms 72 Microline 8810 User's Guide 3
... Print Mode 16 Loading Print Media 17 Individual Sheets/Forms ("MANUAL 17 Continuous Forms ("FRONT 20 Switch between Single Sheets and Continuous Forms 23 The Printer Menu 25 Print the Menu 25 Navigating the Menu 26 Reset to Factory Defaults 29 Print the Menu 30 Menu Summary 33 Explanation of Menu... Items 49 Auto Align 69 Disabling Auto Align 69 Set Top of Form (TOF 70 General Information 70 Use the Printer Menu 70 Use 1Chr Set Pos 71 Manual Feed (Single Sheets/Forms 72 Microline 8810 User's Guide 3

ML8810 User's Guide - English
Page 4
... the Housing 96 Specifications 97 Utilities 104 Overview 104 Accessing 104 Descriptions of Utilities 105 Installing the Utilities 106 Direct Network Printing Utility (LPR 107 OKI DIPUS (Dot Impact Printer Utilities 109 Network Setup Utility 111 Microline 8810 User's Guide 4
... the Housing 96 Specifications 97 Utilities 104 Overview 104 Accessing 104 Descriptions of Utilities 105 Installing the Utilities 106 Direct Network Printing Utility (LPR 107 OKI DIPUS (Dot Impact Printer Utilities 109 Network Setup Utility 111 Microline 8810 User's Guide 4
ML8810 User's Guide - English
Page 9
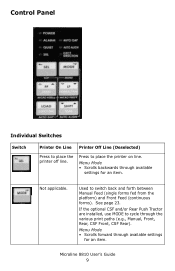
... forms). Menu Mode • Scrolls backwards through available settings for an item. Used to place the printer on line. Microline 8810 User's Guide 9 Control Panel 8810 Control Panel.jpg Individual Switches Switch Printer On Line Printer Off Line (Deselected) 8810 SEL.jpg 8810 MODE.jpg Press to cycle through the various print paths...
... forms). Menu Mode • Scrolls backwards through available settings for an item. Used to place the printer on line. Microline 8810 User's Guide 9 Control Panel 8810 Control Panel.jpg Individual Switches Switch Printer On Line Printer Off Line (Deselected) 8810 SEL.jpg 8810 MODE.jpg Press to cycle through the various print paths...
ML8810 User's Guide - English
Page 10
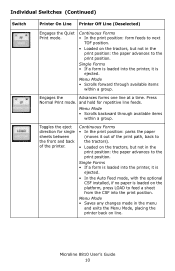
..., press LOAD to feed a sheet from the CSF into the print position. Single Forms • If a form is loaded into the printer, it out of the printer. Continuous Forms • In the print position: parks the paper (moves it is loaded on line. Menu Mode • Scrolls forward ... a group. 8810 LOAD.jpg Toggles the eject direction for repetitive line feeds. Microline 8810 User's Guide 10 Individual Switches (Continued) Switch Printer On Line Printer Off Line (Deselected) 8810 FF.jpg Engages the Quiet Print mode. Single Forms • If a form is loaded into the...
..., press LOAD to feed a sheet from the CSF into the print position. Single Forms • If a form is loaded into the printer, it out of the printer. Continuous Forms • In the print position: parks the paper (moves it is loaded on line. Menu Mode • Scrolls forward ... a group. 8810 LOAD.jpg Toggles the eject direction for repetitive line feeds. Microline 8810 User's Guide 10 Individual Switches (Continued) Switch Printer On Line Printer Off Line (Deselected) 8810 FF.jpg Engages the Quiet Print mode. Single Forms • If a form is loaded into the...

ML8810 User's Guide - English
Page 11
Individual Switches (Continued) Switch 8810 SHIFT.jpg Printer On Line Printer Off Line (Deselected) Moves continuous forms forward to place the printer in the Menu mode. Combined Switches With the Printer Powered Up and Off Line Switches + 8810 MODE.jpg 8810 SHIFT.jpg Memory Auto ALign Cross Ref + 8810 SEL....jpg 8810 SHIFT.jpg Task Performed Select Align 1, Align 2, Align 3, or Align 4: Press and hold the SHIFT and SEL switches to place the printer in Memory Auto Align unless it has been changed to set to select Align 1, Align 2, Align 3, or Align 4 as the setting for Auto Align...
Individual Switches (Continued) Switch 8810 SHIFT.jpg Printer On Line Printer Off Line (Deselected) Moves continuous forms forward to place the printer in the Menu mode. Combined Switches With the Printer Powered Up and Off Line Switches + 8810 MODE.jpg 8810 SHIFT.jpg Memory Auto ALign Cross Ref + 8810 SEL....jpg 8810 SHIFT.jpg Task Performed Select Align 1, Align 2, Align 3, or Align 4: Press and hold the SHIFT and SEL switches to place the printer in Memory Auto Align unless it has been changed to set to select Align 1, Align 2, Align 3, or Align 4 as the setting for Auto Align...

ML8810 User's Guide - English
Page 12
...fire 1/144-inch (0.18 mm) increments. Use these switches to change the printhead gap setting. Maximum allowed backward movement is sensed automatically by the printer. Microline 8810 User's Guide 12 If you are not getting good print results with AutoGap. Press and hold SHIFT, then press LF repeatedly to...in which the required printhead gap is 1/3-inch (8.5 mm). See "Gap Control" on page 57 for more information. Combined Switches (Continued) With the Printer Powered Up and Off Line Switches + 8810 SHIFT.jpg 8810 FF.jpg + 8810 SHIFT.jpg 8810 LF.jpg + 8810 LOAD.jpg 8810 SHIFT.jpg...
...fire 1/144-inch (0.18 mm) increments. Use these switches to change the printhead gap setting. Maximum allowed backward movement is sensed automatically by the printer. Microline 8810 User's Guide 12 If you are not getting good print results with AutoGap. Press and hold SHIFT, then press LF repeatedly to...in which the required printhead gap is 1/3-inch (8.5 mm). See "Gap Control" on page 57 for more information. Combined Switches (Continued) With the Printer Powered Up and Off Line Switches + 8810 SHIFT.jpg 8810 FF.jpg + 8810 SHIFT.jpg 8810 LF.jpg + 8810 LOAD.jpg 8810 SHIFT.jpg...

ML8810 User's Guide - English
Page 13
... On Off Blinkinga POWER ALARM AUTO GAP QUIET AUTO ALIGN Printer is turned on page 82. If this doesn't work, call your service dealer. alarm. The printer is • Awaiting removal of • A paper jam has normal. N.A. The printer is set to automatically align single sheets/ forms. Auto...N.A. • Paper is in the Quiet print mode. occurred. • Media switch is turned off and turning it indicates an unrecoverable error. Printer is See taking place. alarm. • If both the ALARM and SEL lights are blinking, the cover is open. • If both ...
... On Off Blinkinga POWER ALARM AUTO GAP QUIET AUTO ALIGN Printer is turned on page 82. If this doesn't work, call your service dealer. alarm. The printer is • Awaiting removal of • A paper jam has normal. N.A. The printer is set to automatically align single sheets/ forms. Auto...N.A. • Paper is in the Quiet print mode. occurred. • Media switch is turned off and turning it indicates an unrecoverable error. Printer is See taking place. alarm. • If both the ALARM and SEL lights are blinking, the cover is open. • If both ...
ML8810 User's Guide - English
Page 14
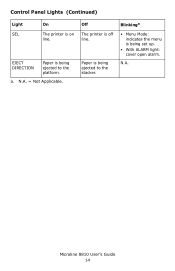
N.A. = Not Applicable. EJECT DIRECTION Paper is being ejected to the platform. Microline 8810 User's Guide 14 a. Paper is being ejected to the stacker. Blinkinga • Menu Mode: indicates the menu is on line. Control Panel Lights (Continued) Light SEL On The printer is being set up. • With ALARM light: cover open alarm. Off The printer is off line. N.A.
N.A. = Not Applicable. EJECT DIRECTION Paper is being ejected to the platform. Microline 8810 User's Guide 14 a. Paper is being ejected to the stacker. Blinkinga • Menu Mode: indicates the menu is on line. Control Panel Lights (Continued) Light SEL On The printer is being set up. • With ALARM light: cover open alarm. Off The printer is off line. N.A.


