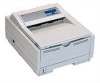

Quick Start Guide for the OKIPAGE 10e
Page 6
... a table or desktop • Space to open the cover and pull out the paper tray and the rear output extender • Air circulation around the printer to prevent overheating (minimum of 4 inches) • A nearby power source • Room temperature of 50° to 90°F (10° to 32°C) •... Web Site http://www.okidata.com for the latest information on: • Product Guides • Customer Support • Software Drivers • Corporate Information • Documentation | E-6 OKIPAGE 10e
... a table or desktop • Space to open the cover and pull out the paper tray and the rear output extender • Air circulation around the printer to prevent overheating (minimum of 4 inches) • A nearby power source • Room temperature of 50° to 90°F (10° to 32°C) •... Web Site http://www.okidata.com for the latest information on: • Product Guides • Customer Support • Software Drivers • Corporate Information • Documentation | E-6 OKIPAGE 10e

Quick Start Guide for the OKIPAGE 10e
Page 7
The shipping box should contain: 1 OKIPAGE 10e Printer (with image drum cartridge installed) 2 CD-ROM (includes printer drivers, software and User Manual) 3 Toner Cartridge 4 Black plastic light-shield bag (to store image drum if you need to ship the printer) 5 Power Cord 6 Warranty Registration Card If you are missing anything, contact your printer. Checking the Contents Unpack your dealer. | Quick Start Guide E-7
The shipping box should contain: 1 OKIPAGE 10e Printer (with image drum cartridge installed) 2 CD-ROM (includes printer drivers, software and User Manual) 3 Toner Cartridge 4 Black plastic light-shield bag (to store image drum if you need to ship the printer) 5 Power Cord 6 Warranty Registration Card If you are missing anything, contact your printer. Checking the Contents Unpack your dealer. | Quick Start Guide E-7
Quick Start Guide for the OKIPAGE 10e
Page 8
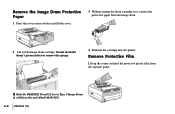
... the cartridge into the printer. OTHER ENV ! Remove Protective Film Lift up the corner and peel the protective plastic film from the image drum. 2 Lift out the image drum cartridge. Only the OKIPAGE 10 and 12 Series Type 5 Image Drum will fit in this unit (Part# 40433305) | E-8 OKIPAGE 10e Remove the Image Drum Protective...
... the cartridge into the printer. OTHER ENV ! Remove Protective Film Lift up the corner and peel the protective plastic film from the image drum. 2 Lift out the image drum cartridge. Only the OKIPAGE 10 and 12 Series Type 5 Image Drum will fit in this unit (Part# 40433305) | E-8 OKIPAGE 10e Remove the Image Drum Protective...
Quick Start Guide for the OKIPAGE 10e
Page 10
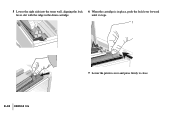
5 Lower the right side into the toner well, aligning the lock 6 When the cartridge is in place, push the lock lever forward lever slot with the ridge in the drum cartridge. PUSH | E-10 OKIPAGE 10e 7 Lower the printer cover and press firmly to close. until it stops.
5 Lower the right side into the toner well, aligning the lock 6 When the cartridge is in place, push the lock lever forward lever slot with the ridge in the drum cartridge. PUSH | E-10 OKIPAGE 10e 7 Lower the printer cover and press firmly to close. until it stops.
Quick Start Guide for the OKIPAGE 10e
Page 14
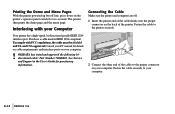
... User's Guide for purchasing information. 2 Connect the other end of the printer. Your printer has a high-speed, bi-directional parallel IEEE 1284 interface port. To comply with your computer. | E-14 OKIPAGE 10e Fasten the cable securely to the proper connector on your computer. ! Fasten... the cable to the printer securely. Interfacing with FCC regulations, the cable must be shielded and UL and ...
... User's Guide for purchasing information. 2 Connect the other end of the printer. Your printer has a high-speed, bi-directional parallel IEEE 1284 interface port. To comply with your computer. | E-14 OKIPAGE 10e Fasten the cable securely to the proper connector on your computer. ! Fasten... the cable to the printer securely. Interfacing with FCC regulations, the cable must be shielded and UL and ...

Quick Start Guide for the OKIPAGE 10e
Page 15
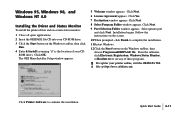
... software application can communicate with your printer and support all the OKIPAGE 10e features. If you are using DOS or another non-windows operating system, select a PCL-compatible driver. | Quick Start Guide E-15 It takes about 10 seconds for the printer to initialize and warm up, and... steps in the following Windows environments: • Windows 95 • Windows 98 • Windows 3.x • Windows NT 4.0 ! The OKIPAGE 10e CD-ROM includes printer drivers for the Ready light on the operator panel to use all of its features. POWER O OFF ON F 2 Plug the cord into the...
... software application can communicate with your printer and support all the OKIPAGE 10e features. If you are using DOS or another non-windows operating system, select a PCL-compatible driver. | Quick Start Guide E-15 It takes about 10 seconds for the printer to initialize and warm up, and... steps in the following Windows environments: • Windows 95 • Windows 98 • Windows 3.x • Windows NT 4.0 ! The OKIPAGE 10e CD-ROM includes printer drivers for the Ready light on the operator panel to use all of its features. POWER O OFF ON F 2 Plug the cord into the...

Quick Start Guide for the OKIPAGE 10e
Page 16
...OKI Menu Installer Setup window appears. 3 Order a 3.5" diskette kit. To obtain a set of the CD ROM drive). Windows 3.1 Windows 95 Windows 98 MS 10691/0699 MS 10692/0699 MS 10693/0699 Status Monitor The status monitor program allows you to monitor and configure an OKIPAGE 10e ... create your parallel port. In addition to displaying printer status messages, the status monitor provides remote access to the printer's operator panel. − Click Create Diskettes to create diskettes. − Close all open applications. − Insert the OKIPAGE 10e CD into the CD-ROM drive. − ...
...OKI Menu Installer Setup window appears. 3 Order a 3.5" diskette kit. To obtain a set of the CD ROM drive). Windows 3.1 Windows 95 Windows 98 MS 10691/0699 MS 10692/0699 MS 10693/0699 Status Monitor The status monitor program allows you to monitor and configure an OKIPAGE 10e ... create your parallel port. In addition to displaying printer status messages, the status monitor provides remote access to the printer's operator panel. − Click Create Diskettes to create diskettes. − Close all open applications. − Insert the OKIPAGE 10e CD into the CD-ROM drive. − ...
Quick Start Guide for the OKIPAGE 10e
Page 17
... programs. ! The OKI Menu Installer Setup window appears. 5 Welcome window appears. Windows 95, Windows 98, and Windows NT 4.0 Installing the Driver and Status Monitor To install the printer driver and on-screen status monitor: 1 Close all open applications. 2 Insert the OKIPAGE 10e CD into your CD...-ROM drive. 3 Click the Start button on the Windows taskbar, then choose Programs→OKIPAGE 10e. Click Next. 9 Port Selection Folder window appears. Select printer port and click Next. Click OK. From the submenu, click Electronic Registration, Windows Status Monitor, or ...
... programs. ! The OKI Menu Installer Setup window appears. 5 Welcome window appears. Windows 95, Windows 98, and Windows NT 4.0 Installing the Driver and Status Monitor To install the printer driver and on-screen status monitor: 1 Close all open applications. 2 Insert the OKIPAGE 10e CD into your CD...-ROM drive. 3 Click the Start button on the Windows taskbar, then choose Programs→OKIPAGE 10e. Click Next. 9 Port Selection Folder window appears. Select printer port and click Next. Click OK. From the submenu, click Electronic Registration, Windows Status Monitor, or ...

Quick Start Guide for the OKIPAGE 10e
Page 18
The OKI Menu Installer Setup window appears. | E-18 OKIPAGE 10e Click Printer Software to complete the installation. Click Yes. 7 Destination window appears. Click Next. 6 License Agreement appears. Click Next. 9 Port Selection Folder window appears. Installation begins. Select printer port and click Next. Follow the instructions on the screen. 10 When prompted, click Finish to continue the...
The OKI Menu Installer Setup window appears. | E-18 OKIPAGE 10e Click Printer Software to complete the installation. Click Yes. 7 Destination window appears. Click Next. 6 License Agreement appears. Click Next. 9 Port Selection Folder window appears. Installation begins. Select printer port and click Next. Follow the instructions on the screen. 10 When prompted, click Finish to continue the...
Quick Start Guide for the OKIPAGE 10e
Page 19
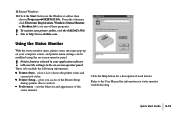
... Status Monitor, or Readme.txt to the Printer Setup dialog (printer driver control). • Preferences - Three tabs include the following information: • Printer State - (shown here) shows the printer status and current job status. • Printer Setup - To register your application software will...Using the Status Monitor With the status monitor open, printer status messages pop-up on your computer screen, and printer menu settings can be modified using the on the Windows taskbar, then choose Programs→OKIPAGE 10e. 11 Restart Windows. 12 Click the Start button on...
... Status Monitor, or Readme.txt to the Printer Setup dialog (printer driver control). • Preferences - Three tabs include the following information: • Printer State - (shown here) shows the printer status and current job status. • Printer Setup - To register your application software will...Using the Status Monitor With the status monitor open, printer status messages pop-up on your computer screen, and printer menu settings can be modified using the on the Windows taskbar, then choose Programs→OKIPAGE 10e. 11 Restart Windows. 12 Click the Start button on...
Quick Start Guide for the OKIPAGE 10e
Page 20
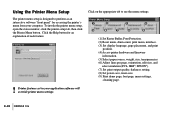
... of each feature. To invoke the printer menu setup, open the status monitor, click the printer setup tab, then click the Printer Menu button. Click the Help button for accessing the printer's menu from your application software will override printer menu settings. | E-20 OKIPAGE 10e Using the Printer Menu Setup The printer menu setup is designed to see the...
... of each feature. To invoke the printer menu setup, open the status monitor, click the printer setup tab, then click the Printer Menu button. Click the Help button for accessing the printer's menu from your application software will override printer menu settings. | E-20 OKIPAGE 10e Using the Printer Menu Setup The printer menu setup is designed to see the...

Quick Start Guide for the OKIPAGE 10e
Page 21
.... Using Power Save to finalize your hard drive, use the following procedure: Windows 95, Windows 98 and NT 4.0 To remove the printer driver: 1 Click Start →Settings →Printers 2 Highlight the OKIPAGE 10e Printer icon. 3 Click File from the Menu bar. 4 Click Delete. To remove the status monitor: 1 Click Start →Settings →Control Panel...
.... Using Power Save to finalize your hard drive, use the following procedure: Windows 95, Windows 98 and NT 4.0 To remove the printer driver: 1 Click Start →Settings →Printers 2 Highlight the OKIPAGE 10e Printer icon. 3 Click File from the Menu bar. 4 Click Delete. To remove the status monitor: 1 Click Start →Settings →Control Panel...

Quick Start Guide for the OKIPAGE 10e
Page 22
Windows 3.x To remove the printer driver and status monitor: 1 From Program Manager double-click the OKIPAGE 10e icon (or the group where your printer is installed). 2 Double-click uninstallShield. 3 Restart your computer. | E-22 OKIPAGE 10e
Windows 3.x To remove the printer driver and status monitor: 1 From Program Manager double-click the OKIPAGE 10e icon (or the group where your printer is installed). 2 Double-click uninstallShield. 3 Restart your computer. | E-22 OKIPAGE 10e

Warranty Booklet for the OKIPAGE 10e
Page 6
Some states do not allow limitations on obtaining service under this printer. However, the procedure for such warranty service information. NO WARRANTIES WHETHER EXPRESS OR IMPLIED, INCLUDING, BUT NOT LIMITED TO, ANY IMPLIED WARRANTIES OF MERCHANTABILITY OR...the product was purchased, by contacting Okidata directly at 1-609-222-5276 (Spanish only), or by any other rights which vary from state to state. | E-6 OKIPAGE 10e and Canada, English only) or at 1-800-OKIDATA (U.S. This Limited Warranty shall not apply if the product has been damaged due to abuse, misuse, misapplication...
Some states do not allow limitations on obtaining service under this printer. However, the procedure for such warranty service information. NO WARRANTIES WHETHER EXPRESS OR IMPLIED, INCLUDING, BUT NOT LIMITED TO, ANY IMPLIED WARRANTIES OF MERCHANTABILITY OR...the product was purchased, by contacting Okidata directly at 1-609-222-5276 (Spanish only), or by any other rights which vary from state to state. | E-6 OKIPAGE 10e and Canada, English only) or at 1-800-OKIDATA (U.S. This Limited Warranty shall not apply if the product has been damaged due to abuse, misuse, misapplication...
Warranty Booklet for the OKIPAGE 10e
Page 16
... replaced. Be sure to save it for adequate ventilation and easy access to the paper trays. | E-16 OKIPAGE 10e • Do not use your power source matches the rating listed on the back of the printer. If you can't plug it in this handbook carefully. contact an electrician to have an older, nongrounded... equipment, however, there are a few basic precautions you put anything on it or place it where it will only fit into a grounded outlet. SaOfevetyrvIineswtructions Your OKI printer has been carefully designed to give you are using an extension cord or power strip with the...
... replaced. Be sure to save it for adequate ventilation and easy access to the paper trays. | E-16 OKIPAGE 10e • Do not use your power source matches the rating listed on the back of the printer. If you can't plug it in this handbook carefully. contact an electrician to have an older, nongrounded... equipment, however, there are a few basic precautions you put anything on it or place it where it will only fit into a grounded outlet. SaOfevetyrvIineswtructions Your OKI printer has been carefully designed to give you are using an extension cord or power strip with the...

Users' Guide for the OKIPAGE 10e
Page 3
CoOnvteernvtisew Features 5 Consumables 5 Options 5 Operating Your Printer 7 Using the Front Operator Panel 7 OKIPAGE 10e Front Operator Panel Reference ........ 8 OKIPAGE 10e Function Reference 12 Changing the Menu Settings 14 Using the Printer Menu Setup 14 Resetting the Menu 15 Using Power Save to Minimize Warm... 19 Printing Transparencies and Adhesive Labels......... 19 Guidelines for Transparencies and Labels 20 Using Recycled Print Media 20 Printer Maintenance 22 Replacing The Toner Cartridge 22 Replacing the Image Drum Cartridge 23 Cleaning the LED Array 24 Printing...
CoOnvteernvtisew Features 5 Consumables 5 Options 5 Operating Your Printer 7 Using the Front Operator Panel 7 OKIPAGE 10e Front Operator Panel Reference ........ 8 OKIPAGE 10e Function Reference 12 Changing the Menu Settings 14 Using the Printer Menu Setup 14 Resetting the Menu 15 Using Power Save to Minimize Warm... 19 Printing Transparencies and Adhesive Labels......... 19 Guidelines for Transparencies and Labels 20 Using Recycled Print Media 20 Printer Maintenance 22 Replacing The Toner Cartridge 22 Replacing the Image Drum Cartridge 23 Cleaning the LED Array 24 Printing...
Users' Guide for the OKIPAGE 10e
Page 8
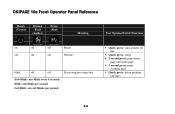
OKIPAGE 10e Front Operator Panel Reference Ready (Green) Manual Feed (Amber) Error (Red) Meaning User Options/Switch Function on off off Ready off off off Off line blink off off Processing/receiving data slow blink: one blink every 4 seconds blink: one blink per second fast blink: several blinks per second • Quick press: takes printer off line • Quick press: ready • 2 second press: print demo page and menu page • 5 second press: print cleaning page • Quick press: pause printing (off line) E-8
OKIPAGE 10e Front Operator Panel Reference Ready (Green) Manual Feed (Amber) Error (Red) Meaning User Options/Switch Function on off off Ready off off off Off line blink off off Processing/receiving data slow blink: one blink every 4 seconds blink: one blink per second fast blink: several blinks per second • Quick press: takes printer off line • Quick press: ready • 2 second press: print demo page and menu page • 5 second press: print cleaning page • Quick press: pause printing (off line) E-8
Users' Guide for the OKIPAGE 10e
Page 15
Using Power Save to the factory (default) settings in the Printer Menu Setup: 1 In Windows 95, click Start and select Programs. 2 Choose OKIPAGE 10e and click OKIPAGE 10e Status Monitor. We suggest that only experienced users should change these settings. (4) Access printer hardware and firmware information. (5) Select paper source, weight, ... save, toner save. (9) Print demo page, font page, menu settings, cleaning page. The Status Monitor appears. 3 Select the Printer Setup tab and press Printer Menu. E-15 Resetting the Menu The menu can be reset to Minimize Warm-up Time To minimize the...
Using Power Save to the factory (default) settings in the Printer Menu Setup: 1 In Windows 95, click Start and select Programs. 2 Choose OKIPAGE 10e and click OKIPAGE 10e Status Monitor. We suggest that only experienced users should change these settings. (4) Access printer hardware and firmware information. (5) Select paper source, weight, ... save, toner save. (9) Print demo page, font page, menu settings, cleaning page. The Status Monitor appears. 3 Select the Printer Setup tab and press Printer Menu. E-15 Resetting the Menu The menu can be reset to Minimize Warm-up Time To minimize the...

OKIPAGE10e
Page 6
... Okidata directly at 1-609-222-5276 (Spanish only), or by contacting one of service or modification by contacting the Okidata dealer from state to state. | E-6 OKIPAGE 10e This Limited Warranty shall not apply if the product has been damaged due to abuse, misuse, misapplication, accident, or as a result of the service locations... ARE NO EXPRESS WARRANTIES OTHER THAN THOSE ON THE FACE HEREOF AND DESCRIBED ABOVE. Some states do not allow limitations on obtaining service under this printer. However, the procedure for such warranty service information.
... Okidata directly at 1-609-222-5276 (Spanish only), or by contacting one of service or modification by contacting the Okidata dealer from state to state. | E-6 OKIPAGE 10e This Limited Warranty shall not apply if the product has been damaged due to abuse, misuse, misapplication, accident, or as a result of the service locations... ARE NO EXPRESS WARRANTIES OTHER THAN THOSE ON THE FACE HEREOF AND DESCRIBED ABOVE. Some states do not allow limitations on obtaining service under this printer. However, the procedure for such warranty service information.

OKIPAGE10e
Page 16
... and easy access to the paper trays. | E-16 OKIPAGE 10e • Do not use your printer on something unsteady, it in this handbook carefully. If you have the outlet replaced. SaOfevetyrvIineswtructions Your OKI printer has been carefully designed to give you should not exceed 15... amperes. do not use an adapter to defeat the grounding. • The printer must be walked on the printer itself. • Unplug the printer before you are using ...
... and easy access to the paper trays. | E-16 OKIPAGE 10e • Do not use your printer on something unsteady, it in this handbook carefully. If you have the outlet replaced. SaOfevetyrvIineswtructions Your OKI printer has been carefully designed to give you should not exceed 15... amperes. do not use an adapter to defeat the grounding. • The printer must be walked on the printer itself. • Unplug the printer before you are using ...


